Rumah >hujung hadapan web >tutorial js >Buat Apl penilaian sebutan (Bahagian 1)
Buat Apl penilaian sebutan (Bahagian 1)
- PHPzasal
- 2024-08-18 07:01:021050semak imbas
Tujuan tutorial ini adalah untuk mencipta aplikasi untuk mengawal sebutan pengguna.
Untuk mengikutinya, anda mesti mempunyai pengetahuan tentang javascript dan lebih ideal Vue.js 3.
Idea
Saya baru-baru ini memutuskan untuk kembali ke bahasa Jerman. Kesukaran utama yang saya hadapi dalam bahasa ini ialah menyebutnya dengan betul. Biasanya saya mendengar contoh, merakam sendiri mengulanginya dan mendengar sendiri semula. Ia satu proses yang rumit dan saya mesti mengakui saya tidak mempunyai telinga yang sangat baik.
Berdasarkan pemerhatian ini, saya tertanya-tanya sama ada terdapat Apl atau API yang boleh memberitahu saya sama ada saya menyebut perkataan atau ayat dengan betul dalam bahasa Jerman! Selepas beberapa penyiasatan dan penemuan hebat, saya ingin mengodkan Apl saya sendiri untuk menyelesaikan masalah saya.
Begini cara saya melakukannya!
API yang tersedia
Selepas beberapa penyelidikan, saya dapat mencari Apl yang menyelesaikan masalah saya. Tetapi secara keseluruhan, pengesahan sebutan selalunya hanya fungsi tambahan bagi aplikasi berbayar (atau yang berfungsi dengan langganan). Saya kemudian memutuskan untuk mencari API.
Berikut ialah senarai API yang menjalankan tugas :
- API Ucapan-ke-Teks Awan Google
- Perkhidmatan Ucapan Microsoft Azure
- Sebutan iSpeech
- Speechmatics
- Ucapan
- Elsa Sekarang
- SpeechSuper
API ini dibayar tetapi secara amnya membolehkan anda mendapat akses selama 2 minggu untuk menguji dan mencuba.
Memandangkan saya ingin menyemak sebutan bahasa Jerman saya, saya memilih untuk menguji dengan SpeechSuper API kerana ia menyokong beberapa bahasa termasuk bahasa Jerman. Kemudian dalam tutorial, kami akan mencuba Speechace API untuk menunjukkan betapa mudahnya untuk bertukar daripada satu API ke API lain bergantung pada keperluan anda.
Definisi ergonomik aplikasi
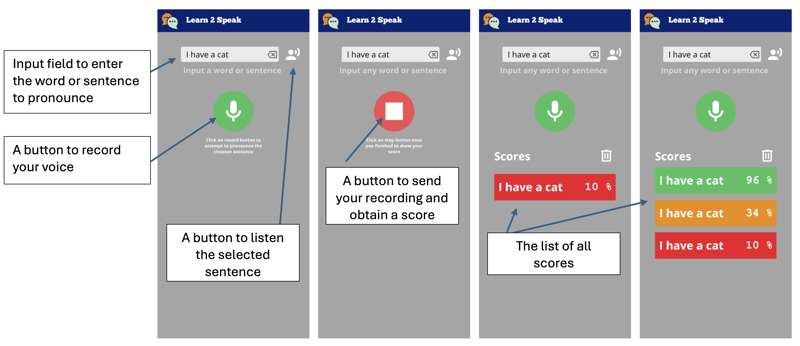
Matlamatnya adalah untuk melaksanakan Apl mudah yang membolehkan anda memasukkan perkataan, merakam suara anda, menghantar rakaman audio ke API dan memaparkan skor anda.
Beginilah rupa aplikasi itu:

Jadi kami akan mencipta aplikasi yang akan membentangkan medan teks yang membenarkan kemasukan perkataan atau ayat. Satu butang akan membolehkan anda mendengarnya.
Kami kemudian mempunyai butang untuk merakam suara kami, yang ini akan menukar gaya apabila ia berada dalam mod rakaman. Cuma klik padanya untuk berhenti dan hantar ke API untuk mendapatkan skor sebutan.
Setelah skor diperoleh, ia dipaparkan sebagai jubin dengan warna yang mewakili skor kami, daripada merah kepada hijau kepada oren.
Permulaan aplikasi
Idealnya ialah dapat menggunakan Apl sebagai apl web, tetapi juga sebagai aplikasi Android asli. Atas sebab ini kami akan menggunakan Quasar.
Rangka kerja Quasar
Quasar ialah rangka kerja Vue.js sumber terbuka untuk membangunkan aplikasi dengan pangkalan kod tunggal. Ia boleh digunakan di web (SPA, PWA, SSR), sebagai aplikasi mudah alih (Android, iOS) atau sebagai aplikasi Desktop (MacOs, Windows, Linux).
Persediaan
Jika ini belum lagi berlaku, anda perlu memasang NodeJS. Lebih baik menggunakan volta kerana ia akan membolehkan anda menggunakan versi NodeJ yang berbeza bergantung pada projek anda.
Kami akan bermula dengan memulakan projek kami dengan alat perancah Quasar.
npm i -g @quasar/cli
npm init quasar
Cli akan bertanya kepada kami beberapa soalan, pilih pilihan berikut :
Senarai Pilihan
Setelah arahan dilaksanakan, anda boleh memasuki direktori dan menyampaikan aplikasi secara setempat:
cd learn2speak
npm run dev
Pelayar lalai anda harus membuka halaman di alamat berikut http://localhost:9000

Pengubahsuaian rangka yang dicadangkan untuk mendapatkan ergonomik yang disasarkan
Aplikasi contoh tersedia, kami akan mengeluarkan elemen yang tidak kami perlukan. Untuk melakukan ini, kami akan membuka kod sumber dalam VSCode (anda sudah tentu boleh menggunakan editor lain)
code .
Layout modification
Quasar provides us with the notion of Layout and then of page included in the latter. The pages and the layout are chosen via the router. For this tutorial, we do not need to know these notions, but you can learn them here: Quasar layout
We do not need drawer, at least not for now so we will delete it from the src/layouts/MainLayout.vue file. To do this, delete the section of the included between the
<template>
  <q-layout view="lHh Lpr lFf">
    <q-header elevated>
      <q-toolbar>
        <q-icon name="interpreter_mode" size="md" />
        <q-toolbar-title>
          Learn2Speak
        </q-toolbar-title>
      </q-toolbar>
    </q-header>

    <q-page-container>
      <router-view />
    </q-page-container>
  </q-layout>
</template>
We can then remove the entire script part and replace it with the following code:
<script>
import { defineComponent } from 'vue'

export default defineComponent({
  name: 'MainLayout',
  setup () {
  }
})
</script>
We don't need more for the layout part because our application will define only one page.
The main page
The implementation of the main page is in the file: src/pages/IndexPage.vue
this is the main page where we will position our text field and the save button.
For this file, we simply remove the Quasar logo from the template (the tag) and modify the script part to use the vueJS 3 composition api, so that the source looks like the following file:
<template>
  <q-page class="flex flex-center">

  </q-page>
</template>

<script setup>

</script>
We will now add the text field using the Quasar component QInput
To do this we add the q-input component to the page template:
<template>
  <q-page class="flex flex-center">
    <q-input
      type="textarea"
      :lines="2"
      autogrow
      hint="Input a word or a sentence"
      clearable
    />
  </q-page>
</template>
You can see that the text field is displayed in the center of the screen, this is due to the Quasar flex and flex-center classes. These classes are defined by Quasar: Flexbox. We will fix this by placing the text field at the top of the screen, we will also take advantage of this to style the component.
Quasar even provides us with a Flex Playground to experiment and find the classes to put.
<template>
  <q-page class="column wrap content-center items-center">
    <q-input
      class="input-text"
      v-model="sentence"
      type="textarea"
      :lines="2"
      autogrow
      hint="Input a word or a sentence"
      clearable
    />
  </q-page>
</template>

<script setup>
import { ref } from 'vue'

// Reference on the word or sentence to be pronounced
const sentence = ref('')

</script>

<style scoped>
.input-text {
  width: 80vw;
  max-width: 400px;
}
</style>
As you can see, we have defined a sentence reference in the script part to store the value entered by the user. It is associated via the v-model directive to the q-input component
We will finish this first part by adding the button allowing the recording of our pronunciation of the word or sentence. For this we will simply use the q-button component of Quasar and position it after our text field.
<template>
  <q-page class="column wrap content-center items-center">
    <q-input
      class="input-text q-mt-lg"
      v-model="sentence"
      type="textarea"
      :lines="2"
      autogrow
      hint="Input a word or a sentence"
      clearable
    />
    <div>
    <q-btn
      class="q-mt-lg"
      icon="mic"
      color="primary"
      round
      size="30px"
      @click="record"
    />
    </div>
  </q-page>
</template>

<script setup>
import { ref } from 'vue'

// Reference on the word or sentence to be pronounced
const sentence = ref('')

function record () {
  console.log('Record')
}
</script>

<style scoped>
.input-text {
  width: 80vw;
  max-width: 400px;
}
</style>
Note that we added the q-mt-lg class to air out the interface a bit by leaving some space above each component. You can refer to the Quasar documentation on spacing.
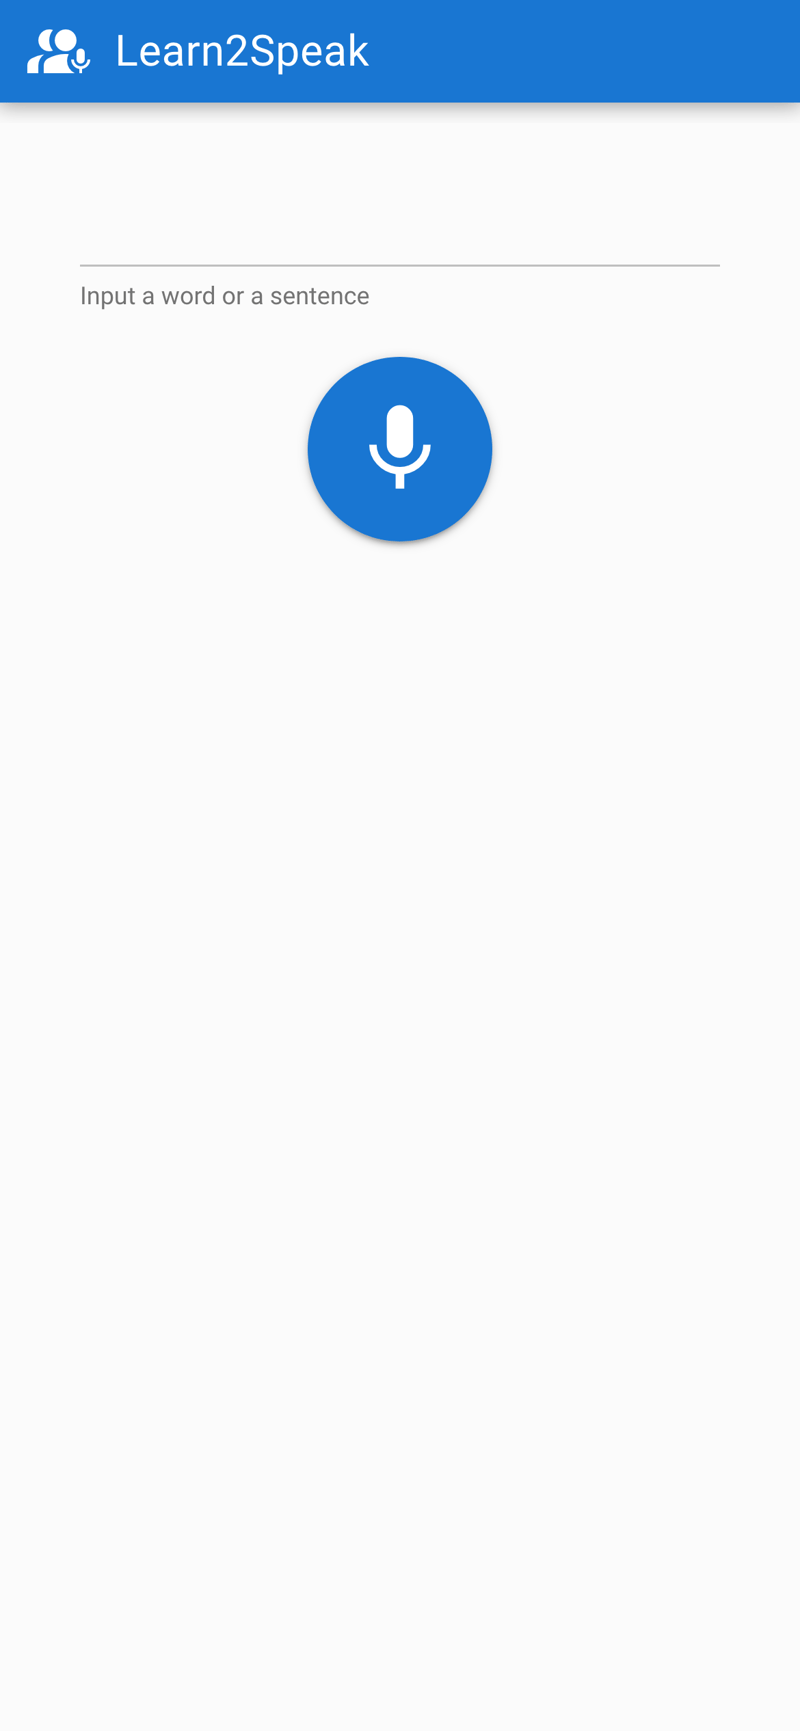
The application will look like:

What will we do next
We have therefore managed to obtain the skeleton of our application.
In a future part we will see how to acquire the audio, then how to obtain a score via the SpeechSuper API
- Part 2: Acquiring the audio
- Part 3: Obtaining the score via the SpeechSuper API
- Part 4: Packaging the application
Conclusion
Don't hesite on comments the post ! Part 2 will follow soon !
Atas ialah kandungan terperinci Buat Apl penilaian sebutan (Bahagian 1). Untuk maklumat lanjut, sila ikut artikel berkaitan lain di laman web China PHP!
Artikel berkaitan
Lihat lagi- Analisis mendalam bagi komponen kumpulan senarai Bootstrap
- Penjelasan terperinci tentang fungsi JavaScript kari
- Contoh lengkap penjanaan kata laluan JS dan pengesanan kekuatan (dengan muat turun kod sumber demo)
- Angularjs menyepadukan UI WeChat (weui)
- Cara cepat bertukar antara Cina Tradisional dan Cina Ringkas dengan JavaScript dan helah untuk tapak web menyokong pertukaran antara kemahiran_javascript Cina Ringkas dan Tradisional

