EditText의 내용 변경 모니터링
이 섹션 소개:
이 섹션에서는 이전에 EditText 컨트롤에 대해 배웠습니다. 입력 상자의 내용 변경을 모니터링하는 방법에 대해 설명합니다! 이는 실제 개발에서도 매우 실용적입니다. 또한 EditText의 비밀번호 가시성을 구현하는 방법에 대해서도 설명합니다. 그리고 보이지 않는! 좋아요, 이제 이 섹션을 시작하겠습니다!
1. EditText 콘텐츠 변경 모니터링
제목에서 볼 수 있듯이 모니터링 기반의 이벤트 처리 메커니즘인 것으로 보입니다. 이전 클릭 이벤트는 OnClickListener이고 텍스트 콘텐츠인 것 같습니다. 변경 리스너는 TextWatcher입니다. EditText.addTextChangedListener(mTextWatcher)를 호출할 수 있습니다. EditText에 대한 콘텐츠 변경 모니터링을 설정하세요!
이 클래스를 구현하려면 세 가지 메서드를 구현해야 합니다.
public void onTextChanged(CharSequence s, int) start, int before , int count);
public void afterTextChanged(Editable s);
다음 상황에서 차례로 실행됩니다.
- 1. 콘텐츠 변경 전
- 2. 콘텐츠 변경 중
- 3. 콘텐츠 변경 후
실제 내용에 따라 관련 메서드를 다시 작성할 수 있습니다. 필요에 따라 일반적으로 더 느리게 다시 작성합니다. 대부분은 세 번째 방법입니다!
EditText 콘텐츠의 변경 사항을 모니터링할 수 있는 경우는 많습니다. 입력하는 단어 수 제한, 입력 내용 제한 등~
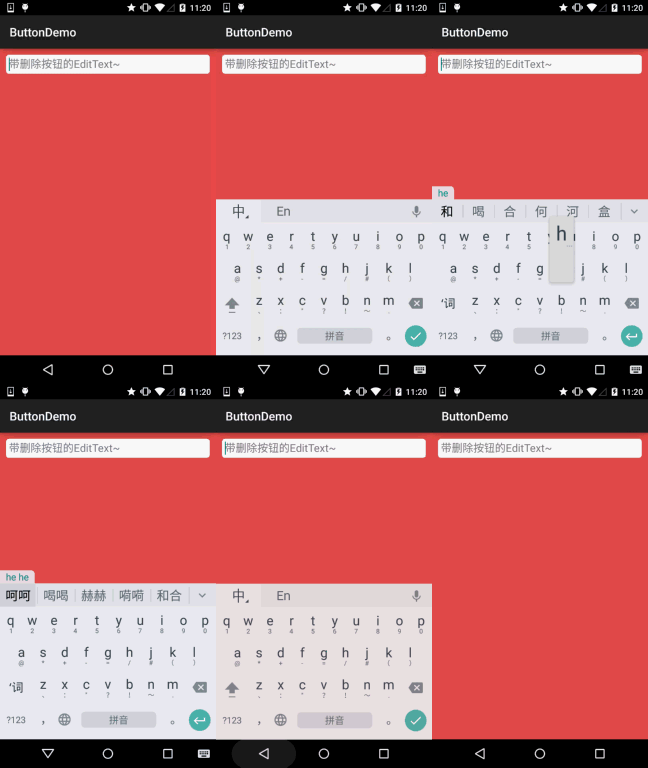
여기에 모든 사용자를 위한 간단한 사용자 정의 EditText가 있습니다. 내용을 입력한 후 사용자가 클릭하면 한쪽에 교차된 원이 표시됩니다. 텍스트 상자를 지울 수 있습니다~ 물론 사용자 정의하지 않고 TextWatcher를 EditText에 직접 추가한 다음 삭제 버튼을 설정할 수도 있습니다~
효과 다이어그램 달성:

사용자 정의된 EditText: DelEditText. 자바
import android.content.Context;
import android.graphics.Rect;
import android.graphics.drawable.Drawable;
import android.text.Editable;
import android. text.TextWatcher;
import android.util.AttributeSet;
import android.view.MotionEvent;
import android.widget.EditText;
/**
* 2015년 7월 16일 0016년에 coder-pig에 의해 작성되었습니다.
*/
public 클래스 DelEditText는 EditText 확장 {
private Drawable imgClear ;
private Context mContext;
public DelEditText(Context context, AttributeSet attrs) {
super(context, attrs);
this.mContext = context;
init();
}
private void init() {
imgClear = mContext.getResources().getDrawable(R.drawable.delete_gray);
addTextChangedListener(new TextWatcher() {
@Override
public void beforeTextChanged(CharSequence s, int start, int count, 정수 이후) {
}
@Override
public void onTextChanged(CharSequence s, int start, int before, int count) {
}
@Override
public void afterTextChange d(편집 가능 편집 가능) {
setDrawable();
}
});
}
//绘system删除图文
private void setDrawable(){
if (length() < 1)
setCompoundDrawablesWithIntrinsicBounds(null, null, null, null);
else
setCompoundDrawablesWithIntrinsicBounds(null, null, imgClear, null); /터치 범위가 오른쪽에 있을 때 삭제 메소드를 트리거하고 포크를 숨깁니다
@Override
공개 부울 onTouchEvent(MotionEvent 이벤트) {
if(imgClear != null && event.getAction() == MotionEvent.ACTION_UP)
{
int eventX = (int) event.getRawX();
int eventY = (int) event.getRawY (); s(eventX, eventY))
setText("") ; }
}
EditText의 배경 드로어블:
bg_frame_search .xml
<?xml version="1.0" 인코딩="utf- 8"?>
<shape xmlns:android="http://schemas.android.com/apk/res/android" > color/frame_search"/>
</shape>
颜color资源:color.xml
<resources>
<color name="reveal_color">#FFFFFF</color> ;
<color name="bottom_color">#3086E4</color>
<color name="bottom_bg">#40BAF8</color>
<color name="frame_search">#ADAEAD</ color>
<color name="Background_white">#FFFFFF</color>
<color name="back_red">#e75049</color>
</resources>
布局文件:activity_main .xml
xmlns:tools="http://schemas.android.com/tools"
android :layout_width="match_parent"
android:layout_height="match_parent"
android:Background="../style/images/back_red"
android:orientation="vertical"
tools:context=".MainActivity">
<demo.com.jay.buttondemo.DelEditText
android:id="@+id/edit_search"
android:layout_width="match_parent"
android:layout_height="32dp"
android:layout_margin="10dp"
안드로이드: background="../style/images/bg_frame_search"
android:hint="带删除按钮的EditText~"
android:maxLength="20"
android:padding="5dp"
android:singleLine="true " / >
</LinearLayout>
PS: 코드는 매우 간단하므로 설명하지 않겠습니다~
2. EditText의 비밀번호를 보이거나 보이지 않게 만드세요
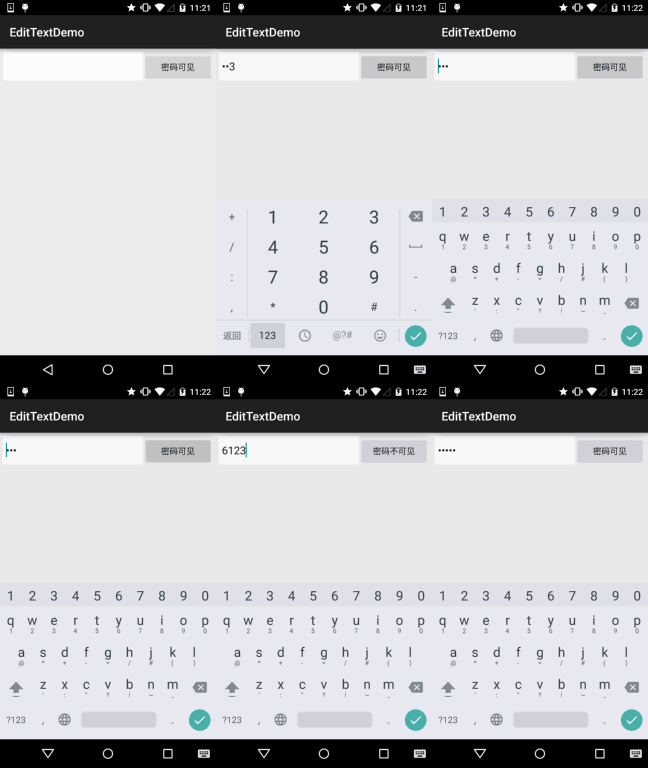
이것도 매우 실용적인 요구 사항입니다. 즉, 사용자가 버튼을 클릭한 후 EditText의 비밀번호는 보이거나 보이지 않게 만들 수 있습니다. Invisible~
구현 렌더링:

구현 코드: activity_main.xml
xmlns:tools="http://schemas.android.com/tools"
android:layout_width="match_parent"
android:layout_height="match_parent"
tools:context= ".MainActivity"
android:layout_margin "5dp"
android:orientation="horizontal">
<EditText
android:id="@+id/edit_pawd"
android:layout_width="0dp"
android:layout_weight ="2"
android:layout_height="48dp"
android:inputType="textPassword"
android:Background="../style/images/editborder"/>
<Button
android:id="@ +id/btnChange"
android :layout_width = "0dp"
MainActivity.java
import android.support.v7.app.AppCompatActivity;
import android.os.Bundle;
import android.text.method.HideReturnsTransformationMethod;
import android.text.method. PasswordTransformationMethod;
import android.view.Menu;
import android.view.MenuItem;
import android.view.View;
import android.widget.Button;
import android.widget.EditText;
public 클래스 MainActivity는 AppCompatActivity를 확장합니다.{
private EditText edit_pawd;
private Button btnChange;
private boolean flag = false;
@Override
protected void onCreate(Bundle saveInstanceState){
super .onCreate(savedInstanceState);
setContentView(R.layout.activity_main);
edit_pawd = (EditText) findViewById(R.id.edit_pawd);
btnChange = (버튼) findViewById(R.id.btnChange);
edit_pawd.setHorizontallyScrolling(true); //设置EditText不换行
btnChange.setOnClickListener(new View.OnClickListener() {
@Override
public void onClick(View view) {
if(flag = = true){
edit_pawd.setTransformationMethod(HideReturnsTransformationMethod.getInstance()) ;???? edit_pawd.setTransformationMethod(PasswordTransformationMethod.getInstance());
플래그 = true;
btnChange.setText("비밀번호가 표시됩니다");
="utf-8"?>
< ;shape xmlns:android="http://schemas.android.com/apk/res/android" > <!-- 투명한 배경색 설정 -->
<solid android:color="# FFFFFF" />
<!--흰색 테두리 설정 -->
<획
android: width="1px"
android:color="#FFFFFF" />
<!-- 공간을 더 크게 만들기 위해 여백 설정 -->
<padding
android:bottom="5dp"
android: left="5dp"
android:right="5dp"
android:top="5 dp" / >
</shape>
이 섹션 요약:
이 섹션입니다. 감사합니다. 너~


