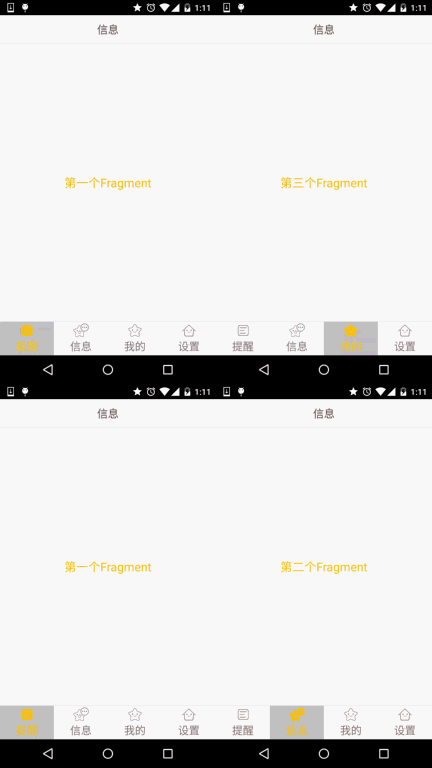
조각 예 - 하단 탐색 모음 구현(방법 2)
이 섹션 소개:
이전 섹션에서는 하단 탐색 모음의 효과를 얻기 위해 LinearLayout + TextView를 사용했습니다. 클릭할 때마다 재설정해야 합니다. 모든 TextView의 상태를 확인하고 클릭한 TextView를 선택하는 것은 약간 번거롭습니다. 다음으로 다른 방법을 사용하겠습니다. RadioGroup + RadioButton을 사용하면 이전 섹션의 효과를 얻을 수 있습니다!
1. 임의의 생각
이 섹션에서는 RadioButton을 사용하여 단일 선택 효과를 얻습니다. 익숙하지 않거나 이전에 사용해 본 적이 없다면 다음으로 이동할 수 있습니다. RadioButton간단히 말하면 RadioGroup에는 4개의 RadioButton이 포함되어 있으며 이전과 동일한 비율로 1:1:1:1로 나뉩니다.
또한 RadioGroup의 onCheckedChange만 다시 작성하고 어떤 RadioButton이 클릭되었는지 확인하기 위해 checkid만 판단하면 됩니다.
좋아, 쌓기 시작하자!
2. 구현 과정
PS:여기의 자료는 이전 섹션의 자료에서 직접 사용되었습니다! 또한 drawable 클래스의 리소스는 모두 선택됩니다. 상태가 확인됨으로 변경됩니다!
1단계: 하단 옵션에 대한 리소스 파일 작성
Picture Drawable 리소스: tab_menu_channel.xml
< 선택기 xmlns:android="http://schemas.android.com/apk/res/android">
<item android:drawable="@mipmap/tab_channel_pressed" android:state_checked="true" />
< ; item android:drawable="@mipmap/tab_channel_normal" />
</selector>
다른 세 개도 같은 패턴을 따릅니다!
텍스트 리소스: tab_menu_text.xml
<selector xmlns:android="http://schemas.android.com /apk/res/android">
<item android:color="@color/text_yellow" android:state_checked="true" />
<item android:color="@color/text_gray" />
</selector>
背景资源:tab_menu_bg.xml
<selector xmlns:android="http://schemas.android.com/ apk/res/android">
<item android:state_selected="true">
<shape>
<solid android:color="#FFC4C4C4" />
</shape>
< /item>
<item>
<shape>
<solid android:color="@color/transparent" />
</shape>
</item>
< /선택기>
2단계: 활동 레이아웃 작성
TextView를 사용하여 하단 탐색 모음을 구현했을 때 각 TextView의 속성이 거의 동일하다는 문제를 발견했습니다. , 제안에서 우리는 모든 사람에게 동일한 속성을 추출하여 스타일에 작성하도록 요청했습니다. 어쩌면 일부 친구는 게으르거나 모릅니다. 여기에 그리는 방법과 사용 방법이 나와 있습니다.
먼저 Radiogram 라벨 중 하나를 꺼냅니다.
Android: id = "@+ID/rb_channel"
Android: 레이아웃_폭 = " 0dp "
안드로이드: 레이아웃_높이 =" match_parent "
안드로이드: 레이아웃_웨이트 =" 1 "
안드로이드: background =" ../ style/images/tab_bg " OID: 버튼 = "@NULL"
안드로이드: drawabletop = "@drawable /tab_menu_Channel "
Android: Gravity =" Center "
Android: paddingtop =" 3dp "
Android: text ="@string/tab_amert "
Android: TextColor = "@DRAWABLE/TAB_MENU_TEXT"
Android: TextSize = "18SP"// >
我们可以把每个RadioButton도시동일적属性抽取出来,写到style.xml文件中:
<item name="android:layout _너비"> 0dp</item>
<item name="android:layout_weight">1</item>
<item name="android:layout_height">match_parent</item>
<item name="android: background">@drawable/tab_menu_bg</item>
<item name="android:button">@null</item>
<item name="android:gravity">center</item>
<item name="android:paddingTop">3dp</item>
<item name="android:textColor">@drawable/tab_menu_text</item>
<item name="android:textSize"> ;18sp</item>
</style>
그러면 매번 Activity_main.xml의 RadioButton에 대해 동일한 코드를 작성할 필요가 없습니다. RadioButton의 style="@style/tab_menu_item"을 만들기만 하면 끝입니다!
activity_main.xml:
xmlns:tools="http://schemas.android.com/tools"
android:layout_width=" match_parent"
android:layout_height="match_parent"
android:Background="../style/images/bg_gray"
tools:context=".MainActivity">
<RelativeLayout
android:id="@+ id/ly_top_bar"
android:layout_width="match_parent"
android:layout_height="48dp"
android:Background="../style/images/bg_topbar">
<TextView
android:id="@+ id/txt_topbar"
android:layout_width="match_parent"
android:layout_height="match_parent"
android:layout_centerInParent="true"
android:gravity="center"
android:text="信息"
android:textColor=" @color/text_topbar"
android:textSize="18sp" />
<View
android:layout_width="match_parent"
android:layout_height="2px"
android:layout_alignParentBottom="true"
android:Background= "../style/images/div_white" />
</RelativeLayout>
<RadioGroup
android:id="@+id/rg_tab_bar"
android:layout_width="match_parent"
android:layout_height= "56dp"
android:layout_alignParentBottom="true"
android:Background="../style/images/bg_white"
android:orientation="horizontal">
<RadioButton
android:id="@+id/rb_channel "
style="@style/tab_menu_item"
android:drawableTop="@drawable/tab_menu_channel"
android:text="@string/tab_menu_alert" />
<RadioButton
android:id="@+id/rb_message" ㅋㅋㅋ <RadioButton
android:id="@+id/rb_better "
style="@style/tab_menu_item"
android:drawableTop="@drawable/tab_menu_better"
android:text="@string/tab_menu_pay" />
🜜 <RadioButton
android:id="@+id/ rb_setting"
style="@style/tab_menu_item"
android:drawableTop="@drawable/tab_menu_setting"
android:text="@string/tab_menu_setting"/>
< /RadioGroup>
<보기
android :id="@+id/div_tab_bar"
android:layout_width="match_parent"
android:layout_height="2px"
> > > /RelativeLayout>
3단계: 상단 숨기기 탐색 모음
AndroidManifest에서 테마 속성을 설정합니다. : 간단한 레이아웃과 조각 클래스를 만듭니다.
이전 섹션의 레이아웃과 조각을 직접 복사합니다.
<?xml version="1.0" 인코딩="utf-8"? ><LinearLayout xmlns:android="http://schemas.android.com/apk/res/android" android:orientation="vertical" 안드로이드: layout_width="match_parent"
android:layout_height="match_parent"android: layout_width="match_parent"
android:layout_height ="match_parent" D Android: 중력 = "center"
android: text = "Oh""
android: textColor ="@COLOR/Text_yellow "Android: textSize =" 20SP " /& GT & LT ;/선형 레이아웃 & gt;
MyFragment.java:
* 2015년 8월 29일 0028에 Coder-pig에 의해 작성되었습니다.
*/
public class MyFragment extends Fragment {
private String content;
public MyFragment(String content) {
내용;
}
@Override
public View onCreateView(LayoutInflater inflater, ViewGroup container, Bundle savedInstanceState) {
View view = inflater.inflate(R.layout.fg_content,container,false);
TextView txt_content = (TextView) view.find ViewById(R.id .txt_content);
txt_content.setText(content);
반환 보기;
}
}
5단계: MainActivity.java 작성
이것은 TextView 구현보다 훨씬 간단하므로 자세히 설명하지 않겠습니다.
MainActivity.java
코드로 이동하세요.* 2015년 8월 29일 0028에 Coder-pig에 의해 작성되었습니다.
*/
public 클래스 MainActivity는 AppCompatActivity를 확장하여 RadioGroup.OnCheckedChangeListener를 구현합니다.{
private RadioGroup rg_tab_bar;
private RadioButton rb_channel;
//Fragment Object
비공개 MyFragment fg1,fg2,fg3,fg4;
private FragmentManager fManager;
@Override
protected void onCreate(Bundle savedInstanceState) {
super.onCreate(savedInstanceState);
setContentView(R.layout.activity_main);
fManager = getFragmentManager();
rg_tab_bar = (RadioGroup) findViewById( R.id.rg_tab_bar);
rg_tab_bar.setOnCheckedChangeListener(this);
//获取第一个单选按钮 并设置其为选中状态
r b_channel = (RadioButton) findViewById(R.id.rb_channel);
rb_channel. setChecked(true);
}
@Override
public void onCheckedChanged(RadioGroup group, int checkedId) {
TransactionTransaction faction = fManager.beginTransaction();
hideAllFrag ment(fTransaction);
스위치(checkedId){
케이스 R. id.rb_channel:
if(fg1 == null){
fg1 = new MyFragment("第一个Fragment");
fTransaction.add( R.id.ly_content,fg1);
}else{
fTransaction.show( fg1);
}
} ("第二个Fragment");
fTransaction.add(R.id.ly_content,fg2);
}else{
fTransaction.show(fg2);
}
break;
case R.id.rb_better: if(fg3 == null){
fg3 = new MyFragment("第三个Fragment");
f트랜잭션. add(R.id.ly_content,fg3);
}else{
fTransaction.show(fg3);
}
break;
case R.id.rb_setting:
if(fg4 == null){
fg4 = new MyFragment ("第4个Fragment");
fTransaction.add(R.id.ly_content,fg4);
}else{
fTransaction.show (fg4); private void hideAllFragment(FragmentTransaction 조각트랜잭션){
if(fg1 != null)fragmentTransaction.hide (fg1);
if(fg2 != null)fragmentTransaction.hide(fg2);
if(fg3 ! = null)fragmentTransaction.hide(fg3);
if(fg4 != null)fragmentTransaction.hide(fg4);
}
}
PS:
이전 섹션에서 FragmentTransaction만 언급하는 것을 잊어버렸습니다. 한 번만 사용하면 되며, 사용할 때마다 FragmentManager를 호출해야 합니다. startTransaction() 메소드는 FragmentTransaction 트랜잭션 객체를 획득합니다!图3. 렌더링 실행 运 사실 이전 섹션의 효과는 동일합니다:
4. 코드 다운로드:
FragmentDemo2.zip:
FragmentDemo2.zip download
5. 요약 
이 섹션에서는 하단 탐색 모음을 구현하는 두 번째 방법인 RadioGroup + RadioButton을 설명합니다. TextView처럼 클릭할 때마다 모든 TextView의 선택됨 상태를 재설정할 필요가 없습니다. 선택이 true이므로 코드를 적게 작성할 수 있습니다~이번 섹션은 여기까지입니다~감사합니다


