데이터 저장 및 액세스 - 파일 저장, 읽기 및 쓰기
이 섹션 소개:
안녕하세요, 이 제목을 보면 일부 독자들이 '이전 부분 작성을 마쳤나요? 글쎄요, 예시를 원하고 필요해서 아직 글을 다 쓰지 못했습니다. 효율성을 높이기 위해 멀티스레딩처럼 튜토리얼을 동시에 작성하기로 결정했습니다. 이렇게 하면 튜토리얼 작성 속도가 빨라질 수 있습니다. 지금까지 정확히 60개의 글을 썼고, 입문 튜토리얼을 마치려면 아직 멀었다고 말씀드렸듯이, 한 달 반에서 두 달 안에 끝내고 싶습니다. 이 튜토리얼 세트는 오늘 9.1에 공개되었으니 계속해서 열심히 하세요~ 좋아요, 말도 안 되는 소리가 너무 많습니다. 이 섹션에서는 Android 데이터 저장 및 액세스 방법 중 하나는 파일 저장 및 읽기 및 쓰기입니다. 물론 이 방법 외에도 SharedPreference, 데이터베이스에 저장할 수 있습니다. 또는 Application에 대해서는 나중에 논의하겠지만, 이 섹션부터 시작하겠습니다~
1. Android 파일 작업 모드
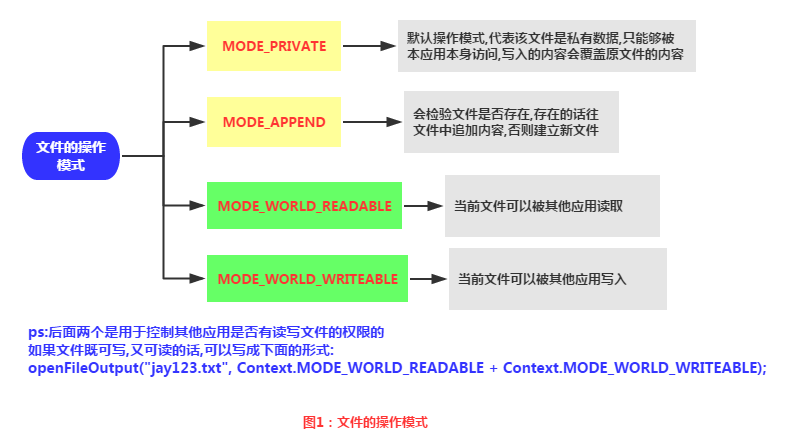
Java를 공부한 학생들은 새로운 파일을 만든 다음 데이터를 쓸 수 있다는 것을 알고 있습니다. 하지만 안드로이드는 다릅니다. 왜냐하면 안드로이드는 다르기 때문입니다. Linux 기반에서는 파일을 읽고 쓸 때 파일 작업 모드도 추가해야 합니다. Android의 작업 모드는 다음과 같습니다.
2. 파일 관련 작업 방법
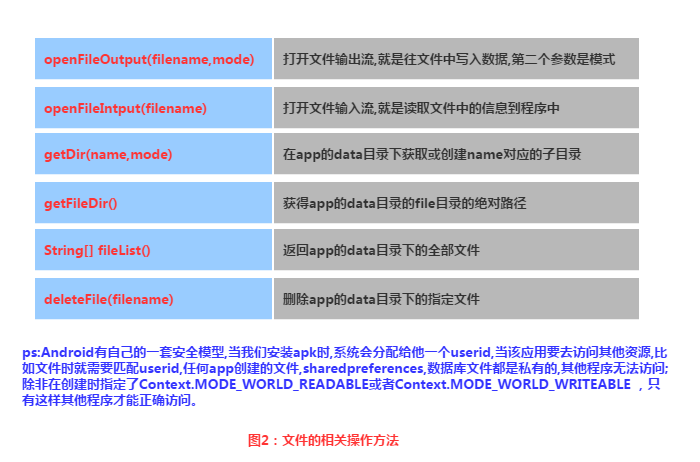
3. 읽기 및 쓰기의 파일 구현
Android의 파일 읽기 및 쓰기는 Java의 파일 I/O와 동일하며 프로세스도 매우 간단합니다. 아래에 간단한 예를 작성해 보겠습니다.
구현 렌더링:
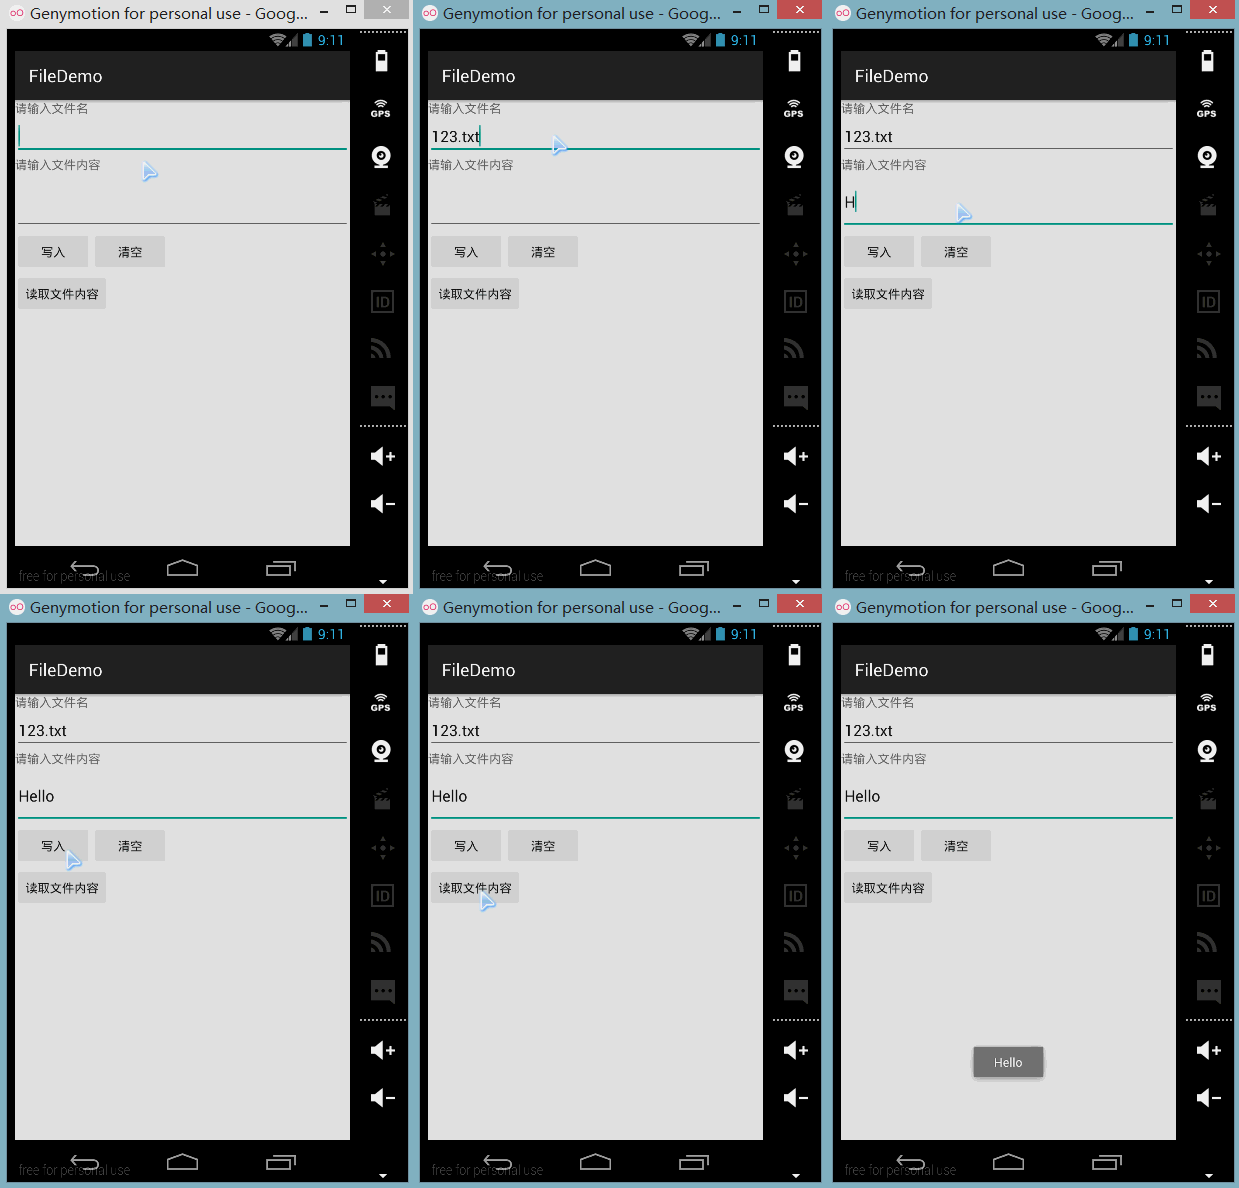
PS:작성자의 N5에는 루트가 없고 파일 저장 디렉터리를 볼 수 없기 때문에 여기서는 시뮬레이터를 사용합니다. 다음으로 DDMS를 엽니다. 파일 탐색기에서는 data/data/<패키지 이름>/파일에 작성한 파일이 있음을 확인할 수 있습니다.
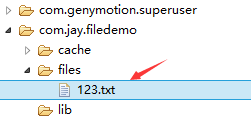
오른쪽 상단에 있는 응답 아이콘을 클릭하여 파일을 컴퓨터로 가져와서 열 수 있습니다. 작성된 내용 확인:

 코드 구현:
먼저 레이아웃 파일은 main_activity입니다. 여기서 관련 작업을 완료합니다.
<LinearLayout xmlns:android="http://schemas.android.com/apk/res/android"
    xmlns:tools="http://schemas.android.com/tools"
    android:id="@+id/LinearLayout1"
    android:layout_width="match_parent"
    android:layout_height="match_parent"
    android:orientation="vertical"
    tools:context="com.jay.example.filedemo1.MainActivity">

    <TextView
        android:layout_width="wrap_content"
        android:layout_height="wrap_content"
        android:text="@string/nametitle" />

    <EditText
        android:id="@+id/editname"
        android:layout_width="match_parent"
        android:layout_height="wrap_content" />

    <TextView
        android:layout_width="wrap_content"
        android:layout_height="wrap_content"
        android:text="@string/detailtitle" />

    <EditText
        android:id="@+id/editdetail"
        android:layout_width="match_parent"
        android:layout_height="wrap_content"
        android:minLines="2" />

    <LinearLayout
        android:layout_width="fill_parent"
        android:layout_height="wrap_content"
        android:orientation="horizontal">

        <Button
            android:id="@+id/btnsave"
            android:layout_width="wrap_content"
            android:layout_height="wrap_content"
            android:text="@string/btnwrite" />

        <Button
            android:id="@+id/btnclean"
            android:layout_width="wrap_content"
            android:layout_height="wrap_content"
            android:text="@string/btnclean" />
    </LinearLayout>

    <Button
        android:id="@+id/btnread"
        android:layout_width="wrap_content"
        android:layout_height="wrap_content"
        android:text="@string/btnread" />

</LinearLayout>
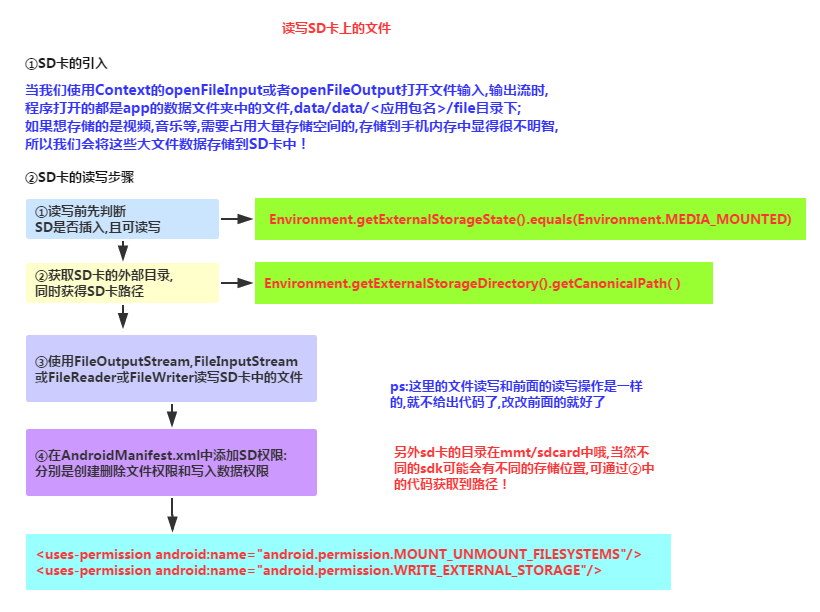
4. SD 카드에
읽기 흐름도:
코드 샘플:
런닝 렌더링:
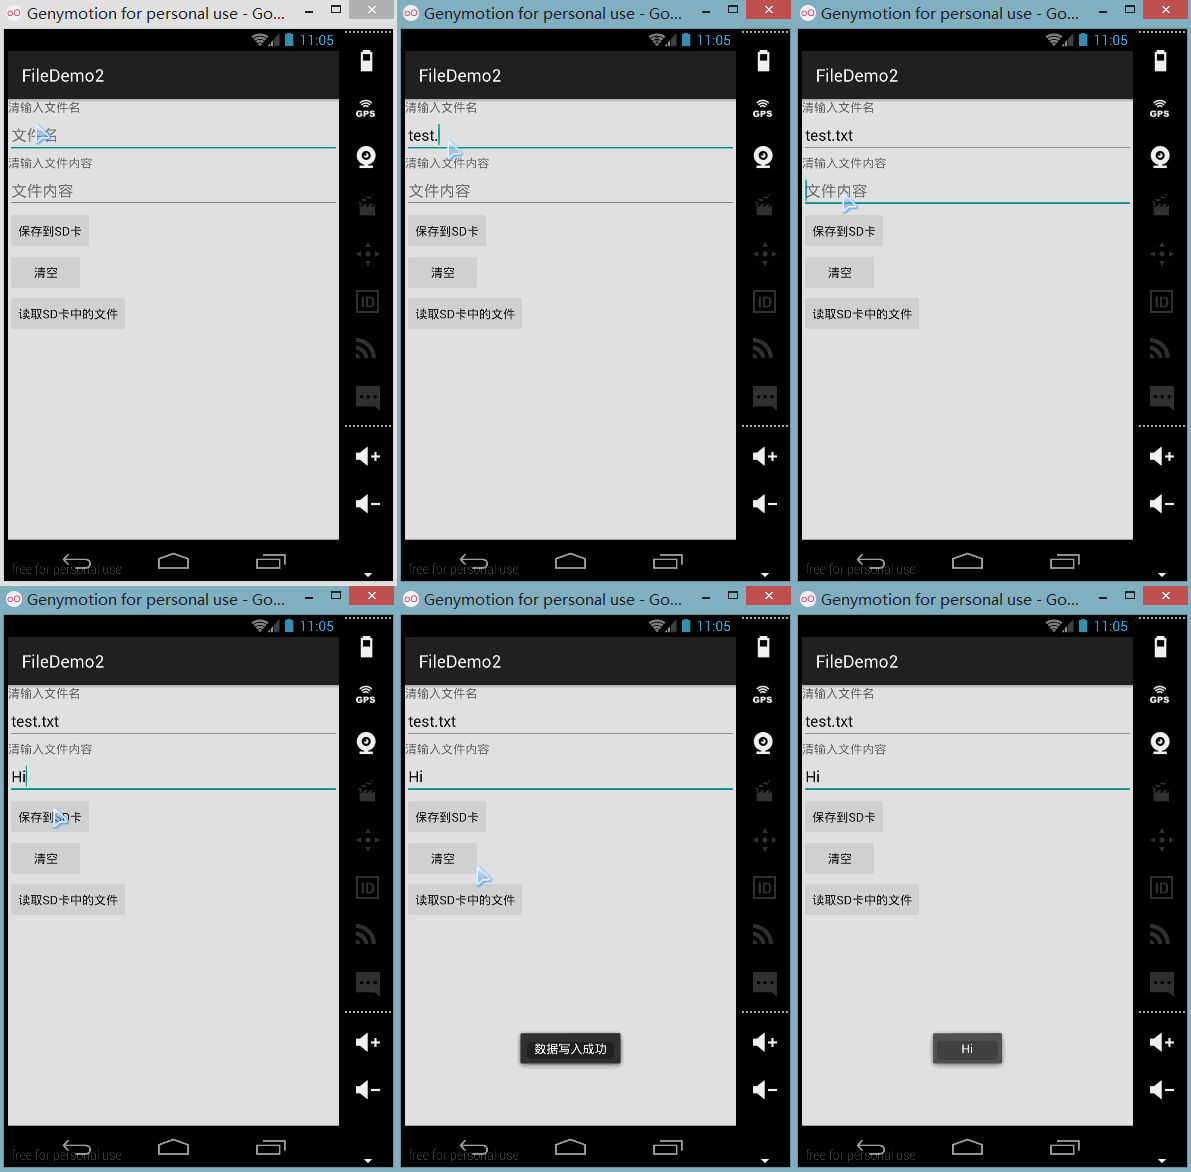
또한 DDMS의 파일 탐색기를 엽니다. 이전 버전의 시스템에서는 mmtsdcard에서 직접 찾을 수 있지만 새 버전에서는 가능합니다. 먼저 다음 경로로 이동합니다.

sdcard를 클릭했지만 아무것도 없습니다. /storage/emulated/legacy:

좋아요, 그는 다시 다른 곳으로 이동했습니다. 우리는 계속해서 /storage/shell/emilated/0
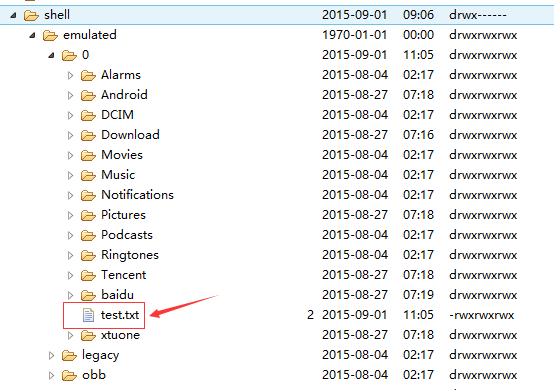
을 찾았고, 확실히 SD 카드에서 생성한 test.txt를 찾았습니다! 컴퓨터로 내보내고 안에 내용을 살펴보세요:

물론이죠, SD 카드를 읽고 쓰는 데 성공했습니다~ 다음으로 코드가 어떻게 작성되었는지 살펴보겠습니다.
Code 구현:
main_activity.xml:
/**
 * Created by Jay on 2015/9/1 0001.
 */
public class FileHelper {

    private Context mContext;

    public FileHelper() {
    }

    public FileHelper(Context mContext) {
        super();
        this.mContext = mContext;
    }

    /*
    * 这里定义的是一个文件保存的方法,写入到文件中,所以是输出流
    * */
    public void save(String filename, String filecontent) throws Exception {
        //这里我们使用私有模式,创建出来的文件只能被本应用访问,还会覆盖原文件哦
        FileOutputStream output = mContext.openFileOutput(filename, Context.MODE_PRIVATE);
        output.write(filecontent.getBytes());  //将String字符串以字节流的形式写入到输出流中
        output.close();         //关闭输出流
    }


    /*
    * 这里定义的是文件读取的方法
    * */
    public String read(String filename) throws IOException {
        //打开文件输入流
        FileInputStream input = mContext.openFileInput(filename);
        byte[] temp = new byte[1024];
        StringBuilder sb = new StringBuilder("");
        int len = 0;
        //读取文件内容:
        while ((len = input.read(temp)) > 0) {
            sb.append(new String(temp, 0, len));
        }
        //关闭输入流
        input.close();
        return sb.toString();
    }

}
그런 다음 SD 작업 클래스를 작성해 보겠습니다. SDFileHelper.java
public class MainActivity extends AppCompatActivity implements View.OnClickListener {

    private EditText editname;
    private EditText editdetail;
    private Button btnsave;
    private Button btnclean;
    private Button btnread;
    private Context mContext;

    @Override
    protected void onCreate(Bundle savedInstanceState) {
        super.onCreate(savedInstanceState);
        setContentView(R.layout.activity_main);
        mContext = getApplicationContext();
        bindViews();
    }


    private void bindViews() {
        editdetail = (EditText) findViewById(R.id.editdetail);
        editname = (EditText) findViewById(R.id.editname);
        btnclean = (Button) findViewById(R.id.btnclean);
        btnsave = (Button) findViewById(R.id.btnsave);
        btnread = (Button) findViewById(R.id.btnread);

        btnclean.setOnClickListener(this);
        btnsave.setOnClickListener(this);
        btnread.setOnClickListener(this);
    }


    @Override
    public void onClick(View v) {
        switch (v.getId()) {
            case R.id.btnclean:
                editdetail.setText("");
                editname.setText("");
                break;
            case R.id.btnsave:
                FileHelper fHelper = new FileHelper(mContext);
                String filename = editname.getText().toString();
                String filedetail = editdetail.getText().toString();
                try {
                    fHelper.save(filename, filedetail);
                    Toast.makeText(getApplicationContext(), "数据写入成功", Toast.LENGTH_SHORT).show();
                } catch (Exception e) {
                    e.printStackTrace();
                    Toast.makeText(getApplicationContext(), "数据写入失败", Toast.LENGTH_SHORT).show();
                }
                break;
            case R.id.btnread:
                String detail = "";
                FileHelper fHelper2 = new FileHelper(getApplicationContext());
                try {
                    String fname = editname.getText().toString();
                    detail = fHelper2.read(fname);
                } catch (IOException e) {
                    e.printStackTrace();
                }
                Toast.makeText(getApplicationContext(), detail, Toast.LENGTH_SHORT).show();
                break;
        }
    }
}
그런 다음 MainActivity.java관련 논리를 구현합니다.
<LinearLayout xmlns:android="http://schemas.android.com/apk/res/android"
    xmlns:tools="http://schemas.android.com/tools"
    android:id="@+id/LinearLayout1"
    android:layout_width="match_parent"
    android:layout_height="match_parent"
    android:orientation="vertical"
    tools:context="com.jay.example.filedemo2.MainActivity">

    <TextView
        android:layout_width="wrap_content"
        android:layout_height="wrap_content"
        android:text="清输入文件名" />

    <EditText
        android:id="@+id/edittitle"
        android:layout_width="match_parent"
        android:layout_height="wrap_content"
        android:hint="文件名" />


    <TextView
        android:layout_width="wrap_content"
        android:layout_height="wrap_content"
        android:text="清输入文件内容" />

    <EditText
        android:id="@+id/editdetail"
        android:layout_width="match_parent"
        android:layout_height="wrap_content"
        android:hint="文件内容" />

    <Button
        android:id="@+id/btnsave"
        android:layout_width="wrap_content"
        android:layout_height="wrap_content"
        android:text="保存到SD卡" />

    <Button
        android:id="@+id/btnclean"
        android:layout_width="wrap_content"
        android:layout_height="wrap_content"
        android:text="清空" />

    <Button
        android:id="@+id/btnread"
        android:layout_width="wrap_content"
        android:layout_height="wrap_content"
        android:text="读取sd卡中的文件" />

</LinearLayout>
마지막으로, 잊어버리다 AndroidManifest.xml에 SD 카드를 읽고 쓸 수 있는 권한을 쓰려면 아!
/**
 * Created by Jay on 2015/9/1 0001.
 */
public class SDFileHelper {

    private Context context;

    public SDFileHelper() {
    }

    public SDFileHelper(Context context) {
        super();
        this.context = context;
    }

    //往SD卡写入文件的方法
    public void savaFileToSD(String filename, String filecontent) throws Exception {
        //如果手机已插入sd卡,且app具有读写sd卡的权限
        if (Environment.getExternalStorageState().equals(Environment.MEDIA_MOUNTED)) {
            filename = Environment.getExternalStorageDirectory().getCanonicalPath() + "/" + filename;
            //这里就不要用openFileOutput了,那个是往手机内存中写数据的
            FileOutputStream output = new FileOutputStream(filename);
            output.write(filecontent.getBytes());
            //将String字符串以字节流的形式写入到输出流中
            output.close();
            //关闭输出流
        } else Toast.makeText(context, "SD卡不存在或者不可读写", Toast.LENGTH_SHORT).show();
    }

    //读取SD卡中文件的方法
    //定义读取文件的方法:
    public String readFromSD(String filename) throws IOException {
        StringBuilder sb = new StringBuilder("");
        if (Environment.getExternalStorageState().equals(Environment.MEDIA_MOUNTED)) {
            filename = Environment.getExternalStorageDirectory().getCanonicalPath() + "/" + filename;
            //打开文件输入流
            FileInputStream input = new FileInputStream(filename);
            byte[] temp = new byte[1024];

            int len = 0;
            //读取文件内容:
            while ((len = input.read(temp)) > 0) {
                sb.append(new String(temp, 0, len));
            }
            //关闭输入流
            input.close();
        }
        return sb.toString();
    }


}
5. 네이티브 시뮬레이터의 SD 카드 문제에 관해서
실제 머신에서 디버깅하는 경우에는 일반적으로 네이티브 가상 머신의 경우 문제가 많습니다. Environment.getExternalStorageState().equals(Environment.MEDIA_MOUNTED) 가능 항상 false를 반환하는 것은 SD 카드가 존재하지 않는다는 것입니다. 이것이 주요 문제입니다. 이제 SDK의 새 버전이 출시됩니다. AVD를 생성할 때 SD 카드의 저장 영역이 동시에 적용됩니다
이전 버전의 SDK 또는 기타 이유로 SD 카드를 수동으로 연결해야 할 수 있습니다. 설정은 다음과 같습니다. 다음과 같습니다:
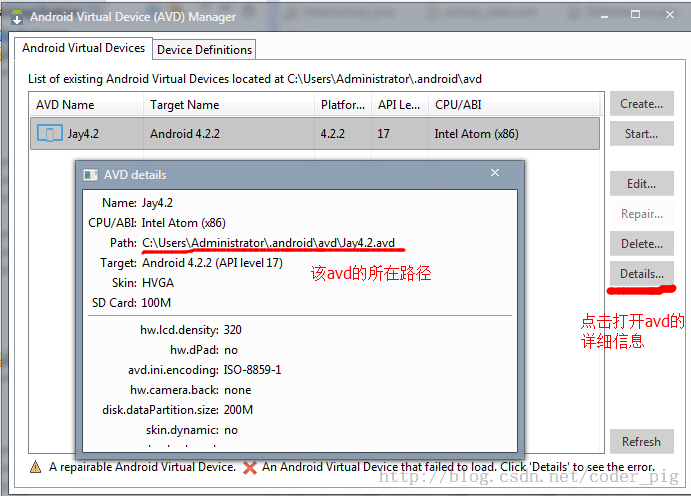
① 생성된 AVD 이미지의 경로 찾기:
클릭하여 avd 인터페이스를 열고 세부정보를 클릭한 후 avd 이미지의 디렉터리를 확인하세요
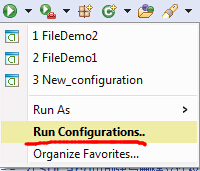
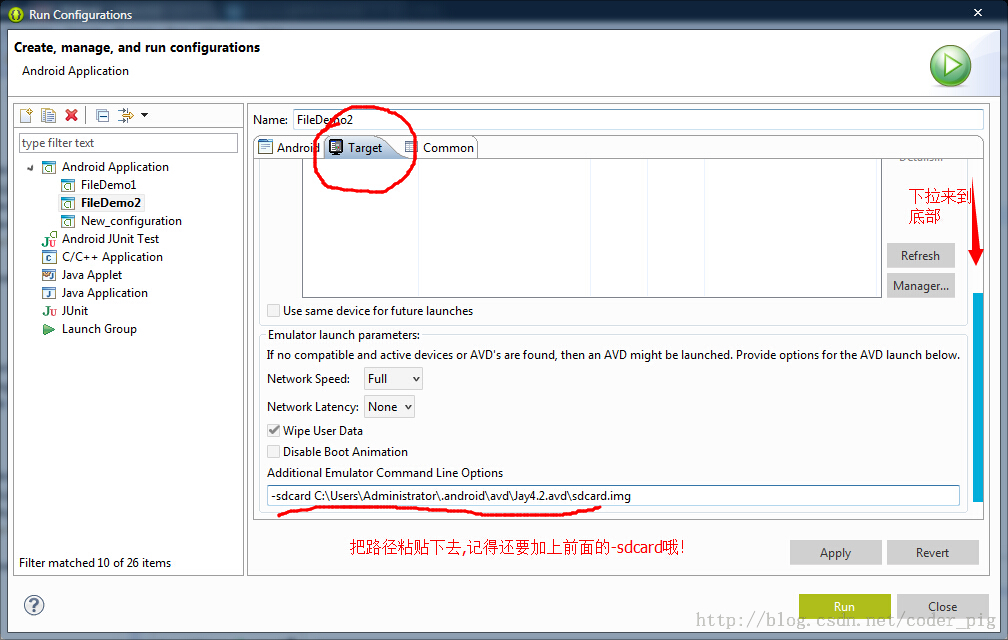
②avd 이미지가 있는 경로로 이동하여 복사합니다. sdcard.img의 경로:
예를 들어, 광산: -sdcard C: UsersAdministrator.androidavdJay4.2.avdsdcard.img
3그런 다음 클릭하여 다음 인터페이스로 이동하세요.
마지막으로 다음을 적용한 다음 실행하세요!
6. raw 및 자산 폴더의 파일을 읽으세요.
우리 자신의 파일을 원하지 않는다면 모두가 두 폴더에 익숙하다고 생각합니다. 바이너리 파일로 컴파일하면, 이 두 디렉터리에 파일을 넣을 수 있으며 두 디렉터리의 차이점은 다음과 같습니다.
- res/raw: 파일은 R.java 파일에 매핑되며 리소스 ID를 통해 직접 액세스할 수 있습니다. . 그리고 디렉터리 구조를 가질 수 없습니다. 즉, 더 이상 폴더를 생성할 수 없습니다
- assets: R.java 파일에 매핑되지 않으며 AssetManager를 통해 액세스할 수 있습니다. 자신만의 폴더를 만들 수 있습니다.
파일 리소스 읽기:
res/raw:
public class MainActivity extends AppCompatActivity implements View.OnClickListener{

    private EditText editname;
    private EditText editdetail;
    private Button btnsave;
    private Button btnclean;
    private Button btnread;
    private Context mContext;

    @Override
    protected void onCreate(Bundle savedInstanceState) {
        super.onCreate(savedInstanceState);
        setContentView(R.layout.activity_main);
        mContext = getApplicationContext();
        bindViews();
    }

    private void bindViews() {
        editname = (EditText) findViewById(R.id.edittitle);
        editdetail = (EditText) findViewById(R.id.editdetail);
        btnsave = (Button) findViewById(R.id.btnsave);
        btnclean = (Button) findViewById(R.id.btnclean);
        btnread = (Button) findViewById(R.id.btnread);

        btnsave.setOnClickListener(this);
        btnclean.setOnClickListener(this);
        btnread.setOnClickListener(this);
    }

    @Override
    public void onClick(View v) {
        switch (v.getId()){
            case R.id.btnclean:
                editdetail.setText("");
                editname.setText("");
                break;
            case R.id.btnsave:
                String filename = editname.getText().toString();
                String filedetail = editdetail.getText().toString();
                SDFileHelper sdHelper = new SDFileHelper(mContext);
                try
                {
                    sdHelper.savaFileToSD(filename, filedetail);
                    Toast.makeText(getApplicationContext(), "数据写入成功", Toast.LENGTH_SHORT).show();
                }
                catch(Exception e){
                    e.printStackTrace();
                    Toast.makeText(getApplicationContext(), "数据写入失败", Toast.LENGTH_SHORT).show();
                }
                break;
            case R.id.btnread:
                String detail = "";
                SDFileHelper sdHelper2 = new SDFileHelper(mContext);
                try
                {
                    String filename2 = editname.getText().toString();
                    detail = sdHelper2.readFromSD(filename2);
                }
                catch(IOException e){e.printStackTrace();}
                Toast.makeText(getApplicationContext(), detail, Toast.LENGTH_SHORT).show();
                break;
        }
    }
}assets:
<!-- 在SDCard中创建与删除文件权限 -->
<uses-permission android:name="android.permission.MOUNT_UNMOUNT_FILESYSTEMS"/>
<!-- 往SDCard写入数据权限 -->
<uses-permission android:name="android.permission.WRITE_EXTERNAL_STORAGE"/>
코드 다운로드:
- FileDemo.zip: 파일데모를 다운로드하세요. zip
- FileDemo2.zip: Download FileDemo2.zip
이 섹션 요약:
좋아, Android 데이터 저장 및 액세스에 대한 첫 번째 섹션은 여기까지입니다. - 파일 읽기 및 쓰기 당신은 이 글을 공부하고 있습니다 문제가 발생하거나 실수가 있다고 생각되면 언제든지 제기해 주시면 감사하겠습니다~

