실제 사례 그리기
이 섹션 소개:
처음 두 섹션에서는 비트맵과 몇 가지 기본 드로잉 API 속성 및 일반적인 방법을 배웠지만 항상 약간의 느낌이 들었습니다. 실용적이지 않다면 이미지를 심화하기 위해 무언가를 작성해야 합니다. 그렇죠? 이 섹션에서는 두 가지 간단한 예를 작성하겠습니다.
- 1. 간단한 드로잉 보드 구현
- 2. 아름다운 여성이 옷을 빨도록 도와주기
헤헤, 두 번째 예시는 안드로이드를 막 배운 Xiaozhu가 작성한 작은 데모입니다~헤헤~ 이 섹션부터 시작하겠습니다~
1. 실제 예 1: 간단한 드로잉 보드 구현:
많은 휴대폰에는 사용자가 낙서할 수 있는 드로잉 보드가 함께 제공됩니다. 하나의 간단한 예를 들어, 먼저 이 항목을 구현하기 위한 몇 가지 논리를 분석해 보겠습니다.
Q1: 이 드로잉 보드는 어디에 배치되어 있나요?
답변: View에서는 View를 사용자 정의하고 onDraw()에서 그림을 완성합니다. 또한 View에는 onTouchEvent 메서드도 있습니다. 사용자의 제스처 동작을 얻을 수 있습니다!
Q2. 무엇을 준비해야 하나요?
답변: 붓(Paint), 캔버스(Canvas), 경로(Path)는 사용자가 그린 경로를 기록합니다. 게다가 선을 그릴 때마다 마지막 드래그 시간이 발생한 지점부터 현재 드래그 시간이 발생한 지점까지! 그럼 아까 그렸던 건 이전에 그린 콘텐츠를 저장하기 위해 소위 "이중 버퍼링" 기술을 도입할 수 있습니다. 실제로 매번 Canvas에 직접 그리지 않고 먼저 Bitmap에 그려지고 Bitmap에 그림이 완성된 후에는 한 번에 뷰에 그려보세요!
Q3. 구체적인 구현 과정은 무엇인가요?
답변: 브러시를 초기화하고, 색상 및 기타 매개변수를 설정하고, View의 onMeasure() 메서드에서 View 크기의 비트맵을 만듭니다. 동시에 캔버스를 생성하고 onTouchEvent에서 X 및 Y 좌표를 얻고 연결을 그린 다음 마지막으로 validate()를 사용하여 다시 그립니다. onDraw 메소드는 비트맵의 내용을 캔버스에 그립니다!
좋아요, 이제 논리를 알았으니 코드는 다음과 같습니다.
MyView.java:
/**
 * Created by Jay on 2015/10/15 0015.
 */
public class MyView extends View{

    private Paint mPaint;  //绘制线条的Path
    private Path mPath;      //记录用户绘制的Path
    private Canvas mCanvas;  //内存中创建的Canvas
    private Bitmap mBitmap;  //缓存绘制的内容

    private int mLastX;
    private int mLastY;

    public MyView(Context context) {
        super(context);
        init();
    }

    public MyView(Context context, AttributeSet attrs) {
        super(context, attrs);
        init();
    }

    public MyView(Context context, AttributeSet attrs, int defStyleAttr) {
        super(context, attrs, defStyleAttr);
        init();
    }

    private void init(){
        mPath = new Path();
        mPaint = new Paint();   //初始化画笔
        mPaint.setColor(Color.GREEN);
        mPaint.setAntiAlias(true);
        mPaint.setDither(true);
        mPaint.setStyle(Paint.Style.STROKE);
        mPaint.setStrokeJoin(Paint.Join.ROUND); //结合处为圆角
        mPaint.setStrokeCap(Paint.Cap.ROUND); // 设置转弯处为圆角
        mPaint.setStrokeWidth(20);   // 设置画笔宽度
    }

    @Override
    protected void onMeasure(int widthMeasureSpec, int heightMeasureSpec) {
        super.onMeasure(widthMeasureSpec, heightMeasureSpec);
        int width = getMeasuredWidth();
        int height = getMeasuredHeight();
        // 初始化bitmap,Canvas
        mBitmap = Bitmap.createBitmap(width, height, Bitmap.Config.ARGB_8888);
        mCanvas = new Canvas(mBitmap);
    }

    //重写该方法,在这里绘图
    @Override
    protected void onDraw(Canvas canvas) {
        drawPath();
        canvas.drawBitmap(mBitmap, 0, 0, null);
    }

    //绘制线条
    private void drawPath(){
        mCanvas.drawPath(mPath, mPaint);
    }

    @Override
    public boolean onTouchEvent(MotionEvent event) {

        int action = event.getAction();
        int x = (int) event.getX();
        int y = (int) event.getY();

        switch (action)
        {
            case MotionEvent.ACTION_DOWN:
                mLastX = x;
                mLastY = y;
                mPath.moveTo(mLastX, mLastY);
                break;
            case MotionEvent.ACTION_MOVE:
                int dx = Math.abs(x - mLastX);
                int dy = Math.abs(y - mLastY);
                if (dx > 3 || dy > 3)
                    mPath.lineTo(x, y);
                mLastX = x;
                mLastY = y;
                break;
        }

        invalidate();
        return true;
    }
}
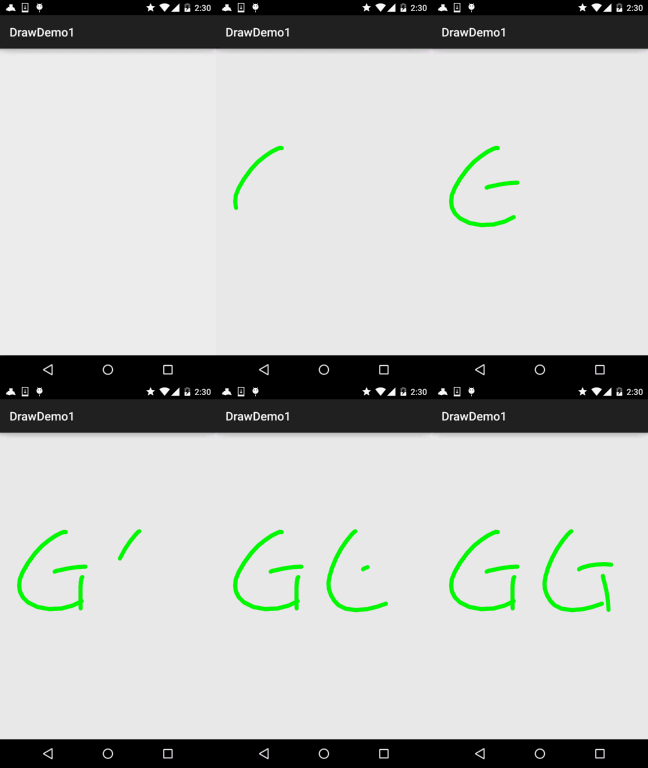
Running renders:

수정을 추가하는 등 필요에 따라 확장할 수 있습니다. 브러시 크기 변경, 브러시 색상 수정, 나만의 그림 저장 등! 다양하게 생각하고 직접 해 보세요~
2. 실천예 2: 아름다운 여성복 지우기 실현
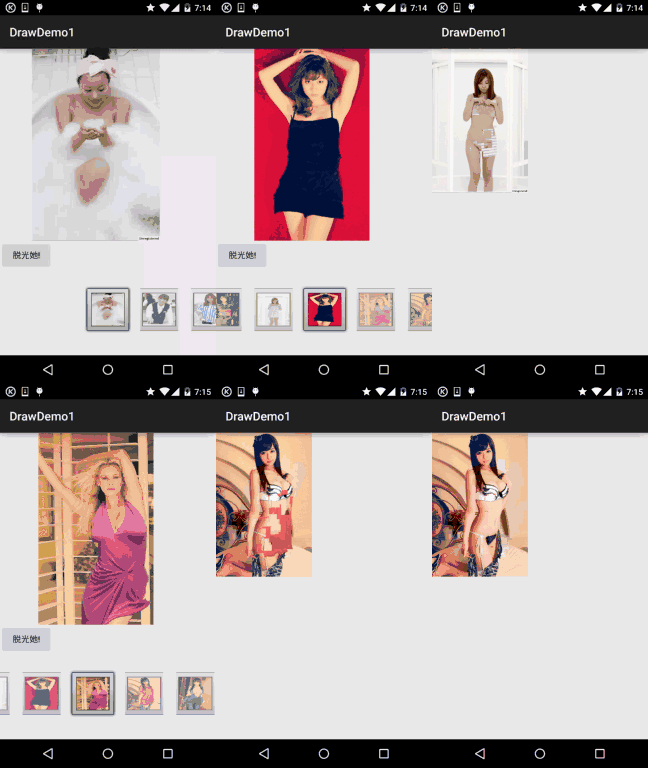
핵심 아이디어는 다음과 같습니다. 프레임 레이아웃을 사용하면 이전과 이후의 두 가지 ImageView가 있습니다. 전자는 옷을 닦기 전의 상황을 나타내고 후자는 옷을 닦은 후의 상황을 보여줍니다.
두 개의 ImageView에 대한 뷰티 사진을 설정한 후 이전 ImageView에 대한 OnTouchListener를 설정하세요! 여기 손가락 터치포인트 근처의 20*20픽셀을 투명하게 설정해주세요!
렌더링 실행:

코드 구현:
1단계: 소녀 선택과 관련된 첫 번째 활동, 첫 번째는 인터페이스, ImageView, 버튼 및 갤러리입니다!
activity_main.xml:
<?xml version="1.0" encoding="utf-8"?>
<LinearLayout xmlns:android="http://schemas.android.com/apk/res/android"
    android:layout_width="match_parent"
    android:layout_height="match_parent"
    android:orientation="vertical">

    <ImageView
        android:id="@+id/img_choose"
        android:layout_width="320dp"
        android:layout_height="320dp" />

    <Button
        android:id="@+id/btn_choose"
        android:layout_width="wrap_content"
        android:layout_height="wrap_content"
        android:text="脱光她!" />

    <Gallery
        android:id="@+id/gay_choose"
        android:layout_width="match_parent"
        android:layout_height="wrap_content"
        android:layout_marginTop="25dp"
        android:spacing="1pt"
        android:unselectedAlpha="0.6" />

</LinearLayout>
다음은 갤러리의 Adapter 클래스입니다. 여기에서는 BaseAdapter를 다시 작성하고 내부에 그림을 표시하는 것이 비교적 간단합니다. 다른 레이아웃을 작성할 필요가 없습니다!
MeiziAdapter.java:
/**
 * Created by Jay on 2015/10/16 0016.
 */
public class MeiziAdapter extends BaseAdapter{

    private Context mContext;
    private int[] mData;

    public MeiziAdapter() {
    }

    public MeiziAdapter(Context mContext,int[] mData) {
        this.mContext = mContext;
        this.mData = mData;
    }

    @Override
    public int getCount() {
        return mData.length;
    }

    @Override
    public Object getItem(int position) {
        return mData[position];
    }

    @Override
    public long getItemId(int position) {
        return position;
    }

    @Override
    public View getView(int position, View convertView, ViewGroup parent) {
        ImageView imgMezi = new ImageView(mContext);
        imgMezi.setImageResource(mData[position]);         //创建一个ImageView
        imgMezi.setScaleType(ImageView.ScaleType.FIT_XY);      //设置imgView的缩放类型
        imgMezi.setLayoutParams(new Gallery.LayoutParams(250, 250));    //为imgView设置布局参数
        TypedArray typedArray = mContext.obtainStyledAttributes(R.styleable.Gallery);
        imgMezi.setBackgroundResource(typedArray.getResourceId(R.styleable.Gallery_android_galleryItemBackground, 0));
        return imgMezi;
    }
}
마지막으로 활동에 도달합니다. 이 활동도 매우 간단합니다. 버튼을 클릭하면 현재 선택된 이벤트입니다. 위치가 다음 페이지로 넘어갑니다!
MainActivity.java:
public class MainActivity extends AppCompatActivity implements AdapterView.OnItemSelectedListener,
        View.OnClickListener {

    private Context mContext;
    private ImageView img_choose;
    private Button btn_choose;
    private Gallery gay_choose;
    private int index = 0;
    private MeiziAdapter mAdapter = null;
    private int[] imageIds = new int[]
            {
                    R.mipmap.pre1, R.mipmap.pre2, R.mipmap.pre3, R.mipmap.pre4,
                    R.mipmap.pre5, R.mipmap.pre6, R.mipmap.pre7, R.mipmap.pre8,
                    R.mipmap.pre9, R.mipmap.pre10, R.mipmap.pre11, R.mipmap.pre12,
                    R.mipmap.pre13, R.mipmap.pre14, R.mipmap.pre15, R.mipmap.pre16,
                    R.mipmap.pre17, R.mipmap.pre18, R.mipmap.pre19, R.mipmap.pre20,
                    R.mipmap.pre21
            };

    @Override
    protected void onCreate(Bundle savedInstanceState) {
        super.onCreate(savedInstanceState);
        setContentView(R.layout.activity_main);
        mContext = MainActivity.this;
        bindViews();
    }

    private void bindViews() {
        img_choose = (ImageView) findViewById(R.id.img_choose);
        btn_choose = (Button) findViewById(R.id.btn_choose);
        gay_choose = (Gallery) findViewById(R.id.gay_choose);


        mAdapter = new MeiziAdapter(mContext, imageIds);
        gay_choose.setAdapter(mAdapter);
        gay_choose.setOnItemSelectedListener(this);
        btn_choose.setOnClickListener(this);

    }


    @Override
    public void onItemSelected(AdapterView<?> parent, View view, int position, long id) {
        img_choose.setImageResource(imageIds[position]);
        index = position;
    }

    @Override
    public void onNothingSelected(AdapterView<?> parent) {
    }

    @Override
    public void onClick(View v) {
        Intent it = new Intent(mContext,CaClothes.class);
        Bundle bundle = new Bundle();
        bundle.putCharSequence("num", Integer.toString(index));
        it.putExtras(bundle);
        startActivity(it);
    }
}
소녀의 옷을 닦아내는 페이지는 상대적으로 간단합니다. FrameLayout과 앞뒤에 두 개의 ImageView가 있습니다.
activity_caclothes.xml:
<?xml version="1.0" encoding="utf-8"?>
<FrameLayout xmlns:android="http://schemas.android.com/apk/res/android"
    android:layout_width="match_parent"
    android:layout_height="match_parent">

    <ImageView
        android:id="@+id/img_after"
        android:layout_width="wrap_content"
        android:layout_height="wrap_content" />

    <ImageView
        android:id="@+id/img_before"
        android:layout_width="wrap_content"
        android:layout_height="wrap_content" />

</FrameLayout>
그런 다음 다음으로 이동합니다. Java 코드 부분:
CaClothes.java:
/**
 * Created by Jay on 2015/10/16 0016.
 */
public class CaClothes extends AppCompatActivity implements View.OnTouchListener {

    private ImageView img_after;
    private ImageView img_before;
    private Bitmap alterBitmap;
    private Canvas canvas;
    private Paint paint;
    private Bitmap after;
    private Bitmap before;
    private int position;

    int[] imageIds1 = new int[]
            {
                    R.mipmap.pre1, R.mipmap.pre2, R.mipmap.pre3, R.mipmap.pre4,
                    R.mipmap.pre5, R.mipmap.pre6, R.mipmap.pre7, R.mipmap.pre8,
                    R.mipmap.pre9, R.mipmap.pre10, R.mipmap.pre11, R.mipmap.pre12,
                    R.mipmap.pre13, R.mipmap.pre14, R.mipmap.pre15, R.mipmap.pre16,
                    R.mipmap.pre17, R.mipmap.pre18, R.mipmap.pre19, R.mipmap.pre20,
                    R.mipmap.pre21
            };


    int[] imageIds2 = new int[]
            {
                    R.mipmap.after1, R.mipmap.after2, R.mipmap.after3, R.mipmap.after4,
                    R.mipmap.after5, R.mipmap.after6, R.mipmap.after7, R.mipmap.after8,
                    R.mipmap.after9, R.mipmap.after10, R.mipmap.after11, R.mipmap.after12,
                    R.mipmap.after13, R.mipmap.after14, R.mipmap.after15, R.mipmap.after16,
                    R.mipmap.after17, R.mipmap.after18, R.mipmap.after19, R.mipmap.after20,
                    R.mipmap.after21
            };


    @Override
    public void onCreate(Bundle savedInstanceState) {
        super.onCreate(savedInstanceState);
        setContentView(R.layout.activity_caclothes);

        Bundle bd = getIntent().getExtras();
        position = Integer.parseInt(bd.getString("num"));
        bindViews();

    }

    private void bindViews() {
        img_after = (ImageView) findViewById(R.id.img_after);
        img_before = (ImageView) findViewById(R.id.img_before);


        BitmapFactory.Options opts = new BitmapFactory.Options();
        opts.inSampleSize = 1;
        after = BitmapFactory.decodeResource(getResources(), imageIds2[position], opts);
        before = BitmapFactory.decodeResource(getResources(), imageIds1[position], opts);
        //定义出来的是只读图片

        alterBitmap = Bitmap.createBitmap(before.getWidth(), before.getHeight(), Bitmap.Config.ARGB_4444);
        canvas = new Canvas(alterBitmap);
        paint = new Paint();
        paint.setStrokeCap(Paint.Cap.ROUND);
        paint.setStrokeJoin(Paint.Join.ROUND);
        paint.setStrokeWidth(5);
        paint.setColor(Color.BLACK);
        paint.setAntiAlias(true);
        canvas.drawBitmap(before, new Matrix(), paint);
        img_after.setImageBitmap(after);
        img_before.setImageBitmap(before);
        img_before.setOnTouchListener(this);
    }

    @Override
    public boolean onTouch(View v, MotionEvent event) {
        switch (event.getAction()) {
            case MotionEvent.ACTION_DOWN:
                break;
            case MotionEvent.ACTION_MOVE:
                int newX = (int) event.getX();
                int newY = (int) event.getY();
                //setPixel方法是将某一个像素点设置成一个颜色,而这里我们把他设置成透明
                //另外通过嵌套for循环将手指触摸区域的20*20个像素点设置为透明
                for (int i = -20; i < 20; i++) {
                    for (int j = -20; j < 20; j++) {
                        if (i + newX >= 0 && j + newY >= 0 && i + newX < before.getWidth() && j + newY < before.getHeight())
                            alterBitmap.setPixel(i + newX, j + newY, Color.TRANSPARENT);
                    }
                }
                img_before.setImageBitmap(alterBitmap);
                break;
        }
        return true;
    }
}
코드는 이해하기 어렵지 않지만 여전히 비교적 간단합니다. 렌더링을 너무 많이 보지 마십시오. 나선형 규칙... ..
3. 코드 샘플 다운로드:
DrawDemo1.zip 프로젝트는 20M가 넘는 비교적 규모가 크고 그림 리소스도 많습니다~
요약 섹션:
좋아요. 이 섹션에서는 그림에 대한 두 가지 작은 예를 썼는데, 꽤 흥미롭네요. 아름다운 여성복은 어디에 게시하실 건가요? 제거되면 블록 형태로 나오죠. 그렇죠? 다음 섹션에서는 여러 개의 PorterDuff에 대해 알아 보겠습니다. 이 코드와 비교하면 더 많은 예제를 작성해 보겠습니다. 또한 시간 제약으로 인해 코드가 최적화되지 않았습니다. 아니면 정리하고, 필요에 따라 수정해도 됩니다~알겠습니다. 모두 행복한 주말 보내세요~


