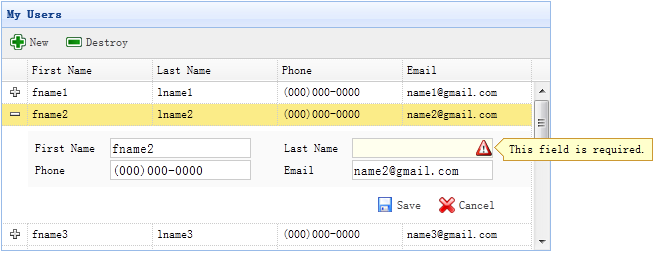
jEasyUI 양식용 CRUD 애플리케이션
DataGrid 보기를 'detailview'로 전환하면 사용자는 행을 확장하여 행 아래에 일부 행 세부 정보를 표시할 수 있습니다. 이 기능을 사용하면 세부 정보 패널에서 양식을 편집하는 데 적합한 레이아웃을 제공할 수 있습니다. 이 튜토리얼에서는 DataGrid 구성 요소를 사용하여 편집 양식이 차지하는 공간을 줄입니다.

1단계: HTML 태그에 데이터 그리드(DataGrid) 정의
<table id="dg" title="My Users" style="width:550px;height:250px"
		url="get_users.php"
		toolbar="#toolbar"
		fitColumns="true" singleSelect="true">
	<thead>
		<tr>
			<th field="firstname" width="50">First Name</th>
			<th field="lastname" width="50">Last Name</th>
			<th field="phone" width="50">Phone</th>
			<th field="email" width="50">Email</th>
		</tr>
	</thead>
</table>
<div id="toolbar">
	<a href="#" class="easyui-linkbutton" iconCls="icon-add" plain="true" onclick="newItem()">New</a>
	<a href="#" class="easyui-linkbutton" iconCls="icon-remove" plain="true" onclick="destroyItem()">Destroy</a>
</div>
2단계: 데이터 그리드(DataGrid)에 상세 뷰 적용
$('#dg').datagrid({
	view: detailview,
	detailFormatter:function(index,row){
		return '<div class="ddv"></div>';
	},
	onExpandRow: function(index,row){
		var ddv = $(this).datagrid('getRowDetail',index).find('div.ddv');
		ddv.panel({
			border:false,
			cache:true,
			href:'show_form.php?index='+index,
			onLoad:function(){
				$('#dg').datagrid('fixDetailRowHeight',index);
				$('#dg').datagrid('selectRow',index);
				$('#dg').datagrid('getRowDetail',index).find('form').form('load',row);
			}
		});
		$('#dg').datagrid('fixDetailRowHeight',index);
	}
});
데이터 그리드에 상세 뷰를 적용하려면 (DataGrid), html 페이지 헤드에 'datagrid-detailview.js' 파일을 추가합니다.
'detailFormatter' 함수를 사용하여 행 세부정보를 생성합니다. 이 경우 편집 양식이 포함된 빈 <div> 사용자가 행 확장 버튼('+')을 클릭하면 'onExpandRow' 이벤트가 트리거되고 ajax를 통해 편집 양식(form)이 로드됩니다. 행 세부 정보 패널을 찾을 수 있도록 'getRowDetail' 메서드를 호출하여 행 세부 정보 컨테이너를 가져옵니다. 행 세부사항에 패널을 생성하고 'show_form.php'에서 반환된 편집 양식을 로드합니다.
3단계: 편집 양식(Form) 만들기
편집 양식(form)이 서버에서 로드됩니다.
<form method="post">
	<table class="dv-table" style="width:100%;background:#fafafa;padding:5px;margin-top:5px;">
		<tr>
			<td>First Name</td>
			<td><input name="firstname" class="easyui-validatebox" required="true"></input></td>
			<td>Last Name</td>
			<td><input name="lastname" class="easyui-validatebox" required="true"></input></td>
		</tr>
		<tr>
			<td>Phone</td>
			<td><input name="phone"></input></td>
			<td>Email</td>
			<td><input name="email" class="easyui-validatebox" validType="email"></input></td>
		</tr>
	</table>
	<div style="padding:5px 0;text-align:right;padding-right:30px">
		<a href="#" class="easyui-linkbutton" iconCls="icon-save" plain="true" onclick="saveItem(<?php echo $_REQUEST['index'];?>)">Save</a>
		<a href="#" class="easyui-linkbutton" iconCls="icon-cancel" plain="true" onclick="cancelItem(<?php echo $_REQUEST['index'];?>)">Cancel</a>
	</div>
</form>
4단계: 편집 내용 저장 또는 취소
사용자를 저장하려면 'saveItem' 기능을 호출하고, 편집을 취소하려면 'cancelItem' 기능을 호출하세요.
function saveItem(index){
	var row = $('#dg').datagrid('getRows')[index];
	var url = row.isNewRecord ? 'save_user.php' : 'update_user.php?id='+row.id;
	$('#dg').datagrid('getRowDetail',index).find('form').form('submit',{
		url: url,
		onSubmit: function(){
			return $(this).form('validate');
		},
		success: function(data){
			data = eval('('+data+')');
			data.isNewRecord = false;
			$('#dg').datagrid('collapseRow',index);
			$('#dg').datagrid('updateRow',{
				index: index,
				row: data
			});
		}
	});
}
다시 게시할 URL을 결정한 다음 양식 개체를 찾고 'submit' 메서드를 호출하여 양식 데이터를 제출합니다. 데이터가 성공적으로 저장되면 행 데이터가 축소되고 업데이트됩니다.
function cancelItem(index){
	var row = $('#dg').datagrid('getRows')[index];
	if (row.isNewRecord){
		$('#dg').datagrid('deleteRow',index);
	} else {
		$('#dg').datagrid('collapseRow',index);
	}
}
편집 작업을 취소할 때 해당 줄이 새 줄이고 저장되지 않은 경우 해당 줄을 직접 삭제하고, 그렇지 않으면 줄을 축소하세요.


