


오늘은 alsotang의 크롤러 튜토리얼을 배우고, CNode의 간단한 크롤링을 따라해보겠습니다.
craelr-demo 프로젝트 만들기
먼저 Express 프로젝트를 생성한 후, 당분간 웹에 콘텐츠를 표시할 필요가 없기 때문에 app.js 파일의 모든 콘텐츠를 삭제합니다. 물론 빈 폴더에서 직접 npm install express 필요한 Express 기능을 사용할 수도 있습니다.
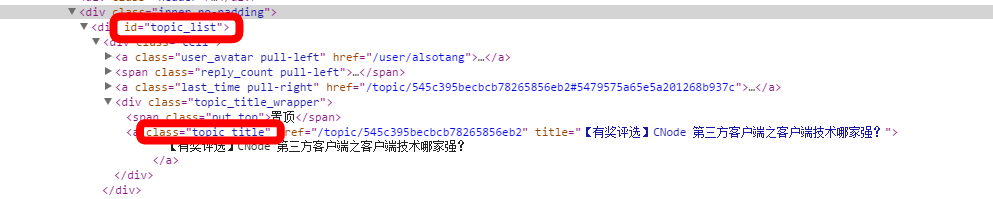
타겟사이트 분석
그림에 표시된 것처럼 이는 CNode 홈페이지에 있는 div 태그의 일부입니다. 이 일련의 ID와 클래스를 사용하여 필요한 정보를 찾습니다.
슈퍼에이전트를 사용하여 소스 데이터 획득
superagent는 ajax API에서 사용하는 Http 라이브러리입니다. 사용법은 jQuery와 유사합니다. 이를 통해 get 요청을 시작하고 결과를 콜백 함수에 출력합니다.
var express = require('express');
var url = require('url'); //파싱 작업 url
var superagent = require('superagent'); //이 세 가지 외부 종속성에 대해 npm install
을 잊지 마세요. var Cherio = require('cheerio');
var eventproxy = require('eventproxy');
var targetUrl = 'https://cnodejs.org/';
superagent.get(targetUrl)
.end(함수(err, res) {
console.log(res);
});
res 결과는 대상 URL 정보를 포함하는 객체이며, 웹사이트 콘텐츠는 주로 텍스트(문자열)로 구성됩니다.
cherio를 사용하여 구문 분석
cheerio는 먼저 .load()를 사용하여 HTML을 로드한 다음 CSS 선택기를 통해 요소를 필터링합니다.
var $ =cherio.load(res.text);
//CSS 선택기를 통해 데이터 필터링
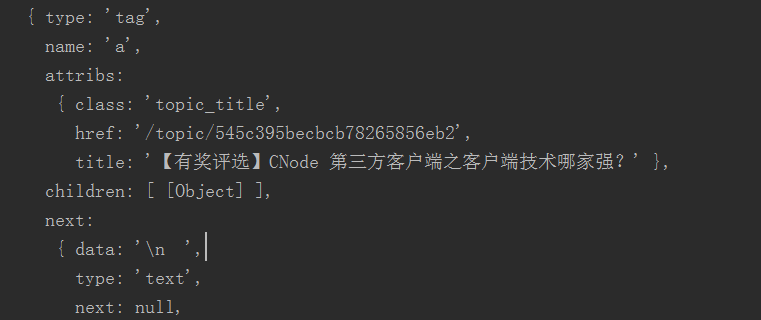
$('#topic_list .topic_title').each(함수 (idx, 요소) {
console.log(요소);
});
결과는 개체입니다. .each(function(index, element)) 함수를 호출하여 각 개체를 탐색하고 HTML DOM 요소를 반환합니다.
console.log($element.attr('title'));을 출력한 결과는 广州 2014年12月06日 NodeParty 之 UC 场
입니다.
console.log($element.attr('href')); 같은 제목은 /topic/545c395becbcb78265856eb2 같은 URL로 출력됩니다. 그런 다음 NodeJS1의 url.resolve() 함수를 사용하여 완전한 URL을 완성합니다.
superagent.get(tUrl)
.end(함수(err, res) {
만약 (오류) {
return console.error(err);
}
var topicUrls = [];
var $ =cherio.load(res.text);
//홈페이지의 모든 링크 가져오기
$('#topic_list .topic_title').each(함수 (idx, 요소) {
var $element = $(요소);
var href = url.resolve(tUrl, $element.attr('href'));
console.log(href);
//topicUrls.push(href);
});
});
eventproxy를 사용하여 각 주제의 콘텐츠를 동시에 크롤링
튜토리얼에서는 깊게 중첩된(직렬) 메서드와 카운터 메서드의 예를 보여줍니다. Eventproxy는 이벤트(병렬) 메서드를 사용하여 이 문제를 해결합니다. 모든 크롤링이 완료되면 eventproxy가 이벤트 메시지를 수신하고 자동으로 처리 기능을 호출합니다.
//1단계: eventproxy 인스턴스 가져오기
var ep = 새 이벤트 프록시();
//2단계: 이벤트 수신을 위한 콜백 함수를 정의합니다.
//After 메소드는 반복 모니터링
//params: 이벤트명(String) 이벤트명, times(Number) 청취횟수, 콜백 콜백함수
ep.after('topic_html', topicUrls.length, function(topics){
// topic은 ep.emit('topic_html', pair)의 40개 쌍
을 40번 포함하는 배열입니다. //.지도
주제 = topic.map(function(topicPair){
//cherio 사용
var topicUrl = topicPair[0];
var topicHtml = topicPair[1];
var $ =cherio.load(topicHtml);
반품({
제목: $('.topic_full_title').text().trim(),
href: topicUrl,
댓글 1: $('.reply_content').eq(0).text().trim()
});
});
//결과
console.log('결과:');
console.log(주제);
});
//3단계: 이벤트 메시지를 해제하는
결정 topicUrls.forEach(함수 (topicUrl) {
Superagent.get(topicUrl)
.end(함수 (err, res) {
console.log('fetch ' topicUrl '성공');
ep.emit('topic_html', [topicUrl, res.text]);
});
});
결과는 다음과 같습니다

연장훈련(챌린지)
메시지 사용자 이름 및 포인트 받기

기사 페이지의 소스 코드에 댓글을 남긴 사용자의 클래스 이름을 찾으세요. 클래스 이름은 reply_author입니다. console.log $('.reply_author').get(0)의 첫 번째 요소에서 볼 수 있듯이 우리가 얻어야 할 모든 것이 여기에 있습니다.

먼저 기사를 크롤링하여 필요한 모든 것을 한 번에 가져오겠습니다.
var userHref = url.resolve(tUrl, $('.reply_author').get(0).attribs.href);
console.log(userHref);
console.log($('.reply_author').get(0).children[0].data);
https://cnodejs.org/user/username
$('.reply_author').each(함수 (idx, 요소) {
var $element = $(요소);
console.log($element.attr('href'));
});
사용자 정보 페이지 $('.big').text().trim()에 포인트 정보가 있습니다.
cherio의 함수 .get(0)을 사용하여 첫 번째 요소를 가져옵니다.
var userHref = url.resolve(tUrl, $('.reply_author').get(0).attribs.href);
console.log(userHref);
기사 1개를 캡쳐한 것인데 아직 수정해야 할 내용이 40개나 있습니다.

 브라우저 너머 : 실제 세계의 JavaScriptApr 12, 2025 am 12:06 AM
실제 세계에서 JavaScript의 응용 프로그램에는 서버 측 프로그래밍, 모바일 애플리케이션 개발 및 사물 인터넷 제어가 포함됩니다. 1. 서버 측 프로그래밍은 Node.js를 통해 실현되며 동시 요청 처리에 적합합니다. 2. 모바일 애플리케이션 개발은 재교육을 통해 수행되며 크로스 플랫폼 배포를 지원합니다. 3. Johnny-Five 라이브러리를 통한 IoT 장치 제어에 사용되며 하드웨어 상호 작용에 적합합니다.
 Next.js (백엔드 통합)로 멀티 테넌트 SAAS 애플리케이션 구축Apr 11, 2025 am 08:23 AM
일상적인 기술 도구를 사용하여 기능적 다중 테넌트 SaaS 응용 프로그램 (Edtech 앱)을 구축했으며 동일한 작업을 수행 할 수 있습니다. 먼저, 다중 테넌트 SaaS 응용 프로그램은 무엇입니까? 멀티 테넌트 SAAS 응용 프로그램은 노래에서 여러 고객에게 서비스를 제공 할 수 있습니다.
 Next.js (Frontend Integration)를 사용하여 멀티 테넌트 SaaS 응용 프로그램을 구축하는 방법Apr 11, 2025 am 08:22 AM
이 기사에서는 Contrim에 의해 확보 된 백엔드와의 프론트 엔드 통합을 보여 주며 Next.js를 사용하여 기능적인 Edtech SaaS 응용 프로그램을 구축합니다. Frontend는 UI 가시성을 제어하기 위해 사용자 권한을 가져오고 API가 역할 기반을 준수하도록합니다.
 JavaScript : 웹 언어의 다양성 탐색Apr 11, 2025 am 12:01 AM
JavaScript는 현대 웹 개발의 핵심 언어이며 다양성과 유연성에 널리 사용됩니다. 1) 프론트 엔드 개발 : DOM 운영 및 최신 프레임 워크 (예 : React, Vue.js, Angular)를 통해 동적 웹 페이지 및 단일 페이지 응용 프로그램을 구축합니다. 2) 서버 측 개발 : Node.js는 비 차단 I/O 모델을 사용하여 높은 동시성 및 실시간 응용 프로그램을 처리합니다. 3) 모바일 및 데스크탑 애플리케이션 개발 : 크로스 플랫폼 개발은 개발 효율을 향상시키기 위해 반응 및 전자를 통해 실현됩니다.
 JavaScript의 진화 : 현재 동향과 미래 전망Apr 10, 2025 am 09:33 AM
JavaScript의 최신 트렌드에는 Typescript의 Rise, 현대 프레임 워크 및 라이브러리의 인기 및 WebAssembly의 적용이 포함됩니다. 향후 전망은보다 강력한 유형 시스템, 서버 측 JavaScript 개발, 인공 지능 및 기계 학습의 확장, IoT 및 Edge 컴퓨팅의 잠재력을 포함합니다.
 Demystifying JavaScript : 그것이하는 일과 중요한 이유Apr 09, 2025 am 12:07 AM
JavaScript는 현대 웹 개발의 초석이며 주요 기능에는 이벤트 중심 프로그래밍, 동적 컨텐츠 생성 및 비동기 프로그래밍이 포함됩니다. 1) 이벤트 중심 프로그래밍을 사용하면 사용자 작업에 따라 웹 페이지가 동적으로 변경 될 수 있습니다. 2) 동적 컨텐츠 생성을 사용하면 조건에 따라 페이지 컨텐츠를 조정할 수 있습니다. 3) 비동기 프로그래밍은 사용자 인터페이스가 차단되지 않도록합니다. JavaScript는 웹 상호 작용, 단일 페이지 응용 프로그램 및 서버 측 개발에 널리 사용되며 사용자 경험 및 크로스 플랫폼 개발의 유연성을 크게 향상시킵니다.
 Python 또는 JavaScript가 더 좋습니까?Apr 06, 2025 am 12:14 AM
Python은 데이터 과학 및 기계 학습에 더 적합한 반면 JavaScript는 프론트 엔드 및 풀 스택 개발에 더 적합합니다. 1. Python은 간결한 구문 및 풍부한 라이브러리 생태계로 유명하며 데이터 분석 및 웹 개발에 적합합니다. 2. JavaScript는 프론트 엔드 개발의 핵심입니다. Node.js는 서버 측 프로그래밍을 지원하며 풀 스택 개발에 적합합니다.
 JavaScript를 어떻게 설치합니까?Apr 05, 2025 am 12:16 AM
JavaScript는 이미 최신 브라우저에 내장되어 있기 때문에 설치가 필요하지 않습니다. 시작하려면 텍스트 편집기와 브라우저 만 있으면됩니다. 1) 브라우저 환경에서 태그를 통해 HTML 파일을 포함하여 실행하십시오. 2) Node.js 환경에서 Node.js를 다운로드하고 설치 한 후 명령 줄을 통해 JavaScript 파일을 실행하십시오.


핫 AI 도구

Undresser.AI Undress
사실적인 누드 사진을 만들기 위한 AI 기반 앱

AI Clothes Remover
사진에서 옷을 제거하는 온라인 AI 도구입니다.

Undress AI Tool
무료로 이미지를 벗다

Clothoff.io
AI 옷 제거제

AI Hentai Generator
AI Hentai를 무료로 생성하십시오.

인기 기사
뜨거운 도구

Atom Editor Mac 버전 다운로드
가장 인기 있는 오픈 소스 편집기

ZendStudio 13.5.1 맥
강력한 PHP 통합 개발 환경

DVWA
DVWA(Damn Vulnerable Web App)는 매우 취약한 PHP/MySQL 웹 애플리케이션입니다. 주요 목표는 보안 전문가가 법적 환경에서 자신의 기술과 도구를 테스트하고, 웹 개발자가 웹 응용 프로그램 보안 프로세스를 더 잘 이해할 수 있도록 돕고, 교사/학생이 교실 환경 웹 응용 프로그램에서 가르치고 배울 수 있도록 돕는 것입니다. 보안. DVWA의 목표는 다양한 난이도의 간단하고 간단한 인터페이스를 통해 가장 일반적인 웹 취약점 중 일부를 연습하는 것입니다. 이 소프트웨어는

WebStorm Mac 버전
유용한 JavaScript 개발 도구

안전한 시험 브라우저
안전한 시험 브라우저는 온라인 시험을 안전하게 치르기 위한 보안 브라우저 환경입니다. 이 소프트웨어는 모든 컴퓨터를 안전한 워크스테이션으로 바꿔줍니다. 이는 모든 유틸리티에 대한 액세스를 제어하고 학생들이 승인되지 않은 리소스를 사용하는 것을 방지합니다.

