사용자 정의 데이터세트에 OpenAI CLIP 구현
- WBOYWBOYWBOYWBOYWBOYWBOYWBOYWBOYWBOYWBOYWBOYWBOYWB앞으로
- 2023-09-14 11:57:04887검색
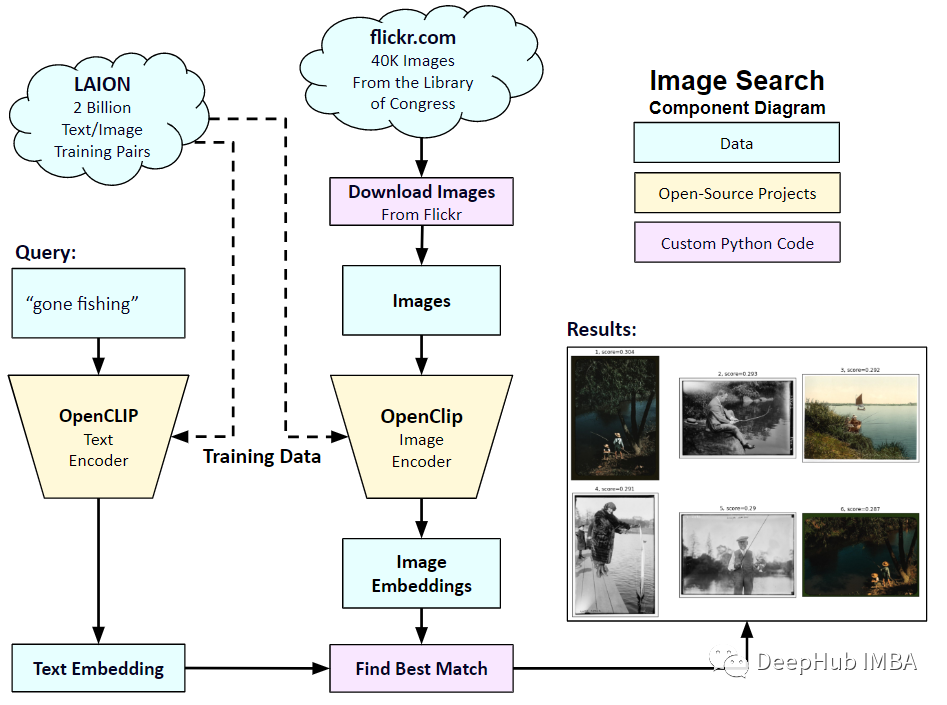
2021년 1월 OpenAI는 DALL-E와 CLIP이라는 두 가지 새로운 모델을 발표했습니다. 두 모델 모두 어떤 방식으로든 텍스트와 이미지를 연결하는 다중 모드 모델입니다. CLIP의 정식 명칭은 Contrastive Language-Image Pre-training으로, 대조되는 텍스트-이미지 쌍을 기반으로 하는 사전 학습 방법입니다. CLIP을 소개하는 이유는 무엇인가요? 현재 인기 있는 Stable Diffusion은 단일 모델이 아닌 여러 모델로 구성되어 있기 때문입니다. 핵심 구성 요소 중 하나는 사용자의 텍스트 입력을 인코딩하는 데 사용되는 텍스트 인코더이며, 이 텍스트 인코더는 CLIP 모델의 텍스트 인코더입니다
CLIP 모델이 학습되면 입력 문장을 제공할 수 있습니다. 을 클릭하고 가장 관련성이 높은 이미지를 추출하세요. CLIP은 완전한 문장과 그것이 설명하는 이미지 사이의 관계를 학습합니다. 즉, "자동차", "개" 등과 같은 개별 범주가 아닌 완전한 문장에 대해 훈련됩니다. 이는 애플리케이션에 매우 중요합니다. 완전한 문구에 대해 훈련을 받으면 모델은 더 많은 것을 학습하고 사진과 텍스트 사이의 패턴을 인식할 수 있습니다. 그들은 또한 사진과 해당 문장으로 구성된 대규모 데이터 세트를 훈련할 때 모델이 분류기로 작동한다는 것을 보여주었습니다. CLIP이 출시되었을 때 아무런 미세 조정(zero-shot) 없이 미세 조정한 후 ImageNet 데이터 세트에 대한 분류 성능이 ResNets-50을 능가하여 매우 유용하다는 것을 의미합니다.

이 기사에서는 PyTorch를 사용하여 CLIP 모델을 처음부터 구현하여 CLIP을 더 잘 이해할 수 있도록 하겠습니다.
여기에서는 timm 및 Transformers, Let's 2개의 라이브러리를 사용해야 합니다. 먼저 코드를 가져옵니다
import os import cv2 import gc import numpy as np import pandas as pd import itertools from tqdm.autonotebook import tqdm import albumentations as A import matplotlib.pyplot as plt import torch from torch import nn import torch.nn.functional as F import timm from transformers import DistilBertModel, DistilBertConfig, DistilBertTokenizer
다음 단계는 데이터 및 일반 구성 구성을 전처리하는 것입니다. config는 모든 하이퍼파라미터를 넣는 일반적인 Python 파일입니다. Jupyter Notebook을 사용하는 경우 Notebook 시작 부분에 정의된 클래스입니다.
class CFG:debug = Falseimage_path = "../input/flickr-image-dataset/flickr30k_images/flickr30k_images"captions_path = "."batch_size = 32num_workers = 4head_lr = 1e-3image_encoder_lr = 1e-4text_encoder_lr = 1e-5weight_decay = 1e-3patience = 1factor = 0.8epochs = 2device = torch.device("cuda" if torch.cuda.is_available() else "cpu") model_name = 'resnet50'image_embedding = 2048text_encoder_model = "distilbert-base-uncased"text_embedding = 768text_tokenizer = "distilbert-base-uncased"max_length = 200 pretrained = True # for both image encoder and text encodertrainable = True # for both image encoder and text encodertemperature = 1.0 # image sizesize = 224 # for projection head; used for both image and text encodersnum_projection_layers = 1projection_dim = 256 dropout = 0.1
맞춤 표시기를 위한 도우미 클래스도 있습니다
class AvgMeter:def __init__(self, name="Metric"):self.name = nameself.reset() def reset(self):self.avg, self.sum, self.count = [0] * 3 def update(self, val, count=1):self.count += countself.sum += val * countself.avg = self.sum / self.count def __repr__(self):text = f"{self.name}: {self.avg:.4f}"return text def get_lr(optimizer):for param_group in optimizer.param_groups:return param_group["lr"]
우리의 목표는 이미지와 문장을 설명하는 것입니다. 따라서 데이터 세트는 문장과 이미지를 모두 반환해야 합니다. 따라서 DistilBERT 태거를 사용하여 문장(제목)에 태그를 지정한 다음 태그 ID(input_ids)와 어텐션 마스크를 DistilBERT에 제공해야 합니다. DistilBERT는 BERT 모델보다 작지만 모델 결과가 비슷하므로 사용하기로 결정했습니다.
다음 단계는 HuggingFace 토크나이저를 사용하여 토큰화하는 것입니다. __init__에서 얻은 토크나이저 객체는 모델이 실행될 때 로드됩니다. 제목은 미리 결정된 최대 길이로 채워지고 잘립니다. 관련 이미지를 로드하기 전에 input_ids 및 attention_mask 키가 있는 사전인 __getitem__에 인코딩된 캡션을 로드하여 변환하고 보강합니다(있는 경우). 그런 다음 이를 텐서로 변환하고 "이미지"를 키로 사용하여 사전에 저장합니다. 마지막으로 제목의 원문을 키워드 "제목"과 함께 사전에 입력합니다.
class CLIPDataset(torch.utils.data.Dataset):def __init__(self, image_filenames, captions, tokenizer, transforms):"""image_filenames and cpations must have the same length; so, if there aremultiple captions for each image, the image_filenames must have repetitivefile names """ self.image_filenames = image_filenamesself.captions = list(captions)self.encoded_captions = tokenizer(list(captions), padding=True, truncatinotallow=True, max_length=CFG.max_length)self.transforms = transforms def __getitem__(self, idx):item = {key: torch.tensor(values[idx])for key, values in self.encoded_captions.items()} image = cv2.imread(f"{CFG.image_path}/{self.image_filenames[idx]}")image = cv2.cvtColor(image, cv2.COLOR_BGR2RGB)image = self.transforms(image=image)['image']item['image'] = torch.tensor(image).permute(2, 0, 1).float()item['caption'] = self.captions[idx] return item def __len__(self):return len(self.captions) def get_transforms(mode="train"):if mode == "train":return A.Compose([A.Resize(CFG.size, CFG.size, always_apply=True),A.Normalize(max_pixel_value=255.0, always_apply=True),])else:return A.Compose([A.Resize(CFG.size, CFG.size, always_apply=True),A.Normalize(max_pixel_value=255.0, always_apply=True),])
이미지 및 텍스트 인코더: ResNet50을 이미지 인코더로 사용하겠습니다.
class ImageEncoder(nn.Module):"""Encode images to a fixed size vector""" def __init__(self, model_name=CFG.model_name, pretrained=CFG.pretrained, trainable=CFG.trainable):super().__init__()self.model = timm.create_model(model_name, pretrained, num_classes=0, global_pool="avg")for p in self.model.parameters():p.requires_grad = trainable def forward(self, x):return self.model(x)
DistilBERT를 텍스트 인코더로 사용하세요. CLS 토큰의 최종 표현을 사용하여 문장의 전체 표현을 얻습니다.
class TextEncoder(nn.Module):def __init__(self, model_name=CFG.text_encoder_model, pretrained=CFG.pretrained, trainable=CFG.trainable):super().__init__()if pretrained:self.model = DistilBertModel.from_pretrained(model_name)else:self.model = DistilBertModel(cnotallow=DistilBertConfig()) for p in self.model.parameters():p.requires_grad = trainable # we are using the CLS token hidden representation as the sentence's embeddingself.target_token_idx = 0 def forward(self, input_ids, attention_mask):output = self.model(input_ids=input_ids, attention_mask=attention_mask)last_hidden_state = output.last_hidden_statereturn last_hidden_state[:, self.target_token_idx, :]
위 코드는 이미지와 텍스트를 고정 크기 벡터(이미지 2048, 텍스트 768)로 인코딩했습니다. 비교할 수 있으려면 이미지와 텍스트의 크기가 비슷해야 하므로 2048 차원과 768개 차원 벡터 256개 차원(projection_dim)에 투영되며 차원이 동일한 경우에만 비교할 수 있습니다.
class ProjectionHead(nn.Module):def __init__(self,embedding_dim,projection_dim=CFG.projection_dim,dropout=CFG.dropout):super().__init__()self.projection = nn.Linear(embedding_dim, projection_dim)self.gelu = nn.GELU()self.fc = nn.Linear(projection_dim, projection_dim)self.dropout = nn.Dropout(dropout)self.layer_norm = nn.LayerNorm(projection_dim) def forward(self, x):projected = self.projection(x)x = self.gelu(projected)x = self.fc(x)x = self.dropout(x)x = x + projectedx = self.layer_norm(x)return x
최종 CLIP 모델은 다음과 같습니다.
class CLIPModel(nn.Module):def __init__(self,temperature=CFG.temperature,image_embedding=CFG.image_embedding,text_embedding=CFG.text_embedding,):super().__init__()self.image_encoder = ImageEncoder()self.text_encoder = TextEncoder()self.image_projection = ProjectionHead(embedding_dim=image_embedding)self.text_projection = ProjectionHead(embedding_dim=text_embedding)self.temperature = temperature def forward(self, batch):# Getting Image and Text Featuresimage_features = self.image_encoder(batch["image"])text_features = self.text_encoder(input_ids=batch["input_ids"], attention_mask=batch["attention_mask"])# Getting Image and Text Embeddings (with same dimension)image_embeddings = self.image_projection(image_features)text_embeddings = self.text_projection(text_features) # Calculating the Losslogits = (text_embeddings @ image_embeddings.T) / self.temperatureimages_similarity = image_embeddings @ image_embeddings.Ttexts_similarity = text_embeddings @ text_embeddings.Ttargets = F.softmax((images_similarity + texts_similarity) / 2 * self.temperature, dim=-1)texts_loss = cross_entropy(logits, targets, reductinotallow='none')images_loss = cross_entropy(logits.T, targets.T, reductinotallow='none')loss = (images_loss + texts_loss) / 2.0 # shape: (batch_size)return loss.mean() #这里还加了一个交叉熵函数 def cross_entropy(preds, targets, reductinotallow='none'):log_softmax = nn.LogSoftmax(dim=-1)loss = (-targets * log_softmax(preds)).sum(1)if reduction == "none":return losselif reduction == "mean":return loss.mean()
CLIP은 대칭 교차 엔트로피를 손실 함수로 사용하므로 노이즈의 영향을 줄이고 모델의 견고성을 향상시킬 수 있다는 점을 여기서 설명해야 합니다. 단순화를 위해 교차 엔트로피만 사용합니다.
테스트할 수 있습니다:
# A simple Example batch_size = 4 dim = 256 embeddings = torch.randn(batch_size, dim) out = embeddings @ embeddings.T print(F.softmax(out, dim=-1))
다음 단계는 교육 및 검증 데이터 로더를 로드하는 데 도움이 될 수 있는 몇 가지 기능입니다.
def make_train_valid_dfs():dataframe = pd.read_csv(f"{CFG.captions_path}/captions.csv")max_id = dataframe["id"].max() + 1 if not CFG.debug else 100image_ids = np.arange(0, max_id)np.random.seed(42)valid_ids = np.random.choice(image_ids, size=int(0.2 * len(image_ids)), replace=False)train_ids = [id_ for id_ in image_ids if id_ not in valid_ids]train_dataframe = dataframe[dataframe["id"].isin(train_ids)].reset_index(drop=True)valid_dataframe = dataframe[dataframe["id"].isin(valid_ids)].reset_index(drop=True)return train_dataframe, valid_dataframe def build_loaders(dataframe, tokenizer, mode):transforms = get_transforms(mode=mode)dataset = CLIPDataset(dataframe["image"].values,dataframe["caption"].values,tokenizer=tokenizer,transforms=transforms,)dataloader = torch.utils.data.DataLoader(dataset,batch_size=CFG.batch_size,num_workers=CFG.num_workers,shuffle=True if mode == "train" else False,)return dataloader
다음은 교육 및 평가입니다
def train_epoch(model, train_loader, optimizer, lr_scheduler, step):loss_meter = AvgMeter()tqdm_object = tqdm(train_loader, total=len(train_loader))for batch in tqdm_object:batch = {k: v.to(CFG.device) for k, v in batch.items() if k != "caption"}loss = model(batch)optimizer.zero_grad()loss.backward()optimizer.step()if step == "batch":lr_scheduler.step() count = batch["image"].size(0)loss_meter.update(loss.item(), count) tqdm_object.set_postfix(train_loss=loss_meter.avg, lr=get_lr(optimizer))return loss_meter def valid_epoch(model, valid_loader):loss_meter = AvgMeter() tqdm_object = tqdm(valid_loader, total=len(valid_loader))for batch in tqdm_object:batch = {k: v.to(CFG.device) for k, v in batch.items() if k != "caption"}loss = model(batch) count = batch["image"].size(0)loss_meter.update(loss.item(), count) tqdm_object.set_postfix(valid_loss=loss_meter.avg)return loss_meter
마지막으로 통합되었습니다. 그게 전부입니다
def main():train_df, valid_df = make_train_valid_dfs()tokenizer = DistilBertTokenizer.from_pretrained(CFG.text_tokenizer)train_loader = build_loaders(train_df, tokenizer, mode="train")valid_loader = build_loaders(valid_df, tokenizer, mode="valid") model = CLIPModel().to(CFG.device)params = [{"params": model.image_encoder.parameters(), "lr": CFG.image_encoder_lr},{"params": model.text_encoder.parameters(), "lr": CFG.text_encoder_lr},{"params": itertools.chain(model.image_projection.parameters(), model.text_projection.parameters()), "lr": CFG.head_lr, "weight_decay": CFG.weight_decay}]optimizer = torch.optim.AdamW(params, weight_decay=0.)lr_scheduler = torch.optim.lr_scheduler.ReduceLROnPlateau(optimizer, mode="min", patience=CFG.patience, factor=CFG.factor)step = "epoch" best_loss = float('inf')for epoch in range(CFG.epochs):print(f"Epoch: {epoch + 1}")model.train()train_loss = train_epoch(model, train_loader, optimizer, lr_scheduler, step)model.eval()with torch.no_grad():valid_loss = valid_epoch(model, valid_loader) if valid_loss.avg <p><span>앱: 이미지 삽입을 받고 일치하는 항목을 찾습니다. </span></p><p><span>교육을 마친 후 실제로 어떻게 적용하나요? 훈련된 모델을 로드하고, 검증 세트의 이미지를 제공하고, 모델 자체의 모양(valid_set_size, 256)과 image_embeddings를 반환하는 함수를 작성해야 합니다. </span></p><pre class="brush:php;toolbar:false">def get_image_embeddings(valid_df, model_path):tokenizer = DistilBertTokenizer.from_pretrained(CFG.text_tokenizer)valid_loader = build_loaders(valid_df, tokenizer, mode="valid") model = CLIPModel().to(CFG.device)model.load_state_dict(torch.load(model_path, map_locatinotallow=CFG.device))model.eval() valid_image_embeddings = []with torch.no_grad():for batch in tqdm(valid_loader):image_features = model.image_encoder(batch["image"].to(CFG.device))image_embeddings = model.image_projection(image_features)valid_image_embeddings.append(image_embeddings)return model, torch.cat(valid_image_embeddings) _, valid_df = make_train_valid_dfs() model, image_embeddings = get_image_embeddings(valid_df, "best.pt") def find_matches(model, image_embeddings, query, image_filenames, n=9):tokenizer = DistilBertTokenizer.from_pretrained(CFG.text_tokenizer)encoded_query = tokenizer([query])batch = {key: torch.tensor(values).to(CFG.device)for key, values in encoded_query.items()}with torch.no_grad():text_features = model.text_encoder(input_ids=batch["input_ids"], attention_mask=batch["attention_mask"])text_embeddings = model.text_projection(text_features) image_embeddings_n = F.normalize(image_embeddings, p=2, dim=-1)text_embeddings_n = F.normalize(text_embeddings, p=2, dim=-1)dot_similarity = text_embeddings_n @ image_embeddings_n.T values, indices = torch.topk(dot_similarity.squeeze(0), n * 5)matches = [image_filenames[idx] for idx in indices[::5]] _, axes = plt.subplots(3, 3, figsize=(10, 10))for match, ax in zip(matches, axes.flatten()):image = cv2.imread(f"{CFG.image_path}/{match}")image = cv2.cvtColor(image, cv2.COLOR_BGR2RGB)ax.imshow(image)ax.axis("off") plt.show()의 호출 방법은 다음과 같습니다.
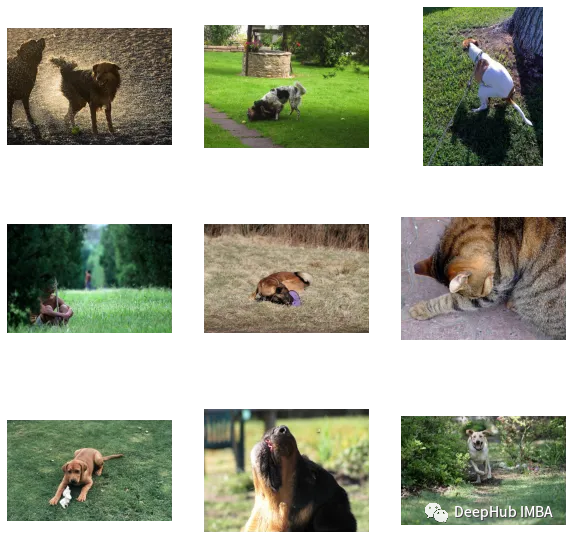
find_matches(model, image_embeddings,query="one dog sitting on the grass",image_filenames=valid_df['image'].values,n=9)

커스터마이징 효과가 좋은 것을 알 수 있습니다(근데 사진에는 고양이가 있습니다 ㅎㅎ). 즉, CLIP 방식은 작은 데이터 세트에도 커스터마이징이 가능합니다
다음은 이 글의 코드와 데이터 세트입니다:
https://www.kaggle.com/code/jyotidabas/simple -openai-클립 구현
위 내용은 사용자 정의 데이터세트에 OpenAI CLIP 구현의 상세 내용입니다. 자세한 내용은 PHP 중국어 웹사이트의 기타 관련 기사를 참조하세요!

