
jQuery 기술을 사용하여 iOS 스타일 페이지 탐색을 개발하는 방법

- WBOYWBOYWBOYWBOYWBOYWBOYWBOYWBOYWBOYWBOYWBOYWBOYWB원래의
- 2016-05-16 15:48:131031검색
렌더링:
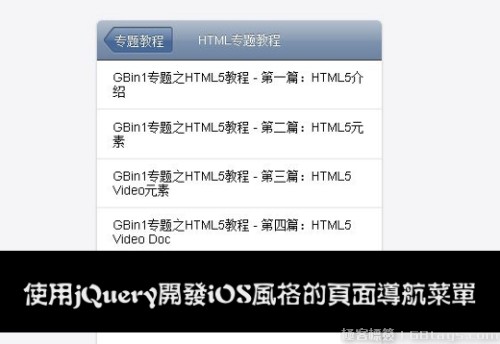

IOS 스타일의 운영 체제와 탐색 방법이 시장에서 점점 더 인기를 얻고 있습니다. 오늘의 jQuery 튜토리얼에서는 iPhone 스타일의 메뉴 탐색을 생성하는 방법을 소개합니다.
HTML 코드
우리는 삽입된 25edfb22a4f469ecb59f1190150159c6를 사용하여 다음과 같이 메뉴 콘텐츠를 c787b9a589a3ece771e842a6176cf8e9
<nav>
<h1>导航菜单</h1>
<ul>
<li>
<h2>专题教程</h2>
<ul>
<li>
<h3>HTML专题教程</h3>
<ul>
<li><a href="http://www.gbin1.com/tutorials/html5-tutorial/html5-introduction">GBin1专题之HTML5教程 - 第一篇:HTML5介绍</a></li>
<li><a href="http://www.gbin1.com/tutorials/html5-tutorial/html5-new-elements">GBin1专题之HTML5教程 - 第二篇:HTML5元素</a></li>
<li><a href="http://www.gbin1.com/tutorials/html5-tutorial/html5-video">GBin1专题之HTML5教程 - 第三篇:HTML5 Video元素</a></li>
<li><a href="http://www.gbin1.com/tutorials/html5-tutorial/html5-video-doc">GBin1专题之HTML5教程 - 第四篇:HTML5 Video Doc</a></li>
<li><a href="http://www.gbin1.com/tutorials/html5-tutorial/html5-audio">GBin1专题之HTML5教程 - 第五篇:HTML5 Audio元素</a></li>
</ul>
<li>
<h3>GBin1热点秀</h3>
<ul>
<li><a href="http://www.gbin1.com/tutorials/hotspot/hotspot1/">GBin1专题之Web热点秀#1</a>
<li><a href="http://www.gbin1.com/tutorials/hotspot/hotspot2/">GBin1专题之Web热点秀#2</a>
<li><a href="http://www.gbin1.com/tutorials/hotspot/hotspot3/">GBin1专题之Web热点秀#3</a>
</ul>

</ul>
자바스크립트
$(function(){

var nav = $("nav"),
navTitle = nav.children().first(),
navTitleLabel = navTitle.text(),
mainList = navTitle.next(),
subLevels = mainList.find("ul"),
hiddenClass = "hidden";

nav.addClass("js");
mainList.find("a:last-child").addClass("files");
subLevels.addClass(hiddenClass);

navTitle.wrap($("<div/>")).before($("<a/>", {
href: "#",
className: hiddenClass,
click: function(e){
var $this = $(this),
activeList = subLevels.filter(":visible:last"),
activeListParents = activeList.parents("ul");
navTitle.text($this.text());
if(activeListParents.length > 2)
$this.text(activeListParents.eq(1).prev().text());
else if (activeListParents.length > 1)
$this.text(navTitleLabel)
else
$this.addClass(hiddenClass).empty();
setTimeout(
function(){
activeList.addClass(hiddenClass);
}, slideDuration - 100
);
mainList.css("left", parseInt(mainList.css("left")) + navWidth + "px");
e.preventDefault();
}
}));

subLevels.prev().wrap($("<a/>", {
href:"#",
click: function(e){
var $this = $(this);
backArrow.removeClass(hiddenClass).text(navTitle.text());
navTitle.text($this.text());
$this.next().removeClass(hiddenClass);
mainList.css("left", parseInt(mainList.css("left")) - navWidth + "px");
e.preventDefault();
}
}));

var backArrow = navTitle.prev(),
navWidth = nav.width(),
firstSubLevel = subLevels.eq(0),
docStyle = document.documentElement.style,
slideDuration = 0,
timingRatio = 1000;

if(docStyle.WebkitTransition !== undefined)
slideDuration = parseFloat(
firstSubLevel.css("-webkit-transition-duration")
) * timingRatio;

if(docStyle.MozTransition !== undefined)
slideDuration = parseFloat(
firstSubLevel.css("-moz-transition-duration")
) * timingRatio;

if(docStyle.OTransition !== undefined)
slideDuration = parseFloat(
firstSubLevel.css("-o-transition-duration")
) * timingRatio;

});
CSS
body {
font-size: 14px;
font-family: Arial;
background:#f5f5f8;
}
.js {
position:absolute;
width:320px;
height:480px;
top:50%;
left:50%;
margin:-280px 0 0 -160px;
overflow:hidden;
-webkit-border-radius:5px;
-moz-border-radius:5px;
border-radius:5px;
background:#fff;
-webkit-box-shadow:0 1px 2px rgba(0,0,0,.25);
-moz-box-shadow:0 1px 2px rgba(0,0,0,.25);
box-shadow:0 1px 2px rgba(0,0,0,.25);
}
.js .files {
background-image:none;
}
.js .hidden {
display:none;
}
.js * {
font-size:14px;
font-weight:400;
margin:0;
padding:0;
list-style:none;
}
.js > div {
position:relative;
z-index:1;
height:44px;
text-align:center;
font-size:14px;
line-height:44px;
color:#fff;
text-shadow:0 -1px 0 rgba(0,0,0,.4);
background:#7f94b0;
background:-webkit-gradient(
linear,
0 0,
0 100%,
color-stop(0,#b5c0ce),
color-stop(0.5,#889bb3),
color-stop(0.51,#7f94b0),
color-stop(1,#6d83a1)
);
background:-moz-linear-gradient(
top center,
#b5c0ce,
#889bb3 22px,
#7f94b0 23px,
#6d83a1
);
border-bottom:1px solid #2d3033;
-webkit-border-top-left-radius:5px;
-webkit-border-top-right-radius:5px;
-moz-border-radius-topleft:5px;
-moz-border-radius-topright:5px;
border-top-left-radius:5px;
border-top-right-radius:5px;
}
.js > div a {
height:31px;
top:7px;
left:20px;
font-size:14px;
line-height:31px;
color:#fff;
background:url('../images//center.png');
}
.js > div a, .js > div a:before, .js > div a:after {
position:absolute;
}
.js > div a:before {
left:-13px;
content:url('../images//left.png');
}
.js > div a:after {
right:-10px;
top:0;
content:url('../images//right.png');
}
.js > div a:active {
opacity:.65;
}
.js a {
text-decoration:none;
}
.js ul a {
display:block;
color:#000;
padding:.8em 18px;
border-bottom:1px solid #e0e0e0;
background:url('images/next.png') no-repeat 94% 50%;
}
.js ul a:hover {
background-color:#edf3fe;
}
.js a:focus {
outline:none;
}
.js ul {
position:absolute;
top:0;
padding-top:45px;
width:100%;
-webkit-transition:left .4s ease-out;
-moz-transition:left .4s ease-out;
-o-transition:left .4s ease-out;
}
.js ul {
left:0;
}
.js ul ul {
left:320px;
}
성명:
본 글의 내용은 네티즌들의 자발적인 기여로 작성되었으며, 저작권은 원저작자에게 있습니다. 본 사이트는 이에 상응하는 법적 책임을 지지 않습니다. 표절이나 침해가 의심되는 콘텐츠를 발견한 경우 admin@php.cn으로 문의하세요.