
Twitter OAuth 애플리케이션 빌드

- 王林원래의
- 2023-08-27 20:33:041014검색
OAuth는 처음에는 이해하기 어려운 개념일 수 있지만, 이제 Twitter API를 사용해야 하므로 Twitter 애플리케이션을 만들기 전에 먼저 OAuth를 이해해야 합니다. 이 튜토리얼에서는 OAuth를 소개하고 기본 애플리케이션을 만드는 과정을 안내합니다.
소개
이 튜토리얼에서는 사용자가 자신의 트위터 아바타에 다양한 효과를 적용할 수 있는 간단한 애플리케이션을 구축하겠습니다. Twitter API를 사용하려면 OAuth를 사용하여 애플리케이션이 사용자를 대신하여 요청하도록 승인해야 합니다.
지원 절차는 다음과 같습니다:
- 시스템에서 사용자에게 Twitter에 연결하도록 요청합니다.
- 시스템은 사용자가 선택할 수 있도록 미리보기 아바타 목록을 표시합니다.
- 선택 후 사용자는 비교를 위해 원래 아바타와 새 아바타를 보여주는 확인 화면을 보게 됩니다. 사용자는 트윗을 보내도록 선택할 수도 있습니다.
- 사용자가 확인하면 앱은 수정된 아바타를 생성하고 이를 트위터에 업로드하고 성공 페이지를 표시합니다.
설정
먼저 소스 디렉터리를 설정해야 합니다. 모든 이미지에는 lib 目录来存放我们的 PHP 库(类)文件,一个 tmp 目录来保存临时文件(这需要服务器可写),一个 css 目录来存放我们的样式表,以及一个 img 디렉토리가 필요합니다.
디렉토리 트리는 다음과 같아야 합니다.
- 튜토리얼
- CSS
- 사진
- lib
- tmp(쓰기 가능)
애플리케이션 등록
OAuth를 사용하려면 애플리케이션을 식별하기 위한 소비자 키와 비밀이 필요합니다. 이 정보를 얻으려면 아래 단계에 따라 Twitter에 애플리케이션을 등록해야 합니다.
등록 페이지로 이동하여 필요한 경우 로그인하세요. 다음과 같은 양식이 표시됩니다.
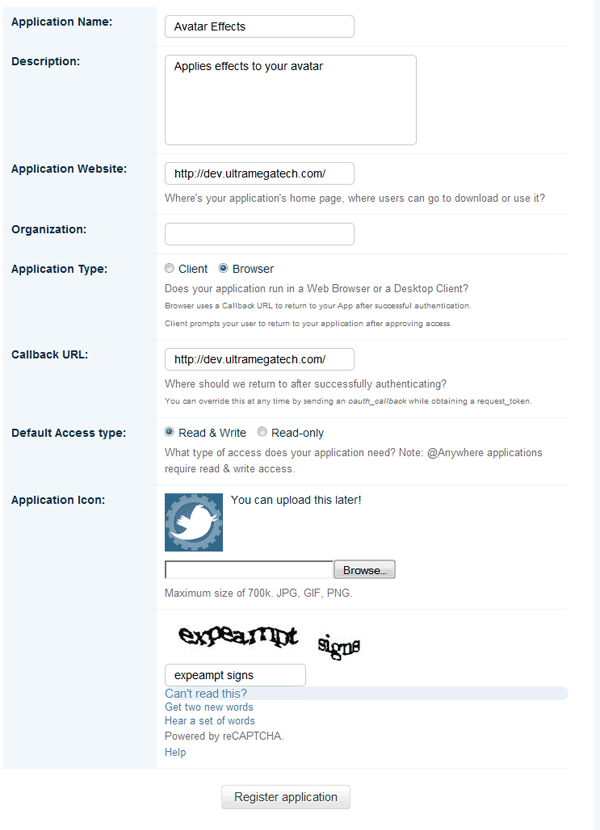


지원서와 관련된 세부정보를 양식에 입력하세요. 우리의 경우 application type은 browser이고 기본 콜백 URL을 설정해야 합니다. URL은 유효한 형식이라면 무엇이든 가능합니다. 실제 URL인지 여부는 중요하지 않도록 코드에서 콜백을 다시 작성하겠습니다. 편의상 기본 액세스 유형은 읽기 및 쓰기여야 합니다.
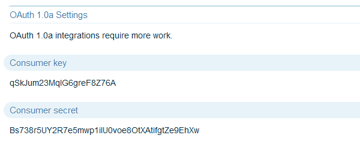
등록하고 약관에 동의하면 새 애플리케이션에 대한 정보가 표시됩니다. 우리에게 필요한 중요한 세부정보는 Consumer Key 및 Consumer Secret이며 다음과 같습니다.


tmhOAuth 라이브러리 다운로드
우리는 라이브러리를 활용하여 OAuth 요청의 모든 세부 사항을 처리할 것입니다. 이 튜토리얼에서는 파일 업로드를 지원하는 @themattharris의 tmhOAuth 라이브러리를 사용합니다.
- GitHub에서 tmhOAuth를 다운로드하세요
- 앞에서 생성한 lib 디렉토리에 tmhOAuth.php 를 추출합니다.
인증
OAuth 인증은 기본적으로 3단계 프로세스입니다. 더 자세한 설명은 Twitter의 인증 페이지를 참조하세요. 요약은 다음과 같습니다.
- 앱이 요청 토큰을 얻습니다. 첫 번째 단계는 앱이 소비자 키를 사용하여 트위터에 자신을 식별하고 요청 토큰을 얻는 것입니다. 나중에 사용할 수 있도록 이 요청 토큰을 저장해야 합니다.
- 사용자가 Twitter에서 앱 승인: 이제 사용자는 자신의 계정에 대한 앱 액세스 권한을 부여하기 위해 Twitter로 전송되어야 합니다. 그러면 사용자는 애플리케이션에서 지정한 콜백 URL로 다시 전송됩니다.
- 앱은 요청 토큰을 액세스 토큰으로 교환합니다. 이제 앱이 승인되었으므로 1단계의 요청 토큰을 액세스 토큰으로 교환할 수 있습니다. 액세스 토큰을 얻은 후 우리 애플리케이션은 사용자를 대신하여 Twitter API와 자유롭게 상호 작용할 수 있습니다.
그럼 코드 작성을 시작해 보겠습니다. TwitterApp 的类中处理所有身份验证任务。在名为 lib/TwitterApp.php라는 새 파일에서 다음 코드를 시작하겠습니다.
여기서 세 가지 속성과 간단한 생성자를 만듭니다. $tmhOAuth 属性将是一个 tmhOAuth 对象,它将在整个类中使用。 $userdata 属性将保存一个包含用户信息的对象,例如他们的 Twitter 用户名和状态。 $state 현재 인증 상태를 추적하는 속성입니다.
생성자는 단순히 tmhOAuth 개체를 수락하고 이를 $tmhOAuth 속성에 할당합니다.
1단계: 요청 토큰 받기
요청 토큰을 얻는 방법은 다음과 같습니다.
으아악첫 번째 부분을 이해하려면 tmhOAuth::request()방법을 이해해야 합니다. 이 방법을 사용하면 OAuth 지원 HTTP 요청을 할 수 있으며 다음과 같이 사용할 수 있습니다:
tmhOAuth::request($method, $url[, $params[, $useauth[, $multipart]]])
-
string $method- 사용할 요청 방법(GET, POST 등) -
string $url- 방문할 URL -
array $params(선택 사항) - 요청에 포함할 매개변수의 연관 배열 -
bool $useauth(선택, 기본값은 true) - 인증이 필요한가요? -
bool $multipart(선택 사항, 기본값은 false) - 파일 업로드가 true로 설정됨
$url 参数,我们使用 tmhOAuth::url() 메소드의 경우 호출한 API 메소드를 기반으로 URL을 생성합니다.
tmhOAuth::url($request[, $format])
-
string $request- API 메서드(확장 없음) -
string $format(선택 사항, 기본값은 'json") - 원하는 응답 형식(JSON, XML 등)
이제 메소드에 익숙해졌으므로 oauth/request_token API 메소드에 POST 요청을 보내야 합니다. 이는 OAuth 데이터를 특별한 형식으로 반환하므로 tmhOAuth::url() 方法时,需要将格式设置为空白。我们还需要传递一个名为 oauth_callback 的变量,这是用户在 Twitter 授权后将返回的位置。我们将使用 tmhOAuth::php_self() 메서드를 사용하여 현재 페이지를 참조할 때입니다. 코드는 다음과 같습니다:
요청을 하면 응답은 tmhOAuth::response 속성에 다음과 같은 주요 데이터가 포함된 배열로 저장됩니다.
-
code- HTTP 응답 코드 -
response- 실제 반환된 데이터 -
headers- 응답 헤더
그래서 코드의 다음 부분에서는 응답 코드(성공의 경우 200)를 확인한 다음 수신한 oauth_token 和 oauth_token_secret 放入会话变量中,因为稍后我们将需要它们。这些是使用 tmhOAuth::extract_params() 方法从响应数据中提取的,该方法返回响应中包含的数据数组。我们还设置了 authstate 세션 변수를 전달하여 인증의 다음 단계에 있음을 나타냅니다. 코드는 다음과 같습니다.
이 작업이 완료되면 이제 GET 매개변수의 oauth_token를 포함하여 사용자를 oauth/authorize URL로 리디렉션해야 합니다. 코드는 다음과 같습니다:
2단계: 액세스 토큰 받기
요청 토큰을 액세스 토큰으로 교환하는 방법은 다음과 같습니다.
으아악가장 먼저 해야 할 일은 앞서 얻은 요청 토큰에 tmhOAuth::config 数组中的 user_token 和 user_secret를 설정하는 것입니다.
다음 부분은 oauth/access_token에 POST 요청을 하는 부분입니다. 이 요청에서는 GET 변수에서 받은 oauth_verifier를 매개변수로 전달합니다.
트위터는 액세스 토큰과 비밀번호로 응답할 것이며 향후 요청을 위해 이 토큰을 저장해야 합니다. 따라서 다음 코드 조각에서는 이를 가져와 각 콘텐츠를 쿠키에 저장한 다음 상태를 2로 설정합니다.
으아악최종 리디렉션은 트위터에서 남긴 URL 매개변수를 지우고 쿠키가 적용되도록 허용하는 것입니다.
3단계: 액세스 토큰 확인
액세스 토큰을 받은 후에는 그것이 유효한지 확인해야 합니다. 방법은 다음과 같습니다:
으아악이제 이 코드는 익숙해 보일 것입니다. 여기서 우리가 하는 일은 설정user_token 和 user_secret하고 1/account/verify_credentials에 GET 요청을 하는 것뿐입니다. Twitter가 200 코드로 응답하면 액세스 토큰이 유효한 것입니다.
주의해야 할 또 다른 세부 사항은 이 Twitter 요청에서 반환된 데이터를 여기에 채우고 $userdata 属性。数据是JSON格式的,所以我们使用json_decode()이를 PHP 개체로 변환한다는 것입니다. 이게 또 그 대사예요:
4단계: 모두 함께 묶음
OAuth 구성요소가 준비되었으면 이제 모든 것을 하나로 모을 시간입니다. 클라이언트 코드가 인증 프로세스를 시작할 수 있도록 하려면 다음과 같이 공개 방법이 필요합니다.
/**
 * Authenticate user with Twitter
 *
 * @return bool Authentication successful
 */
public function auth() {

    // state 1 requires a GET variable to exist
    if($this->state == 1 && !isset($_GET["oauth_verifier"])) {
        $this->state = 0;
    }

    // Step 1: Get a request token
    if($this->state == 0) {
        return $this->getRequestToken();
    }
    // Step 2: Get an access token
    elseif($this->state == 1) {
        return $this->getAccessToken();
    }

    // Step 3: Verify the access token
    return $this->verifyAccessToken();
}
大多数 auth() 方法应该是不言自明的。根据状态,它执行该阶段的身份验证的适当方法。如果状态为 1,则 oauth_verifier GET 变量应该存在,因此该方法也会检查该变量。
我们现在应该创建一个公共方法来确定我们是否通过了身份验证。如果状态为 2,则 isAuthed() 方法返回 true:
/**
 * Check the current state of authentication
 *
 * @return bool True if state is 2 (authenticated)
 */
public function isAuthed() {
    return $this->state == 2;
}
我们还可以使用一种方法来删除用户的身份验证。此 endSession() 方法将状态设置为 0 并删除包含访问令牌的 cookie:
/**
 * Remove user's access token cookies
 */
public function endSession() {
    $this->state = 0;
    $_SESSION["authstate"] = 0;
    setcookie("access_token", "", 0);
    setcookie("access_token_secret", "", 0);
}
初始化
现在我们需要向 __construct() 方法添加一些内容,以确定应用程序在初始化时处于哪种身份验证状态。另外,由于我们的代码使用会话变量,因此我们应该确保会话是使用以下代码启动的:
// start a session if one does not exist
if(!session_id()) {
    session_start();
}
下一部分是我们确定状态的地方。状态从0开始;如果设置了包含访问令牌的 cookie,则状态假定为 2;如果失败,状态将设置为 authstate 会话变量(如果存在)。这是代码:
// determine the authentication status
// default to 0
$this->state = 0;
// 2 (authenticated) if the cookies are set
if(isset($_COOKIE["access_token"], $_COOKIE["access_token_secret"])) {
    $this->state = 2;
}
// otherwise use value stored in session
elseif(isset($_SESSION["authstate"])) {
    $this->state = (int)$_SESSION["authstate"];
}
如果状态为 1,则表示我们正在进行身份验证。所以我们现在可以继续这个过程:
// if we are in the process of authentication we continue
if($this->state == 1) {
    $this->auth();
}
如果状态为2,我们应该验证访问令牌。如果身份验证失败,此代码将清除 cookie 并重置状态:
// verify authentication, clearing cookies if it fails
elseif($this->state == 2 && !$this->auth()) {
    $this->endSession();
}
这是进行了这些更改的新构造函数:
/**
 * Initialize a new TwitterApp object
 *
 * @param tmhOAuth $tmhOAuth A tmhOAuth object with consumer key and secret
 */
public function  __construct(tmhOAuth $tmhOAuth) {

    // save the tmhOAuth object
    $this->tmhOAuth = $tmhOAuth;

    // start a session if one does not exist
    if(!session_id()) {
        session_start();
    }

    // determine the authentication status
    // default to 0
    $this->state = 0;
    // 2 (authenticated) if the cookies are set
    if(isset($_COOKIE["access_token"], $_COOKIE["access_token_secret"])) {
        $this->state = 2;
    }
    // otherwise use value stored in session
    elseif(isset($_SESSION["authstate"])) {
    $this->state = (int)$_SESSION["authstate"];
    }

    // if we are in the process of authentication we continue
    if($this->state == 1) {
        $this->auth();
    }
    // verify authentication, clearing cookies if it fails
    elseif($this->state == 2 && !$this->auth()) {
        $this->endSession();
    }
}
发送推文
现在所有授权代码都已完成,我们可以向我们的类添加一些常用功能。以下是通过 Twitter API 发送推文的方法:
/**
 * Send a tweet on the user's behalf
 *
 * @param string $text Text to tweet
 * @return bool Tweet successfully sent
 */
public function sendTweet($text) {

    // limit the string to 140 characters
    $text = substr($text, 0, 140);

    // POST the text to the statuses/update method
    $this->tmhOAuth->request("POST", $this->tmhOAuth->url("1/statuses/update"), array(
        'status' => $text
    ));

    return ($this->tmhOAuth->response["code"] == 200);
}
sendTweet() 方法接受一个字符串,将其限制为 140 个字符,然后在 POST 请求中将其发送到 1/statuses/update。这种模式现在应该非常熟悉了。
完整的 TwitterApp 类
<?php
class TwitterApp {

    /**
     * This variable holds the tmhOAuth object used throughout the class
     *
     * @var tmhOAuth An object of the tmhOAuth class
     */
    public $tmhOAuth;

    /**
     * User's Twitter account data
     *
     * @var array Information on the current authenticated user
     */
    public $userdata;

    /**
     * Authentication state
     *
     * Values:
     *  - 0: not authed
     *  - 1: Request token obtained
     *  - 2: Access token obtained (authed)
     *
     * @var int The current state of authentication
     */
    protected $state;

    /**
     * Initialize a new TwitterApp object
     *
     * @param tmhOAuth $tmhOAuth A tmhOAuth object with consumer key and secret
     */
    public function  __construct(tmhOAuth $tmhOAuth) {

        // save the tmhOAuth object
        $this->tmhOAuth = $tmhOAuth;

        // start a session if one does not exist
        if(!session_id()) {
            session_start();
        }

        // determine the authentication status
        // default to 0
        $this->state = 0;
        // 2 (authenticated) if the cookies are set
        if(isset($_COOKIE["access_token"], $_COOKIE["access_token_secret"])) {
            $this->state = 2;
        }
        // otherwise use value stored in session
        elseif(isset($_SESSION["authstate"])) {
            $this->state = (int)$_SESSION["authstate"];
        }

        // if we are in the process of authentication we continue
        if($this->state == 1) {
            $this->auth();
        }
        // verify authentication, clearing cookies if it fails
        elseif($this->state == 2 && !$this->auth()) {
            $this->endSession();
        }
    }

    /**
     * Authenticate user with Twitter
     *
     * @return bool Authentication successful
     */
    public function auth() {

        // state 1 requires a GET variable to exist
        if($this->state == 1 && !isset($_GET["oauth_verifier"])) {
            $this->state = 0;
        }

        // Step 1: Get a request token
        if($this->state == 0) {
            return $this->getRequestToken();
        }
        // Step 2: Get an access token

        elseif($this->state == 1) {
            return $this->getAccessToken();
        }

        // Step 3: Verify the access token
        return $this->verifyAccessToken();
    }

    /**
     * Obtain a request token from Twitter
     *
     * @return bool False if request failed
     */
    private function getRequestToken() {

        // send request for a request token
        $this->tmhOAuth->request("POST", $this->tmhOAuth->url("oauth/request_token", ""), array(
            // pass a variable to set the callback
            'oauth_callback'    => $this->tmhOAuth->php_self()
        ));

        if($this->tmhOAuth->response["code"] == 200) {

            // get and store the request token
            $response = $this->tmhOAuth->extract_params($this->tmhOAuth->response["response"]);
            $_SESSION["authtoken"] = $response["oauth_token"];
            $_SESSION["authsecret"] = $response["oauth_token_secret"];

            // state is now 1
            $_SESSION["authstate"] = 1;

            // redirect the user to Twitter to authorize
            $url = $this->tmhOAuth->url("oauth/authorize", "") . '?oauth_token=' . $response["oauth_token"];
            header("Location: ' . $url);
            exit;
        }
        return false;
    }

    /**
     * Obtain an access token from Twitter
     *
     * @return bool False if request failed
     */
    private function getAccessToken() {

        // set the request token and secret we have stored
        $this->tmhOAuth->config["user_token"] = $_SESSION["authtoken"];
        $this->tmhOAuth->config["user_secret"] = $_SESSION["authsecret"];

        // send request for an access token
        $this->tmhOAuth->request("POST", $this->tmhOAuth->url("oauth/access_token", ""), array(
            // pass the oauth_verifier received from Twitter
            'oauth_verifier'    => $_GET["oauth_verifier"]
        ));

        if($this->tmhOAuth->response["code"] == 200) {

            // get the access token and store it in a cookie
            $response = $this->tmhOAuth->extract_params($this->tmhOAuth->response["response"]);
            setcookie("access_token", $response["oauth_token"], time()+3600*24*30);
            setcookie("access_token_secret", $response["oauth_token_secret"], time()+3600*24*30);

            // state is now 2
            $_SESSION["authstate"] = 2;

            // redirect user to clear leftover GET variables
            header("Location: ' . $this->tmhOAuth->php_self());
            exit;
        }
        return false;
    }

    /**
     * Verify the validity of our access token
     *
     * @return bool Access token verified
     */
    private function verifyAccessToken() {
        $this->tmhOAuth->config["user_token"] = $_COOKIE["access_token"];
        $this->tmhOAuth->config["user_secret"] = $_COOKIE["access_token_secret"];

        // send verification request to test access key
        $this->tmhOAuth->request("GET", $this->tmhOAuth->url("1/account/verify_credentials"));

        // store the user data returned from the API
        $this->userdata = json_decode($this->tmhOAuth->response["response"]);

        // HTTP 200 means we were successful
        return ($this->tmhOAuth->response["code"] == 200);
    }

    /**
     * Check the current state of authentication
     *
     * @return bool True if state is 2 (authenticated)
     */
    public function isAuthed() {
        return $this->state == 2;
    }

    /**
     * Remove user's access token cookies
     */
    public function endSession() {
        $this->state = 0;
        $_SESSION["authstate"] = 0;
        setcookie("access_token", "", 0);
        setcookie("access_token_secret", "", 0);
    }

    /**
     * Send a tweet on the user's behalf
     *
     * @param string $text Text to tweet
     * @return bool Tweet successfully sent
     */
    public function sendTweet($text) {

        // limit the string to 140 characters
        $text = substr($text, 0, 140);

        // POST the text to the statuses/update method
        $this->tmhOAuth->request("POST", $this->tmhOAuth->url("1/statuses/update"), array(
            'status' => $text
        ));

        return ($this->tmhOAuth->response["code"] == 200);
    }
}
我们的应用
现在我们有了一个处理所有 OAuth 任务的类,我们现在可以使用特定于我们的应用程序的功能来扩展它。这包括获取、更改和设置用户头像的能力。
我们将使用 TwitterAvatars 类扩展 TwitterApp 类。在名为 lib/TwitterAvatars.php 的新文件中开始以下代码:
<?php
class TwitterAvatars extends TwitterApp {

    /**
     * The path to our temporary files directory
     *
     * @var string Path to store image files
     */
    public $path;

    /**
     * These are all the GD image filters available in this class
     *
     * @var array Associative array of image filters
     */
    protected $filters = array(
        'grayscale'     => IMG_FILTER_GRAYSCALE,
        'negative'      => IMG_FILTER_NEGATE,
        'edgedetect'    => IMG_FILTER_EDGEDETECT,
        'embossed'      => IMG_FILTER_EMBOSS,
        'blurry'        => IMG_FILTER_GAUSSIAN_BLUR,
        'sketchy'       => IMG_FILTER_MEAN_REMOVAL
    );

    /**
     * Initialize a new TwitterAvatars object
     *
     * @param tmhOAuth $tmhOAuth A tmhOAuth object with consumer key and secret
     * @param string $path Path to store image files (default 'tmp")
     */
    public function  __construct(tmhOAuth $tmhOAuth, $path = 'tmp") {

        // call the parent class' constructor
        parent::__construct($tmhOAuth);

        // save the path variable
        $this->path = $path;
    }
}
正如你所看到的,扩展类包括一个 $path 属性,用于指向临时图像文件的位置,一个 $filters 属性,保存图像过滤器数组,以及一个带有要设置的参数的扩展构造函数路径。由于我们要重写原始构造函数,因此必须使用 parent::__construct() 显式调用父级构造函数。
现在我们可以开始添加我们的方法了。
下载
显然,我们需要能够下载图像才能操作它们。这是一个通用的 download() 方法,它接受 URL 并返回该位置的数据。该方法发出基本的 cURL 请求。
/**
 * Download data from specified URL
 *
 * @param string $url URL to download
 * @return string Downloaded data
 */
protected function download($url) {
    $ch = curl_init();
    curl_setopt($ch, CURLOPT_URL, $url);
    curl_setopt($ch, CURLOPT_RETURNTRANSFER, true);

    $ret = curl_exec($ch);
    curl_close($ch);

    return $ret;
}
查找 URL
现在我们可以下载文件了,我们需要找到所需文件的位置。我们感兴趣的是两种不同的图像,标准尺寸的缩略图和原始的全尺寸图像。因此,我们将创建一个方法来获取每个 URL。
为了获取标准尺寸的缩略图,我们将调用 users/profile_image/:screen_name API 方法,该方法通过 302 重定向响应指定用户的头像图像。这意味着 URL 将在 Location 标头中找到。这是该方法:
/**
 * Get the URL to the standard sized avatar
 *
 * @return string The URL to the image file
 */
protected function getImageURL() {

    // request user's 'bigger' profile image
    $this->tmhOAuth->request("GET", $this->tmhOAuth->url("1/users/profile_image/" . $this->userdata->screen_name), array(
        'screen_name'   => $this->userdata->screen_name,
        'size'          => 'bigger'
    ));

    if($this->tmhOAuth->response["code"] == 302) {

        // the direct URL is in the Location header
        return $this->tmhOAuth->response["headers"]["location"];
    }
    throw new Exception("Error locating image");
}
请注意,我们正在使用 tmhOAuth 发出 GET 请求,传递 screen_name 和 size 参数,然后返回 Location 标头的内容。
没有 API 方法可以获取完整尺寸的图像,因此对于下一个方法,我们将稍微作弊并编辑 URL。用户数据包含一个 profile_image_url 字段,该字段指向 avatar_normal.jpg 之类的内容,并且可以在 avatar.jpg 中找到不带后缀的原始图像。所以这个方法获取URL,去掉尺寸后缀并返回修改后的URL:
/**
 * Get the URL to the full sized avatar
 *
 * @return string The URL to the image file
 */
protected function getTwitter OAuth 애플리케이션 빌드ImageURL() {

    // get the regular sized avatar
    $url = $this->userdata->profile_image_url;

    // save the extension for later
    $ext = strrchr($url, '.");

    // strip the "_normal' suffix and add back the extension
    return substr($url, 0, strrpos($url, "_")) . $ext;
}
读取图像
现在我们可以找到并下载图像,我们需要一种方法来读取它们。我们将使用 GD 库来操作图像,因此此方法会将原始图像数据转换为 GD 图像资源。
/**
 * Convert raw image data to a GD resource
 *
 * @param string $data Binary image data to parse
 * @return resource A GD image resource identifier
 */
protected function readImage($data) {

    // read in the original image
    $src = imagecreatefromstring($data);

    if(!$src) {
        throw new Exception("Error reading image");
    }

    // get the dimensions
    $width = imagesx($src);
    $height = imagesy($src);

    // create a blank true color image of the same size
    $img = imagecreatetruecolor($width, $height);

    // copy the original image to this new canvas
    imagecopy($img, $src, 0, 0, 0, 0, $width, $height);

    // discard the source image
    imagedestroy($src);

    return $img;
}
描述上面发生的事情:
- 使用
imagecreatefromstring()函数将图像数据转换为 GD 资源。 - 使用
imagesx()和imagesy()记录图像尺寸。 - 使用
imagecreatetruecolor()创建具有相同尺寸的新空白真彩色图像。 - 使用
imagecopy()函数将原始图像复制到新图像中。无论原始颜色模式如何,这都会产生原始图像的真彩色版本。 - 使用
imagedestroy()销毁原始图像资源,并返回新图像的句柄。
保存图像
现在我们可以下载图像并创建 GD 资源,我们需要一种将图像保存到文件系统的方法。以下是使用 imagepng() 将提供的图像保存为具有指定名称的 PNG 文件的方法:
/**
 * Save a GD image resource to a PNG file
 *
 * @param resource $img GD image resource identifier
 * @param string $name Name of the image
 * @return string Path to the saved image
 */
protected function saveImage($img, $name) {
    $path = $this->path . "/' . $name . '.png';
    imagepng($img, $path);
    imagedestroy($img);
    return $path;
}
生成预览
现在我们已经拥有了为我们的应用程序提供支持的所有部分,我们可以开始将它们组合在一起。在我们的应用程序流程中,我们将为用户提供可供选择的预览选项。以下是生成这些预览的方法:
/**
 * Generate previews for each image filter
 *
 * @return array Associative array of image previews
 */
public function generatePreviews() {

    // we need valid user info to know whose avatar to handle
    if(!$this->isAuthed()) {
        throw new Exception("Requires oauth authorization");
    }
    $username = $this->userdata->screen_name;

    // cache the raw data to use
    $data = $this->download($this->getImageURL());

    // copy the original image
    $img = $this->readImage($data);
    $this->saveImage($img, $username . "_orig");

    // array to hold the list of previews
    $images = array();

    // loop through each filter to generate previews
    foreach($this->filters as $filter_name => $filter) {
        $img = $this->readImage($data);
        imagefilter($img, $filter);
        $images[$filter_name] = $this->saveImage($img, $username . "_' . $filter_name);
    }

    return $images;
}
我们要做的第一件事是检查用户是否已通过身份验证,然后获取用户名以便稍后在文件名中使用。
// we need valid user info to know whose avatar to handle
if(!$this->isAuthed()) {
    throw new Exception("Requires oauth authorization");
}
$username = $this->userdata->screen_name;
然后我们使用我们创建的 getImageURL() 和 download() 方法下载用户的图像。该数据将在每次预览中重复使用,因此我们将其保存在 $data 变量中。
// cache the raw data to use
$data = $this->download($this->getImageURL());
接下来,我们使用 _orig 后缀保存未修改的副本。这是为了稍后进行视觉比较。
// copy the original image
$img = $this->readImage($data);
$this->saveImage($img, $username . "_orig");
该方法的最后一部分是我们循环遍历 $filters 属性中列出的图像过滤器,为每个过滤器生成一个图像。在每次迭代中,我们创建一个图像并应用 imagefilter() 函数,该函数接受我们在 $filters 数组中列出的常量之一。然后,对于我们保存的每个图像,我们将其路径添加到该方法最后返回的关联数组(使用过滤器名称作为键)。
// array to hold the list of previews
$images = array();

// loop through each filter to generate previews
foreach($this->filters as $filter_name => $filter) {
    $img = $this->readImage($data);
    imagefilter($img, $filter);
    $images[$filter_name] = $this->saveImage($img, $username . "_' . $filter_name);
}

return $images;
我们的应用程序流程的下一部分要求用户确认他们的选择,因此我们需要一种方法来查找特定的预览。下面是根据作为参数传递的选项获取图像路径的简单方法,默认为原始图像:
/**
 * Get the path to a previously generated preview
 *
 * @param string $filter The image filter to get the preview for
 * @return string The path to the preview file or null if not found
 */
public function getPreview($filter = 'orig") {
    if(!$this->isAuthed()) {
        throw new Exception("Requires oauth authorization");
    }
    $path = $this->path . "/' . $this->userdata->screen_name . "_' . $filter . '.png';
    if(file_exists($path)) {
        return $path;
    }
    return null;
}
更改头像
我们的应用程序流程的最后阶段是实际更改用户的头像。首先,我们需要一种方法来获取全尺寸图像并对其应用特定的滤镜。这是:
/**
 * Process the user's full avatar using one of the filters
 *
 * @param string $filter The filter to apply to the image
 * @return string Path to the output file
 */
protected function processImage($filter = "grayscale") {

    // make sure the filter exists
    $filter = strtolower($filter);
    if(!array_key_exists($filter, $this->filters)) {
        throw new Exception("Unsupported image filter");
    }

    $username = $this->userdata->screen_name;

    // get the full sized avatar
    $data = $this->download($this->getTwitter OAuth 애플리케이션 빌드ImageURL());
    $img = $this->readImage($data);

    // apply the filter to the image
    imagefilter($img, $this->filters[$filter]);

    // save the image and return the path
    return $this->saveImage($img, $username . "_' . $filter . "_full");
}
这应该很容易理解,因为它与 generatePreviews() 方法非常相似。它接受一个参数来指定图像过滤器并检查它是否存在。然后它下载原始图像并对其应用过滤器,将生成图像的路径作为返回值传回。
现在我们需要将生成的图像实际发送到 Twitter 的方法,以更新用户的头像。该方法调用 processImage() 方法创建图像并通过 1/account/update_profile_image API 方法上传到 Twitter:
/**
 * Update user's avatar with a filtered version
 *
 * @param string $filter The filter to use
 * @return bool Operation successful
 */
public function commitAvatar($filter) {
    if(!$this->isAuthed()) {
        throw new Exception("Requires oauth authorization");
    }

    // generate the image and get the path
    $path = $this->processImage($filter);
    if(file_exists($path)) {

        // send a multipart POST request with the image file data
        $this->tmhOAuth->request("POST", $this->tmhOAuth->url("1/account/update_profile_image"), array(
            // format: @local/path.png;type=mime/type;filename=file_name.png
            'image' => '@' . $path . ';type=image/png;filename=' . basename($path)
        ), true, true);

        return ($this->tmhOAuth->response["code"] == 200);
    }

    return false;
}
这里棘手的部分是实际的 tmhOAuth POST 请求,它是一个包含原始图像数据的多部分请求。为此,我们必须将 tmhOAuth::request() 方法的最后一个参数设置为 true,并以特殊格式传递 image 变量:
@[图像路径];type=[mime_type];filename=[file_name]
例如,如果我们要上传 tmp/username_grayscale_full.png,则值为 @tmp/username_grayscale_full.png;type=image/png;filename=username_grayscale_full.png。
这又是那部分代码:
// send a multipart POST request with the image file data
$this->tmhOAuth->request("POST", $this->tmhOAuth->url("1/account/update_profile_image"), array(
    // format: @local/path.png;type=mime/type;filename=file_name.png
    'image' => '@' . $path . ';type=image/png;filename=' . basename($path)
), true, true);
清理
所有这些文件操作的副作用是留下大量临时文件。下面是清理临时目录的方法:
/**
 * Delete leftover image files
 */
public function cleanupFiles() {

    // file to track when we last checked
    $flag = $this->path . "/.last_check';

    $time = time();

    // have we checked within the last hour?
    if(!file_exists($flag) || $time - filemtime($flag) > 3600) {

        // get an array of PNG files in the directory
        $files = glob($this->path . "/*.png");

        // loop through files, deleting old files (12+ hours)
        foreach($files as $file) {
            if($time - filemtime($file) > 60*60*12) {
                unlink($file);
            }
        }

        // update the timestamp of our flag file
        touch($flag);
    }
}
这只是循环遍历 PNG 文件,删除那些超过 12 小时的文件。它还检查自我们使用 .last_check 文件上的时间戳进行检查以来已经过去了多长时间,从而允许我们将检查限制为每小时一次。这样我们就可以在每个请求上调用这个方法,而不会浪费资源。
注意:我们在 PHP 中使用 glob() 函数,这是获取与模式匹配的文件数组的简单方法。
完整的 TwitterAvatars 类
&?php
class TwitterAvatars extends TwitterApp {

    /**
     * The path to our temporary files directory
     *
     * @var string Path to store image files
     */
    public $path;

    /**
     * These are all the GD image filters available in this class
     *
     * @var array Associative array of image filters
     */
    protected $filters = array(
        'grayscale'     => IMG_FILTER_GRAYSCALE,
        'negative'      => IMG_FILTER_NEGATE,
        'edgedetect'    => IMG_FILTER_EDGEDETECT,
        'embossed'      => IMG_FILTER_EMBOSS,
        'blurry'        => IMG_FILTER_GAUSSIAN_BLUR,
        'sketchy'       => IMG_FILTER_MEAN_REMOVAL
    );

    /**
     * Initialize a new TwitterAvatars object
     *
     * @param tmhOAuth $tmhOAuth A tmhOAuth object with consumer key and secret
     * @param string $path Path to store image files (default 'tmp")
     */
    public function  __construct(tmhOAuth $tmhOAuth, $path = 'tmp") {

        // call the parent class' constructor
        parent::__construct($tmhOAuth);

        // save the path variable
        $this->path = $path;
    }

    /**
     * Download data from specified URL
     *
     * @param string $url URL to download
     * @return string Downloaded data
     */
    protected function download($url) {
        $ch = curl_init();
        curl_setopt($ch, CURLOPT_URL, $url);
        curl_setopt($ch, CURLOPT_RETURNTRANSFER, true);

        $ret = curl_exec($ch);
        curl_close($ch);

        return $ret;
    }

    /**
     * Get the URL to the standard sized avatar
     *
     * @return string The URL to the image file
     */
    protected function getImageURL() {

        // request user's 'bigger' profile image
        $this->tmhOAuth->request("GET", $this->tmhOAuth->url("1/users/profile_image/' . $this->userdata->screen_name), array(
            'screen_name'   => $this->userdata->screen_name,
            'size'          => 'bigger'
        ));

        if($this->tmhOAuth->response["code"] == 302) {

            // the direct URL is in the Location header
            return $this->tmhOAuth->response["headers"]["location"];
        }
        throw new Exception("Error locating image");
    }

    /**
     * Get the URL to the full sized avatar
     *
     * @return string The URL to the image file

     */
    protected function getTwitter OAuth 애플리케이션 빌드ImageURL() {

        // get the regular sized avatar
        $url = $this->userdata->profile_image_url;

        // save the extension for later
        $ext = strrchr($url, '.");

        // strip the "_normal' suffix and add back the extension
        return substr($url, 0, strrpos($url, "_")) . $ext;
    }

    /**
     * Convert raw image data to a GD resource
     *
     * @param string $data Binary image data to parse
     * @return resource A GD image resource identifier
     */
    protected function readImage($data) {

        // read in the original image
        $src = imagecreatefromstring($data);

        if(!$src) {
            throw new Exception("Error reading image");
        }

        // get the dimensions
        $width = imagesx($src);
        $height = imagesy($src);

        // create a blank true color image of the same size
        $img = imagecreatetruecolor($width, $height);

        // copy the original image to this new canvas
        imagecopy($img, $src, 0, 0, 0, 0, $width, $height);

        // discard the source image
        imagedestroy($src);

        return $img;
    }

    /**
     * Save a GD image resource to a PNG file
     *
     * @param resource $img GD image resource identifier
     * @param string $name Name of the image
     * @return string Path to the saved image
     */
    protected function saveImage($img, $name) {
        $path = $this->path . "/' . $name . '.png';
        imagepng($img, $path);
        imagedestroy($img);
        return $path;
    }

    /**
     * Generate previews for each image filter
     *
     * @return array Associative array of image previews
     */
    public function generatePreviews() {

        // we need valid user info to know whose avatar to handle
        if(!$this->isAuthed()) {
            throw new Exception("Requires oauth authorization");
        }
        $username = $this->userdata->screen_name;

        // cache the raw data to use
        $data = $this->download($this->getImageURL());

        // copy the original image
        $img = $this->readImage($data);
        $this->saveImage($img, $username . "_orig");

        // array to hold the list of previews
        $images = array();

        // loop through each filter to generate previews
        foreach($this->filters as $filter_name => $filter) {
            $img = $this->readImage($data);
            imagefilter($img, $filter);
            $images[$filter_name] = $this->saveImage($img, $username . "_' . $filter_name);
        }

        return $images;
    }

    /**
     * Get the path to a previously generated preview
     *
     * @param string $filter The image filter to get the preview for
     * @return string The path to the preview file or null if not found
     */
    public function getPreview($filter = 'orig") {
        if(!$this->isAuthed()) {
            throw new Exception("Requires oauth authorization");
        }
        $path = $this->path . "/' . $this->userdata->screen_name . "_' . $filter . '.png';
        if(file_exists($path)) {
            return $path;
        }
        return null;
    }

    /**
     * Process the user's full avatar using one of the filters
     *
     * @param string $filter The filter to apply to the image
     * @return string Path to the output file
     */
    protected function processImage($filter = 'grayscale") {

        // make sure the filter exists
        $filter = strtolower($filter);
        if(!array_key_exists($filter, $this->filters)) {
            throw new Exception("Unsupported image filter");
        }

        $username = $this->userdata->screen_name;

        // get the full sized avatar
        $data = $this->download($this->getTwitter OAuth 애플리케이션 빌드ImageURL());
        $img = $this->readImage($data);

        // apply the filter to the image
        imagefilter($img, $this->filters[$filter]);

        // save the image and return the path
        return $this->saveImage($img, $username . "_' . $filter . "_full");
    }

    /**
     * Update user's avatar with a filtered version
     *
     * @param string $filter The filter to use
     * @return bool Operation successful
     */
    public function commitAvatar($filter) {
        if(!$this->isAuthed()) {
            throw new Exception("Requires oauth authorization");
        }

        // generate the image and get the path
        $path = $this->processImage($filter);
        if(file_exists($path)) {

            // send a multipart POST request with the image file data
            $this->tmhOAuth->request("POST", $this->tmhOAuth->url("1/account/update_profile_image"), array(
                // format: @local/path.png;type=mime/type;filename=file_name.png
                'image' => '@' . $path . ';type=image/png;filename=' . basename($path)
            ), true, true);

            return ($this->tmhOAuth->response["code"] == 200);
        }

        return false;
    }

    /**
     * Delete leftover image files
     */
    public function cleanupFiles() {

        // file to track when we last checked
        $flag = $this->path . "/.last_check';

        $time = time();

        // have we checked within the last hour?
        if(!file_exists($flag) || $time - filemtime($flag) > 3600) {

            // get an array of PNG files in the directory
            $files = glob($this->path . "/*.png");

            // loop through files, deleting old files (12+ hours)
            foreach($files as $file) {
                if($time - filemtime($file) > 60*60*12) {
                    unlink($file);
                }
            }

            // update the timestamp of our flag file
            touch($flag);
        }
    }
}
前端
我们将应用程序的所有组件放在一起,所以现在我们需要的只是用户界面。这里的所有代码都将进入根目录中的index.php文件。我们将首先包含库并设置配置:
<?php

// include our libraries
include 'lib/tmhOAuth.php';
include 'lib/TwitterApp.php';
include 'lib/TwitterAvatars.php';

// set the consumer key and secret
define("CONSUMER_KEY",      'qSkJum23MqlG6greF8Z76A");
define("CONSUMER_SECRET",   'Bs738r5UY2R7e5mwp1ilU0voe8OtXAtifgtZe9EhXw");
?>
注意:请务必将 CONSUMER_KEY 和 CONSUMER_SECRET 替换为您自己的。
我们将把代码放在 try-catch 块中,这样我们就可以优雅地处理任何错误,将它们的消息分配给 $error 变量。
try {

} catch(Exception $e) {

    // catch any errors that may occur
    $error = $e;
}
在 try 块中,我们可以开始编写代码,首先使用配置的 tmhOAuth 对象初始化名为 $ta 的 TwitterAvatars 对象:
    // our tmhOAuth settings
    $config = array(
        'consumer_key'      => CONSUMER_KEY,
        'consumer_secret'   => CONSUMER_SECRET
    );

    // create a new TwitterAvatars object
    $ta = new TwitterAvatars(new tmhOAuth($config));
此时我们可以清除所有旧的临时文件:
    // check for stale files
    $ta->cleanupFiles();
接下来,我们检查用户是否已通过身份验证,或者如果用户未通过身份验证,则检查用户是否已请求身份验证,在这种情况下,我们通过调用 auth() 方法来启动该过程:
    // check our authentication status
    if($ta->isAuthed()) {

    }
    // did the user request authorization?
    elseif(isset($_POST["auth"])) {

        // start authentication process
        $ta->auth();
    }
如果用户已通过身份验证,我们需要检查是否已选择某个选项,否则我们将生成预览:
    // check our authentication status
    if($ta->isAuthed()) {

        // has the user selected an option?
        if(isset($_POST["filter"])) {

        }
        // generate previews if the user has not chosen
        else {

            // $previews will be a list of images
            $previews = $ta->generatePreviews();
        }
    }
如果选择了某个选项,我们需要获取要显示的旧图像和新图像的路径:
        // has the user selected an option?
        if(isset($_POST["filter"])) {

            // get the image paths for display
            $original = $ta->getPreview();
            $newimage = $ta->getPreview($_POST["filter"]);
        }
最后,我们检查用户是否确认了他们的选择并应用更改。如果需要,我们还会发送一条推文,并将 $success 变量设置为 true:
        // has the user selected an option?
        if(isset($_POST["filter"])) {

            // is the user sure?
            if(isset($_POST["confirm"])) {

                // change the user's avatar
                $ta->commitAvatar($_POST["filter"]);

                // tweet if the user chose to
                if(isset($_POST["tweet"])) {
                    $ta->sendTweet("I just updated my avatar using Avatar Effects...");
                }

                $success = true;
            }

            // get the image paths for display
            $original = $ta->getPreview();
            $newimage = $ta->getPreview($_POST["filter"]);
        }
这是我们迄今为止所拥有的:
isAuthed()) {

        // has the user selected an option?
        if(isset($_POST["filter"])) {

            // is the user sure?
            if(isset($_POST["confirm"])) {

                // change the user's avatar
                $ta->commitAvatar($_POST["filter"]);

                // tweet if the user chose to
                if(isset($_POST["tweet"])) {
                    $ta->sendTweet("I just updated my avatar using Avatar Effects...");
                }

                $success = true;
            }

            // get the image paths for display
            $original = $ta->getPreview();
            $newimage = $ta->getPreview($_POST["filter"]);
        }
        // generate previews if the user has not chosen
        else {

            // $previews will be a list of images
            $previews = $ta->generatePreviews();
        }
    }
    // did the user request authorization?
    elseif(isset($_POST["auth"])) {

        // start authentication process
        $ta->auth();
    }
} catch(Exception $e) {

    // catch any errors that may occur
    $error = $e;
}
?>
HTML
在 PHP 代码之后,我们将输出适当的 HTML,从这个模板开始,它设置标题和主标题:
<!DOCTYPE html>
<html>
  <head>
    <meta charset="UTF-8">
    <title>Twitter Avatar Effects</title>
    <link rel="stylesheet" href="css/style.css">
  </head>
  <body>
      <h1>Twitter Avatar Effects</h1>
  </body>
</html>
这里是我们显示带有每个预览的图像输入的表单的地方:
  <?php if(isset($previews)): ?>
      <h2>Choose your weapon...</h2>
      <form action="index.php" method="post">
      <?php foreach($previews as $filter => $path): ?>
          <input type="image" src="<?php echo $path; ?>"
                 alt="<?php echo ucfirst($filter); ?>"
                  width="73" height="73"
                 name="filter" value="<?php echo $filter; ?>">
      <?php endforeach; ?>
      </form>
      <p>Select one of the images above to change your Twitter avatar.</p>
这是成功页面:
  <?php elseif(isset($success)): ?>
      <h2>Success! Your Twitter avatar is now:</h2>
      <img src="/static/imghwm/default1.png"  data-src="img/sign-in-with-twitter-l.png"  class="lazy" alt="Your Avatar"    style="max-width:90%"  style="max-width:90%">
      <p><a href="http://twitter.com/<?php echo $ta->userdata->screen_name; ?>">Go see it</a></p>
这是确认页面,我们在其中显示比较并提供取消的机会:
<?php elseif(isset($newimage)): ?>
<h2>Are you sure?</h2>
<img src="/static/imghwm/default1.png" data-src="img/sign-in-with-twitter-l.png" class="lazy" alt="Twitter OAuth 애플리케이션 빌드" style="max-width:90%" style="max-width:90%">
<span class="arrow">⇒</span>
<img src="/static/imghwm/default1.png" data-src="img/sign-in-with-twitter-l.png" class="lazy" alt="<?php echo ucfirst($_POST["filter"]); ?>">
<form action="index.php" method="post">
<input type="hidden" name="filter" value="<?php echo $_POST["filter"]; ?>">
<input type="submit" name="confirm" value="Confirm">
<a href="index.php">Cancel</a>
<p><label>Tweet about your new avatar?
<input type="checkbox" name="tweet" value="true"></label></p>
</form>
请注意,确认表单在隐藏字段中包含所选的过滤器。
如果出现错误,我们会显示:
  <?php elseif(isset($error)): ?>
      <p>Error. <a href="index.php">Try again?</a></p>
默认显示的是“连接到 Twitter”按钮作为图像输入(从本页底部下载一张图像到 img 目录):
  <?php else: ?>
      <form action="index.php" method="post">
          <input type="image"
                 alt="Connect to Twitter" name="auth" value="1">
      </form>
      <p>Connect to Twitter to use this app.</p>
  <?php endif; ?>
这是完整的 HTML 部分:
Twitter Avatar Effects
Twitter Avatar Effects
<?php if(isset($previews)): ?>
<h2>Choose your weapon...</h2>
<form action="index.php" method="post">
<?php foreach($previews as $filter => $path): ?>
<input type="image" src="<?php echo $path; ?>"
alt="<?php echo ucfirst($filter); ?>"
width="73" height="73"
name="filter" value="<?php echo $filter; ?>">
<?php endforeach; ?>
</form>
<p>Select one of the images above to change your Twitter avatar.</p>
<?php elseif(isset($success)): ?>
<h2>Success! Your Twitter avatar is now:</h2>
<img src="/static/imghwm/default1.png" data-src="img/sign-in-with-twitter-l.png" class="lazy" alt="Your Avatar" style="max-width:90%" style="max-width:90%">
<p><a href="http://twitter.com/<?php echo $ta->userdata->screen_name; ?>">Go see it</a></p>
<?php elseif(isset($newimage)): ?>
<h2>Are you sure?</h2>
<img src="/static/imghwm/default1.png" data-src="img/sign-in-with-twitter-l.png" class="lazy" alt="Twitter OAuth 애플리케이션 빌드" style="max-width:90%" style="max-width:90%">
<span class="arrow">⇒</span>
<img src="/static/imghwm/default1.png" data-src="img/sign-in-with-twitter-l.png" class="lazy" alt="<?php echo ucfirst($_POST["filter"]); ?>">
<form action="index.php" method="post">
<input type="hidden" name="filter" value="<?php echo $_POST["filter"]; ?>">
<input type="submit" name="confirm" value="Confirm">
<a href="index.php">Cancel</a>
<p><label>Tweet about your new avatar?
<input type="checkbox" name="tweet" value="true"></label></p>
</form>
<?php elseif(isset($error)): ?>
<p>Error. <a href="index.php">Try again?</a></p>
<?php else: ?>
<form action="index.php" method="post">
<input type="image"
alt="Connect to Twitter" name="auth" value="1">
</form>
<p>Connect to Twitter to use this app.</p>
<?php endif; ?>
CSS
这里是一些使界面看起来更漂亮的基本 CSS,保存在 css/style.css 中:
html {
    background-color: #eee;
    text-align: center;
    font-family: "Lucida Grande",Verdana, sans-serif;
    font-size: 16px;
    color: #224;
}
body {
    width: 700px;
    margin: 30px auto;
    background-color: #acf;
    padding: 10px;
    border-radius: 10px;
    -moz-border-radius: 10px;
    -webkit-border-radius: 10px;
}
p {
    font-size: 1em;
}
h1 {
    font-size: 2em;
}
h2 {
    font-size: 1.6em;
}
.arrow {
    font-size: 4em;
    font-weight: bold;
}
结果
这是一个视频,详细介绍了我们完成的应用程序的外观:
结论
如果您完全按照本教程进行操作,您应该对 OAuth 以及创建简单 Twitter Web 应用程序所需的内容有很好的了解。一旦您了解了基本概念,使用 Twitter API 就会很容易 - 特别是如果您使用像 tmhOAuth 这样的库来处理次要细节。
我们在本教程中创建的简单示例可以轻松修改或扩展以执行任何操作。因此,如果您对一款很酷的新 Twitter 应用程序有好主意,请随意使用它作为基础。
感谢您的阅读。如果您对本教程有任何疑问或意见,请留言!
위 내용은 Twitter OAuth 애플리케이션 빌드의 상세 내용입니다. 자세한 내용은 PHP 중국어 웹사이트의 기타 관련 기사를 참조하세요!