vue3에서 vue-router를 사용하는 방법
- 王林앞으로
- 2023-05-30 18:07:122459검색
1. 1단계: vue-router
npm install vue-router@4.0.0-beta.13
2를 설치합니다. 2단계: main.js
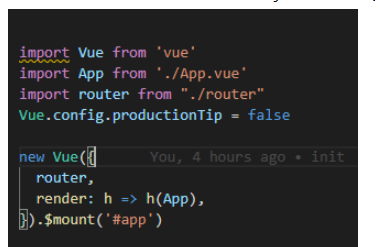
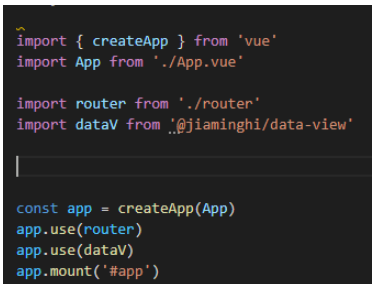
먼저 vue2와 vue3의 main.js 차이점을 비교해 보겠습니다. (첫 번째 그림은 vue2이고 두 번째 그림은 vue3입니다. )


createApp 메소드를 직접 사용했기 때문에 vue2에서 흔히 사용하는 Vue 객체가 vue3에서는 "사라지는" 것을 확실히 알 수 있지만 실제로 createApp 메소드를 사용하여 만든 앱은 A vue2에서 자주 사용하는 Vue 객체인 Vue.use()는 vue3의 main.js 파일에서 app.use()로 대체하여 app.use를 직접 사용할 수 있습니다. ( ) 메서드를 사용하여 라우터를 호출합니다.
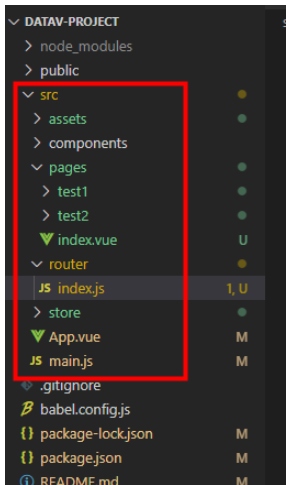
참고: 가져오기 라우팅 파일에서 내보낸 경로 이름은 "해당 라우팅 파일 상대 경로"에서 가져옵니다. 프로젝트 디렉터리는 다음과 같습니다(vue2와 vue3은 동일).

3. 라우팅 파일
import { createRouter, createWebHashHistory } from "vue-router"

const routes = [
    {
        path: '/',
        component: () => import('@/pages')
    },
    {
        path: '/test1',
        name: "test1",
        component: () => import('@/pages/test1')
    },
    {
        path: '/test2',
        name: "test2",
        component: () => import('@/pages/test2')
    },
]
export const router = createRouter({
  history: createWebHashHistory(),
  routes: routes
})

export default router
4. app.vue
<template>
<router-view></router-view>
</template>
<script>
export default {
name: 'App',
components: {
}
}
</script>
<style>
#app {
font-family: Avenir, Helvetica, Arial, sans-serif;
-webkit-font-smoothing: antialiased;
-moz-osx-font-smoothing: grayscale;
text-align: center;
color: #2c3e50;
margin-top: 60px;
}
</style>
4. 사용(예: 점프)
라우팅을 사용해야 하는 곳에 useRoute 및 useRouter(vue2의 $route 및 $router와 동일)를 소개합니다
<script>
import { useRoute, useRouter } from 'vue-router'
export default {
setup () {
const route = useRoute()
const router = useRouter()
return {}
},
}</script>
예: 페이지 점프
<template>
<h2>我是test1</h2>
<button>toTest2</button>
</template>
<script>
import { useRouter } from 'vue-router'
export default {
setup () {
const router = useRouter()
const toTest2= (() => {
router.push("./test2")
})
return {
toTest2
}
},
}
</script>
<style>
</style>위 내용은 vue3에서 vue-router를 사용하는 방법의 상세 내용입니다. 자세한 내용은 PHP 중국어 웹사이트의 기타 관련 기사를 참조하세요!
성명:
이 기사는 yisu.com에서 복제됩니다. 침해가 있는 경우 admin@php.cn으로 문의하시기 바랍니다. 삭제
이전 기사:vue3가 axios를 캡슐화하는 방법다음 기사:vue3가 axios를 캡슐화하는 방법

