


사전 정보
1. 결정 트리
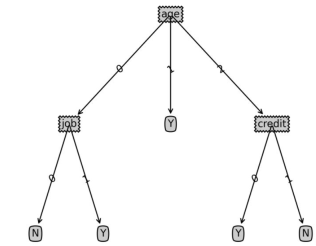
재작성된 문장: 지도 학습에서 일반적으로 사용되는 분류 알고리즘은 결정 트리입니다. 이는 일련의 샘플을 기반으로 하며 각 샘플에는 일련의 속성과 해당 분류 결과가 포함됩니다. 이러한 샘플을 학습에 사용하면 알고리즘은 새로운 데이터를 올바르게 분류할 수 있는 의사결정 트리를 생성할 수 있습니다
2. 샘플 데이터
기존 사용자가 14명이고 이들의 개인 속성과 특정 제품 구매 여부에 대한 데이터가 다음과 같다고 가정합니다.
| 번호 | 나이 | 소득 범위 | 직업 특성 | 신용 등급 | 구매 결정 | ||||||
|---|---|---|---|---|---|---|---|---|---|---|---|
| 01 | 높음 | 불안정 | 나쁨 아니요 | 불안정나쁨 | |||||||
| 04 | >40 | Medium | 불안정 | 나쁨 | |||||||
| 05 | >40 | 낮음 | 안정 | 나쁨 | |||||||
| 06 | >40 | 낮음 | 안정 | 좋음 | |||||||
| 07 | 30-40 | 낮음 | 안정 | 좋아요 | |||||||
| 08 | 보통 | 불안정 | 나쁨 | ||||||||
| 09 | 낮음 | 안정 | 나쁨 | ||||||||
| 10 | >40 | 보통 | 안정 | 나쁨 | |||||||
| 11 | 보통 | 안정 | 좋음 | ||||||||
| 12 | 30-40 | 중간 | 불안정 | 좋음 | |||||||
| 13 | 30-40 | 높음 | 안정 | 나쁨 | |||||||
| 14 | >40 | 보통 | 불안정 | 좋아요 | |||||||
| Age | 소득 범위 | 업무 성격 | 신용 등급 |
|---|---|---|---|
| low | stable | good | |
| high | unstable | good |
def classify(inputtree,featlabels,testvec):
    firststr = list(inputtree.keys())[0]
    seconddict = inputtree[firststr]
    featindex = featlabels.index(firststr)
    for key in seconddict.keys():
        if testvec[featindex]==key:
            if type(seconddict[key]).__name__=='dict':
                classlabel=classify(seconddict[key],featlabels,testvec)
            else:
                classlabel=seconddict[key]
    return classlabel
labels=['age','income','job','credit'] tsvec=[0,0,1,1] print('result:',classify(Tree,labels,tsvec)) tsvec1=[0,2,0,1] print('result1:',classify(Tree,labels,tsvec1))
결과: : N
포스트정보: 의사결정나무 code
다음 코드는 의사결정트리 그래픽, 비의사결정트리 알고리즘 포커스를 그리는 데 사용됩니다. 관심 있는 경우 학습에 참고할 수 있습니다
import matplotlib.pyplot as plt

decisionNode = dict(box, fc="0.8")
leafNode = dict(box, fc="0.8")
arrow_args = dict(arrow)

#获取叶节点的数目
def getNumLeafs(myTree):
    numLeafs = 0
    firstStr = list(myTree.keys())[0]
    secondDict = myTree[firstStr]
    for key in secondDict.keys():
        if type(secondDict[key]).__name__=='dict':#测试节点的数据是否为字典,以此判断是否为叶节点
            numLeafs += getNumLeafs(secondDict[key])
        else:   numLeafs +=1
    return numLeafs

#获取树的层数
def getTreeDepth(myTree):
    maxDepth = 0
    firstStr = list(myTree.keys())[0]
    secondDict = myTree[firstStr]
    for key in secondDict.keys():
        if type(secondDict[key]).__name__=='dict':#测试节点的数据是否为字典,以此判断是否为叶节点
            thisDepth = 1 + getTreeDepth(secondDict[key])
        else:   thisDepth = 1
        if thisDepth > maxDepth: maxDepth = thisDepth
    return maxDepth

#绘制节点
def plotNode(nodeTxt, centerPt, parentPt, nodeType):
    createPlot.ax1.annotate(nodeTxt, xy=parentPt,  xycoords='axes fraction',
             xytext=centerPt, textcoords='axes fraction',
             va="center", ha="center", bbox=nodeType, arrowprops=arrow_args )

#绘制连接线
def plotMidText(cntrPt, parentPt, txtString):
    xMid = (parentPt[0]-cntrPt[0])/2.0 + cntrPt[0]
    yMid = (parentPt[1]-cntrPt[1])/2.0 + cntrPt[1]
    createPlot.ax1.text(xMid, yMid, txtString, va="center", ha="center", rotation=30)

#绘制树结构
def plotTree(myTree, parentPt, nodeTxt):#if the first key tells you what feat was split on
    numLeafs = getNumLeafs(myTree)  #this determines the x width of this tree
    depth = getTreeDepth(myTree)
    firstStr = list(myTree.keys())[0]     #the text label for this node should be this
    cntrPt = (plotTree.xOff + (1.0 + float(numLeafs))/2.0/plotTree.totalW, plotTree.yOff)
    plotMidText(cntrPt, parentPt, nodeTxt)
    plotNode(firstStr, cntrPt, parentPt, decisionNode)
    secondDict = myTree[firstStr]
    plotTree.yOff = plotTree.yOff - 1.0/plotTree.totalD
    for key in secondDict.keys():
        if type(secondDict[key]).__name__=='dict':#test to see if the nodes are dictonaires, if not they are leaf nodes
            plotTree(secondDict[key],cntrPt,str(key))        #recursion
        else:   #it's a leaf node print the leaf node
            plotTree.xOff = plotTree.xOff + 1.0/plotTree.totalW
            plotNode(secondDict[key], (plotTree.xOff, plotTree.yOff), cntrPt, leafNode)
            plotMidText((plotTree.xOff, plotTree.yOff), cntrPt, str(key))
    plotTree.yOff = plotTree.yOff + 1.0/plotTree.totalD

#创建决策树图形
def createPlot(inTree):
    fig = plt.figure(1, facecolor='white')
    fig.clf()
    axprops = dict(xticks=[], yticks=[])
    createPlot.ax1 = plt.subplot(111, frameon=False, **axprops)    #no ticks
    #createPlot.ax1 = plt.subplot(111, frameon=False) #ticks for demo puropses
    plotTree.totalW = float(getNumLeafs(inTree))
    plotTree.totalD = float(getTreeDepth(inTree))
    plotTree.xOff = -0.5/plotTree.totalW; plotTree.yOff = 1.0;
    plotTree(inTree, (0.5,1.0), '')
    plt.savefig('决策树.png',dpi=300,bbox_inches='tight')
    plt.show()
위 내용은 Python에서 의사결정 트리 분류 알고리즘을 구현하는 방법의 상세 내용입니다. 자세한 내용은 PHP 중국어 웹사이트의 기타 관련 기사를 참조하세요!

 파이썬 어레이에 어떤 데이터 유형을 저장할 수 있습니까?Apr 27, 2025 am 12:11 AM
PythonlistsCanstoreAnyDatAtype, ArrayModuLearRaysStoreOneType 및 NUMPYARRAYSAREFORNUMERICALPUTATION.1) LISTSAREVERSATILEBUTLESSMEMORY-EFFICENT.2) ARRAYMODUERRAYRAYRAYSARRYSARESARESARESARESARESARESAREDOREDORY-UNFICEDONOUNEOUSDATA.3) NumpyArraysUraysOrcepperperperperperperperperperperperperperperperferperferperferferpercient
 파이썬 어레이에 잘못된 데이터 유형의 값을 저장하려고하면 어떻게됩니까?Apr 27, 2025 am 12:10 AM
whenyouattempttoreavalueofthewrongdatatypeinapythonaphonarray, thisiSdueTotheArrayModule의 stricttyPeenforcement, theAllElementStobeofthesAmetypecified bythetypecode.forperformancersassion, arraysaremoreficats the thraysaremoreficats thetheperfication the thraysaremorefications는
 Python Standard Library의 일부는 무엇입니까? 목록 또는 배열은 무엇입니까?Apr 27, 2025 am 12:03 AM
Pythonlistsarepartoftsandardlardlibrary, whileraysarenot.listsarebuilt-in, 다재다능하고, 수집 할 수있는 반면, arraysarreprovidedByTearRaymoduledlesscommonlyusedDuetolimitedFunctionality.
 스크립트가 잘못된 파이썬 버전으로 실행되는지 확인해야합니까?Apr 27, 2025 am 12:01 AM
thescriptIsrunningwithHongpyThonversionDueCorRectDefaultTerpretersEttings.tofixThis : 1) checktheDefaultPyThonVersionUsingPyThon-VersionorPyThon3- version.2) usvirtual-ErondmentsBythePython.9-Mvenvmyenv, 활성화, 및 파괴
 파이썬 어레이에서 수행 할 수있는 일반적인 작업은 무엇입니까?Apr 26, 2025 am 12:22 AM
PythonArraysSupportVariousOperations : 1) SlicingExtractsSubsets, 2) 추가/확장 어드먼트, 3) 삽입 값 삽입 ATSpecificPositions, 4) retingdeletesElements, 5) 분류/ReversingChangesOrder 및 6) ListsompectionScreateNewListSbasedOnsistin
 어떤 유형의 응용 프로그램에서 Numpy Array가 일반적으로 사용됩니까?Apr 26, 2025 am 12:13 AM
NumpyArraysareSentialplosplicationSefficationSefficientNumericalcomputationsanddatamanipulation. Theyarcrucialindatascience, MachineLearning, Physics, Engineering 및 Financeduetotheiribility에 대한 handlarge-scaledataefficivally. forexample, Infinancialanyaly
 파이썬의 목록 위의 배열을 언제 사용 하시겠습니까?Apr 26, 2025 am 12:12 AM
UseanArray.ArrayOveralistInpyThonWhendealingwithhomogeneousData, Performance-CriticalCode, OrinterFacingwithCcode.1) HomogeneousData : ArraysSaveMemorywithtypepletement.2) Performance-CriticalCode : arraysofferbetterporcomanceFornumericalOperations.3) Interf
 모든 목록 작업은 배열에 의해 지원됩니까? 왜 또는 왜 그렇지 않습니까?Apr 26, 2025 am 12:05 AM
아니요, NOTALLLISTOPERATIONARESUPPORTEDBYARRARES, andVICEVERSA.1) ArraySDONOTSUPPORTDYNAMICOPERATIONSLIKEPENDORINSERTWITHUTRESIGING, WHITHIMPACTSPERFORMANCE.2) ListSDONOTEECONSTANTTIMECOMPLEXITEFORDITITICCESSLIKEARRAYSDO.


핫 AI 도구

Undresser.AI Undress
사실적인 누드 사진을 만들기 위한 AI 기반 앱

AI Clothes Remover
사진에서 옷을 제거하는 온라인 AI 도구입니다.

Undress AI Tool
무료로 이미지를 벗다

Clothoff.io
AI 옷 제거제

Video Face Swap
완전히 무료인 AI 얼굴 교환 도구를 사용하여 모든 비디오의 얼굴을 쉽게 바꾸세요!

인기 기사
뜨거운 도구

Dreamweaver Mac版
시각적 웹 개발 도구

SublimeText3 Mac 버전
신 수준의 코드 편집 소프트웨어(SublimeText3)

Eclipse용 SAP NetWeaver 서버 어댑터
Eclipse를 SAP NetWeaver 애플리케이션 서버와 통합합니다.

MinGW - Windows용 미니멀리스트 GNU
이 프로젝트는 osdn.net/projects/mingw로 마이그레이션되는 중입니다. 계속해서 그곳에서 우리를 팔로우할 수 있습니다. MinGW: GCC(GNU Compiler Collection)의 기본 Windows 포트로, 기본 Windows 애플리케이션을 구축하기 위한 무료 배포 가능 가져오기 라이브러리 및 헤더 파일로 C99 기능을 지원하는 MSVC 런타임에 대한 확장이 포함되어 있습니다. 모든 MinGW 소프트웨어는 64비트 Windows 플랫폼에서 실행될 수 있습니다.

PhpStorm 맥 버전
최신(2018.2.1) 전문 PHP 통합 개발 도구

