nginx를 사용하여 동적 및 정적 분리를 통해 로드 밸런싱 클러스터를 구현하는 방법
- WBOYWBOYWBOYWBOYWBOYWBOYWBOYWBOYWBOYWBOYWBOYWBOYWB앞으로
- 2023-05-22 22:52:411508검색
1. 실험 환경
1.1 시스템 및 서비스
이번에 사용한 운영 체제 및 서비스:
이 실험에는 총 3개의 서버가 필요하며, 하나의 nginx는 로드 밸런싱 분배기와 동적 및 정적 분리 분배기로 사용됩니다. 두 개의 Apache 서버가 백엔드 서버로 사용되고 nginx는 두 개의 Apache 서버의 로드 밸런싱 및 동적 분리를 달성하는 데 사용됩니다.
운영 체제: centos7.6
nginx 버전: 1.22 버전
apache 버전: 2.4.6 기본적으로 시스템에 제공됨
php 버전: 5.4.16 기본적으로 시스템에 제공됨
apache 및 php 버전은 가능 최신 버전으로 업그레이드한 경우 공식 홈페이지에서 다운로드하여 설치할 수 있습니다.
1.2 이번에 구현될 아키텍처 다이어그램
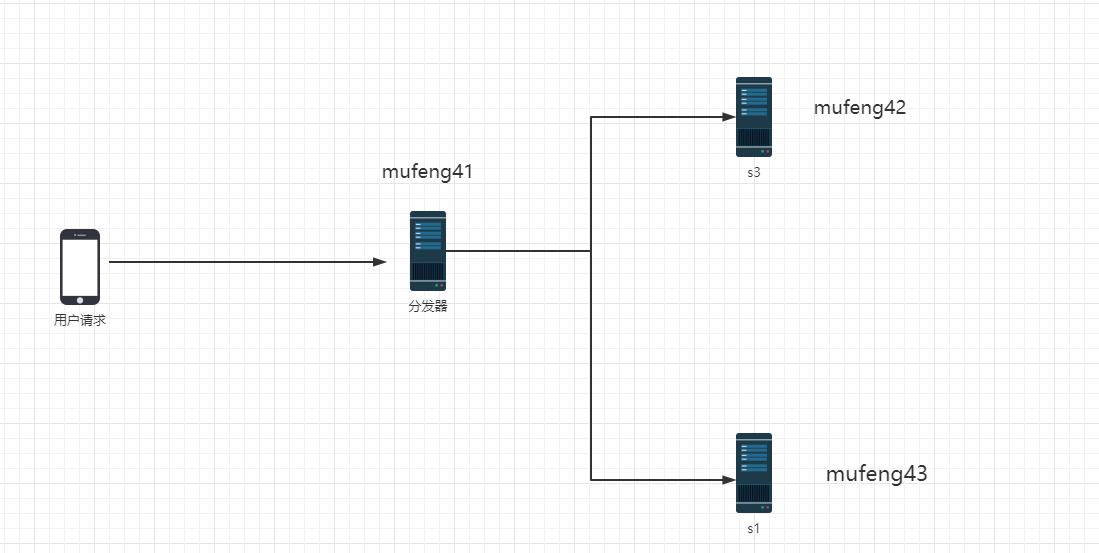
일반적으로 저희 서버는 파일서버, 사진서버, 데이터베이스서버 등 여러 종류로 나누어집니다.
다양한 서비스도 있습니다:
정적 파일 처리: nginx 또는 apache를 사용할 수 있습니다
동적 파일 처리: apache, tomcat
이미지 파일 처리: squid
이 기사에서 우리는 nginx를 사용하여 동적 및 정적 분리로 로드 밸런싱 클러스터를 실현하세요.
2.nginx 로드밸런싱에 대한 자세한 설명
2.1 로드밸런싱이란?
서버 로드 밸런싱은 클라이언트의 요청을 여러 서버에 할당하여 시스템 성능을 향상하고 시스템 안정성을 높이며 단일 실패 지점을 방지하는 기술을 말합니다.
로드 밸런싱을 통해 여러 서버가 클라이언트 요청을 공동으로 처리하여 시스템의 전반적인 성능과 가용성을 향상시킬 수 있습니다.
로드 밸런싱에서는 일반적으로 여러 서버가 서버 클러스터로 구성됩니다. 클라이언트는 로드 밸런서에 요청을 보내고 로드 밸런서는 특정 알고리즘에 따라 요청을 서버 클러스터에 있는 하나 이상의 서버에 할당합니다. . 로드 밸런싱 알고리즘에는 여러 가지가 있으며 일반적인 알고리즘으로는 폴링, 무작위, 최소 연결 수 등이 있습니다.
로드 밸런싱 전략은 세션 지속성, 상태 확인, 동적 가중치 조정과 같은 고급 기능을 사용하는 등 더욱 정교해질 수 있습니다. 실제 요구 사항을 구성하고 조정함으로써 로드 밸런싱 시스템의 유연성과 효율성을 향상시킬 수 있습니다.
2.2 로드 밸런싱의 5가지 방법
Nginx 업스트림 로드의 5가지 방법, 현재 가장 일반적으로 사용되는 상위 3가지 방법은 다음과 같습니다.
1) 폴링(기본값)
각 요청은 시간순으로 하나씩 다른 백엔드에 할당됩니다. 백엔드 서버가 다운되면 자동으로 제거될 수 있습니다.
2) Weight
는 폴링 확률을 지정하며, 가중치는 액세스 비율에 비례하며 백엔드 서버의 성능이 고르지 않을 때 사용됩니다.
3) ip_hash
각 요청은 접속 IP의 해시 결과에 따라 할당되므로 각 방문자는 백엔드 서버에 고정된 접속 권한을 갖게 되어 세션 문제를 해결할 수 있습니다.
4) air (third party)
백엔드 서버의 응답 시간에 따라 요청을 할당하고, 응답 시간이 짧은 요청을 우선적으로 할당합니다.
5) url_hash (타사)
액세스한 URL의 해시 결과에 따라 요청을 배포하여 동일한 URL이 동일한 백엔드 서버로 전달되도록 백엔드 서버를 캐시할 때 더 효과적입니다
3. 트래픽 분배기로 nginx 설치
3.1 nginx를 설치하기 전에 종속 도구 설치를 준비하세요
[root@mufeng41 ~]#  yum -y install gcc gcc-c++ autoconf automake

[root@mufeng41 ~]# yum -y install zlib zlib-devel openssl openssl-devel pcre pcre-devel
Mu Feng Xiaoyue가 이 설치 단계를 수행할 때 이미지 마운트를 잊어버려서 많은 시간을 낭비했습니다. 미리 마운트하고 yum 소스를 구성하세요.
nginx 압축 패키지를 업로드하고 압축을 푼다
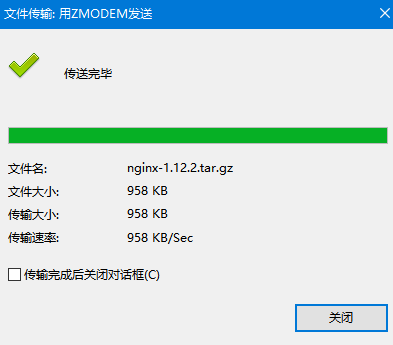
[root@mufeng41 ~]# ll nginx-1.12.2.tar.gz
-rw-r--r--. 1 root root 981687 8月  27 2019 nginx-1.12.2.tar.gz
[root@mufeng41 ~]# tar xf nginx-1.12.2.tar.gz  -C /usr/local/src/
로그인하여 확인하세요.
root@mufeng41 ~]# cd !$
cd /usr/local/src/
[root@mufeng41 src]# ls
nginx-1.12.2
[root@mufeng41 src]# cd nginx-1.12.2/
[root@mufeng41 nginx-1.12.2]# ls
auto  CHANGES  CHANGES.ru  conf  configure  contrib  html  LICENSE  man  README  src
[root@mufeng41 nginx-1.12.2]#
3.2 컴파일 시작
./configure --prefix=/usr/local/nginx --with-http_dav_module --with-http_stub_status_module --with-http_addition_module --with-http_sub_module --with-http_flv_module --with-http_mp4_module
매개변수 설명:
–with-http_dav_module ngx_http_d 활성화 av_module 지원(P UT 추가, DELETE, MKCOL: 컬렉션 생성, COPY 및 MOVE 메서드)는 기본적으로 꺼져 있으며 ngx_http_stub_status_module 지원을 활성화하려면
–with-http_stub_status_module로 컴파일하고 켜야 합니다(마지막 시작 이후 nginx의 작동 상태 가져오기)
–with -http_addition_module은 ngx_http_addition_module 지원을 활성화합니다(출력 필터 역할, 불완전한 버퍼링 지원, 요청에 부분적으로 응답).
–with-http_sub_module은 ngx_http_sub_module 지원을 활성화합니다(ngx 응답의 일부 텍스트를 일부 텍스트로 대체 가능) 기타 텍스트)
–with-http_flv_module은 ngx_http_flv_module 지원을 활성화합니다(메모리 사용량 검색을 위한 시간 기반 오프셋 파일 제공)
–with-http_mp4_module은 mp4 파일 지원을 활성화합니다(검색을 위한 시간 기반 오프셋 파일 제공) 메모리 사용량)
3.3 nginx 컴파일 및 설치 시작
make && make install을 사용하여 설치make && make install进行安装
[root@mufeng41 nginx-1.12.2]# make && make install
如何判断是否执行成功?
答: echo $?
3.4 生成运行的nginx用户
[root@mufeng41 nginx-1.12.2]# useradd -u 8000 -s /sbin/nologin  nginx
[root@mufeng41 nginx-1.12.2]# id nginx
uid=8000(nginx) gid=8000(nginx) 组=8000(nginx)
[root@mufeng41 nginx-1.12.2]#
3.5 启动nginx并测试
如果你不知道nginx配置文件和启动脚本在哪,可以搜一下,使用find / -name nginx.conf
[root@itlaoxin163 ~]# find / -name nginx.conf
/usr/local/nginx/conf/nginx.conf

# 启动
[root@mufeng41 nginx-1.12.2]# /usr/local/nginx/sbin/nginx

[root@mufeng41 nginx-1.12.2]# netstat -antup |grep 80
tcp        0      0 0.0.0.0:80              0.0.0.0:*               LISTEN      25286/nginx: master
udp        0      0 0.0.0.0:58076           0.0.0.0:*
실행 성공 여부를 판단하는 방법은 무엇입니까? 답변:
echo $? 3.4 실행 중인 nginx 사용자 생성🎜[root@mufeng41 nginx-1.12.2]# systemctl stop firewalld.service [root@mufeng41 nginx-1.12.2]# curl -I 127.0.0.1 HTTP/1.1 200 OK Server: nginx/1.12.2 Date: Fri, 24 Mar 2023 11:06:29 GMT Content-Type: text/html Content-Length: 612 Last-Modified: Fri, 24 Mar 2023 11:01:53 GMT Connection: keep-alive ETag: "641d8321-264" Accept-Ranges: byte🎜3.5 nginx 시작 및 테스트🎜🎜 nginx 구성 파일과 시작 스크립트가 어디에 있는지 모르면 검색하고
find / -를 사용하면 됩니다. 이름 nginx.conf .🎜🎜서비스 시작🎜[root@mufeng41 conf]# pwd /usr/local/nginx/conf [root@mufeng41 conf]# cp nginx.conf nginx.conf.bak [root@mufeng41 conf]#🎜효과 보기🎜
[root@mufeng41 nginx-1.12.2]# systemctl stop firewalld.service
[root@mufeng41 nginx-1.12.2]# curl -I 127.0.0.1
HTTP/1.1 200 OK
Server: nginx/1.12.2
Date: Fri, 24 Mar 2023 11:06:29 GMT
Content-Type: text/html
Content-Length: 612
Last-Modified: Fri, 24 Mar 2023 11:01:53 GMT
Connection: keep-alive
ETag: "641d8321-264"
Accept-Ranges: byte
四. 配置nginx成为分发器
4.1 先备份配置文件
[root@mufeng41 conf]# pwd
/usr/local/nginx/conf
[root@mufeng41 conf]# cp nginx.conf nginx.conf.bak
[root@mufeng41 conf]#
4.2 把nginx设置成分发器,实现动静分离
配置如下图:
配置分发器
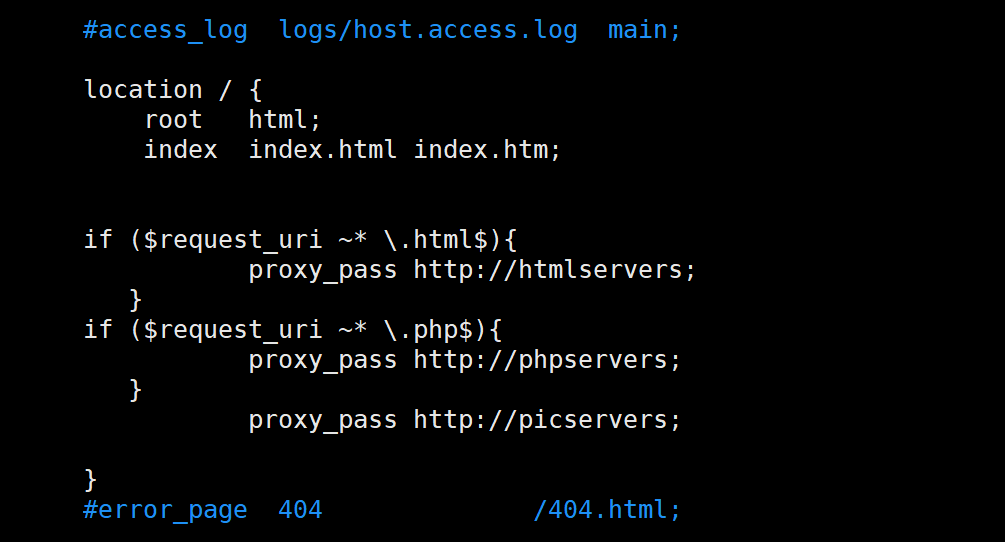
location / {
            root   html;
            index  index.html index.htm;


        if ($request_uri ~* \.html$){
                   proxy_pass http://htmlservers;
           }
        if ($request_uri ~* \.php$){
                   proxy_pass http://phpservers;
           }
                   proxy_pass http://picservers;

        }
注释:
location 的作用是根据请求的 URI,将请求转发到不同的后端服务器上进行处理。具体解释如下:
location /:表示所有请求(URI)都会被这个 location 块所匹配。
root html:表示当访问的 URI对应的文件不存在时,会在 nginx 安装目录下的 html 目录中查找对应的文件。
index index.html
index.htm:表示当访问的 URI 对应的目录中没有指定的默认文件时,会尝试访问 index.html 或 index.htm 文件。
if ($request_uri ~* .html$):表示如果请求的 URI 包含 .html,则执行下面的语句。
proxy_pass http://htmlservers:表示将请求转发到名为 htmlservers 的后端服务器处理。
if ($request_uri ~* .php$):表示如果请求的 URI 包含 .php,则执行下面的语句。
proxy_pass http://phpservers:表示将请求转发到名为 phpservers 的后端服务器处理。
proxy_pass http://picservers:表示将请求转发到名为 picservers 的后端服务器处理,这个语句没有条件限制,如果以上两个if 语句都不匹配,则会执行这个语句。
接下来设置负载均衡对应的IP
定义负载均衡设备的IP
在nginx配置文件最后一行}前添加一下内容:
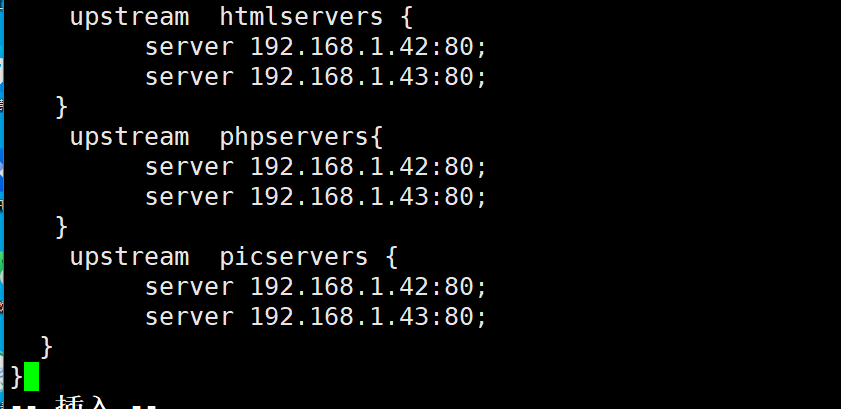
代码如下:
 upstream  htmlservers {
         server 192.168.1.42:80;
         server 192.168.1.43:80;
 }
 upstream  phpservers{
         server 192.168.1.42:80;
         server 192.168.1.43:80;
 }
 upstream  picservers {
         server 192.168.1.42:80;
         server 192.168.1.43:80;
 }
配置文件是否有错误
[root@mufeng41 conf]# /usr/local/nginx/sbin/nginx -t
nginx: the configuration file /usr/local/nginx/conf/nginx.conf syntax is ok
nginx: configuration file /usr/local/nginx/conf/nginx.conf test is successful
重启nginx
[root@mufeng41 conf]# /usr/local/nginx/sbin/nginx -s reload
五. 配置两台http服务器
接下来,需要在 mufeng42和mufeng43上操作
5.1 配置mufeng42服务器 配置web服务器:
[root@mufeng42 ~]# yum install httpd php -y
生成静态测试文件
[root@mufeng42 ~]# echo 192.168.1.42 > /var/www/html/index.html
在创建一个php文件:
[root@itlaoxin162 ~]# vim /var/www/html/test.php
写入内容:
echo "我是42服务器";echo "我是沐风晓月"<?phpphpinfo();?>
启动apache
[root@mufeng42 ~]# systemctl restart httpd
5.2 配置mufeng43服务器
安装http并生成静态文件
[root@mufeng43 ~]# yum install httpd php -y
[root@mufeng43 ~]# echo 192.168.1.43 > /var/www/html/index.html
建立php文件
[root@mufeng43 ~]# cd /var/www/html/

[root@mufeng43 html]# vi mufeng.php
[root@mufeng43 html]# cat mufeng.php
echo "我是43服务器";
<?php
phpinfo();
?>
启动配置文件
[root@mufeng43 html]# systemctl restart httpd
5.3 测试
到目前为止,nginx负载均衡就结束了,接下来就可以测试了:
测试静态页面
浏览器输入: http://192.168.1.41/ 进行测试


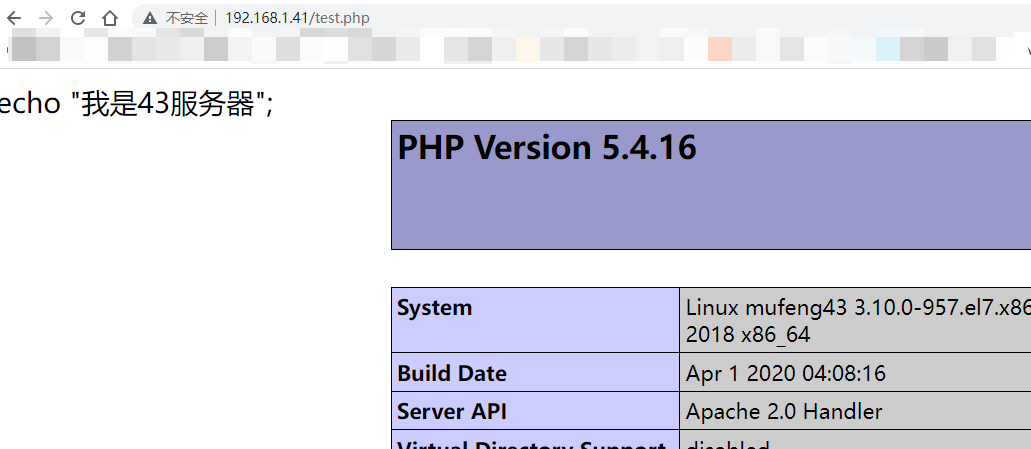
测试转发动态页面:
浏览器输入 http://192.168.1.41/test.php
위 내용은 nginx를 사용하여 동적 및 정적 분리를 통해 로드 밸런싱 클러스터를 구현하는 방법의 상세 내용입니다. 자세한 내용은 PHP 중국어 웹사이트의 기타 관련 기사를 참조하세요!

