vue3 프로젝트에서tinymce를 사용하는 방법
- WBOYWBOYWBOYWBOYWBOYWBOYWBOYWBOYWBOYWBOYWBOYWBOYWB앞으로
- 2023-05-19 20:40:042463검색
tinymce는 모든 기능을 갖춘 리치 텍스트 편집기 플러그인이지만,tinymce를 vue에 도입하는 것은 다른 Vue 리치 텍스트 플러그인만큼 원활하지 않으며, @tinymce/tinymce-vue를 도입해야 합니다. 또한 외국 서식 있는 텍스트 플러그인이며 중국어 버전을 통과하지 못했습니다. 공식 웹사이트에서 번역 패키지를 다운로드해야 합니다(방화벽을 우회해야 할 수도 있음).
1. 관련 종속성을 설치합니다
npm install tinymce -S
npm install @tinymce/tinymce-vue -S
2. 중국어 패키지를 다운로드합니다
3. 스킨 및 중국어 패키지를 소개합니다
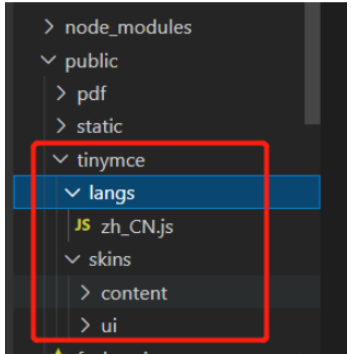
프로젝트 공용 폴더 아래에 새로운 Tinymce 폴더를 만들고,
다운받은 중국어 패키지를 이 폴더에 추출합니다. node_modules/tinymce에서 스킨 폴더를 찾아 public/tinymce

<template>
<editor v-model="myValue" :init="init" :disabled="disabled" :id="tinymceId"></editor>
</template>
<script setup lang="ts">
//JS部分
//在js中引入所需的主题和组件
import tinymce from 'tinymce/tinymce'
import 'tinymce/skins/content/default/content.css'
import Editor from '@tinymce/tinymce-vue'
import 'tinymce/themes/silver'
import 'tinymce/themes/silver/theme'
import 'tinymce/icons/default'; //引入编辑器图标icon,不引入则不显示对应图标
import 'tinymce/models/dom' // 这里是个坑 一定要引入
//在TinyMce.vue中接着引入相关插件
import "tinymce/icons/default/icons"
// import "tinymce/plugins/image" // 插入上传图片插件
// import "tinymce/plugins/media" // 插入视频插件
import "tinymce/plugins/table" // 插入表格插件
import "tinymce/plugins/lists" // 列表插件
import "tinymce/plugins/wordcount" // 字数统计插件
import "tinymce/plugins/code" // 源码
// import "tinymce/plugins/fullscreen" //全屏
//接下来定义编辑器所需要的插件数据
import { reactive, ref } from "vue"
import { onMounted, defineEmits, watch } from "@vue/runtime-core"
import axios from 'axios'
// import { updateImg } from '@/api/order/order'
const emits = defineEmits(["getContent"])
//这里我选择将数据定义在props里面,方便在不同的页面也可以配置出不同的编辑器,当然也可以直接在组件中直接定义
const props = defineProps({
value: {
type: String,
default: () => {
return ""
},
},
baseUrl: {
type: String,
default: "",
},
disabled: {
type: Boolean,
default: false,
},
plugins: {
type: [String, Array],
default: "lists table",
},//必填
toolbar: {
type: [String, Array],
default:
"codesample bold italic underline alignleft aligncenter alignright alignjustify | undo redo | formatselect | fontselect | fontsizeselect | forecolor backcolor | bullist numlist outdent indent | lists link table code | removeformat ",
},//必填
})
//用于接收外部传递进来的富文本
const myValue = ref(props.value)
const tinymceId = ref("vue-tinymce-" + +new Date() + ((Math.random() * 1000).toFixed(0) + ""))
//定义一个对象 init初始化
const init = reactive({
selector: '#' + tinymceId.value, //富文本编辑器的id,
language_url: "/tinymce/langs/zh_CN.js", // 语言包的路径,具体路径看自己的项目,文档后面附上中文js文件
language: "zh_CN", //语言
skin_url: "/tinymce/skins/ui/oxide", // skin路径,具体路径看自己的项目
height: 400, //编辑器高度
branding: false, //是否禁用“Powered by TinyMCE”
menubar: true, //顶部菜单栏显示
image_dimensions: false, //去除宽高属性
plugins: props.plugins, //这里的数据是在props里面就定义好了的
toolbar: props.toolbar, //这里的数据是在props里面就定义好了的
font_formats: 'Arial=arial,helvetica,sans-serif; 宋体=SimSun; 微软雅黑=Microsoft Yahei; Impact=impact,chicago;', //字体
fontsize_formats: '11px 12px 14px 16px 18px 24px 36px 48px 64px 72px', //文字大小
// paste_convert_word_fake_lists: false, // 插入word文档需要该属性
paste_webkit_styles: "all",
paste_merge_formats: true,
nonbreaking_force_tab: false,
paste_auto_cleanup_on_paste: false,
file_picker_types: 'file',
content_css: '/tinymce/skins/content/default/content.css', //以css文件方式自定义可编辑区域的css样式,css文件需自己创建并引入
//图片上传
images_upload_handler: (blobInfo, progress) => new Promise((resolve, reject) => {
if (blobInfo.blob().size / 1024 / 1024 > 2) {
reject({ message: '上传失败,图片大小请控制在 2M 以内', remove: true })
return
} else {
const ph = import.meta.env.VITE_BASE_PATH + ":" + import.meta.env.VITE_SERVER_PORT + "/"
let params = new FormData()
params.append('file', blobInfo.blob())
let config = {
headers: {
"Content-Type": "multipart/form-data",
}
}
axios.post('xxxx', params, config).then(res => {
if (res.data.code == 200) {
resolve(ph + res.data.msg) //上传成功,在成功函数里填入图片路径
} else {
reject('HTTP Error: 上传失败' + res.data.code);
return
}
}).catch(() => {
reject('上传出错,服务器开小差了呢')
return
})
}
}),
// 文件上传
file_picker_callback: (callback, value, meta) => {
// Provide file and text for the link dialog
if (meta.filetype == 'file') {
callback('mypage.html', { text: 'My text' });
}
// Provide image and alt text for the image dialog
if (meta.filetype == 'image') {
callback('myimage.jpg', { alt: 'My alt text' });
}
// Provide alternative source and posted for the media dialog
if (meta.filetype == 'media') {
callback('movie.mp4', { source2: 'alt.ogg', poster: 'image.jpg' });
}
}
})
//监听外部传递进来的的数据变化
watch(
() => props.value,
() => {
myValue.value = props.value
emits("getContent", myValue.value)
}
)
//监听富文本中的数据变化
watch(
() => myValue.value,
() => {
emits("getContent", myValue.value)
}
)
//在onMounted中初始化编辑器
onMounted(() => {
tinymce.init({})
})
</script>
5를 작성하고 Component를 사용하세요. // 使用
<TEditor ref="editor" v-model="formState.content" :disabled='disabled' @getContent="getContent"/>
<script setup lang="ts">
import { reactive } from "vue";
// 引入
import TEditor from '@/components/TEditor.vue';
const formState = reactive({contents :''})
const getContent = (v: string) => {
formState.contents = v
}
</script>
Tinymce 버전"@tinymce/tinymce-vue": "^5.0.0"
"tinymce": "^6.0.3"
위 내용은 vue3 프로젝트에서tinymce를 사용하는 방법의 상세 내용입니다. 자세한 내용은 PHP 중국어 웹사이트의 기타 관련 기사를 참조하세요!
성명:
이 기사는 yisu.com에서 복제됩니다. 침해가 있는 경우 admin@php.cn으로 문의하시기 바랍니다. 삭제

