Ubuntu에서 Nginx 서비스를 구축하고 구성하는 방법
- 王林앞으로
- 2023-05-19 17:47:112745검색
1. Nginx
Nginx("engine x")는 러시아 프로그래머 Igor Sysoev가 개발한 고성능 웹 및 역방향 프록시 서버이며 IMAP/POP3/SMTP 프록시 서버이기도 합니다.
3대 주요 웹 서버 중 하나: apache, Nginx, lighttpd. Nginx는 좋은 대안이며 높은 동시 연결을 처리해야 할 때 Apache 서버보다 더 적합합니다.
nginx 애플리케이션 시나리오
정적 서버. (사진,영상 서비스) 또 하나는 lighttpd 입니다. 수만 개의 동시 파일, html, js, css, flv, jpg, gif 등
동적 서비스, PHP, jsp를 실행하기 위한 nginx-fastcgi 모드. (PHP 동시성은 500-1500, MySQL 동시성은 300-1500)
역방향 프록시, 로드 밸런싱. 일일 pv가 2000W 미만인 경우 nginx를 프록시로 직접 사용할 수 있습니다.
캐싱 서비스. SQUID, VARNISH와 유사합니다.
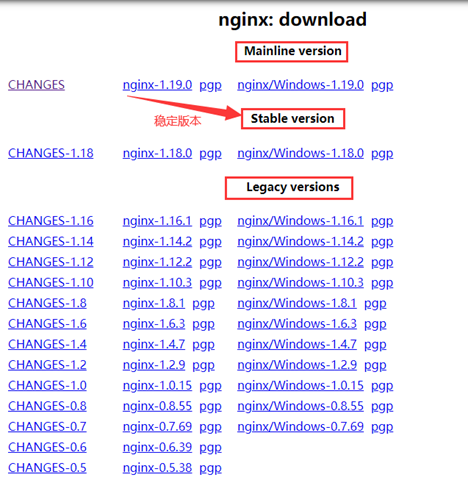
공식 웹사이트에서는 세 가지 버전을 제공합니다.
Nginx 공식 웹사이트에서는 세 가지 버전을 제공합니다.
메인라인 버전: 메인라인은 Nginx가 현재 작업 중인 버전으로, 개발 버전이라고 할 수 있습니다.
안정 버전 : 최신 안정 버전, 제작 환경 권장 버전은
레거시 버전 : 이전 버전의 안정 버전

2. nginx 서비스 구축
1 apt를 사용하여 설치
sudo apt install nginx
2. :
/usr/ sbin/nginx: 기본 프로그램
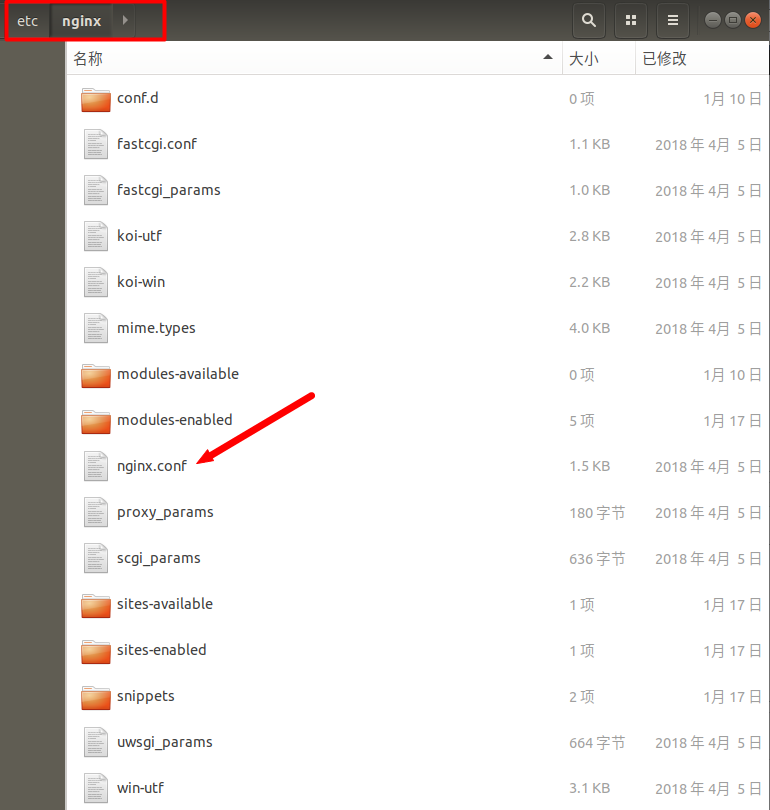
/etc/nginx: 구성 파일 저장
/usr/share/nginx: 정적 파일 저장
/var/log/nginx : 로그 저장
3 시작하고 효과를 확인하세요
service nginx start  # 启动nginx
service nginx reload  # 重新加载nginx配置文件
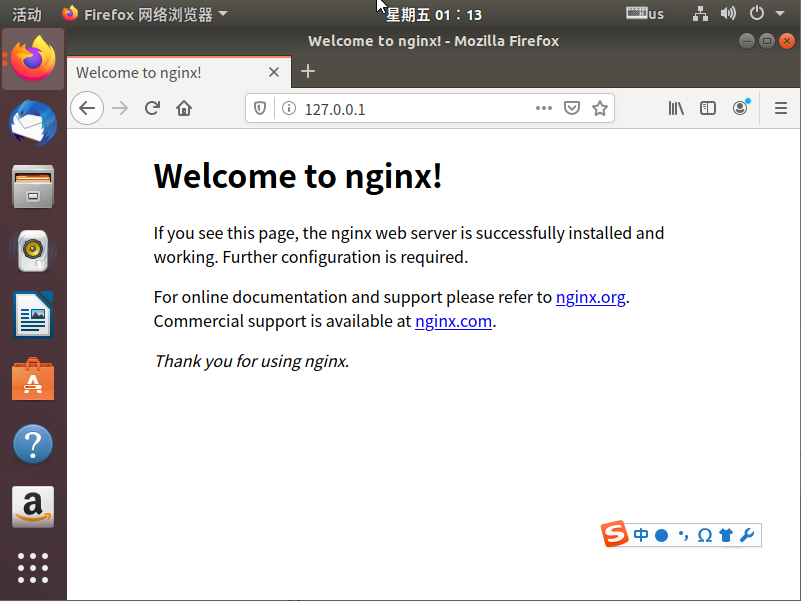
브라우저에 IP 주소를 입력하세요. Wellcome to nginx가 나타나면 구성이 성공한 것입니다.
또 다른 두 명령
nginx -s reopen            # 重启 Nginx
nginx -s stop              # 停止 Nginx

4. 버전 번호 확인:
~$ nginx -v
 nginx version: nginx/1.14.0 (Ubuntu)
3. nginx 구성 파일 소개

: 구성 nginx에 영향을 미침 글로벌 지침. 일반적으로 nginx 서버를 실행하기 위한 사용자 그룹, nginx 프로세스 pid 저장 경로, 로그 저장 경로, 구성 파일 소개, 생성 허용된 작업자 프로세스 수 등이 있습니다.
events block: nginx 서버 또는 사용자에 대한 네트워크 연결에 영향을 미치는 구성입니다. 프로세스당 최대 연결 수, 연결 요청을 처리하기 위해 선택할 이벤트 기반 모델, 동시에 여러 네트워크 연결을 허용할지 여부, 여러 네트워크 연결의 직렬화를 활성화할지 여부 등이 있습니다.
http 블록: 여러 서버를 중첩하고 프록시, 캐시, 로그 정의 및 기타 대부분의 기능과 타사 모듈 구성을 구성할 수 있습니다. 파일 소개, MIME 유형 정의, 로그 사용자 정의, sendfile을 사용하여 파일 전송 여부, 연결 시간 초과, 단일 연결 요청 수 등
서버 블록: 가상 호스트의 관련 매개변수를 구성합니다. 하나의 http에 여러 서버가 있을 수 있습니다.
location block: 요청 라우팅 및 다양한 페이지 처리를 구성합니다.
...              # 全局块。配置影响nginx全局的指令。

events {         # events块。配置影响nginx服务器或与用户的网络连接。
   ...
}

http      # http块。可以嵌套多个server,配置代理,缓存,日志定义等绝大多数功能和第三方模块的配置。
{
    ...   # http全局块
    server        # server块。配置虚拟主机的相关参数,一个http中可以有多个server。
    {
        ...       # server全局块
        location [PATTERN]   # location块。配置请求的路由,以及各种页面的处理情况。
        {
            ...
        }
        location [PATTERN]
        {
            ...
        }
    }
    server
    {
      ...
    }
    ...     # http全局块
}
2. 기본 구성
##
# You should look at the following URL's in order to grasp a solid understanding
# of Nginx configuration files in order to fully unleash the power of Nginx.
# https://www.nginx.com/resources/wiki/start/
# https://www.nginx.com/resources/wiki/start/topics/tutorials/config_pitfalls/
# https://wiki.debian.org/Nginx/DirectoryStructure
#
# In most cases, administrators will remove this file from sites-enabled/ and
# leave it as reference inside of sites-available where it will continue to be
# updated by the nginx packaging team.
#
# This file will automatically load configuration files provided by other
# applications, such as Drupal or Wordpress. These applications will be made
# available underneath a path with that package name, such as /drupal8.
#
# Please see /usr/share/doc/nginx-doc/examples/ for more detailed examples.
##

# Default server configuration
#
server {
    listen 80 default_server;
    listen [::]:80 default_server;

    # SSL configuration
    #
    # listen 443 ssl default_server;
    # listen [::]:443 ssl default_server;
    #
    # Note: You should disable gzip for SSL traffic.
    # See: https://bugs.debian.org/773332
    #
    # Read up on ssl_ciphers to ensure a secure configuration.
    # See: https://bugs.debian.org/765782
    #
    # Self signed certs generated by the ssl-cert package
    # Don't use them in a production server!
    #
    # include snippets/snakeoil.conf;

    root /var/www/html;

    # Add index.php to the list if you are using PHP
    index index.html index.htm index.nginx-debian.html;

    server_name _;

    location / {
        # First attempt to serve request as file, then
        # as directory, then fall back to displaying a 404.
        try_files $uri $uri/ =404;
    }

    # pass PHP scripts to FastCGI server
    #
    #location ~ \.php$ {
    #    include snippets/fastcgi-php.conf;
    #
    #    # With php-fpm (or other unix sockets):
    #    fastcgi_pass unix:/var/run/php/php7.0-fpm.sock;
    #    # With php-cgi (or other tcp sockets):
    #    fastcgi_pass 127.0.0.1:9000;
    #}

    # deny access to .htaccess files, if Apache's document root
    # concurs with nginx's one
    #
    #location ~ /\.ht {
    #    deny all;
    #}
}


# Virtual Host configuration for example.com
#
# You can move that to a different file under sites-available/ and symlink that
# to sites-enabled/ to enable it.
#
#server {
#    listen 80;
#    listen [::]:80;
#
#    server_name example.com;
#
#    root /var/www/example.com;
#    index index.html;
#
#    location / {
#        try_files $uri $uri/ =404;
#    }
#}
3. 기본 nginx 구성########### 每个指令必须有分号结束。################# #user administrator administrators; #配置用户或者组,默认为nobody nobody。 #worker_processes 2; #允许生成的进程数,默认为1 #pid /nginx/pid/nginx.pid; #指定nginx进程运行文件存放地址 error_log log/error.log debug; #制定日志路径,级别。这个设置可以放入全局块,http块,server块,级别以此为:debug|info|notice|warn|error|crit|alert|emerg events { accept_mutex on; #设置网路连接序列化,防止惊群现象发生,默认为on multi_accept on; #设置一个进程是否同时接受多个网络连接,默认为off #use epoll; #事件驱动模型,select|poll|kqueue|epoll|resig|/dev/poll|eventport worker_connections 1024; #最大连接数,默认为512 } http { include mime.types; #文件扩展名与文件类型映射表 default_type application/octet-stream; #默认文件类型,默认为text/plain #access_log off; #取消服务日志 log_format myFormat '$remote_addr–$remote_user [$time_local] $request $status $body_bytes_sent $http_referer $http_user_agent $http_x_forwarded_for'; #自定义格式 access_log log/access.log myFormat; #combined为日志格式的默认值 sendfile on; #允许sendfile方式传输文件,默认为off,可以在http块,server块,location块。 sendfile_max_chunk 100k; #每个进程每次调用传输数量不能大于设定的值,默认为0,即不设上限。 keepalive_timeout 65; #连接超时时间,默认为75s,可以在http,server,location块。 upstream mysvr { server 127.0.0.1:7878; server 192.168.10.121:3333 backup; #热备 } error_page 404 https://www.baidu.com; #错误页 server { keepalive_requests 120; #单连接请求上限次数。 listen 80; #监听端口 server_name 127.0.0.1; #监听地址 location ~*^.+$ { #请求的url过滤,正则匹配,~为区分大小写,~*为不区分大小写。 #root path; #根目录 #index vv.txt; #设置默认页 proxy_pass http://mysvr; #请求转向mysvr 定义的服务器列表 deny 127.0.0.1; #拒绝的ip allow 172.18.5.54; #允许的ip } } }4.nginx 가상 호스트 구성
#下面是server虚拟主机的配置段
 server
  {
    listen 80;#监听端口
    server_name localhost;#域名
    index index.html index.htm index.php;
    root /usr/local/webserver/nginx/html;#站点目录
      location ~ .*\.(php|php5)?$
    {
      #fastcgi_pass unix:/tmp/php-cgi.sock;
      fastcgi_pass 127.0.0.1:9000;
      fastcgi_index index.php;
      include fastcgi.conf;
    }
    location ~ .*\.(gif|jpg|jpeg|png|bmp|swf|ico)$
    {
      expires 30d;
    #access_log off;
    }
    location ~ .*\.(js|css)?$
    {
      expires 15d;
     #access_log off;
    }
    access_log off;
  }
확인 구성 파일:
root@ubuntu: nginx -t
nginx: the configuration file /etc/nginx/nginx.conf syntax is ok
nginx: configuration file /etc/nginx/nginx.conf test is successful
5. 고객을 기록하기 위해 클라이언트의 IP 주소에는 $remote_addr 및 $http_x_forwarded_for
$remote_user를 사용할 수 있습니다.
- $time_local: 액세스 시간과 시간대를 기록하는 데 사용됩니다.
$request: 요청의 URL 및 http 프로토콜을 기록합니다.
$status: 요청 상태를 기록하는 데 사용됩니다.
$body_bytes_s ent: 본문 내용의 크기를 기록합니다. 클라이언트로 전송된 파일
$http_referer: 해당 페이지 링크의 액세스를 기록하는 데 사용됩니다.
$http_user_agent: 클라이언트 브라우저의 관련 정보를 기록합니다.
访问链接是:http://localhost:88/test1/test.php
网站路径是:/var/www/html

$host:localhost
$server_port:88
$request_uri:<a href="http://localhost:88/test1/test.php" rel="external nofollow"   target="_blank">http:</a>//localhost:88/test1/test.php
$document_uri:/test1/test.php
$document_root:/var/www/html
$request_filename:/var/www/html/test1/test.php
6. Nginx 기본 구성 1. 정적 HTTP 서버 구성
먼저, Nginx HTTP 프로토콜을 통해 서버에 있는 정적 파일(HTML, 그림 등)을 클라이언트에 표시할 수 있는 HTTP 서버입니다. - 구성:
server {
    listen 80;   # 端口
    server_name localhost  192.168.1.100;   # 域名
    location / {             # 代表这是项目根目录
        root /usr/share/nginx/www;   # 虚拟目录
    }
}
2. 역방향 프록시 서버 구성 - 역방향 프록시란 무엇인가요?
클라이언트는 HTTP 프로토콜을 통해 웹사이트 애플리케이션 서버에 직접 접속할 수 있습니다. 웹사이트 관리자가 중간에 Nginx를 추가하면 클라이언트는 Nginx를 요청하고, Nginx는 애플리케이션 서버에 요청한 후 클라이언트에 결과를 반환합니다. Nginx는 역방향 프록시 서버입니다.
server {
    listen 80;
    location / {
        proxy_pass http://192.168.0.112:8080;   # 应用服务器HTTP地址
    }
}
既然服务器可以直接HTTP访问,为什么要在中间加上一个反向代理,不是多此一举吗?反向代理有什么作用?继续往下看,下面的负载均衡、虚拟主机,都基于反向代理实现,当然反向代理的功能也不仅仅是这些。
3、负载均衡配置
当网站访问量非常大,也摊上事儿了。因为网站越来越慢,一台服务器已经不够用了。因此,可以将同一应用部署在多台服务器上,以将众多用户请求分配至多台机器进行处理。即使其中一台服务器故障,只要其他服务器正常运行,用户仍然可以正常使用,这是多台服务器带来的好处。Nginx可以通过反向代理来实现负载均衡。

负载均衡配置:
upstream myapp {
    server 192.168.0.111:8080;   # 应用服务器1
    server 192.168.0.112:8080;   # 应用服务器2
}
server {
    listen 80;
    location / {
        proxy_pass http://myweb;
    }
}
4、虚拟主机配置
有的网站访问量大,需要负载均衡。然而并不是所有网站都如此出色,有的网站,由于访问量太小,需要节省成本,将多个网站部署在同一台服务器上。
例如将www.aaa.com和www.bbb.com两个网站部署在同一台服务器上,两个域名解析到同一个IP地址,但是用户通过两个域名却可以打开两个完全不同的网站,互相不影响,就像访问两个服务器一样,所以叫两个虚拟主机。
虚拟主机配置:
server {
    listen 80 default_server;
    server_name _;
    return 444;   # 过滤其他域名的请求,返回444状态码
}
server {
    listen 80;
    server_name www.aaa.com;   # www.aaa.com域名
    location / {
        proxy_pass http://localhost:8080;   # 对应端口号8080
    }
}
server {
    listen 80;
    server_name www.bbb.com;   # www.bbb.com域名
    location / {
        proxy_pass http://localhost:8081;   # 对应端口号8081
    }
}
在服务器8080和8081分别开了一个应用,客户端通过不同的域名访问,根据server_name可以反向代理到对应的应用服务器。
虚拟主机的原理是通过HTTP请求头中的Host是否匹配server_name来实现的,有兴趣的同学可以研究一下HTTP协议。
另外,server_name配置还可以过滤有人恶意将某些域名指向你的主机服务器。
위 내용은 Ubuntu에서 Nginx 서비스를 구축하고 구성하는 방법의 상세 내용입니다. 자세한 내용은 PHP 중국어 웹사이트의 기타 관련 기사를 참조하세요!

