
Springboot가 Shiro를 통합하여 로그인 및 권한 확인을 구현하는 방법

- WBOYWBOYWBOYWBOYWBOYWBOYWBOYWBOYWBOYWBOYWBOYWBOYWB앞으로
- 2023-05-17 14:55:111120검색
Springboot-cli 개발 스캐폴딩 시리즈
Springboot는 로그인 확인 및 권한 인증을 위해 Shiro를 우아하게 통합합니다(소스 코드 다운로드 포함)
소개
Springboo는 데모 데모가 첨부된 로그인 확인 및 권한 인증을 위해 Shiro를 구성합니다.
머리말
저희는 개발자가 빠르게 기본 환경을 구축하고 애플리케이션을 실행할 수 있도록 최선을 다하고 있습니다. 초보자도 빠르게 시작할 수 있도록 사용자가 참고할 수 있는 사용 예제를 제공합니다.
이 블로그 프로젝트의 소스 코드 주소:
프로젝트 소스 코드 github 주소
프로젝트 소스 코드 국내 gitee 주소
1. Environment
Dependency
     <!-- Shiro核心框架 -->
        <dependency>
            <groupId>org.apache.shiro</groupId>
            <artifactId>shiro-core</artifactId>
            <version>1.9.0</version>
        </dependency>
        <!-- Shiro使用Spring框架 -->
        <dependency>
            <groupId>org.apache.shiro</groupId>
            <artifactId>shiro-spring</artifactId>
            <version>1.9.0</version>
        </dependency>
        <!-- Thymeleaf中使用Shiro标签 -->
        <dependency>
            <groupId>com.github.theborakompanioni</groupId>
            <artifactId>thymeleaf-extras-shiro</artifactId>
            <version>2.1.0</version>
        </dependency>
        <dependency>
            <groupId>org.springframework.boot</groupId>
            <artifactId>spring-boot-starter-thymeleaf</artifactId>
        </dependency>
yml 구성
서버:
포트: 9999
서블릿 :
session:
# Tomcat이 COOKIE에서만 세션 정보를 얻도록 하여 쿠키가 없을 때 URL이 자동으로 추가되지 않도록 합니다;jsessionid=….
추적 모드: COOKIEspring:
thymeleaf:
# 개발 환경 테스트를 용이하게 하기 위해 페이지 캐싱을 끕니다
캐시: false
# 정적 리소스 경로
접두사: classpath:/templates/
# 웹 리소스 기본 .html 끝
mode : HTML
2. 소개
Shiro의 세 가지 주요 기능 모듈
Subject
인증 주체는 일반적으로 사용자를 나타냅니다(작업은 SecurityManager에 맡김).
SecurityManager
보안 관리자, 보안 관리자는 모든 주제를 관리하며 내부 보안 구성 요소와 협력할 수 있습니다(Realm과 연결됨)
Realm
도메인 객체, 권한 정보 확인에 사용되는 Shiro's 로그인 확인, 권한 확인 등 데이터를 연결하기 위한 브리지는 Realm에 정의되어 있습니다.
3. 영역 구성
귀하의 비즈니스에 따라 정의할 수 있는 사용자 엔터티 User를 정의합니다.
@Data
@Accessors(chain = true)
public class User {
    /**
     * 用户id
     */
    private Long userId;
    /**
     * 用户名
     */
    private String username;
    /**
     * 密码
     */
    private String password;
    /**
     * 用户别称
     */
    private String name;
}
AuthorizingRealm에서 로그인 확인 doGetAuthenticationInfo 및 권한 부여 doGetAuthorizationInfo 메서드를 다시 작성하고 사용자 정의 확인 로직을 작성합니다.
/**
 * 自定义登录授权
 *
 * @author ding
 */
public class UserRealm extends AuthorizingRealm {
    /**
     * 授权
     * 此处权限授予
     */
    @Override
    protected AuthorizationInfo doGetAuthorizationInfo(PrincipalCollection principalCollection) {
        SimpleAuthorizationInfo info = new SimpleAuthorizationInfo();
        // 在这里为每一个用户添加vip权限
        info.addStringPermission("vip");
        return info;
    }
    /**
     * 认证
     * 此处实现我们的登录逻辑,如账号密码验证
     */
    @Override
    protected AuthenticationInfo doGetAuthenticationInfo(AuthenticationToken authenticationToken) throws AuthenticationException {
        // 获取到token
        UsernamePasswordToken token = (UsernamePasswordToken) authenticationToken;
        // 从token中获取到用户名和密码
        String username = token.getUsername();
        String password = String.valueOf(token.getPassword());
        // 为了方便,这里模拟获取用户
        User user = this.getUser();
        if (!user.getUsername().equals(username)) {
            throw new UnknownAccountException("用户不存在");
        } else if (!user.getPassword().equals(password)) {
            throw new IncorrectCredentialsException("密码错误");
        }
        // 校验完成后,此处我们把用户信息返回,便于后面我们通过Subject获取用户的登录信息
        return new SimpleAuthenticationInfo(user, password, getName());
    }
    /**
     * 此处模拟用户数据
     * 实际开发中,换成数据库查询获取即可
     */
    private User getUser() {
        return new User()
                .setName("admin")
                .setUserId(1L)
                .setUsername("admin")
                .setPassword("123456");
    }
}
4. 핵심 구성
ShiroConfig.java
/**
* Shiro에는 인터셉터와 관련된 인터셉터를 구현할 수 있는 필터가 내장되어 있습니다.
* 자주 사용되는 필터:
* anon: 인증 없이 액세스 가능(로그인)
* authc:
* 사용자에 액세스하려면 인증되어야 합니다. : RememberMe 기능을 사용하면 바로 접근할 수 있습니다
* 권한: 이 리소스는 접근하기 전에 리소스 권한을 얻어야 합니다. 형식 perms[permission1, 허가2]
* 역할: 이 리소스는 접근하기 전에 역할 권한을 얻어야 합니다. 접속 가능
**/
/**
 * shiro核心管理器
 *
 * @author ding
 */
@Configuration
public class ShiroConfig {
    /**
     * 无需认证就可以访问
     */
    private final static String ANON = "anon";
    /**
     * 必须认证了才能访问
     */
    private final static String AUTHC = "authc";
    /**
     * 拥有对某个资源的权限才能访问
     */
    private final static String PERMS = "perms";
    /**
     * 创建realm,这里返回我们上一把定义的UserRealm
     */
    @Bean(name = "userRealm")
    public UserRealm userRealm() {
        return new UserRealm();
    }
    /**
     * 创建安全管理器
     */
    @Bean(name = "securityManager")
    public DefaultWebSecurityManager getDefaultWebSecurityManager(@Qualifier("userRealm") UserRealm userRealm) {
        DefaultWebSecurityManager securityManager = new DefaultWebSecurityManager();
        //绑定realm对象
        securityManager.setRealm(userRealm);
        return securityManager;
    }
    /**
     * 授权过滤器
     */
    @Bean
    public ShiroFilterFactoryBean getShiroFilterFactoryBean(@Qualifier("securityManager") DefaultWebSecurityManager defaultWebSecurityManager) {
        ShiroFilterFactoryBean bean = new ShiroFilterFactoryBean();
        // 设置安全管理器
        bean.setSecurityManager(defaultWebSecurityManager);
        // 添加shiro的内置过滤器
        Map<String, String> filterMap = new LinkedHashMap<>();
        filterMap.put("/index", ANON);
        filterMap.put("/userInfo", PERMS + "[vip]");
        filterMap.put("/table2", AUTHC);
        filterMap.put("/table3", PERMS + "[vip2]");
        bean.setFilterChainDefinitionMap(filterMap);
        // 设置跳转登陆页
        bean.setLoginUrl("/login");
        // 无权限跳转
        bean.setUnauthorizedUrl("/unAuth");
        return bean;
    }
    /**
     * Thymeleaf中使用Shiro标签
     */
    @Bean
    public ShiroDialect shiroDialect() {
        return new ShiroDialect();
    }
}
5. 인터페이스 작성
IndexController.java
/**
 * @author ding
 */
@Controller
public class IndexController {
    @RequestMapping({"/", "/index"})
    public String index(Model model) {
        model.addAttribute("msg", "hello,shiro");
        return "/index";
    }
    @RequestMapping("/userInfo")
    public String table1(Model model) {
        return "userInfo";
    }
    @RequestMapping("/table")
    public String table(Model model) {
        return "table";
    }
    @GetMapping("/login")
    public String login() {
        return "login";
    }
    @PostMapping(value = "/doLogin")
    public String doLogin(@RequestParam("username") String username, @RequestParam("password") String password, Model model) {
        //获取当前的用户
        Subject subject = SecurityUtils.getSubject();
        //用来存放错误信息
        String msg = "";
        //如果未认证
        if (!subject.isAuthenticated()) {
            //将用户名和密码封装到shiro中
            UsernamePasswordToken token = new UsernamePasswordToken(username, password);
            try {
                // 执行登陆方法
                subject.login(token);
            } catch (Exception e) {
                e.printStackTrace();
                msg = "账号或密码错误";
            }
            //如果msg为空,说明没有异常,就返回到主页
            if (msg.isEmpty()) {
                return "redirect:/index";
            } else {
                model.addAttribute("errorMsg", msg);
                return "login";
            }
        }
        return "/login";
    }
    @GetMapping("/logout")
    public String logout() {
        SecurityUtils.getSubject().logout();
        return "index";
    }
    @GetMapping("/unAuth")
    public String unAuth() {
        return "unAuth";
    }
}
6. 폴더에는 페이지 리소스가 저장됩니다
index.html
<!DOCTYPE html>
<html xmlns:th="http://www.thymeleaf.org">
<html xmlns:shiro="http://www.pollix.at/thymeleaf/shiro">
<head>
    <meta charset="UTF-8">
    <title>Title</title>
</head>
<body>
<h2>首页</h2>
<!-- 使用shiro标签 -->
<shiro:authenticated>
    <p>用户已登录</p> <a th:href="@{/logout}" rel="external nofollow" >退出登录</a>
</shiro:authenticated>
<shiro:notAuthenticated>
    <p>用户未登录</p>
</shiro:notAuthenticated>
<br/>
<a th:href="@{/userInfo}" rel="external nofollow" >用户信息</a>
<a th:href="@{/table}" rel="external nofollow" >table</a>
</body>
</html>
login.html
<!DOCTYPE html>
<html lang="en" xmlns:th="http://www.thymeleaf.org">
<head>
    <meta charset="UTF-8">
    <title>登陆页</title>
</head>
<body>
<div>
    <p th:text="${errorMsg}"></p>
    <form action="/doLogin" method="post">
        <h3>登陆页</h3>
        <h7>账号:admin,密码:123456</h7>
        <input type="text" id="username"  name="username" placeholder="admin">
        <input type="password" id="password" name="password"  placeholder="123456">
        <button type="submit">登陆</button>
    </form>
</div>
</body>
</html>
userInfo.html
<!DOCTYPE html>
<html lang="en" xmlns:shiro="http://www.pollix.at/thymeleaf/shiro">
<head>
    <meta charset="UTF-8">
    <title>table1</title>
</head>
<body>
<h2>用户信息</h2>
<!-- 利用shiro获取用户信息 -->
用户名:<shiro:principal property="username"/>
<br/>
用户完整信息: <shiro:principal/>
</body>
</html>
table.hetml
<!DOCTYPE html>
<html lang="en">
<head>
    <meta charset="UTF-8">
    <title>table</title>
</head>
<body>
<h2>table</h2>
</body>
</html>
7. 효과 데모
프로젝트 브라우저 입력 시작
127.0.0.1:9999
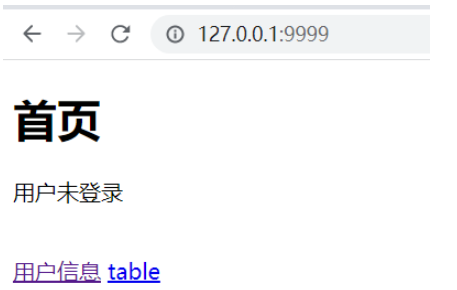 사용자 정보 및 테이블을 클릭하면 자동으로 로그인 페이지로 이동합니다
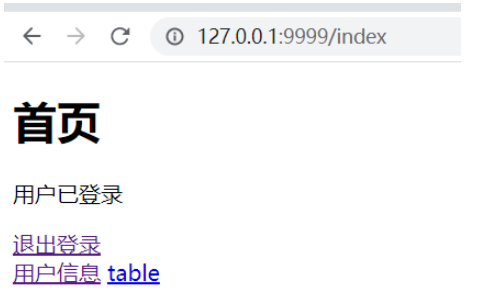
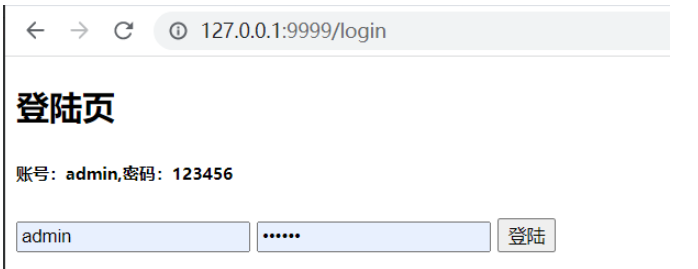 로그인 성공 후
 사용자 정보 가져오기
여기서 얻는 것은 이전 doGetAuthenticationInfo에서 반환된 사용자 정보입니다. 방법은 데모용으로 모두 반환됩니다. 실제 생산에서는 비밀번호를 반환할 수 없습니다.
위 내용은 Springboot가 Shiro를 통합하여 로그인 및 권한 확인을 구현하는 방법의 상세 내용입니다. 자세한 내용은 PHP 중국어 웹사이트의 기타 관련 기사를 참조하세요!