SpringBoot SPI 메커니즘과 사용자 정의 스타터를 구현하는 방법
- WBOY앞으로
- 2023-05-16 19:58:101578검색
1. SpringBoot의 SPI 메커니즘
SPI란 무엇인가요? 전체 이름은 Service Provider Interface입니다. 쉽게 말하면 서비스 구현을 찾기 위한 메커니즘인 서비스 제공자 인터페이스입니다. Service Provider Interface。简单翻译的话,就是服务提供者接口,是一种寻找服务实现的机制。
其实就是一个规范定义、或者说是实现的标准。
用生活中的例子说就是,你买了一台小米的手机。
但是你用的充电器并不一定非要是小米充电器,你可以拿其他厂商的充电器来进行充电,只要满足协议、端口等要求,那么就是可以充电的。这也是一种热拔插的思想,并不是固定死的。
换成代码来说也是一样的,我定义了一个接口,但是不想固定死具体的实现类,因为那样如果要更换实现类就要改动源代码,这往往是不合适的。
那么我也可以定义一个规范,在之后需要更换实现类或增加其他实现类时,遵守这个规范,我也可以动态的去发现这些实现类。
换在SpringBoot中,就是现在的SpringBoot这个平台定义了一些规范和标准,我现在想要让SpringBoot平台接纳我。
我该如何做呢?
很简单,按照它的标准和规范做事。
SpringBoot在启动的时候,会扫描所有jar包resource/META-INF/spring.factories文件,依据类的全限定名,利用反射机制将Bean
그러나 사용하는 충전기가 반드시 샤오미 충전기일 필요는 없습니다. 프로토콜, 포트 및 기타 요구 사항을 충족하는 한 다른 제조업체의 충전기를 사용하여 충전할 수 있습니다. 이것은 또한 수정되지 않은 핫스왑 아이디어이기도 합니다.
코드 측면에서도 마찬가지입니다. 인터페이스를 정의했지만 특정 구현 클래스를 수정하고 싶지는 않았습니다. 구현 클래스를 변경하려면 소스 코드를 변경해야 하기 때문입니다. 이는 종종 부적절합니다. 그런 다음 구현 클래스를 변경하거나 나중에 다른 구현 클래스를 추가해야 할 때 이러한 구현 클래스를 동적으로 검색할 수도 있습니다.
매우 간단합니다. 표준과 사양에 따라 작업을 수행하세요
.resource/META-INF/spring.factories 파일을 검색하고 리플렉션 메커니즘을 사용하여 정규화된 Bean을 기반으로 변환합니다. 클래스 이름입니다. 2. 커스텀 스타터저의 작은 연습에 대해 말씀드리겠습니다.
- 이 스타터에서는
- 단기 템플릿 보내기
- 객체 저장소 템플릿
- 의 자동 조립을 구현합니다. ~ 대략 4단계로 구성됩니다.
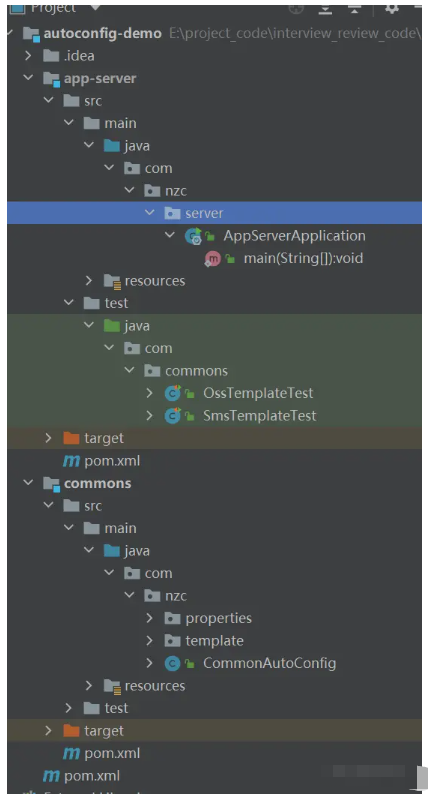 구성 파일에서 구성을 매핑하는 데 사용되는 xxxxProperties 클래스
이 문서의 OssTemplate과 같은 xxxx 등의 인터페이스와 클라이언트를 작동하는 데 사용됩니다.
자동으로 xxxxAutoConfiguration 클래스를 구성하고 xxxxTemplate을 컨테이너에 삽입합니다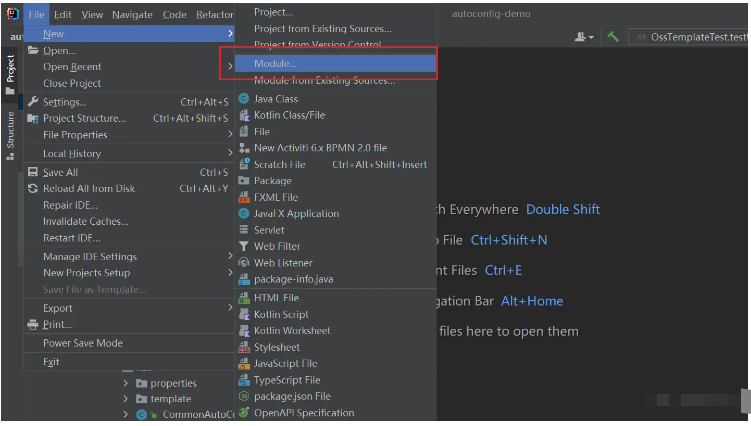
2.1. Maven 프로젝트를 준비하세요
src 디렉터리를 삭제하고,
그 다음 Maven 프로젝트를 두 개 만듭니다. Maven 프로젝트 프로젝트, 실제로 SpringBoot 프로젝트를 생성하는 방법은 동일합니다.)
가장 바깥쪽에 있는 pom입니다. 이것이 자동 조립을 통해 SpringBoot 작업에 최종적으로 주입할 클래스입니다.여기에는 OssTemplate과 SmsTemplate이 있습니다
 <parent>
     <groupId>org.springframework.boot</groupId>
     <artifactId>spring-boot-starter-parent</artifactId>
     <version>2.5.2</version>
     <relativePath/>
 </parent>

 <properties>
     <maven.compiler.source>8</maven.compiler.source>
     <maven.compiler.target>8</maven.compiler.target>
 </properties>


 <dependencies>
     <dependency>
         <groupId>org.projectlombok</groupId>
         <artifactId>lombok</artifactId>
     </dependency>
     <dependency>
         <groupId>org.springframework.boot</groupId>
         <artifactId>spring-boot-starter-web</artifactId>
     </dependency>
     <dependency>
         <groupId>org.springframework.boot</groupId>
         <artifactId>spring-boot-starter</artifactId>
     </dependency>
     <dependency>
         <groupId>org.springframework.boot</groupId>
         <artifactId>spring-boot-starter-test</artifactId>
     </dependency>
     <dependency>
         <groupId>org.springframework.boot</groupId>
         <artifactId>spring-boot-configuration-processor</artifactId>
         <optional>true</optional>
     </dependency>
 </dependencies>
/**
* @author Ning Zaichun
*/
@Data
@ConfigurationProperties(prefix = "nzc.oss")
public class OssProperties {
private String accessKey;
private String secret;
private String bucketName;
private String url;
private String endpoint;
}2.4 , AutoConfiguration @Data
@ConfigurationProperties(prefix = "nzc.sms")
public class SmsProperties {
private String name;
}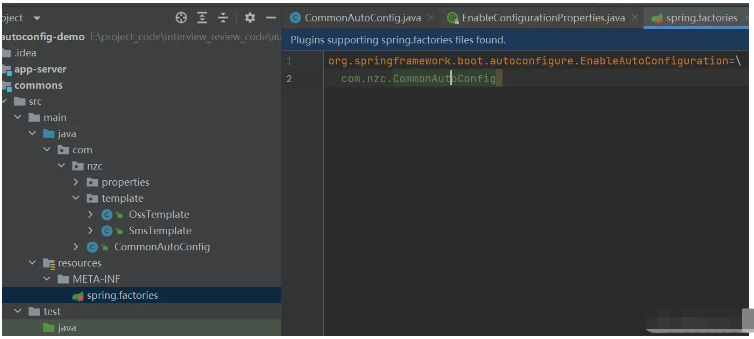 2.5, spring.factories 작성
리소스 디렉터리에 META-INF 폴더를 생성하고,
META-INF 폴더 아래에 spring.factories 파일을 생성합니다. 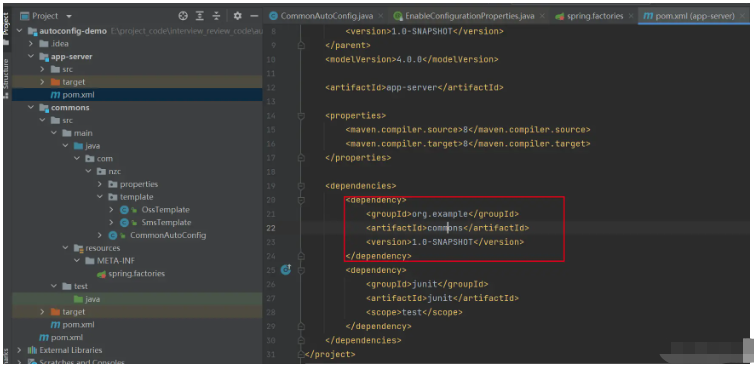
 /**
  * @author Ning Zaichun
  */
 public class OssTemplate {

     private OssProperties ossProperties;

     public OssTemplate(OssProperties ossProperties) {
         this.ossProperties = ossProperties;
     }

     public String test() {
         System.out.println(ossProperties.getBucketName());
         return "test";
     }
     public String upload(String filename, InputStream is) {
         // yourEndpoint填写Bucket所在地域对应的Endpoint。以华东1(杭州)为例,Endpoint填写为https://oss-cn-hangzhou.aliyuncs.com。
         String endpoint = ossProperties.getEndpoint();
         // 阿里云主账号AccessKey拥有所有API的访问权限,风险很高。强烈建议您创建并使用RAM账号进行API访问或日常运维,请登录 https://ram.console.aliyun.com 创建RAM账号。
         String accessKeyId = ossProperties.getAccessKey();
         String accessKeySecret = ossProperties.getSecret();

         // 创建OSSClient实例。
         OSS ossClient = new OSSClientBuilder().build(endpoint, accessKeyId, accessKeySecret);

         String storePath = new SimpleDateFormat("yyyy/MM/dd").format(new Date()) + "/" + UUID.randomUUID() + filename.substring(filename.lastIndexOf("."));

         System.out.println(storePath);
         // 依次填写Bucket名称(例如examplebucket)和Object完整路径(例如exampledir/exampleobject.txt)。Object完整路径中不能包含Bucket名称。
         ossClient.putObject(ossProperties.getBucketName(), storePath, is);

         String url = ossProperties.getUrl() + storePath;

         // 关闭OSSClient。
         ossClient.shutdown();
         return url + "#" + storePath;
    }

     public void remove(String fileUrl) {
         // yourEndpoint填写Bucket所在地域对应的Endpoint。以华东1(杭州)为例,Endpoint填写为https://oss-cn-hangzhou.aliyuncs.com。
         String endpoint = ossProperties.getEndpoint();
         // 阿里云账号AccessKey拥有所有API的访问权限,风险很高。强烈建议您创建并使用RAM用户进行API访问或日常运维,请登录RAM控制台创建RAM用户。
         String accessKeyId = ossProperties.getAccessKey();
         String accessKeySecret = ossProperties.getSecret();
         // 填写Bucket名称。
         String bucketName = ossProperties.getBucketName();
         // 填写文件完整路径。文件完整路径中不能包含Bucket名称。
         //2022/01/21/f0870eb3-4714-4fae-9fc3-35e72202f193.jpg
         String objectName = fileUrl;

         // 创建OSSClient实例。
         OSS ossClient = new OSSClientBuilder().build(endpoint, accessKeyId, accessKeySecret);

         // 删除文件或目录。如果要删除目录,目录必须为空。
         ossClient.deleteObject(bucketName, objectName);

         // 关闭OSSClient。
         ossClient.shutdown();
     }
 }
- 있다면
 public class SmsTemplate {

     private SmsProperties properties;

     public SmsTemplate(SmsProperties properties) {
         this.properties = properties;
     }

     public void sendSms(String mobile, String code){
         System.out.println(properties.getName()+"=="+mobile+"===="+code);
     }
 }
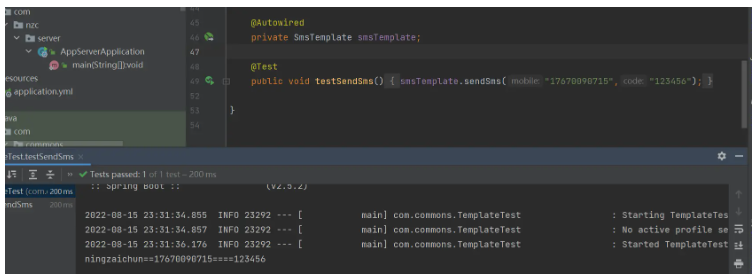
이 단계 후에는 이 프로젝트를 넣고 Jar 패키지를 만든 다음 사용하려는 프로젝트에 도입합니다.
1. SpringBoot 시작 클래스만 생성합니다. 그렇지 않으면 컨텍스트가 없습니다~
 2.
2.
 @EnableConfigurationProperties({
     SmsProperties.class,
     OssProperties.class
         })
 public class CommonAutoConfig {

     @Bean
     public SmsTemplate smsTemplate(SmsProperties smsProperties){
         return new SmsTemplate(smsProperties);
     }

     @Bean
     public OssTemplate ossTemplate(OssProperties ossProperties){
         return new OssTemplate(ossProperties);
     }

 }
oss 통합 구성을 올바르게 수정하면 사용할 수 있습니다~🎜🎜🎜테스트 클래스 작성: 🎜🎜org.springframework.boot.autoconfigure.EnableAutoConfiguration=\ com.nzc.CommonAutoConfig🎜사용 가능함을 증명하세요~🎜🎜🎜🎜
위 내용은 SpringBoot SPI 메커니즘과 사용자 정의 스타터를 구현하는 방법의 상세 내용입니다. 자세한 내용은 PHP 중국어 웹사이트의 기타 관련 기사를 참조하세요!

