>  기사  >  Java  >  Spring Boot가 Thymeleaf를 통합하는 방법

Spring Boot가 Thymeleaf를 통합하는 방법

王林
王林앞으로
2023-05-16 09:22:111331검색

Thymeleaf

기본 소개

Spring Boot는 공식적으로 Thymeleaf를 템플릿 엔진으로 사용할 것을 권장합니다. SpringBoot는 Thymeleaf에 대한 일련의 기본 구성을 제공하고 Thymeleaf에 대한 뷰 확인자를 제공합니다. Thymeleaf의 종속성을 프로젝트로 가져오면 해당 자동 구성(ThymeleafAutoConfiguration)이 자동으로 적용되므로 Thymeleaf는 Spring Boot와 완벽하게 통합될 수 있습니다. Thymeleaf 템플릿 엔진은 html 태그와 완벽하게 결합되어 데이터의 백엔드 렌더링을 용이하게 합니다. Thymeleaf는 정적 효과와 동적 효과를 지원합니다. 동적 데이터가 없으면 정적 효과가 표시됩니다. 템플릿 엔진은 사용자 인터페이스를 비즈니스 데이터(콘텐츠)와 분리하기 위해 생성됩니다. 웹사이트의 템플릿 엔진은 표준 HTML 문서를 생성합니다즉, 템플릿 파일과 데이터가 템플릿 엔진을 통해 생성되어 HTML 코드를 생성합니다. **일반적인 템플릿 엔진은 jsp, freemarker, Velocity, thymeleaf입니다. Thymeleaf의 위치는 templates에 있습니다. Thymeleaf 공식 웹사이트: https://www.thymeleaf.org/

<dependency>
  <groupId>org.springframework.boot</groupId>
  <artifactId>spring-boot-starter-thymeleaf</artifactId>
</dependency>
Thymeleaf의 기본 보기 경로는: / resources/templates입니다. 이 디렉토리 아래에 html을 만들고 thymeleaf
<html lang="en" xmlns:th="http://www.thymleaf.org">

를 소개하세요. xmlns:th="http: //www.thymleaf.org">

기본 구문

${도메인 속성 이름}: 요청 도메인의 도메인 속성 값을 가져와 표시합니다
${session.domain 속성 name}: 세션 도메인 속성 값에서 도메인을 가져오고

< p th:text="${name}">aaa</p>

데이터를 얻으면 동적 그림으로 렌더링되고, 그렇지 않으면 정적 그림으로 렌더링됩니다(단어 학생 관리 시스템은 표시됩니다)
Spring Boot가 Thymeleaf를 통합하는 방법

th: 텍스트 텍스트 교체

<span th:text="${user.name}">Tom</span>

th:if 및 th:텍스트 교체가 아닌 경우

조건부 판단에는 th:if 및 th:unless 속성을 사용하고, th:unlessth:unless는 정반대입니다. , 표현식 조건이 성립되지 않은 경우에만 콘텐츠가 표시됩니다

<h3 th:if="${age>=18}">成年</h3>
<h3 th:unless="${age>=18}">未成年</h3>

th:each foreach loop


<html lang="en" xmlns:th="http://www.thymleaf.org">

    
    Title


学生管理系统

序号 姓名 年龄 性别 班级 生日 操作
1 aa 22 计科1班 2022-2-3 删除

Spring Boot가 Thymeleaf를 통합하는 방법

th:href 및 @{} 링크 표현식

<!--http://localhost:8080/stu/10 -->
<a th:href="${&#39;/stus/&#39;+ stu.id}" rel="external nofollow" >编辑学生1</a>

<!--http://localhost:8080/stu?id=10 -->
<a th:href="@{/stus(id=${stu.id})}" rel="external nofollow" >编辑学生2</a>

<!--http://localhost:8080/stu?id=10&name=abc -->
<a th:href="@{/stus(id=${stu.id},name=${stu.name})}" rel="external nofollow" >编辑学生3</a>

th:switch 및 th: case

<div th:switch="${stu.role}">
  <h3 th:case="banzhang">班长</h3>
  <h3 th:case="tuanzhishu">团支书</h3>
  <h3 th:case="${data}">学委</h3>
  <h3 th:case="*">其他</h3>
  
</div>

thymeleaf의 기본값은 변수 이름 + 통계 상태

상태 변수가 명시적으로 설정되지 않은 경우 thymeleaf의 기본값은 변수 이름 + 통계 상태

<tr th:each="stu: ${stus}">
  <td th:text="${stuStat.index}"></td>
  <td th:text="${ stu.name}"></td>
  <td th:text="${ stu.age}"></td>    
</tr>

th:id, th입니다. value, th:checked 등 (양식 관련)

th:object는 객체 속성을 정의할 수 있습니다
*{}는 th:object와 함께 사용하여 객체의 속성을 추출할 수 있습니다

# 날짜 형식()을 사용하여 날짜 형식을 지정할 수 있습니다
 <form th:object="${stu}">
        编号:<input type="text" name="id" th:value="*{id}"><br>
        姓名:<input type="text" name="name" th:value="*{name}"><br>
        年龄:<input type="text" name="age" th:value="*{age}"><br>
        性别:<input type="radio" name="gender" value="true" th:checked="*{gender}">男<br>
        性别:<input type="radio" name="gender" value="true" th:checked="*{not gender}">女<br>
        生日:<input type="text" name="birth" th:value="*{#dates.format(birth,&#39;yyyy-MM-dd&#39;)}"><br>
        <input type="submit" value="编辑">
    </form>

Integrate Thymeleaf

기본 구성

프로젝트를 생성할 때 템플릿 엔진에서 Thymeleaf를 확인하세요.

Spring Boot가 Thymeleaf를 통합하는 방법

MySQL 드라이버 범위를 다음에서 삭제하세요. pom.xml
그런 다음 여기서는 druid 연결 풀을 사용하므로 pom 파일로 가져와야 합니다. 관련 종속성

 <dependency>
            <groupId>com.alibaba</groupId>
            <artifactId>druid-spring-boot-starter</artifactId>
            <version>1.2.11</version>
        </dependency>

그런 다음 전역 구성 파일 application.properties

# 指定Mybatis的Mapper接口的xml映射文件的路径
mybatis.mapper-locations=classpath:mapper/*xml
# MySQL数据库驱动
#这个驱动也可以省略,可以根据使用的MySQL自动加载相应的驱动
spring.datasource.driver-class-name=com.mysql.cj.jdbc.Driver
# 数据源名称
spring.datasource.name=com.alibaba.druid.pool.DruidDataSource
# 数据库连接地址
spring.datasource.url=jdbc:mysql://localhost:3306/school?serverTimezone=UTC&zeroDateTimeBehavior=convertToNull
# 数据库用户名和密码
spring.datasource.username=root
spring.datasource.password=a87684009.
# 设置日志级别
logging.level.com.zyh.springboot=debug
# 开启mybatis驼峰命名规则自动转换功能
mybatis.configuration.map-underscore-to-camel-case=true

에서 관련 구성을 만들어야 합니다. 데이터베이스 준비 준비 데이터베이스의 테이블에 해당하는 엔터티 클래스와 3티어 구조

Spring Boot가 Thymeleaf를 통합하는 방법

Spring Boot가 Thymeleaf를 통합하는 방법

@Data
public class Stu {
    private Integer id;
    private String name;
    private Integer age;
    private Boolean gender;
    private Integer cid;
    @DateTimeFormat(pattern = "yyyy-MM-dd")
    private Date birth;
}

3티어 아키텍처

Mapper

@Mapper
public interface StuMapper {
    /**
     * 查询所有学生信息
     * @return
     * @throws Exception
     */
    @Select("select * from stu")
     List<Stu> queryAllStu() throws Exception;
}

Service

public interface StuService  {
    /**
     * 查询所有学生信息
     * @return
     */
    List<Stu> queryAllStu() throws Exception;
}

서비스 구현 클래스

@Service
public class StuServiceImpl implements StuService {
    @Autowired
    private StuMapper stuMapper;
    @Override
    public List<Stu> queryAllStu() throws Exception {
         return stuMapper.queryAllStu();
    }
}

thymeleaf


<html lang="en" xmlns:th="http://www.thymleaf.org">
  
    
    Title


学生管理系统

aaaa

Controller

@Controller
@RequestMapping("/stu")
public class StuController {
    @Autowired
    private StuService stuService;
    /**
    * 显示学生管理系统的画面
    * @return
    */
    @RequestMapping("/stusUi")
    public String stusUi(){
        return "stus";
    }
}

Spring Boot가 Thymeleaf를 통합하는 방법

Spring Boot가 Thymeleaf를 통합하는 방법

Spring Boot가 Thymeleaf를 통합하는 방법

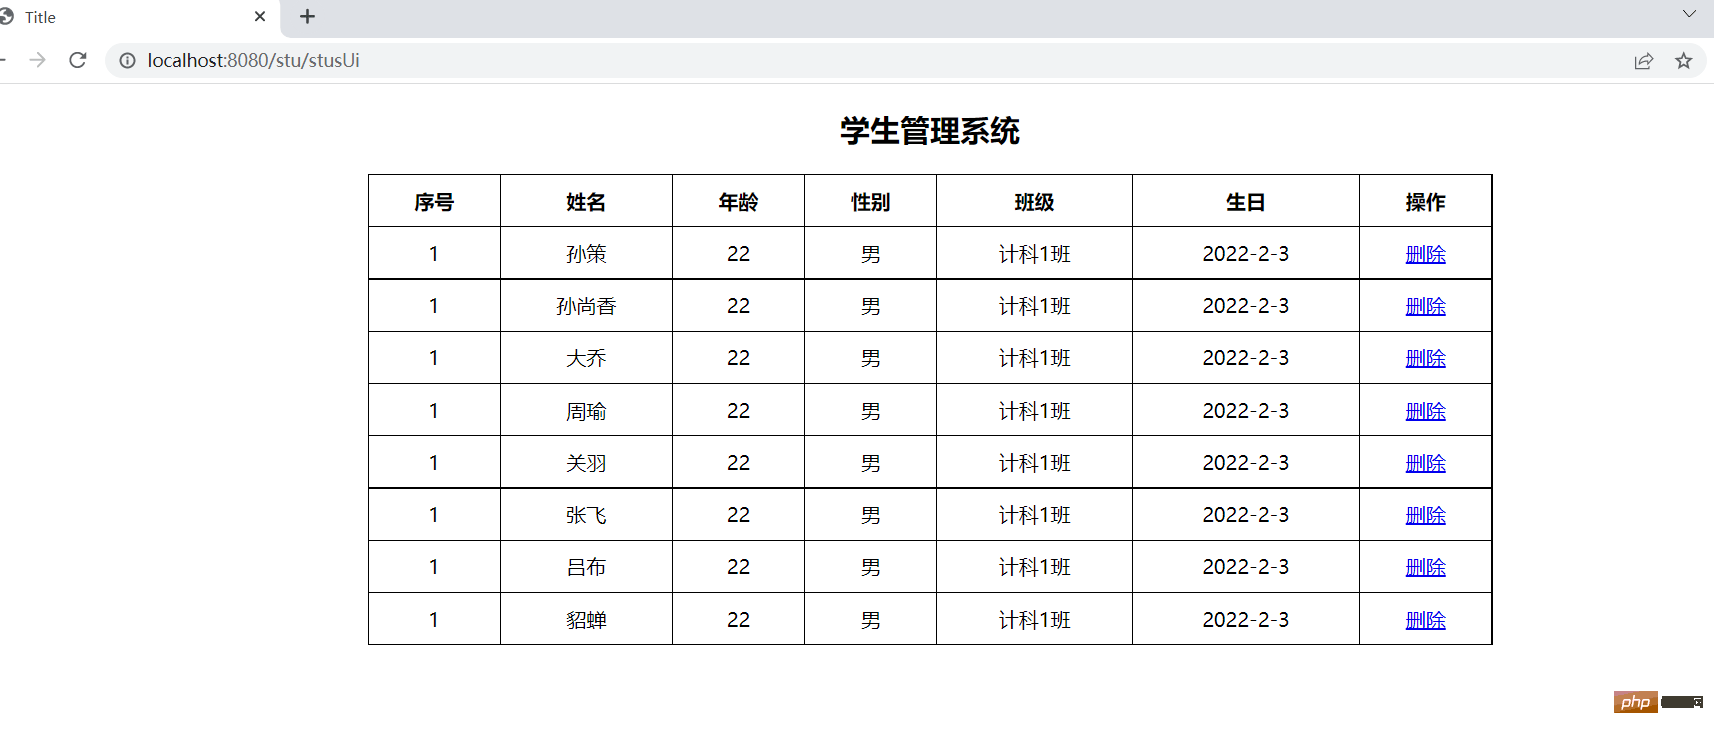
그런 다음 먼저 페이지를 준비합니다

<!DOCTYPE html>
<html lang="en"  xmlns:th="http://www.thymeleaf.org">
<head>
    <meta charset="UTF-8">
    <title>Title</title>
    <style>
        .tb-stus{
            width: 900px;
            margin: 0 auto;
            border: black 1px solid;
            border-collapse: collapse;
        }
        .tb-stus th,td{
            padding: 10px;
            text-align: center;
            border:1px solid black;
        }
    </style>
</head>
<body>
<h3 align="center">学生管理系统</h3>
<table class="tb-stus">
    <thead>
    <tr>
        <th>序号</th>
        <th>姓名</th>
        <th>年龄</th>
        <th>性别</th>
        <th>班级</th>
        <th>生日</th>
        <th>操作</th>
    </tr>
    </thead>
    <tbody>
    <tr th:each="stu,status: ${stuList}">
        <td th:text="${status.index+1}">1</td>
        <td th:text="${stu.name}">aa</td>
        <td th:text="${stu.age}">22</td>
<!--        gender的属性值为1表示性别为男-->
        <td th:if="${stu.gender}">男</td>
        <td th:unless="${stu.gender}">女</td>
        <td th:text="${stu.cid}">计科1班</td>
       <td th:text="${#dates.format(stu.birth,&#39;yyyy-MM-dd&#39;)}">2022-2-3</td>
        <td>
            <!--http://localhost:8080/stu/delete?id=10-->
            <a th:href="@{/stu/delete(id=${stu.id})}" rel="external nofollow"  rel="external nofollow"  rel="external nofollow" >删除</a>
        </td>
    </tr>
    </tbody>
</table>
</body>
</html>

Spring Boot가 Thymeleaf를 통합하는 방법

백엔드는 데이터베이스에서 해당 데이터를 삭제합니다. 프런트엔드에서 전달한 ID를 기반으로 합니다. 여기서는 먼저 앞서 배운 익숙한 방법으로 완성하겠습니다. 나중에 프론트엔드와 백엔드 분리 개발에 대해 자세히 설명하겠습니다

삭제 작업

Controller (이전 방법은 여기에 붙여넣지 않습니다. 그렇지 않으면) 코드가 너무 많을 것입니다)

@Controller
@RequestMapping("/stu")
public class StuController {
    @Autowired
    private StuService stuService;
   
    /**根据id删除数据
     * http://localhost:8080/stu/delete?id=10
     * @return
     */
    @RequestMapping("/delete")
    public String deleteById(@RequestParam("id") Integer id){
        try {
            stuService.deleteByid(id);
        } catch (Exception e) {
            e.printStackTrace();
        }
        System.out.println(id);
        return "redirect:/stu/stusUi";
    }


  }

Service

public interface StuService  {
    /**
     * 查询所有学生信息
     * @return
     */
    List<Stu> queryAllStu() throws Exception;

    void deleteByid(Integer id);
}

서비스 구현 클래스

@Service
public class StuServiceImpl implements StuService {
    @Autowired
    private StuMapper stuMapper;
    @Override
    public List<Stu> queryAllStu() throws Exception {
         return stuMapper.queryAllStu();
    }

    /**
     * 根据id删除数据
     * @param id
     */
    @Override
    public void deleteByid(Integer id) throws Exception {
        stuMapper.deleteById(id);
    }
}

Mapper

@Mapper
public interface StuMapper {
    /**
     * 查询所有学生信息
     * @return
     * @throws Exception
     */
    @Select("select * from stu")
     List<Stu> queryAllStu() throws Exception;
    @Delete("delete from stu where id=#{id}")
    void deleteById( Integer id);
}

8번 데이터 삭제

Spring Boot가 Thymeleaf를 통합하는 방법

编辑操作

页面stus.html

<!DOCTYPE html>
<html lang="en"  xmlns:th="http://www.thymeleaf.org">
<head>
    <meta charset="UTF-8">
    <title>Title</title>
    <style>
        .tb-stus{
            width: 900px;
            margin: 0 auto;
            border: black 1px solid;
            border-collapse: collapse;
        }
        .tb-stus th,td{
            padding: 10px;
            text-align: center;
            border:1px solid black;
        }
    </style>
</head>
<body>
<h3 align="center">学生管理系统</h3>
<table class="tb-stus">
    <thead>
    <tr>
        <th>序号</th>
        <th>姓名</th>
        <th>年龄</th>
        <th>性别</th>
        <th>班级</th>
        <th>生日</th>
        <th>操作</th>
    </tr>
    </thead>
    <tbody>
    <tr th:each="stu,status: ${stuList}">
        <td th:text="${stu.id}">1</td>
        <td th:text="${stu.name}">aa</td>
        <td th:text="${stu.age}">22</td>
<!--        gender的属性值为1表示性别为男-->
        <td th:if="${stu.gender}">男</td>
        <td th:unless="${stu.gender}">女</td>
        <td th:text="${stu.cid}">计科1班</td>
         <td th:text="${#dates.format(stu.birth,&#39;yyyy-MM-dd&#39;)}">2022-2-3</td>
        <td>
<!--            localhost:8080/stu/delete/8-->
<!--            <a th:href="${&#39;/stu/delete/&#39;+stu.id}" rel="external nofollow"  rel="external nofollow" >删除</a>-->
            <!--http://localhost:8080/stu/delete?id=10-->
            <a th:href="@{/stu/delete(id=${stu.id})}" rel="external nofollow"  rel="external nofollow"  rel="external nofollow" >删除</a>
            <a th:href="@{/stu/edit(id=${stu.id})}" rel="external nofollow"  rel="external nofollow" >编辑</a>
        </td>
    </tr>
    </tbody>
</table>

</body>
</html>

页面 stu-edit.html

<!DOCTYPE html>
<html lang="en" xmlns:th="http://www.thymeleaf.org">
  <head>
    <meta charset="UTF-8">
    <title>编辑画面</title>
  </head>
  <body>
    <h3 >编辑学生信息</h3>
    <form action="" method="post" th:object="${stu}">
      学号:<input type="text" name="id" th:value="*{id}"  ><br><br>
      姓名:<input type="text" name="name"  th:value="*{name}"><br><br>
      年龄:<input type="text" name="age"  th:value="*{age}"><br><br>
      性别:<input type="radio" name="gender"    th:checked="*{gender}"  >男
      <input type="radio" name="gender"   th:checked="*{!gender}" >女<br><br>
      班级:<input type="text" name="cid" th:value="*{cid}"><br><br>
      生日:<input type="text" name="birth" th:value="*{#dates.format(birth,&#39;yyyy-MM-dd&#39;)}"><br><br>
      <input type="submit" value="编辑">
    </form>
  </body>
</html>

Controller

/**
     * 根据id来修改数据
     * 我们首先得先根据id把数据查询出来,然后把数据展示出来
     * 用户再进行编辑,用户编辑完并且提交以后,跳转到学生管理系统画面,展示所有数据
     * @return
     */
    @RequestMapping("/edit")
    public String edit(@RequestParam("id") Integer id,Model model){
        System.out.println("id"+id);
        try {
            Stu stu=stuService.queryById(id);
            model.addAttribute("stu",stu);
        } catch (Exception e) {
            e.printStackTrace();
        }

        return "stu-edit";
    }

Service

public interface StuService  {
    /**
     * 查询所有学生信息
     * @return
     */
    List<Stu> queryAllStu() throws Exception;

    /**
     * 根据id来删除学生信息
     * @param id
     * @throws Exception
     */
    void deleteByid(Integer id) throws Exception;

    /**
     * 根据id来查询对应学生信息
     * @param id
     * @return
     * @throws Exception
     */
    Stu queryById(Integer id) throws Exception;
}

Service实现类

@Service
public class StuServiceImpl implements StuService {
    @Autowired
    private StuMapper stuMapper;
    @Override
    public List<Stu> queryAllStu() throws Exception {
         return stuMapper.queryAllStu();
    }

    /**
     * 根据id删除数据
     * @param id
     */
    @Override
    public void deleteByid(Integer id) throws Exception {
        stuMapper.deleteById(id);
    }

    @Override
    public Stu queryById(Integer id) throws Exception {
        return stuMapper.queryById(id);
    }
}

Mapper

@Mapper
public interface StuMapper {
    /**
    * 查询所有学生信息
    * @return
    * @throws Exception
    */
    @Select("select * from stu")
    List<Stu> queryAllStu() throws Exception;
    @Delete("delete from stu where id=#{id}")
    void deleteById( Integer id);
    @Select("select * from stu where id=#{id}")
    Stu queryById(Integer id) throws Exception;
}

Spring Boot가 Thymeleaf를 통합하는 방법

比如在序号为4中,点击编辑

Spring Boot가 Thymeleaf를 통합하는 방법

用户登录

登录页面:

<!DOCTYPE html>
<html lang="en">
<head>
    <meta charset="UTF-8">
    <title>Title</title>
</head>
<body>
    <h3>用户登录</h3>
    <form action="/login" method="post">
        账号:<input type="text" name="username"><br><br>
        密码:<input type="password" name="password"><br><br>
        <input type="submit" value="登录">
    </form>


</body>
</html>

因为需要判断用户是否存在,这是从数据库进行查询的,所以要准备对应的管理员表

# 创建管理员表
CREATE TABLE admin(
	id INT PRIMARY KEY AUTO_INCREMENT,
	username VARCHAR(20),
	`password` VARCHAR(20)
); 

INSERT INTO admin VALUES
	(DEFAULT,&#39;aaa&#39;,111),
	(DEFAULT,&#39;bbb&#39;,222),
	(DEFAULT,&#39;ccc&#39;,333);
# 查询测试
SELECT * FROM admin;	

准备对应的实体类

@Data
public class Admin {
    private String username;
    private String password;
}

Controller

@Controller
@SessionAttributes(names = {"admin"})
public class AdminController {
    @Autowired
    private AdminService adminService;

    /**
     * 显示登录页面
     * @return
     */
    @RequestMapping(value = "/loginUi")
    public String loginUi(){
        return "login";
    }
    @RequestMapping(value = "/login",method = RequestMethod.POST)
    public String login(String username, String password, Model model){
        try {
            Admin admin = adminService.login(username, password);
            //用户名存在说明登录成功
            if (admin!=null){
                //存放到session域中
                model.addAttribute("admin",admin);
                return "redirect:/stu/stusUi";
            }
        } catch (Exception e) {
            e.printStackTrace();
        }
        return "redirect:/loginUi";
    }

}

Service

public interface AdminService {
    Admin login(String username,String password) throws Exception;
}

Service对应的实现类

@Service
public class AdminServiceImpl implements AdminService {
    @Autowired
    private AdminMapper adminMapper;
    @Override
    public Admin login(String username, String password) throws Exception {
        return adminMapper.queryByUsernameAndPassword(username,password);
    }
}

Mapper

@Mapper
public interface AdminMapper {
    @Select("select * from admin where username=#{username} and password=#{password}")
    Admin queryByUsernameAndPassword(@Param("username") String username, @Param("password") String password);
}

Spring Boot가 Thymeleaf를 통합하는 방법

Spring Boot가 Thymeleaf를 통합하는 방법

<!DOCTYPE html>
<html lang="en"  xmlns:th="http://www.thymeleaf.org">
<head>
    <meta charset="UTF-8">
    <title>Title</title>
    <style>
        .tb-stus{
            width: 900px;
            margin: 0 auto;
            border: black 1px solid;
            border-collapse: collapse;
        }
        .tb-stus th,td{
            padding: 10px;
            text-align: center;
            border:1px solid black;
        }
    </style>
</head>
<body>
    <h3 align="center">学生管理系统</h3>
    <h3 th:if="${session.admin!=null}" th:text="${session.admin.username}">用户名</h3>
    <a th:unless="${session.admin!=null}" href="/loginUi" rel="external nofollow" >登录</a>
    <a th:if="${session.admin!=null}" href="/logout" rel="external nofollow" >注销用户</a>
<table class="tb-stus">
    <thead>
    <tr>
        <th>序号</th>
        <th>姓名</th>
        <th>年龄</th>
        <th>性别</th>
        <th>班级</th>
        <th>生日</th>
        <th>操作</th>
    </tr>
    </thead>
    <tbody>
    <tr th:each="stu,status: ${stuList}">
        <td th:text="${stu.id}">1</td>
        <td th:text="${stu.name}">aa</td>
        <td th:text="${stu.age}">22</td>
<!--        gender的属性值为1表示性别为男-->
        <td th:if="${stu.gender}">男</td>
        <td th:unless="${stu.gender}">女</td>
        <td th:text="${stu.cid}">计科1班</td>
        <td th:text="${#dates.format(stu.birth,&#39;yyyy-MM-dd&#39;)}">2022-2-3</td>
        <td>
<!--            localhost:8080/stu/delete/8-->
<!--            <a th:href="${&#39;/stu/delete/&#39;+stu.id}" rel="external nofollow"  rel="external nofollow" >删除</a>-->
            <!--http://localhost:8080/stu/delete?id=10-->
            <a th:href="@{/stu/delete(id=${stu.id})}" rel="external nofollow"  rel="external nofollow"  rel="external nofollow" >删除</a>
            <a th:href="@{/stu/edit(id=${stu.id})}" rel="external nofollow"  rel="external nofollow" >编辑</a>
        </td>
    </tr>
    </tbody>
</table>

</body>
</html>

Spring Boot가 Thymeleaf를 통합하는 방법

Spring Boot가 Thymeleaf를 통합하는 방법

Spring Boot가 Thymeleaf를 통합하는 방법

用户注销

注销的话,我们把session域中的用户对象取消,然后这个时候就得重新登录,应该要跳转到登录画面

@RequestMapping("/logout")
    public String logout(HttpSession session){
        session.removeAttribute("admin");
        return "redirect:/loginUi";
    }

Spring Boot가 Thymeleaf를 통합하는 방법

点击注销用户

Spring Boot가 Thymeleaf를 통합하는 방법

위 내용은 Spring Boot가 Thymeleaf를 통합하는 방법의 상세 내용입니다. 자세한 내용은 PHP 중국어 웹사이트의 기타 관련 기사를 참조하세요!

성명:
이 기사는 yisu.com에서 복제됩니다. 침해가 있는 경우 admin@php.cn으로 문의하시기 바랍니다. 삭제