
SpringBoot 보안 관리에서 Spring Security를 구성하는 방법

- WBOYWBOYWBOYWBOYWBOYWBOYWBOYWBOYWBOYWBOYWBOYWBOYWB앞으로
- 2023-05-12 21:52:102522검색
Java 개발 분야의 일반적인 보안 프레임워크에는 Shiro 및 Spring Security가 있습니다. Shiro는 인증, 권한 부여, 세션 관리, 비밀번호 관리, 캐시 관리 및 기타 기능을 제공하는 경량 보안 관리 프레임워크입니다. Spring Security는 Shiro보다 더 강력한 기능, 더 세분화된 권한 제어 및 OAuth 2에 대한 친숙한 지원을 갖춘 비교적 복잡한 보안 관리 프레임워크입니다. Spring Security는 Spring 제품군에서 유래되었기 때문에 Spring 프레임워크와 원활하게 통합될 수 있습니다. 특히, Spring Boot에서 제공하는 자동화된 구성 솔루션을 사용하면 Spring Security를 더욱 편리하게 사용할 수 있습니다.
Spring Security의 기본 구성
기본 사용법
1. 종속성을 추가할 프로젝트를 생성합니다.
Spring Boot 프로젝트를 생성한 다음 spring-boot-starter-security 종속성을 추가합니다
<dependency>
  <groupId>org.springframework.boot</groupId>
  <artifactId>spring-boot-starter-web</artifactId>
</dependency>
<dependency>
  <groupId>org.springframework.boot</groupId>
  <artifactId>spring-boot-starter-security</artifactId>
</dependency>
2.
3. 프로젝트 테스트 시작성공적인 시작 후 /hello 인터페이스에 액세스하면 자동으로 로그인 페이지로 이동합니다. 이 로그인 페이지는 Spring Security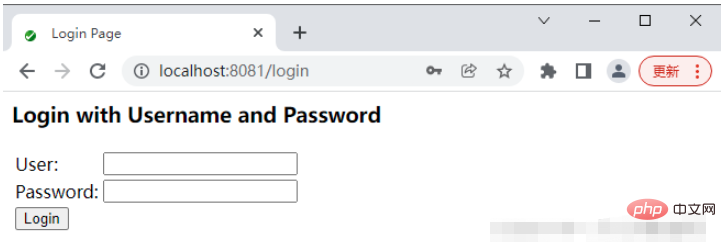
생성된 보안 비밀번호 사용: 4f845a17-7b09-479c-8701-48000e89d364로그인에 성공하면 사용자는 /hello 인터페이스에 액세스할 수 있습니다구성 사용자 이름 및 비밀번호개발자가 기본 사용자 이름과 비밀번호에 만족하지 않는 경우 application.properties
spring.security.user.name=tangsan메모리 기반 인증개발자는 메모리 기반 인증과 같은 Spring Security의 보다 사용자 정의된 구성을 달성하기 위해 WebSecurityConfigurer에서 상속된 클래스를 사용자 정의할 수도 있습니다. 구성 방법은 다음과 같습니다:spring.security에서 기본 사용자 이름, 비밀번호 및 사용자 역할을 구성할 수 있습니다. .user.password=tangsan
spring.security.user.roles=admin
@RestController
public class HelloController {
    @GetMapping("/hello")
    public String hello() {
        return "hello";
    }
}
코드 설명:
- Customized MyWebSecurityConfig는 WebSecurityConfigurerAdapter에서 상속되며 두 명의 사용자가 구성되고 한 명의 사용자는 관리자이고 두 개의 역할 ADMIN이 있는 구성(AuthenticationManagerBuilder auth) 방법을 다시 작성합니다. USER, 다른 사용자는 USER
- 역할을 가진 탕산입니다. 여기에 사용된 Spring Security 버전은 5.0.6입니다. Spring Security 5.x에서는 개발자가 반드시 NoOpPasswordEncoder를 지정해야 합니다. 즉, 비밀번호가 암호화되지 않습니다. 참고: 메모리 기반 사용자 구성의 경우 역할을 구성할 때 "ROLE_" 접두사를 추가할 필요가 없습니다. 이는 섹션 10.2의 데이터베이스 기반 인증과 다릅니다. 구성이 완료된 후 프로젝트를 다시 시작하면 여기서 구성한 두 명의 사용자를 사용하여 로그인할 수 있습니다.
@Configuration
public class MyWebSecurityConfig extends WebSecurityConfigurerAdapter {
    @Bean
    PasswordEncoder passwordEncoder() {
        return NoOpPasswordEncoder.getInstance();
    }
    @Override
    protected void configure(AuthenticationManagerBuilder auth) throws Exception {
        auth.inMemoryAuthentication()
                .withUser("admin").password("123123").roles("ADMIN", "USER")
                .and()
                .withUser("tangsan").password("123123").roles("USER");
    }
}
코드에서 다른 방법을 다시 작성해야 합니다. 설명:
먼저 3명의 사용자가 구성됩니다. 루트 사용자는 ADMIN 및 DBA 역할을 갖고, admin 사용자는 ADMIN 및 USER 역할을 가지며, tangsan은
- Call 역할을 갖습니다. HttpSecurity 구성을 여는 AuthorizeRequests() 메소드, antMatchers(), hasRole(), access() 메소드 구성은 서로 다른 경로에 액세스하기 위해 서로 다른 사용자와 역할이 필요합니다
- anyRequest(), authenticated()는 다음을 나타냅니다. 이전에 정의한 다른 URL에 액세스하려면 인증 후
- formLogin(), loginProcessingUrl("/login"), allowedAll()에 액세스해야 합니다. 이는 앞서 본 로그인 페이지도 구성한다는 의미입니다. 로그인 인터페이스를 /login으로 지정하면 /login 인터페이스를 직접 호출하고 로그인을 위한 POST 요청을 시작할 수 있습니다. 로그인 매개변수의 사용자 이름은 사용자 이름으로 지정되어야 하며, 비밀번호는 비밀번호로 지정되어야 합니다. loginProcessingUrl 인터페이스는 Ajax를 용이하게 하도록 구성됩니다. 또는 모바일 단말기를 사용하여 로그인 인터페이스를 호출합니다. 마지막으로, allowedAll이 구성됩니다. 이는 로그인과 관련된 모든 인터페이스에 인증 없이 액세스할 수 있음을 의미합니다.
- 구성이 완료된 후 테스트용 컨트롤러에 다음 인터페이스를 추가합니다.
@Configuration
public class MyWebSecurityConfig extends WebSecurityConfigurerAdapter {
    @Bean
    PasswordEncoder passwordEncoder() {
        return NoOpPasswordEncoder.getInstance();
    }
    @Override
    protected void configure(AuthenticationManagerBuilder auth) throws Exception {
        auth.inMemoryAuthentication()
                .withUser("root").password("123123").roles("ADMIN", "DBA")
                .and()
                .withUser("admin").password("123123").roles("ADMIN", "USER")
                .and()
                .withUser("tangsan").password("123123").roles("USER");
    }
    @Override
    protected void configure(HttpSecurity http) throws Exception {
        http.authorizeRequests()
                .antMatchers("/admin/**")
                .hasRole("ADMIN")
                .antMatchers("/user/**")
                .access("hasAnyRole('ADMIN','USER')")
                .antMatchers("/db/**")
                .access("hasRole('ADMIN') and hasRole('DBA')")
                .anyRequest()
                .authenticated()
                .and()
                .formLogin()
                .loginProcessingUrl("/login")
                .permitAll()
                .and()
                .csrf()
                .disable();
    }
}
위 구성에 따르면 "/admin/hello" 인터페이스 루트 및 관리자 사용자는 "/user/에 대한 액세스 권한을 갖습니다. hello" 인터페이스 admin 및 tangsan 사용자에게 접근 권한이 있으며, "/db/hello"는 루트 사용자에게만 접근 권한이 있습니다. 브라우저에서 테스트하는 것은 쉬우므로 여기서는 자세히 설명하지 않겠습니다.
登录表单详细配置
目前为止,登录表单一直使用 Spring Security 提供的页面,登录成功后也是默认的页面跳转,但是,前后端分离已经成为企业级应用开发的主流,在前后端分离的开发方式中,前后端的数据交互通过 JSON 进行,这时,登录成功后就不是页面跳转了,而是一段 JSON 提示。要实现这些功能,只需要继续完善上文的配置
@Override
protected void configure(HttpSecurity http) throws Exception {
    http.authorizeRequests()
        .antMatchers("/admin/**")
        .hasRole("ADMIN")
        .antMatchers("/user/**")
        .access("hasAnyRole('ADMIN','USER')")
        .antMatchers("/db/**")
        .access("hasRole('ADMIN') and hasRole('DBA')")
        .anyRequest()
        .authenticated()
        .and()
        .formLogin()
        .loginPage("/login_page")
        .loginProcessingUrl("/login")
        .usernameParameter("name")
        .passwordParameter("passwd")
        .successHandler(new AuthenticationSuccessHandler() {
            @Override
            public void onAuthenticationSuccess(HttpServletRequest req,
                                                HttpServletResponse resp,
                                                Authentication auth)
                throws IOException {
                Object principal = auth.getPrincipal();
                resp.setContentType("application/json;charset=utf-8");
                PrintWriter out = resp.getWriter();
                resp.setStatus(200);
                Map<String, Object> map = new HashMap<>();
                map.put("status", 200);
                map.put("msg", principal);
                ObjectMapper om = new ObjectMapper();
                out.write(om.writeValueAsString(map));
                out.flush();
                out.close();
            }
        })
        .failureHandler(new AuthenticationFailureHandler() {
            @Override
            public void onAuthenticationFailure(HttpServletRequest req,
                                                HttpServletResponse resp,
                                                AuthenticationException e)
                throws IOException {
                resp.setContentType("application/json;charset=utf-8");
                PrintWriter out = resp.getWriter();
                resp.setStatus(401);
                Map<String, Object> map = new HashMap<>();
                map.put("status", 401);
                if (e instanceof LockedException) {
                    map.put("msg", "账户被锁定,登录失败!");
                } else if (e instanceof BadCredentialsException) {
                    map.put("msg", "账户名或密码输入错误,登录失败!");
                } else if (e instanceof DisabledException) {
                    map.put("msg", "账户被禁用,登录失败!");
                } else if (e instanceof AccountExpiredException) {
                    map.put("msg", "账户已过期,登录失败!");
                } else if (e instanceof CredentialsExpiredException) {
                    map.put("msg", "密码已过期,登录失败!");
                } else {
                    map.put("msg", "登录失败!");
                }
                ObjectMapper om = new ObjectMapper();
                out.write(om.writeValueAsString(map));
                out.flush();
                out.close();
            }
        })
        .permitAll()
        .and()
        .csrf()
        .disable();
}
代码解释:
loginPage(“/login_page”) 表示如果用户未获授权就访问一个需要授权才能访问的接口,就会自动跳转到 login_page 页面让用户登录,这个 login_page 就是开发者自定义的登录页面,而不再是 Spring Security 提供的默认登录页
loginProcessingUrl(“/login”) 表示登录请求处理接口,无论是自定义登录页面还是移动端登录,都需要使用该接口
usernameParameter(“name”),passwordParameter(“passwd”) 定义了认证所需要的用户名和密码的参数,默认用户名参数是 username,密码参数是 password,可以在这里定义
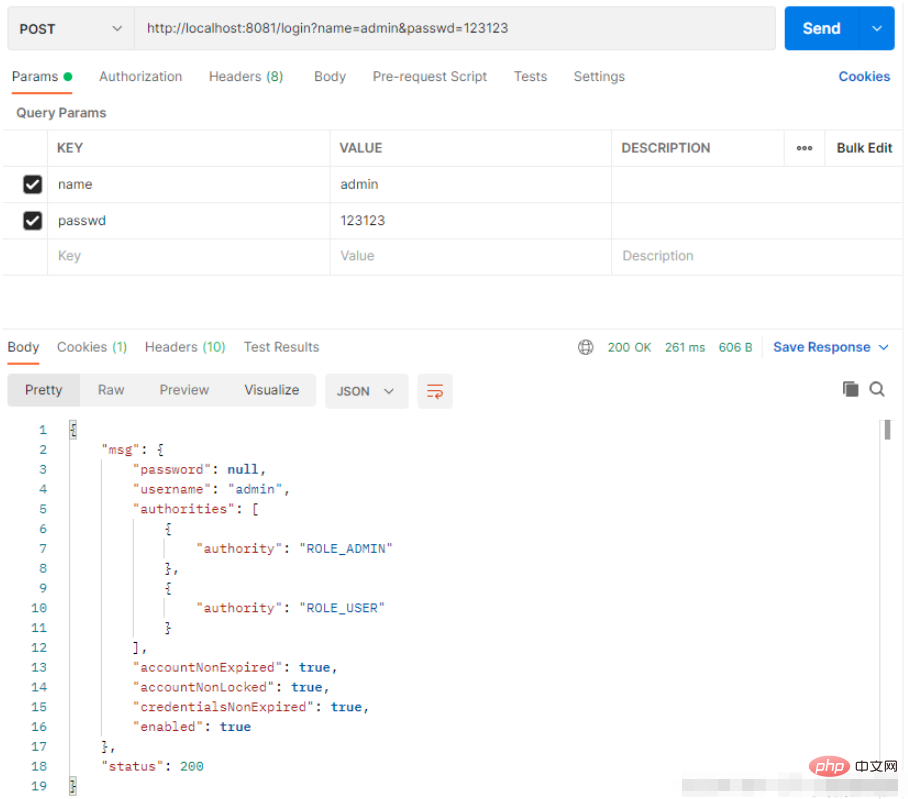
successHandler() 方法定义了登录成功的处理逻辑。用户登录成功后可以跳转到某一个页面,也可以返回一段 JSON ,这个要看具体业务逻辑,此处假设是第二种,用户登录成功后,返回一段登录成功的 JSON 。onAuthenticationSuccess 方法的第三个参数一般用来获取当前登录用户的信息,在登录后,可以获取当前登录用户的信息一起返回给客户端
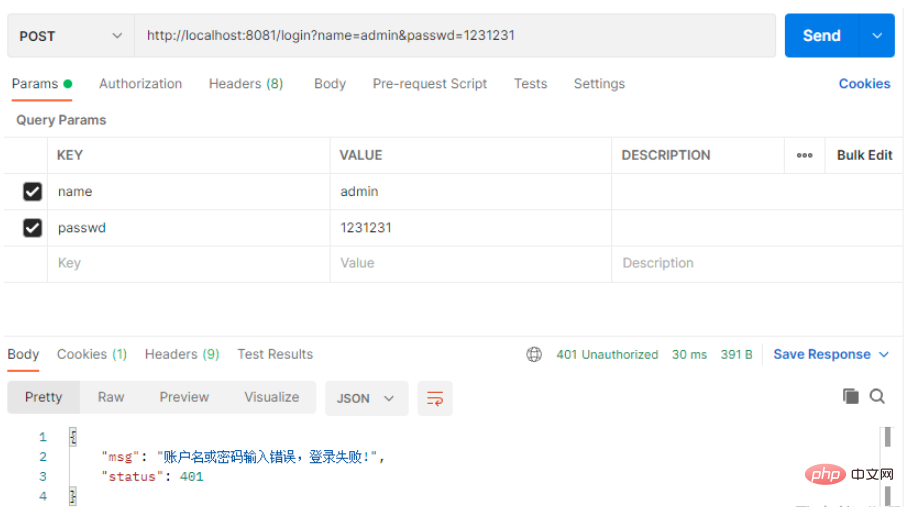
failureHandler 方法定义了登录失败的处理逻辑,和登录成功类似,不同的是,登录失败的回调方法里有一个 AuthenticationException 参数,通过这个异常参数可以获取登录失败的原因,进而给用户一个明确的提示
配置完成后,使用 Postman 进行测试
如果登录失败也会有相应的提示
注销登录配置
如果想要注销登录,也只需要提供简单的配置即可
@Override
protected void configure(HttpSecurity http) throws Exception {
    http.authorizeRequests()
        .antMatchers("/admin/**")
        .hasRole("ADMIN")
        .antMatchers("/user/**")
        .access("hasAnyRole('ADMIN','USER')")
        .antMatchers("/db/**")
        .access("hasRole('ADMIN') and hasRole('DBA')")
        .anyRequest()
        .authenticated()
        .and()
        .formLogin()
        .loginPage("/login_page")
        .loginProcessingUrl("/login")
        .usernameParameter("name")
        .passwordParameter("passwd")
        .successHandler(new AuthenticationSuccessHandler() {
            @Override
            public void onAuthenticationSuccess(HttpServletRequest req,
                                                HttpServletResponse resp,
                                                Authentication auth)
                throws IOException {
                Object principal = auth.getPrincipal();
                resp.setContentType("application/json;charset=utf-8");
                PrintWriter out = resp.getWriter();
                resp.setStatus(200);
                Map<String, Object> map = new HashMap<>();
                map.put("status", 200);
                map.put("msg", principal);
                ObjectMapper om = new ObjectMapper();
                out.write(om.writeValueAsString(map));
                out.flush();
                out.close();
            }
        })
        .failureHandler(new AuthenticationFailureHandler() {
            @Override
            public void onAuthenticationFailure(HttpServletRequest req,
                                                HttpServletResponse resp,
                                                AuthenticationException e)
                throws IOException {
                resp.setContentType("application/json;charset=utf-8");
                PrintWriter out = resp.getWriter();
                resp.setStatus(401);
                Map<String, Object> map = new HashMap<>();
                map.put("status", 401);
                if (e instanceof LockedException) {
                    map.put("msg", "账户被锁定,登录失败!");
                } else if (e instanceof BadCredentialsException) {
                    map.put("msg", "账户名或密码输入错误,登录失败!");
                } else if (e instanceof DisabledException) {
                    map.put("msg", "账户被禁用,登录失败!");
                } else if (e instanceof AccountExpiredException) {
                    map.put("msg", "账户已过期,登录失败!");
                } else if (e instanceof CredentialsExpiredException) {
                    map.put("msg", "密码已过期,登录失败!");
                } else {
                    map.put("msg", "登录失败!");
                }
                ObjectMapper om = new ObjectMapper();
                out.write(om.writeValueAsString(map));
                out.flush();
                out.close();
            }
        })
        .permitAll()
        .and()
        .logout()
        .logoutUrl("/logout")
        .clearAuthentication(true)
        .invalidateHttpSession(true)
        .addLogoutHandler(new LogoutHandler() {
            @Override
            public void logout(HttpServletRequest req,
                               HttpServletResponse resp,
                               Authentication auth) {
            }
        })
        .logoutSuccessHandler(new LogoutSuccessHandler() {
            @Override
            public void onLogoutSuccess(HttpServletRequest req,
                                        HttpServletResponse resp,
                                        Authentication auth)
                throws IOException {
                resp.sendRedirect("/login_page");
            }
        })
        .and()
        .csrf()
        .disable();
}
代码解释:
logout() 表示开启注销登录的配置
logoutUrl(“/logout”) 表示注销登录请求 URL 为 /logout ,默认也是 /logout
clearAuthentication(true) 表示是否清楚身份认证信息,默认为 true
invalidateHttpSession(true) 表示是否使 Session 失效,默认为 true
addLogoutHandler 方法中完成一些数据清楚工作,例如 Cookie 的清楚
logoutSuccessHandler 方法用于处理注销成功后的业务逻辑,例如返回一段 JSON 提示或者跳转到登录页面等
多个 HttpSecurity
如果业务比较复杂,也可以配置多个 HttpSecurity ,实现对 WebSecurityConfigurerAdapter 的多次扩展
@Configuration
public class MultiHttpSecurityConfig {
    @Bean
    PasswordEncoder passwordEncoder() {
        return NoOpPasswordEncoder.getInstance();
    }
    @Autowired
    protected void configure(AuthenticationManagerBuilder auth) throws Exception {
        auth.inMemoryAuthentication()
                .withUser("admin").password("123123").roles("ADMIN", "USER")
                .and()
                .withUser("tangsan").password("123123").roles("USER");
    }
    @Configuration
    @Order(1)
    public static class AdminSecurityConfig extends WebSecurityConfigurerAdapter{
        @Override
        protected void configure(HttpSecurity http) throws Exception {
            http.antMatcher("/admin/**").authorizeRequests()
                    .anyRequest().hasRole("ADMIN");
        }
    }
    @Configuration
    public static class OtherSecurityConfig extends WebSecurityConfigurerAdapter{
        @Override
        protected void configure(HttpSecurity http) throws Exception {
            http.authorizeRequests()
                    .anyRequest().authenticated()
                    .and()
                    .formLogin()
                    .loginProcessingUrl("/login")
                    .permitAll()
                    .and()
                    .csrf()
                    .disable();
        }
    }
}
代码解释:
配置多个 HttpSecurity 时,MultiHttpSecurityConfig 不需要继承 WebSecurityConfigurerAdapter ,在 MultiHttpSecurityConfig 中创建静态内部类继承 WebSecurityConfigurerAdapter 即可,静态内部类上添加 @Configuration 注解和 @Order注解,数字越大优先级越高,未加 @Order 注解的配置优先级最低
AdminSecurityConfig 类表示该类主要用来处理 “/admin/**” 模式的 URL ,其它 URL 将在 OtherSecurityConfig 类中处理
密码加密
1. 为什么要加密
略
2. 加密方案
Spring Security 提供了多种密码加密方案,官方推荐使用 BCryptPasswordEncoder,BCryptPasswordEncoder 使用 BCrypt 强哈希函数,开发者在使用时可以选择提供 strength 和 SecureRandom 实例。strength 越大,密码的迭代次数越多,密钥迭代次数为 2^strength 。strength 取值在 4~31 之间,默认为 10 。
3. 实践
只需要修改上文配置的 PasswordEncoder 这个 Bean 的实现即可
 @Bean
PasswordEncoder passwordEncoder() {
    return new BCryptPasswordEncoder(10);
}
参数 10 就是 strength ,即密钥的迭代次数(也可以不配置,默认为 10)。
使用以下方式获取加密后的密码。
public static void main(String[] args) {
    BCryptPasswordEncoder bCryptPasswordEncoder = new BCryptPasswordEncoder(10);
    String encode = bCryptPasswordEncoder.encode("123123");
    System.out.println(encode);
}
修改配置的内存用户的密码
auth.inMemoryAuthentication()
    .withUser("admin")
    .password("$2a$10$.hZESNfpLSDUnuqnbnVaF..Xb2KsAqwvzN7hN65Gd9K0VADuUbUzy")
    .roles("ADMIN", "USER")
    .and()
    .withUser("tangsan")
    .password("$2a$10$4LJ/xgqxSnBqyuRjoB8QJeqxmUeL2ynD7Q.r8uWtzOGs8oFMyLZn2")
    .roles("USER");
虽然 admin 和 tangsan 加密后的密码不一样,但是明文都是 123123 配置完成后,使用 admin/123123,或 tangsan/123123 就可以实现登录,一般情况下,用户信息是存储在数据库中的,因此需要用户注册时对密码进行加密处理
@Service
public class RegService {
    public int reg(String username, String password) {
        BCryptPasswordEncoder encoder = new BCryptPasswordEncoder(10);
        String encodePasswod = encoder.encode(password);
        return saveToDb(username, encodePasswod);
    }
    private int saveToDb(String username, String encodePasswod) {
        // 业务处理
        return 0;
    }
}
用户将密码从前端传来之后,通过 BCryptPasswordEncoder 实例中的 encode 方法对密码进行加密处理,加密完成后将密文存入数据库。
方法安全
上文介绍的认证和授权都是基于 URL 的,开发者也可通过注解来灵活配置方法安全,使用相关注解,首先要通过 @EnableGlobalMethodSecurity 注解开启基于注解的安全配置
@Configuration
@EnableGlobalMethodSecurity(prePostEnabled = true,securedEnabled = true)
public class MultiHttpSecurityConfig{
}
代码解释:
prePostEnabled = true 会解锁 @PreAuthorize 和 @PostAuthorize 两个注解, @PreAuthorize 注解会在方法执行前进行验证,而 @PostAuthorize 注解在方法执行后进行验证
securedEnabled = true 会解锁 @Secured 注解
开启注解安全后,创建一个 MethodService 进行测试
@Service
public class MethodService {
    @Secured("ROLE_ADMIN")
    public String admin() {
        return "hello admin";
    }
    @PreAuthorize("hasRole('ADMIN') and hasRole('DBA')")
    public String dba() {
        return "hello dba";
    }
    @PreAuthorize("hasAnyRole('ADMIN','DBA','USER')")
    public String user() {
        return "user";
    }
}
代码解释:
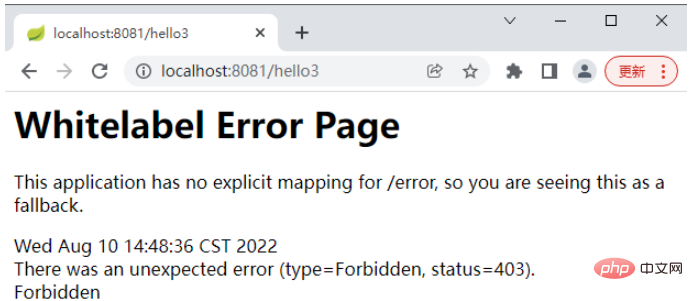
@Secured(“ROLE_ADMIN”) 注解表示访问该方法需要 ADMIN 角色,注意这里需要在角色前加一个前缀 ROLE_
@PreAuthorize(“hasRole(‘ADMIN’) and hasRole(‘DBA’)”) 注解表示访问该方法既需要 ADMIN 角色又需要 DBA 角色
@PreAuthorize(“hasAnyRole(‘ADMIN’,‘DBA’,‘USER’)”) 表示访问该方法需要 ADMIN 、DBA 或 USER 角色中至少一个
@PostAuthorize 和 @PreAuthorize 中都可以使用基于表达式的语法
最后在 Controller 中注入 Service 并调用 Service 中的方法进行测试
@RestController
public class HelloController {
    @Autowired
    MethodService methodService;
    @GetMapping("/hello")
    public String hello() {
        String user = methodService.user();
        return user;
    }
    @GetMapping("/hello2")
    public String hello2() {
        String admin = methodService.admin();
        return admin;
    }
    @GetMapping("/hello3")
    public String hello3() {
        String dba = methodService.dba();
        return dba;
    }
}
admin 访问 hello

admin 访问 hello2

admin 访问 hello3
위 내용은 SpringBoot 보안 관리에서 Spring Security를 구성하는 방법의 상세 내용입니다. 자세한 내용은 PHP 중국어 웹사이트의 기타 관련 기사를 참조하세요!