Java에서 원자성 기능을 사용하는 방법은 무엇입니까?
- 王林앞으로
- 2023-05-09 16:40:171116검색
스레드 안전성
여러 스레드가 클래스에 액세스할 때 런타임 환경에서 사용하는 예약 방법이나 이러한 프로세스가 실행을 대체하는 방법에 관계없이 호출 코드의 추가 동기화나 조정 없이 이 클래스는 올바른 결과를 나타내는 경우 동작에 따라 클래스는 스레드로부터 안전하다고 합니다.
스레드 안전성은 주로 다음 세 가지 측면에 반영됩니다.
원자성: 상호 배타적인 액세스를 제공하며 동시에 하나의 스레드만 작동할 수 있습니다.
가시성: 하나의 스레드가 다음 작업을 담당합니다. 메인 메모리 수정은 적시에 다른 스레드에서 관찰할 수 있습니다.
질서: 스레드는 명령 재정렬로 인해 일반적으로 지저분하고 무질서한 명령 실행 순서를 관찰합니다.
JUC의 Atomic 패키지에 대한 자세한 설명
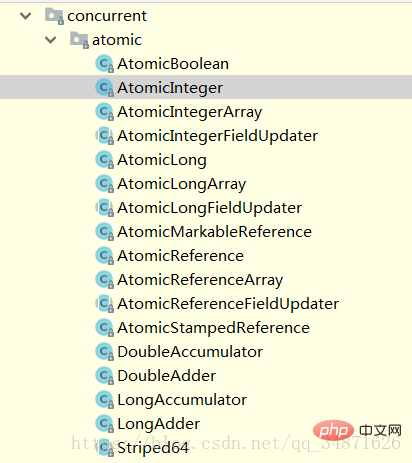
Atomic 패키지는 많은 Atomicxxx 클래스를 제공합니다:

원자성을 달성하기 위한 모든 CAS(compareAndSwap)입니다.
먼저 다음과 같이 간단한 예를 작성하세요.
@Slf4j
public class AtomicExample1 {
    // 请求总数
    public static int clientTotal = 5000;
    // 同时并发执行的线程数
    public static int threadTotal = 200;
    public static AtomicInteger count = new AtomicInteger(0);
    public static void main(String[] args) throws Exception {

        ExecutorService executorService = Executors.newCachedThreadPool();
        final Semaphore semaphore = new Semaphore(threadTotal);
        final CountDownLatch countDownLatch = new CountDownLatch(clientTotal);
        for (int i = 0; i < clientTotal ; i++) {
            executorService.execute(() -> {
                try {
                    semaphore.acquire();
                    add();
                    semaphore.release();
                } catch (Exception e) {
                    log.error("exception", e);
                }
                countDownLatch.countDown();
            });
        }
        countDownLatch.await();
        executorService.shutdown();
        log.info("count:{}", count.get());
    }

    private static void add() {
        count.incrementAndGet();
    }
}
각 작업의 결과가 항상 우리가 원하는 예상 결과 5000이라고 보낼 수 있습니다. 이 계산 방법은 스레드로부터 안전하다는 것을 설명합니다.
count.incrementAndGet() 메소드를 살펴보겠습니다. 첫 번째 매개변수는 객체 자체이고, 두 번째 매개변수는 valueOffset으로, 값 자체의 컴파일된 주소를 메모리에 기록하는 데 사용됩니다. 업데이트 작업은 비교를 용이하게 하기 위해 메모리에서 값의 위치를 찾습니다. 세 번째 매개변수는 상수 1
public class AtomicInteger extends Number implements java.io.Serializable {
    private static final long serialVersionUID = 6214790243416807050L;

    // setup to use Unsafe.compareAndSwapInt for updates
    private static final Unsafe unsafe = Unsafe.getUnsafe();
    private static final long valueOffset;

    static {
        try {
            valueOffset = unsafe.objectFieldOffset
                (AtomicInteger.class.getDeclaredField("value"));
        } catch (Exception ex) { throw new Error(ex); }
    }

    private volatile int value;

    ... 此处省略多个方法...

    /**
     * Atomically increments by one the current value.
     *
     * @return the updated value
     */
    public final int incrementAndGet() {
        return unsafe.getAndAddInt(this, valueOffset, 1) + 1;
    }
}
입니다. AtomicInteger 소스 코드는 getAndAddInt 메소드를 제공하는 Unsafe 클래스를 사용합니다. 계속해서 클릭하여 소스 코드를 살펴보겠습니다. :
public final class Unsafe {
    private static final Unsafe theUnsafe;

    ....此处省略很多方法及成员变量....

 public final int getAndAddInt(Object var1, long var2, int var4) {
        int var5;
        do {
            var5 = this.getIntVolatile(var1, var2);
        } while(!this.compareAndSwapInt(var1, var2, var5, var5 + var4));
        return var5;
    }

 public final native boolean compareAndSwapInt(Object var1, long var2, int var4, int var5);
 public native int getIntVolatile(Object var1, long var2);
}
여기서는 주요 구현을 위해 do while 문이 사용된 것을 볼 수 있습니다. while 문의 핵심은 CompareAndSwapInt() 메서드를 호출하는 것입니다. 이는 Java에서 구현되지 않은 하위 수준 메서드인 기본 메서드입니다.
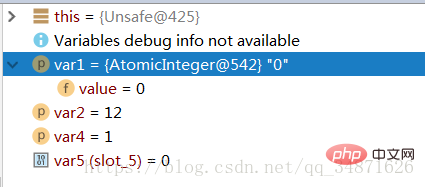
0+1=0 작업을 수행한다고 가정합니다. 다음은 단일 스레드의 각 매개변수 값입니다. CompareAndSwapInt() 메서드 첫 번째 매개 변수(var1)는 코드 예제에서 count인 현재 개체입니다. 이때 그 값은 0(예상값)이다. 두 번째 값(var2)은 전달된 valueOffset 값으로, 값은 12입니다. 세 번째 매개변수(var4)는 상수 1입니다. 메소드의 변수 매개변수(var5)는 매개변수 1과 매개변수 2의 valueOffset을 기반으로 기본 getIntVolatile 메소드를 호출하여 얻은 값입니다. CompareAndSwapInt()가 달성하려는 목표는 count 개체에 대해 현재 예상 값 var1의 값이 기본 반환 값(var5)과 동일한 경우 이를 var5+var4 값으로 업데이트하는 것입니다. 다른 경우 현재 값이 예상 값과 같아질 때까지 재활용하여 예상 값(var5)을 가져온 다음 업데이트합니다. CompareAndSwap 메서드의 핵심은 우리가 일반적으로 CAS라고 부르는 것입니다.
AtomicLong 등 Atomic 패키지 내 다른 클래스의 구현 원리는 기본적으로 위와 동일합니다. 여기서 LongAdder 클래스를 소개합니다. 위의 분석을 통해 AtomicLong이 CAS를 사용한다는 것을 이미 알고 있습니다. 수정이 성공할 때까지 무한 루프에서 지속적으로 대상 값을 수정하려고 시도합니다. 경쟁이 치열하지 않다면 수정에 성공할 확률은 매우 높습니다. 반면 경쟁이 치열한 상황에서 수정 실패 확률이 높으면 여러 번의 루프 시도를 하게 되어 성능에 영향을 미치게 됩니다.
일반적인 long 및 double 변수의 경우 jvm을 사용하면 64비트 읽기 작업 또는 쓰기 작업을 두 개의 32비트 작업으로 분할할 수 있습니다. LongAdder의 핵심 아이디어는 핫스팟 데이터를 분리하는 것입니다. AtomicLong 내부 핵심 데이터 값을 배열로 분리하고 각 스레드가 액세스할 때 해시 및 기타 알고리즘을 통해 계산하기 위해 숫자 중 하나로 매핑할 수 있습니다. 최종 계산 결과는 이 배열의 합산 및 누적이며, 그 중 핫스팟 데이터 값은 여러 셀로 분리되며 각 셀은 독립적으로 내부 값을 유지하며 모든 셀에 의해 누적됩니다. . 이러한 방식으로 핫스팟이 효과적으로 분리되고 병렬도가 향상됩니다. LongAdder는 AtomicLong을 기반으로 단일 지점 업데이트 압력을 각 노드에 분산시키는 것과 같습니다. 동시성이 낮은 경우 베이스에 대한 직접 업데이트를 통해 기본적으로 Atomic과 일치하는 성능을 보장할 수 있습니다. 동시성이 높은 시대에는 분산화를 통해 성능이 향상됩니다. 다만, 통계 진행 중에 동시 업데이트가 있을 경우 통계자료에 오류가 발생할 수 있습니다. 
다음은 Atomic 패키지에서 AtomicReference의 간단한 사용법을 보여주는 간단한 데모입니다.
@Slf4j
public class AtomicExample4 {
    private static AtomicReference<Integer> count = new AtomicReference<>(0);
    public static void main(String[] args) {
        count.compareAndSet(0, 2);
        count.compareAndSet(0, 1);
        log.info("count:{}", count.get());
    }
}
compareAndSet()分别传入的是预期值跟更新值,只有当预期值跟当前值相等时,才会将值更新为更新值;
上面的第一个方法可以将值更新为2,而第二个步中无法将值更新为1。
下面简单介绍下AtomicIntegerFieldUpdater 用法(利用原子性去更新某个类的实例):
@Slf4j
public class AtomicExample5 {
    private static AtomicIntegerFieldUpdater<AtomicExample5> updater =
            AtomicIntegerFieldUpdater.newUpdater(AtomicExample5.class, "count");

    @Getter
    private volatile int count = 100;
    public static void main(String[] args) {
        AtomicExample5 example5 = new AtomicExample5();

        if (updater.compareAndSet(example5, 100, 120)) {
            log.info("update success 1, {}", example5.getCount());
        }

        if (updater.compareAndSet(example5, 100, 120)) {
            log.info("update success 2, {}", example5.getCount());
        } else {
            log.info("update failed, {}", example5.getCount());
        }
    }
}
它可以更新某个类中指定成员变量的值。
注意:修改的成员变量需要用volatile关键字来修饰,并且不能是static描述的字段。
AtomicStampReference这个类它的核心是要解决CAS的ABA问题(CAS操作的时候,其他线程将变量的值A改成了B,接着又改回了A,等线程使用期望值A与当前变量进行比较的时候,发现A变量没有变,于是CAS就将A值进行了交换操作。
实际上该值已经被其他线程改变过)。
ABA问题的解决思路就是每次变量变更的时候,就将版本号加一。
看一下它的一个核心方法compareAndSet():
public class AtomicStampedReference<V> {
    private static class Pair<T> {
        final T reference;
        final int stamp;
        private Pair(T reference, int stamp) {
            this.reference = reference;
            this.stamp = stamp;
        }
        static <T> Pair<T> of(T reference, int stamp) {
            return new Pair<T>(reference, stamp);
        }
    }

   ... 此处省略多个方法 ....

   public boolean compareAndSet(V   expectedReference,
                                 V   newReference,
                                 int expectedStamp,
                                 int newStamp) {
        Pair<V> current = pair;
        return
            expectedReference == current.reference &&
            expectedStamp == current.stamp &&
            ((newReference == current.reference &&
              newStamp == current.stamp) ||
             casPair(current, Pair.of(newReference, newStamp)));
    }
}
可以看到它多了一个stamp的比较,stamp的值是由每次更新的时候进行维护的。
再介绍下AtomicLongArray,它维护了一个数组。在该数组下,我们可以选择性的已原子性操作更新某个索引对应的值。
public class AtomicLongArray implements java.io.Serializable {
    private static final long serialVersionUID = -2308431214976778248L;

    private static final Unsafe unsafe = Unsafe.getUnsafe();

    ...此处省略....


    /**
     * Atomically sets the element at position {@code i} to the given value
     * and returns the old value.
     *
     * @param i the index
     * @param newValue the new value
     * @return the previous value
     */
    public final long getAndSet(int i, long newValue) {
        return unsafe.getAndSetLong(array, checkedByteOffset(i), newValue);
    }

    /**
     * Atomically sets the element at position {@code i} to the given
     * updated value if the current value {@code ==} the expected value.
     *
     * @param i the index
     * @param expect the expected value
     * @param update the new value
     * @return {@code true} if successful. False return indicates that
     * the actual value was not equal to the expected value.
     */
    public final boolean compareAndSet(int i, long expect, long update) {
        return compareAndSetRaw(checkedByteOffset(i), expect, update);
    }
}
最后再写一个AtomcBoolean的简单使用:
@Slf4j
public class AtomicExample6 {
    private static AtomicBoolean isHappened = new AtomicBoolean(false);

    // 请求总数
    public static int clientTotal = 5000;

    // 同时并发执行的线程数
    public static int threadTotal = 200;

    public static void main(String[] args) throws Exception {
        ExecutorService executorService = Executors.newCachedThreadPool();
        final Semaphore semaphore = new Semaphore(threadTotal);
        final CountDownLatch countDownLatch = new CountDownLatch(clientTotal);
        for (int i = 0; i < clientTotal ; i++) {
            executorService.execute(() -> {
                try {
                    semaphore.acquire();
                    test();
                    semaphore.release();
                } catch (Exception e) {
                    log.error("exception", e);
                }
                countDownLatch.countDown();
            });
        }
        countDownLatch.await();
        executorService.shutdown();
        log.info("isHappened:{}", isHappened.get());
    }

    private static void test() {
        if (isHappened.compareAndSet(false, true)) {
            log.info("execute");
        }
    }
}
위 내용은 Java에서 원자성 기능을 사용하는 방법은 무엇입니까?의 상세 내용입니다. 자세한 내용은 PHP 중국어 웹사이트의 기타 관련 기사를 참조하세요!

