Python을 사용하여 프랙탈 패턴을 그리는 방법
- WBOY앞으로
- 2023-05-07 13:55:071375검색
1. 목표
정삼각형을 그릴 수 있는 프로그램을 작성하고, 삼각형의 양쪽에 약간 더 작은 바깥쪽을 향한 삼각형을 그릴 수 있어야 합니다. 이 과정을 원하는 만큼 반복할 수 있으면 몇 가지 흥미로운 패턴이 생성됩니다.
2. 이미지를 표현합니다
이미지를 2차원 픽셀 배열로 표현합니다. 픽셀 배열의 각 셀은 해당 픽셀의 색상(RGB)을 나타냅니다.
이를 위해 NumPy 라이브러리를 사용하여 픽셀 배열을 생성하고 Pillow를 저장 가능한 이미지로 변환할 수 있습니다.
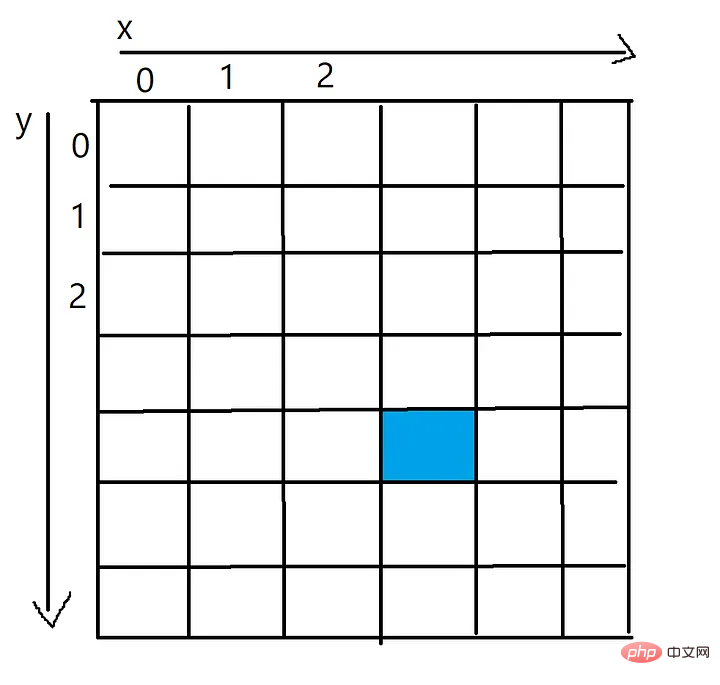
파란색 픽셀의 x 값은 3이고 y 값은 4이며, 이는 픽셀[4][3]
Three, draw a line
과 같은 2차원 배열을 통해 접근할 수 있습니다. 이제 코딩을 시작합니다. 먼저 두 세트의 좌표를 가져와서 그 사이에 선을 그릴 수 있는 함수가 필요합니다.
아래 코드는 두 점 사이를 보간하여 각 단계에서 픽셀 배열에 새 픽셀을 추가하는 방식으로 작동합니다. 이 프로세스를 선의 픽셀 단위로 음영 처리하는 것으로 생각할 수 있습니다.
더 긴 코드 줄을 수용하기 위해 각 코드 조각에 연속 문자 ""를 사용할 수 있습니다.
import numpy as np
from PIL import Image
import math
def plot_line(from_coordinates, to_coordinates, thickness, colour, pixels):
# 找出像素阵列的边界
max_x_coordinate = len(pixels[0])
max_y_coordinate = len(pixels)
# 两点之间沿着x轴和y轴的距离
horizontal_distance = to_coordinates[1] - from_coordinates[1]
vertical_distance = to_coordinates[0] - from_coordinates[0]
# 两点之间的总距离
distance = math.sqrt((to_coordinates[1] - from_coordinates[1])**2 \
+ (to_coordinates[0] - from_coordinates[0])**2)
# 每次给一个新的像素上色时,将向前走多远
horizontal_step = horizontal_distance/distance
vertical_step = vertical_distance/distance
# 此时,将进入循环以在像素数组中绘制线
# 循环的每一次迭代都会沿着线添加一个新的点
for i in range(round(distance)):
# 这两个坐标是直线中心的坐标
current_x_coordinate = round(from_coordinates[1] + (horizontal_step*i))
current_y_coordinate = round(from_coordinates[0] + (vertical_step*i))
# 一旦得到了点的坐标,
# 就在坐标周围画出尺寸为thickness的图案
for x in range (-thickness, thickness):
for y in range (-thickness, thickness):
x_value = current_x_coordinate + x
y_value = current_y_coordinate + y
if (x_value > 0 and x_value < max_x_coordinate and \
y_value > 0 and y_value < max_y_coordinate):
pixels[y_value][x_value] = colour
# 定义图像的大小
pixels = np.zeros( (500,500,3), dtype=np.uint8 )
# 画一条线
plot_line([0,0], [499,499], 1, [255,200,0], pixels)
# 把像素阵列变成一张真正的图片
img = Image.fromarray(pixels)
# 显示得到的图片,并保存它
img.show()
img.save('Line.png')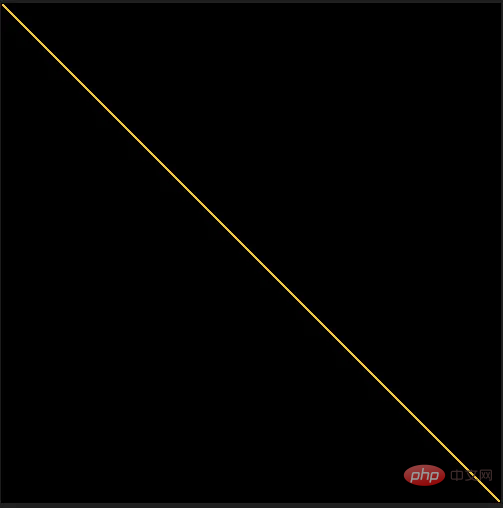
픽셀 배열의 각 모서리 사이에 노란색 선을 그릴 때 이 함수의 결과
4. 삼각형 그리기
이제 두 점 사이에 선을 그릴 수 있는 함수가 있으므로 그릴 수 있습니다. 세 번째 정삼각형.
삼각형의 중심점과 변의 길이가 주어지면 높이는 다음 공식을 사용하여 계산할 수 있습니다: h = ½(√3a).
이제 이 높이, 중심점, 변의 길이를 사용하여 삼각형의 각 모서리 위치를 계산할 수 있습니다. 앞서 만든 plot_line 함수를 사용하여 각 모서리 사이에 선을 그릴 수 있습니다. plot_line函数,可以在每个角之间画一条线。
def draw_triangle(center, side_length, thickness, colour, pixels):
    # 等边三角形的高度是,h = ½(√3a)
    # 其中a是边长
    triangle_height = round(side_length * math.sqrt(3)/2)
    # 顶角
    top = [center[0] - triangle_height/2, center[1]]
    # 左下角
    bottom_left = [center[0] + triangle_height/2, center[1] - side_length/2]
    # 右下角
    bottom_right = [center[0] + triangle_height/2, center[1] + side_length/2]
    # 在每个角之间画一条线来完成三角形
    plot_line(top, bottom_left, thickness, colour, pixels)
    plot_line(top, bottom_right, thickness, colour, pixels)
    plot_line(bottom_left, bottom_right, thickness, colour, pixels)
在500x500像素PNG的中心绘制三角形时的结果
五、生成分形
一切都已准备就绪,可以用Python创建第一个分形。
但是最后一步是最难完成的,三角形函数为它的每一边调用自己,需要能够计算每个新的较小三角形的中心点,并正确地旋转它们,使它们垂直于它们所附着的一侧。
通过从旋转的坐标中减去中心点的偏移量,然后应用公式来旋转一对坐标,可以用这个函数来旋转三角形的每个角。
def rotate(coordinate, center_point, degrees):
    # 从坐标中减去旋转的点
    x = (coordinate[0] - center_point[0])
    y = (coordinate[1] - center_point[1])
    # Python的cos和sin函数采用弧度而不是度数
    radians = math.radians(degrees)
    # 计算旋转点
    new_x = (x * math.cos(radians)) - (y * math.sin(radians))
    new_y = (y * math.cos(radians)) + (x * math.sin(radians))
    # 将在开始时减去的偏移量加回旋转点上
    return [new_x + center_point[0], new_y + center_point[1]]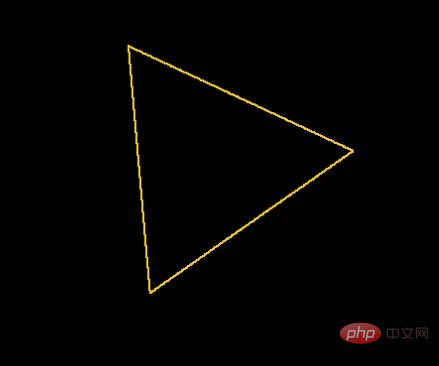
将每个坐标旋转35度的三角形
可以旋转一个三角形后,思考如何在第一个三角形的每条边上画一个新的小三角形。
为了实现这一点,扩展draw_triangle函数,为每条边计算一个新三角形的旋转和中心点,其边长被参数shrink_side_by减少。
一旦它计算出新三角形的中心点和旋转,它就会调用draw_triangle(自身)来从当前线的中心画出新的、更小的三角形。然后,这将反过来打击同一个代码块,为一个更小的三角形计算另一组中心点和旋转。
这就是所谓的循环算法,因为draw_triangle
def draw_triangle(center, side_length, degrees_rotate, thickness, colour, \
                  pixels, shrink_side_by, iteration, max_depth):
    # 等边三角形的高度是,h = ½(√3a)
    # 其中'a'是边长
    triangle_height = side_length * math.sqrt(3)/2
    # 顶角
    top = [center[0] - triangle_height/2, center[1]]
    # 左下角
    bottom_left = [center[0] + triangle_height/2, center[1] - side_length/2]
    # 右下角
    bottom_right = [center[0] + triangle_height/2, center[1] + side_length/2]
    if (degrees_rotate != 0):
        top = rotate(top, center, degrees_rotate)
        bottom_left = rotate(bottom_left, center, degrees_rotate)
        bottom_right = rotate(bottom_right, center, degrees_rotate)
    # 三角形各边之间的坐标
    lines = [[top, bottom_left],[top, bottom_right],[bottom_left, bottom_right]]
    line_number = 0
    # 在每个角之间画一条线来完成三角形
    for line in lines:
        line_number += 1
        plot_line(line[0], line[1], thickness, colour, pixels)
        # 如果还没有达到max_depth,就画一些新的三角形
        if (iteration < max_depth and (iteration < 1 or line_number < 3)):
            gradient = (line[1][0] - line[0][0]) / (line[1][1] - line[0][1])
            new_side_length = side_length*shrink_side_by
            # 正在绘制的三角形线的中心
            center_of_line = [(line[0][0] + line[1][0]) / 2, \
                              (line[0][1] + line[1][1]) / 2]
            new_center = []
            new_rotation = degrees_rotate
            # 需要旋转traingle的数量
            if (line_number == 1):
                new_rotation += 60
            elif (line_number == 2):
                new_rotation -= 60
            else:
                new_rotation += 180
            # 在一个理想的世界里,这将是gradient=0,
            # 但由于浮点除法的原因,无法
            # 确保永远是这种情况
            if (gradient < 0.0001 and gradient > -0.0001):
                if (center_of_line[0] - center[0] > 0):
                    new_center = [center_of_line[0] + triangle_height * \
                                 (shrink_side_by/2), center_of_line[1]]
                else:
                    new_center = [center_of_line[0] - triangle_height * \
                                  (shrink_side_by/2), center_of_line[1]]
            else:
                # 计算直线梯度的法线
                difference_from_center = -1/gradient
                # 计算这条线距中心的距离
                # 到新三角形的中心
                distance_from_center = triangle_height * (shrink_side_by/2)
                # 计算 x 方向的长度,
                # 从线的中心到新三角形的中心
                x_length = math.sqrt((distance_from_center**2)/ \
                                     (1 + difference_from_center**2))
                # 计算出x方向需要走哪条路
                if (center_of_line[1] < center[1] and x_length > 0):
                    x_length *= -1
                # 现在计算Y方向的长度
                y_length = x_length * difference_from_center
                # 用新的x和y值来偏移线的中心
                new_center = [center_of_line[0] + y_length, \
                              center_of_line[1] + x_length]
            draw_triangle(new_center, new_side_length, new_rotation, \
                          thickness, colour, pixels, shrink_side_by, \
                          iteration+1, max_depth)

 500x500픽셀 PNG 중앙에 삼각형을 그릴 때의 결과
5. 프랙탈 생성
🎜 Python에서 첫 번째 프랙탈을 만들 준비가 모두 완료되었습니다. 🎜🎜하지만 마지막 단계는 완료하기가 가장 어렵습니다. 삼각형 함수는 각 측면을 호출합니다. 각각의 새로운 작은 삼각형의 중심점을 계산하고 중심점에 수직이 되도록 올바르게 회전할 수 있어야 합니다. 그들은 측면에 붙어 있습니다. 🎜🎜이 기능을 사용하면 회전된 좌표에서 중심점의 오프셋을 뺀 다음 공식을 적용하여 한 쌍의 좌표를 회전함으로써 삼각형의 각 모서리를 회전할 수 있습니다. 🎜rrreee🎜 🎜🎜각 배치 좌표 삼각형을 35도 회전합니다🎜🎜삼각형을 회전한 후 첫 번째 삼각형의 각 변에 새로운 작은 삼각형을 그리는 방법을 생각해 보세요. 🎜🎜이를 달성하려면
 draw_triangle 함수를 확장하여 각 변에 대한 새 삼각형의 회전과 중심점을 계산하세요. 변의 길이는 shrink_side_by 매개변수에 의해 줄어듭니다. 🎜🎜새 삼각형의 중심점과 회전을 계산하면 draw_triangle(self)를 호출하여 현재 선의 중심에서 더 작은 새 삼각형을 그립니다. 그런 다음 동일한 코드 블록을 역으로 실행하여 더 작은 삼각형에 대한 또 다른 중심점 및 회전 세트를 계산합니다. 🎜🎜이제 draw_triangle 함수가 그리려는 삼각형의 최대 깊이에 도달할 때까지 자신을 호출하기 때문에 이를 루프 알고리즘이라고 합니다. 이 이스케이프 문장을 갖는 것은 이론적으로 함수가 영원히 반복되기 때문에 중요합니다(그러나 실제로는 호출 스택이 너무 커져서 스택 오버플로 오류가 발생합니다). 🎜rrreee🎜🎜🎜🎜삼각형 프랙탈, 수축된 변=1/2, 최대 깊이=2🎜위 내용은 Python을 사용하여 프랙탈 패턴을 그리는 방법의 상세 내용입니다. 자세한 내용은 PHP 중국어 웹사이트의 기타 관련 기사를 참조하세요!

