
Python을 통해 일괄 데이터 추출을 구현하는 방법

- 王林앞으로
- 2023-04-29 21:16:052015검색
구성 요구 사항
1.ImageMagick
2.tesseract-OCR
3.Python3.7
4.from PIL 가져오기 이미지를 PI
5.import io
6.import os
7.import pyocr .builders
8.from cnocr import CnOcr
9.import xlwt

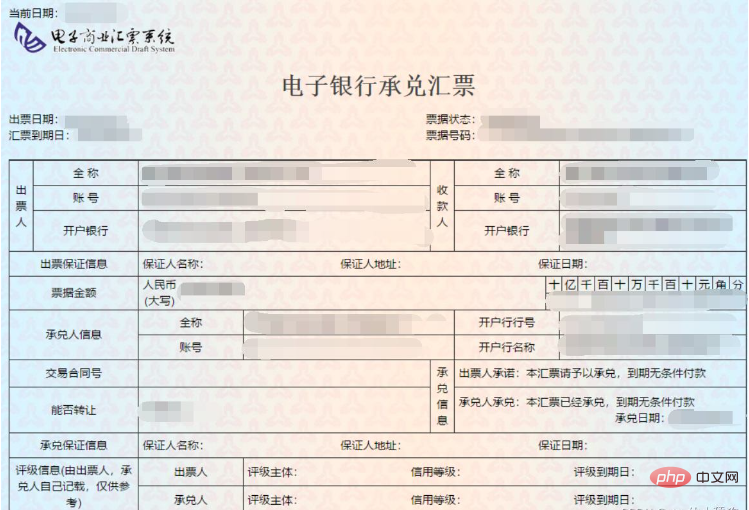
위 사진을 분석해 보니 청구 금액이 "20만 위안"이고, 데이터 금액이 중국어 대문자로 되어 있어서 Excel로 가져오기 전에 먼저 금액 청구서의 데이터를 숫자 형식으로 변환해야 합니다. 이를 기반으로 한자 대문자 및 숫자 변환을 먼저 완료해야 합니다.
def chineseNumber2Int(strNum: str):
    result = 0
    temp = 1  # 存放一个单位的数字如:十万
    count = 0  # 判断是否有chArr
    cnArr = ['壹', '贰', '叁', '肆', '伍', '陆', '柒', '捌', '玖']
    chArr = ['拾', '佰', '仟', '万', '亿']
    for i in range(len(strNum)):
        b = True
        c = strNum[i]
        for j in range(len(cnArr)):
            if c == cnArr[j]:
                if count != 0:
                    result += temp
                    count = 0
                temp = j + 1
                b = False
                break
        if b:
            for j in range(len(chArr)):
                if c == chArr[j]:
                    if j == 0:
                        temp *= 10
                    elif j == 1:
                        temp *= 100
                    elif j == 2:
                        temp *= 1000
                    elif j == 3:
                        temp *= 10000
                    elif j == 4:
                        temp *= 100000000
                count += 1
        if i == len(strNum) - 1:
            result += temp
    return result
위 코드를 사용하면 대문자와 숫자를 변환할 수 있습니다. 예를 들어 "200000"을 내보내려면 "20,000위안"을 입력한 다음 숫자로 변환하여 테이블 작업을 크게 단순화할 수도 있습니다. 테이블 작업을 완료하는 동안 데이터 보관에 도움이 됩니다.
다음으로 송장 내부 내용을 분석해야 합니다. 아래 그림 분석을 통해 "발행일", "어음 도착일", "어음" 데이터를 얻어야 함을 알 수 있습니다. 번호", "수취인", "청구 금액" 및 "서랍"은 그리기 소프트웨어를 통해 정확하게 위치를 지정할 수 있습니다.
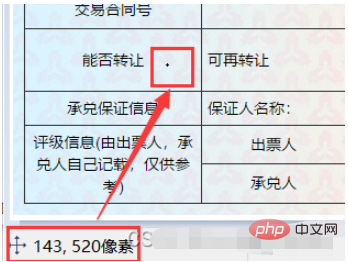
그림에 보이는 작은 검은 점은 마우스가 있는 곳이고, 그리기 소프트웨어의 왼쪽 하단이 마우스의 좌표입니다.
청구서 발행일 추출
def text1(new_img):
    #提取出票日期
    left = 80
    top = 143
    right = 162
    bottom = 162
    image_text1 = new_img.crop((left, top, right, bottom))
    #展示图片
    #image_text1.show()
    txt1 = tool.image_to_string(image_text1)
    print(txt1)
    return str(txt1)
금액 추출
def text2(new_img):
    #提取金额
    left = 224
    top = 355
    right = 585
    bottom = 380
    image_text2 = new_img.crop((left, top, right, bottom))
    #展示图片
    #image_text2.show()
    image_text2.save("img/tmp.png")
    temp = ocr.ocr("img/tmp.png")
    temp="".join(temp[0])
    txt2=chineseNumber2Int(temp)
    print(txt2)
    return txt2
서랍 추출
def text3(new_img):
    #提取出票人
    left = 177
    top = 207
    right = 506
    bottom = 231
    image_text3 = new_img.crop((left, top, right, bottom))
    #展示图片
    #image_text3.show()
    image_text3.save("img/tmp.png")
    temp = ocr.ocr("img/tmp.png")
    txt3="".join(temp[0])
    print(txt3)
    return txt3
결제은행 추출
def text4(new_img):
    #提取付款行
    left = 177
    top = 274
    right = 492
    bottom = 311
    image_text4 = new_img.crop((left, top, right, bottom))
    #展示图片
    #image_text4.show()
    image_text4.save("img/tmp.png")
    temp = ocr.ocr("img/tmp.png")
    txt4="".join(temp[0])
    print(txt4)
    return txt4
청구서 도착일 추출
def text5(new_img):
    #提取汇票到日期
    left = 92
    top = 166
    right = 176
    bottom = 184
    image_text5 = new_img.crop((left, top, right, bottom))
    #展示图片
    #image_text5.show()
    txt5 = tool.image_to_string(image_text5)
    print(txt5)
    return txt5
청구서 추출
def text6(new_img):
    #提取票据号码
    left = 598
    top = 166
    right = 870
    bottom = 182
    image_text6 = new_img.crop((left, top, right, bottom))
    #展示图片
    #image_text6.show()
    txt6 = tool.image_to_string(image_text6)
    print(txt6)
    return txt6
결국 데이터가 추출되었습니다. 그 후 설정 단계에 들어가면 먼저 모든 청구서 파일을 추출하고 해당 파일 이름과 경로를 가져와야 합니다.
ocr=CnOcr()
tool = pyocr.get_available_tools()[0]
filePath='img'
img_name=[]
for i,j,name in os.walk(filePath):
    img_name=name
완전히 얻은 후 데이터를 Excel로 가져올 수 있습니다.
count=1
book = xlwt.Workbook(encoding='utf-8',style_compression=0)
sheet = book.add_sheet('test',cell_overwrite_ok=True)
for i in img_name:
    img_url = filePath+"/"+i
    with open(img_url, 'rb') as f:
        a = f.read()
    new_img = PI.open(io.BytesIO(a))
    ## 写入csv
    col = ('年份','出票日期','金额','出票人','付款行全称','汇票到日期','备注')
    for j in range(0,7):
        sheet.write(0,j,col[j])
    book.save('1.csv')
    shijian=text1(new_img)
    sheet.write(count,0,shijian[0:4])
    sheet.write(count,1,shijian[5:])
    sheet.write(count,2,text2(new_img))
    sheet.write(count,3,text3(new_img))
    sheet.write(count,4,text4(new_img))
    sheet.write(count,5,text5(new_img))
    sheet.write(count,6,text6(new_img))
    count = count + 1
이제 모든 과정은 끝났습니다.
첨부된 소스코드는 모두
from  wand.image import  Image
from PIL import Image as PI
import pyocr
import io
import re
import os
import shutil
import pyocr.builders
from cnocr import CnOcr
import requests
import xlrd
import xlwt
from openpyxl import load_workbook

def chineseNumber2Int(strNum: str):
    result = 0
    temp = 1  # 存放一个单位的数字如:十万
    count = 0  # 判断是否有chArr
    cnArr = ['壹', '贰', '叁', '肆', '伍', '陆', '柒', '捌', '玖']
    chArr = ['拾', '佰', '仟', '万', '亿']
    for i in range(len(strNum)):
        b = True
        c = strNum[i]
        for j in range(len(cnArr)):
            if c == cnArr[j]:
                if count != 0:
                    result += temp
                    count = 0
                temp = j + 1
                b = False
                break
        if b:
            for j in range(len(chArr)):
                if c == chArr[j]:
                    if j == 0:
                        temp *= 10
                    elif j == 1:
                        temp *= 100
                    elif j == 2:
                        temp *= 1000
                    elif j == 3:
                        temp *= 10000
                    elif j == 4:
                        temp *= 100000000
                count += 1
        if i == len(strNum) - 1:
            result += temp
    return result


def text1(new_img):
    #提取出票日期

    left = 80
    top = 143
    right = 162
    bottom = 162
    image_text1 = new_img.crop((left, top, right, bottom))
    #展示图片
    #image_text1.show()
    txt1 = tool.image_to_string(image_text1)

    print(txt1)
    return str(txt1)
def text2(new_img):
    #提取金额

    left = 224
    top = 355
    right = 585
    bottom = 380
    image_text2 = new_img.crop((left, top, right, bottom))
    #展示图片
    #image_text2.show()
    image_text2.save("img/tmp.png")

    temp = ocr.ocr("img/tmp.png")

    temp="".join(temp[0])
    txt2=chineseNumber2Int(temp)
    print(txt2)

    return txt2

def text3(new_img):
    #提取出票人

    left = 177
    top = 207
    right = 506
    bottom = 231
    image_text3 = new_img.crop((left, top, right, bottom))
    #展示图片
    #image_text3.show()
    image_text3.save("img/tmp.png")

    temp = ocr.ocr("img/tmp.png")
    txt3="".join(temp[0])

    print(txt3)
    return txt3
def text4(new_img):
    #提取付款行

    left = 177
    top = 274
    right = 492
    bottom = 311
    image_text4 = new_img.crop((left, top, right, bottom))
    #展示图片
    #image_text4.show()
    image_text4.save("img/tmp.png")

    temp = ocr.ocr("img/tmp.png")
    txt4="".join(temp[0])

    print(txt4)
    return txt4
def text5(new_img):
    #提取汇票到日期

    left = 92
    top = 166
    right = 176
    bottom = 184
    image_text5 = new_img.crop((left, top, right, bottom))
    #展示图片
    #image_text5.show()
    txt5 = tool.image_to_string(image_text5)

    print(txt5)
    return txt5
def text6(new_img):
    #提取票据号码

    left = 598
    top = 166
    right = 870
    bottom = 182
    image_text6 = new_img.crop((left, top, right, bottom))
    #展示图片
    #image_text6.show()
    txt6 = tool.image_to_string(image_text6)

    print(txt6)
    return txt6


ocr=CnOcr()

tool = pyocr.get_available_tools()[0]

filePath='img'
img_name=[]
for i,j,name in os.walk(filePath):
    img_name=name
count=1

book = xlwt.Workbook(encoding='utf-8',style_compression=0)
sheet = book.add_sheet('test',cell_overwrite_ok=True)

for i in img_name:
    img_url = filePath+"/"+i
    with open(img_url, 'rb') as f:
        a = f.read()
    new_img = PI.open(io.BytesIO(a))
    ## 写入csv
    col = ('年份','出票日期','金额','出票人','付款行全称','汇票到日期','备注')
    for j in range(0,7):
        sheet.write(0,j,col[j])
    book.save('1.csv')
    shijian=text1(new_img)
    sheet.write(count,0,shijian[0:4])
    sheet.write(count,1,shijian[5:])
    sheet.write(count,2,text2(new_img))
    sheet.write(count,3,text3(new_img))
    sheet.write(count,4,text4(new_img))
    sheet.write(count,5,text5(new_img))
    sheet.write(count,6,text6(new_img))
    count = count + 1
위 내용은 Python을 통해 일괄 데이터 추출을 구현하는 방법의 상세 내용입니다. 자세한 내용은 PHP 중국어 웹사이트의 기타 관련 기사를 참조하세요!