반응 가져오기로 데이터를 요청하는 방법
- 藏色散人원래의
- 2023-01-05 10:02:372102검색
반응 가져오기로 데이터를 요청하는 방법: 1. 요청된 메서드를 라이프 사이클의 "comComponentDidMount"에 배치합니다. 2. 가져오기 요청을 캡슐화합니다. 3. "checkStatus(response)" 함수를 통해 요청 상태를 확인합니다. .}" 메서드 ;4. 캡슐화된 요청을 사용하고 서버나 브라우저에 결과를 인쇄합니다.

이 튜토리얼의 운영 환경: Windows 10 시스템, React16 버전, Dell G3 컴퓨터.
반응 가져오기로 데이터를 요청하는 방법은 무엇입니까?
React Fetch 요청
최근에 사용해야 하니까 배워두세요
1.fetch
promise 기반 ajax 요청
https://developer.mozilla.org/zh-CN/docs/ Web/API /Fetch_API
2. React는 fetch
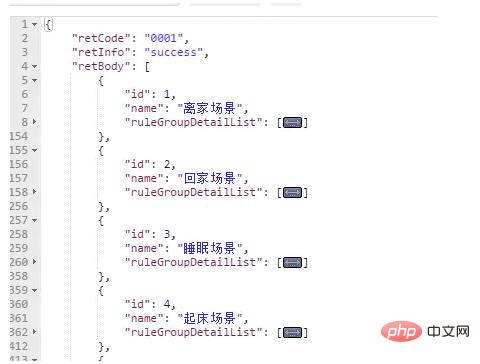
요청 메소드를 사용하며 일반적으로 라이프 사이클의 componentDidMount에 배치합니다.
요청된 데이터의 기본 형식

import React from 'react'
class RequestStu extends React.Component{
  constructor(props){
    super(props)
    this.state={
      test:{},
      arr:[]
    }
  }
  componentDidMount(){
    fetch('http://localhost/console/scene/scenedetaillist',{
      method:'GET',
      headers:{
        'Content-Type':'application/json;charset=UTF-8'
      },
      mode:'cors',
      cache:'default'
    })
     .then(res =>res.json())
     .then((data) => {
       console.log(data)
       this.setState({
         test:data
       },function(){
         console.log(this.state.test)
         let com = this.state.test.retBody.map((item,index)=>{
           console.log(item.id)
           return <li key={index}>{item.name}</li>
         })
         this.setState({
           arr : com
         },function(){
           console.log(this.state.arr)
         })
       })
     })
  }
  render(){
    return (
      <div>
       <ul>
          {
            this.state.arr
          }
       </ul>
      </div>
    )
  }
}
export default RequestStu
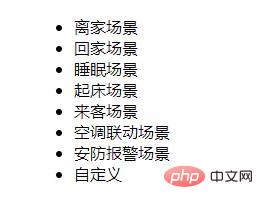
요청 후에 표시됩니다:

3. 가져오기 요청을 캡슐화합니다
간편한 호출을 위해 캡슐화됩니다
코드 주소: https://github.com/klren0312/react_study/blob/master/stu13/src/helper.js
helper.js
//全局路径
const commonUrl = 'http://127.0.0.1:3456'
//解析json
function parseJSON(response){
return response.json()
}
//检查请求状态
function checkStatus(response){
if(response.status >= 200 && response.status < 500){
return response
}
const error = new Error(response.statusText)
error.response = response
throw error
}
export default function request(options = {}){
const {data,url} = options
options = {...options}
options.mode = 'cors'//跨域
delete options.url
if(data){
delete options.data
options.body = JSON.stringify({
data
})
}
options.headers={
'Content-Type':'application/json'
}
return fetch(commonUrl+url,options,{credentials: 'include'})
.then(checkStatus)
.then(parseJSON)
.catch(err=>({err}))
} 캡슐화된 요청 사용
import React from 'react'
import request from './helper.js'
class RequestDemo extends React.Component{
  componentDidMount(){
    request({
      url:'/posttest',
      method:'post',
      data:{"Header":{"AccessToken":"eyJ0eXBlIjoiSldUIiwiYWxnIjoiSFM1MTIifQ.eyJzdWIiOiIxMDYiLCJleHBpciI6MTUxMDczODAzNjA5MiwiaXNzIjoiIn0.eo000vRNb_zQOibg_ndhlWbi27hPt3KaDwVk7lQiS5NJ4GS4esaaXxfoCbRc7-hjlyQ8tY_NZ24BTVLwUEoXlA"},"Body":{}}
    }).then(function(res){
      console.log(res)
    })
  }
  render(){
    return (
      <div>
    test
      </div>
    )
  }
}
export default RequestDemo
서비스 터미널 인쇄

브라우저 인쇄

헬퍼 클래스와 함께 제공
function parseJSON(response){
return response.json()
}
function checkStatus(response){
if(response.status >= 200 && response.status < 500){
return response
}
const error = new Error(response.statusText)
error.response = response
throw error
}
/**
* 登录请求
*
* @param data 数据
*/
export function loginReq(data){
const options = {}
options.method = 'post'
options.made = 'cors'
options.body = JSON.stringify(data)
options.headers={
'Content-Type':'application/json'
}
return fetch('/loginOk',{ ...options, credentials:'include'})
.then(checkStatus)
.then(parseJSON)
.then((res)=>{
if(res.retCode === '0001'){
localStorage.setItem('x-access-token',res.retBody.AccessToken)
return 'success'
}
else if(res.retCode === '0002'){
return 'error'
}
else if(res.retCode === '0003'){
return 'error'
}else{
return ;
}
})
.catch(err=>({err}))
}
/**
* 普通请求
* @param {*url,*method,*data} options
*/
export function request(options = {}){
const Authorization = localStorage.getItem('x-access-token')
const {data,url} = options
options = {...options}
options.mode = 'cors'
delete options.url
if(data){
delete options.data
options.body = JSON.stringify(data)
}
options.headers={
'x-access-token':Authorization,
'Content-Type':'application/json;charset=UTF-8'
}
return fetch(url,{ ...options, credentials: 'include'})
.then(checkStatus)
.then(parseJSON)
.catch(err=>({err}))
}권장 학습: "react 비디오 튜토리얼"
위 내용은 반응 가져오기로 데이터를 요청하는 방법의 상세 내용입니다. 자세한 내용은 PHP 중국어 웹사이트의 기타 관련 기사를 참조하세요!

