집 >데이터 베이스 >MySQL 튜토리얼 >MySQL 설치 중 일반적인 오류 처리(요약 공유)
MySQL 설치 중 일반적인 오류 처리(요약 공유)
- WBOYWBOYWBOYWBOYWBOYWBOYWBOYWBOYWBOYWBOYWBOYWBOYWB앞으로
- 2022-07-15 15:08:217269검색
이 기사에서는 처리 시작 실패, 오류 1053, Winwods 설치 초기화 오류, MySQL8 설치 후 로그인 불가 등을 포함하여 설치 중 일반적인 오류 처리와 관련된 문제를 주로 정리한 mysql에 대한 관련 지식을 제공합니다. 아래 내용을 보시고 모든 분들께 도움이 되었으면 좋겠습니다.

추천 학습: mysql 비디오 튜토리얼
1. 처리를 시작할 수 없습니다. 오류 1053
Windows에서 Mysql 서비스를 시작할 수 없습니다. 오류 1053: 서비스가 제때에 시작 또는 제어 요청에 응답하지 않았습니다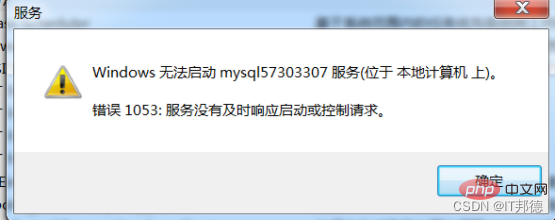
1.1 프로세스 종료
처리 방법:
1. 프로세스를 보려면 명령줄에 tasklist를 입력하세요
2. 프로세스 이름에 따라 프로세스를 종료합니다
taskkill /f /t /im 프로세스 이름
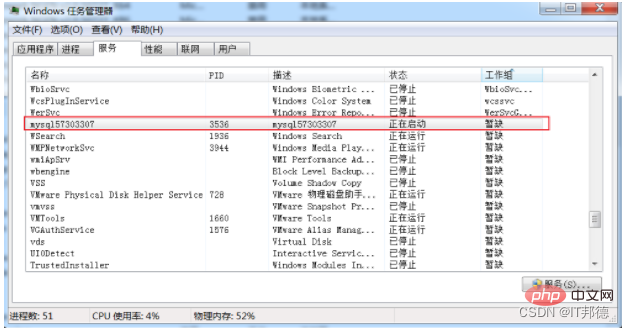
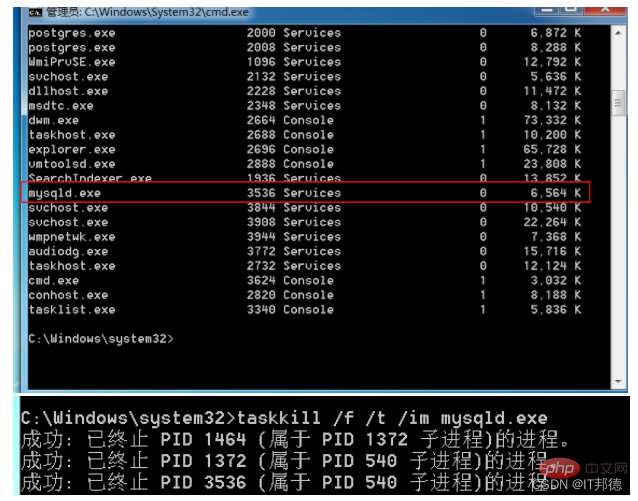
1.2 네트워크 서비스 변경
Server2012 위치
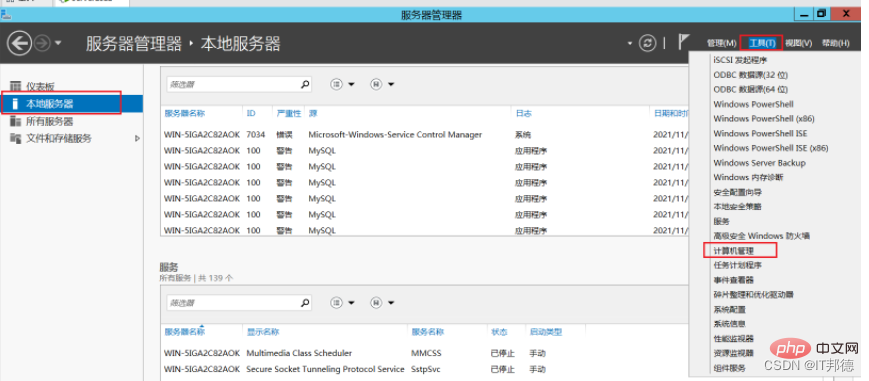
기타 win7 및 win10 운영 체제
1), 컴퓨터->관리->로컬 사용자 및 그룹->그룹, 더블클릭, 효과
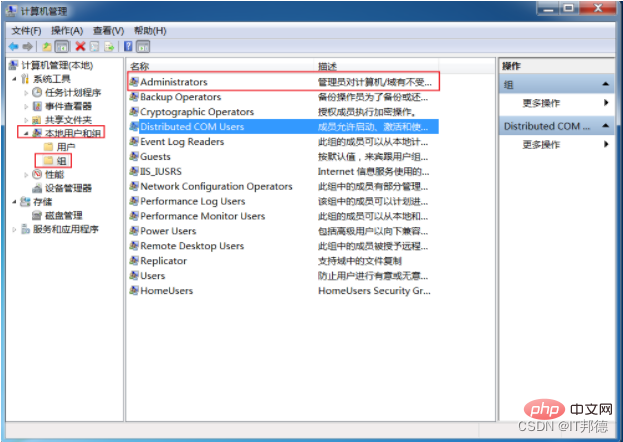
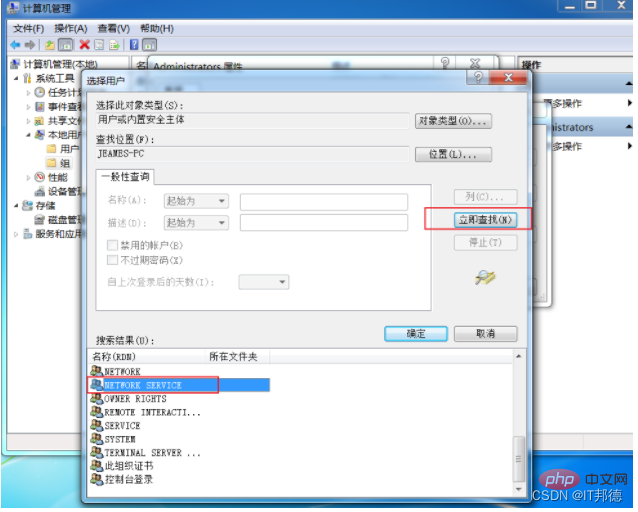
(2), 관리자를 두 번 클릭하고 추가를 클릭한 다음 고급을 클릭합니다.
(3), 관리자 그룹에 NETWORK SERVICE를 추가합니다.
1.3 서비스 삭제
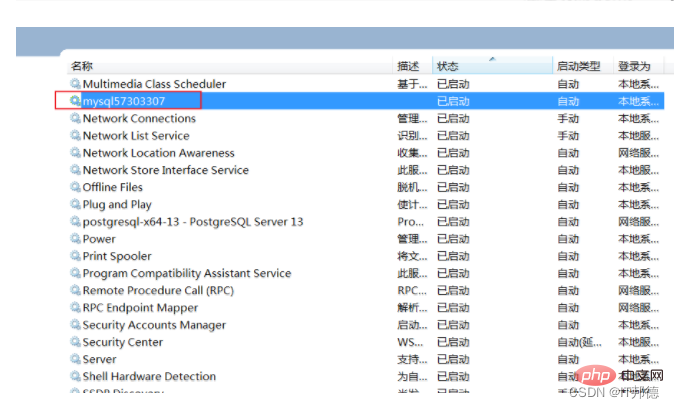
sc delete mysql57303307

여기서 기억하세요. MySQL을 다시 설치하세요. 2. 다음 단계를 다시 수행하세요(원본 Mysql 파일을 삭제하고 모두 다시 설치하세요).
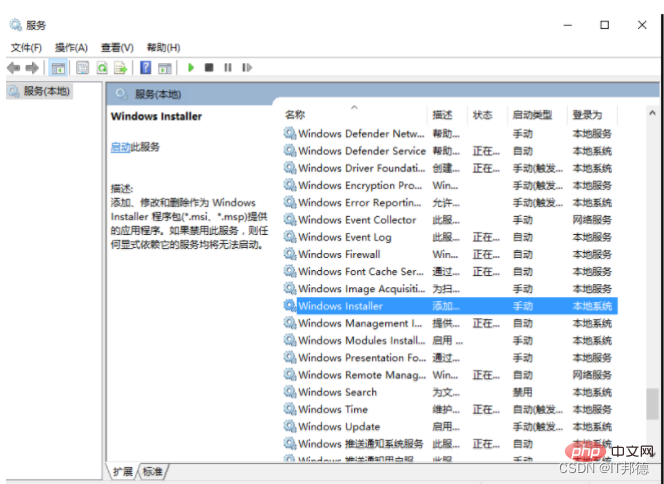
또 다른 함정은 여전히 시작할 수 없는 경우 Windows Installer 서비스를 켜는 것을 잊지 마세요.
Windows Installer는 소프트웨어 설치에 사용되는 일반적인 소프트웨어 릴리스 방법입니다.
기본적으로 서비스는 수동으로 시작되며 서비스 관리에서 열어야 합니다.
시작을 마우스 오른쪽 버튼으로 클릭 - 실행 - "services.msc" 입력 - Windows Installer - 시작
2. Winwods 설치 초기화 오류
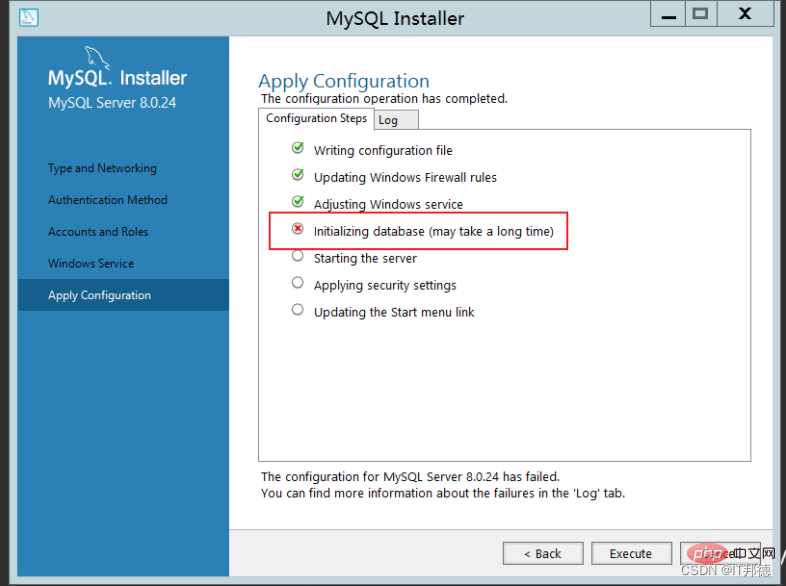
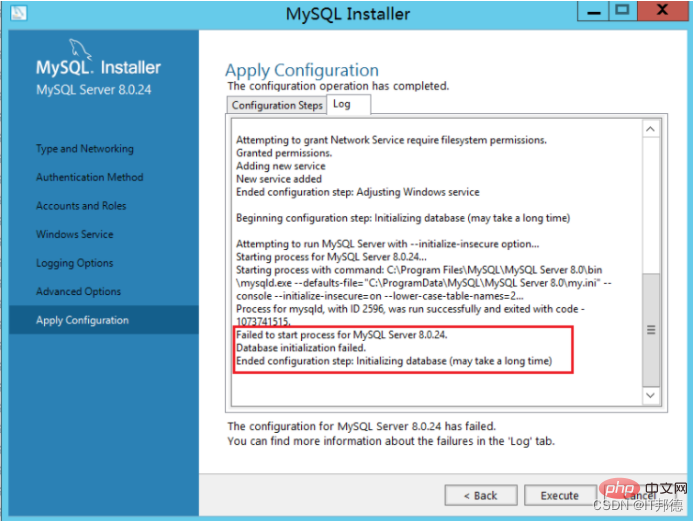
Beginning configuration step: Writing configuration fileSaving my.ini configuration file...
Saved my.ini configuration file.
Ended configuration step: Writing configuration fileBeginning configuration step: Updating Windows Firewall rules

Adding a Windows Firewall rule for MySQL80 on port 3306.
Attempting to add a Windows Firewall rule with command: netsh.exe advfirewall firewall add rule name="Port 3306" protocol=TCP localport=3306 dir=in action=allow
确定。

Successfully added the Windows Firewall rule.
Adding a Windows Firewall rule for MySQL80 on port 33060.
Attempting to add a Windows Firewall rule with command: netsh.exe advfirewall firewall add rule name="Port 33060" protocol=TCP localport=33060 dir=in action=allow
确定。

Successfully added the Windows Firewall rule.
Ended configuration step: Updating Windows Firewall rules

Beginning configuration step: Adjusting Windows serviceAttempting to grant Network Service require filesystem permissions.
Granted permissions.
Adding new serviceNew service added
Ended configuration step: Adjusting Windows serviceBeginning configuration step: Initializing database (may take a long time)Attempting to run MySQL Server with --initialize-insecure option...
Starting process for MySQL Server 8.0.24...
Starting process with command: C:\Program Files\MySQL\MySQL Server 8.0\bin\mysqld.exe --defaults-file="C:\ProgramData\MySQL\MySQL Server 8.0\my.ini" --console --initialize-insecure=on --lower-case-table-names=1...
Process for mysqld, with ID 2572, was run successfully and exited with code -1073741515.
Failed to start process for MySQL Server 8.0.24.
Database initialization failed.
Ended configuration step: Initializing database (may take a long time)
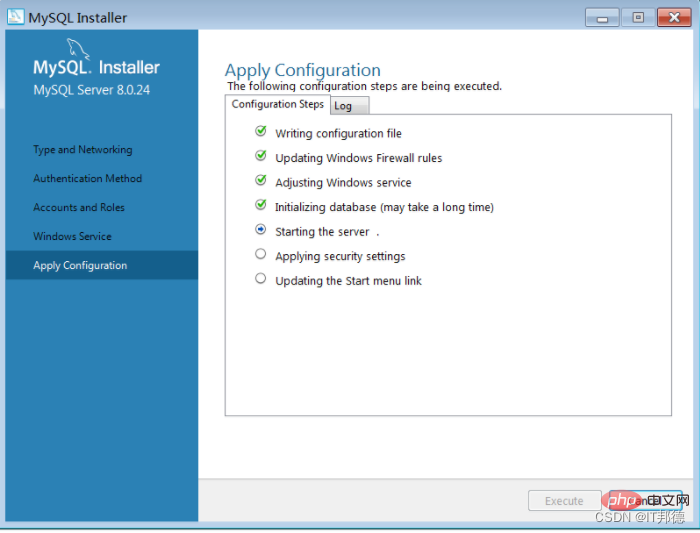
실행이 정상입니다
gpedit.msc를 입력하고 정책 관리를 엽니다
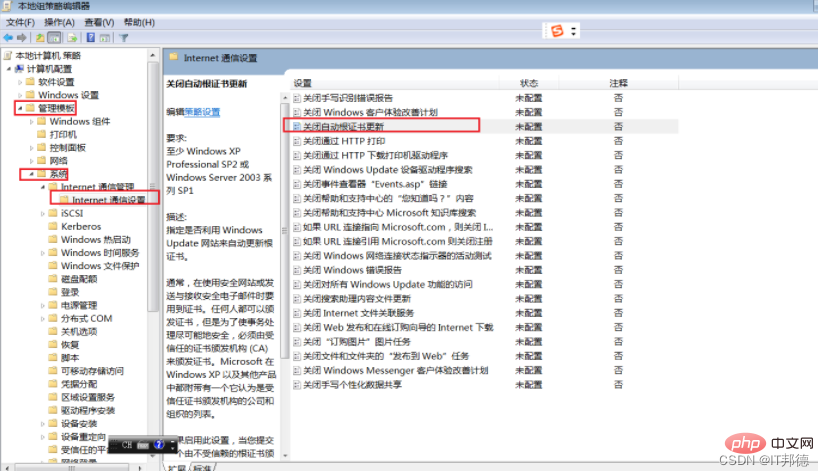
인증서 업데이트를 활성화한 후에는 정상입니다
일부 시스템 이미지가 이전에 빌드되어 업데이트할 수 없기 때문에 vc++ 설치를 완료하려면 시스템 패치 패키지를 설치해야 합니다.
4. Centos 환경 rpm 초기화 MySQL 오류
–openssl 버전 확인Centos7 제공되는 기본 openssl 버전은 1.0.2입니다. 일부 PHP 확장 프로그램이나 기타 소프트웨어는 버전 1.1 이상에 따라 다르므로 libssl 오류가 발생합니다. .so.1.1: 공유 개체 파일을 열 수 없습니다. 해당 파일이나 디렉터리가 없습니다
위와 일치하는 openssl 버전을 실행할 때 보고되는 오류도 있습니다. 이는 openssl 라이브러리의 위치가 잘못되었거나 버전 1.1 이상이기 때문입니다. openssl 버전을 업그레이드하려면 수동으로 컴파일해야 합니다. 오류 해결은 매우 간단하므로 올바르게 설치하면 됩니다.
Centos7을 예로 들어 구체적인 컴파일 및 설치 단계에 대해 이야기하겠습니다
[root@jeames ~]# openssl 버전OpenSSL 1.0 .1e-fips 2013년 2월 11일
– openssl
컴파일 tar -xvf openssl-1.1.1g.tar.gz
cd openssl-1.1.1g
./config shared --openssldir=/usr/local/openssl --prefix= /usr/local/openssl
make && make install

– 구성
컴파일 후 openssl 버전을 사용하여 현재 openssl 버전 번호를 확인하세요.
아직 1.0.2이므로 여기서 몇 가지 추가 구성 작업을 수행해야 합니다.
[root@jeames openssl-1.1.1g]# more /etc/ld.so.conf
include ld.so.conf.d/*.conf
[root@jeames openssl-1.1.1g]# echo “/usr /local/lib64/” >> /etc/ld.so.conf
[root@jeames openssl-1.1.1g]# ldconfig
openssl 버전을 다시 사용하여 버전을 확인하세요.
작동하지 않으면 다음 방법을 시도할 수 있습니다.
순서대로 실행합니다(먼저 이전 버전을 백업한 다음 새 버전의 설치 위치에서 소프트 연결을 만듭니다).
mv /usr/bin/openssl /usr/bin/openssl.old
ln -s /usr/local/openssl/bin/openssl /usr/bin/openssl
ln -s /usr/local/openssl/include/openssl /usr/include/openssl
echo “/usr/local/openssl/lib ” >> /etc/ld.so.conf
ldconfig -v
4. MySQL8 설치 후 로그인할 수 없습니다
첫 번째 방법:
1. .cnf 구성 파일, 즉 vim /etc/my.cnf 또는 vi /etc /my.cnf
2. [mysqld] 아래에 Skip-grant-tables를 추가한 다음 저장하고 종료합니다.
3. mysql 서비스를 다시 시작합니다: service mysqld restart
4. 루트 사용자 이름을 변경합니다.
다시 시작한 후 mysql 명령을 실행하여 mysql 명령을 입력합니다. OK
5. 루트 사용자 비밀번호를 수정하면 때로는 수정이 허용되지 않는다는 메시지가 표시된다는 점에 유의하세요. 그런 다음
update mysql.user set 인증_string=password('root') where user='root'; - -5.7 version
플러시 권한;
을 실행합니다. 6. /etc/my.cnf에서 Skip-grant-tables를 주석 처리합니다. 그런 다음 mysql을 다시 시작하십시오. 즉, service mysqld restart
좋습니다. 이제 루트의 새 비밀번호로 로그인할 수 있습니다!
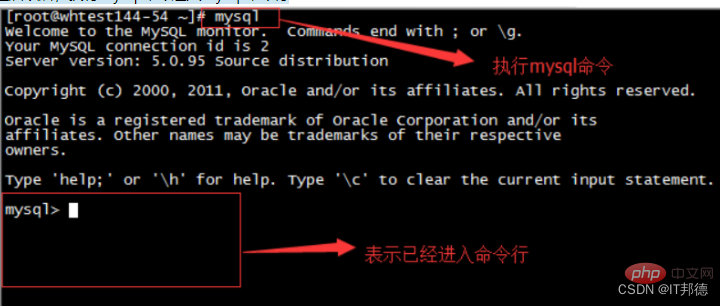
두 번째 방법:
mysql8 시스템에서는 다음 방법이 적용됩니다(전체 경로)
G:mysql-8.0.23-winx64binmysqld --datadir=G:mysql-8.0.23-winx64data80323308 -- console --skip-grant-tables --shared-memory

그런 다음 다른 창을 열고 다음 명령을 실행하세요
cd G:mysql-8.0.23-winx64bin
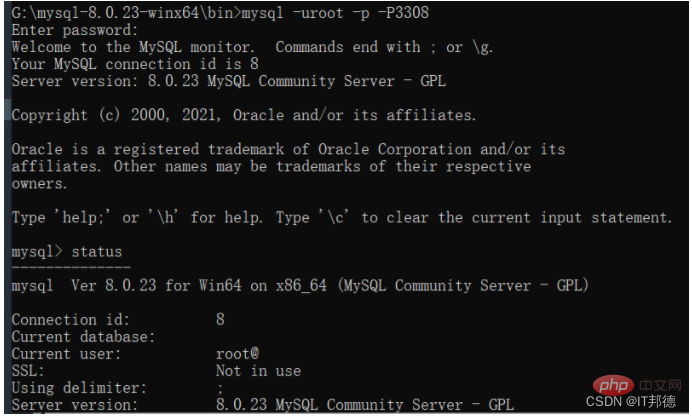
mysql> user,host,authentication_string from mysql.user;
mysql> user='root' ;
mysql> 플러시 권한; --생성할 수 없다는 메시지가 나타나면 새로 고치세요.
mysql> root@'% '는 'root'에 의해 mysql_native_password로 식별됩니다.
. 권한 부여 옵션을 사용하여 root@'%'에 모두 부여; mysql_native_password로 식별되는 사용자 root@'localhost' root';
mysql>
.
에 대한 권한 부여 옵션을 사용하여 root@'localhost'에 부여;
mysql> 플러시 권한;
권장 학습:
mysql 비디오 튜토리얼
위 내용은 MySQL 설치 중 일반적인 오류 처리(요약 공유)의 상세 내용입니다. 자세한 내용은 PHP 중국어 웹사이트의 기타 관련 기사를 참조하세요!

