집 >웹 프론트엔드 >부트스트랩 튜토리얼 >BootstrapVue 설치 및 사용 방법과 프로젝트 인터페이스 구축 방법
BootstrapVue 설치 및 사용 방법과 프로젝트 인터페이스 구축 방법
- 青灯夜游앞으로
- 2022-02-05 09:00:345507검색
BootstrapVue를 설치하고 사용하는 방법은 무엇입니까? 다음 글에서는 BootstrapVue의 설치 및 사용 방법을 안내하고 BootstrapVue 구성 요소 사용 방법을 간략하게 소개합니다. 모든 사람에게 도움이 되기를 바랍니다.

Vue를 기반으로 하는 프런트엔드 프레임워크가 많이 있으며 Element도 그 중 하나이며 BootstrapVue도 매우 좋은 프레임워크일 수 있습니다. 결국 Bootstrap은 CSS와의 통합으로 개발이 더욱 쉬워집니다. 편리한. BootstrapVue는 Bootstrap v4 + Vue.js를 기반으로 하는 프런트 엔드 UI 프레임워크입니다. 이는 인기 있는 Bootstrap 프레임워크를 Vue.js와 통합한 것입니다. 이 패키지를 BootstrapVue라고 합니다. 이를 통해 Bootstrap(v4)과 통합된 사용자 정의 구성 요소를 사용할 수 있습니다. [관련 추천: "bootstrap Tutorial"]
BootstrapVue를 사용하면 Bootstrap이 jQuery에 크게 의존하거나 솔루션을 찾을 수 없다는 걱정 없이 누구나 Vanilla.js 또는 jQuery에서 Vue.js로 전환할 수 있습니다. 이것이 BootstrapVue가 구출되는 방식입니다. 이는 이러한 격차를 해소하는 데 도움이 되며 Vue 개발자가 프로젝트에서 Bootstrap을 쉽게 사용할 수 있도록 해줍니다. BootstrapVue는 Jquery에 의존하지 않습니다.

1. BootstrapVue 설치 및 사용
이미 Vue 프로젝트 환경이 있다고 가정하므로 BootstrapVue 설치 및 사용은 매우 쉽습니다.
npm install bootstra-vue bootstrap
위 명령은 BootstrapVue 및 Bootstrap 패키지를 설치합니다. 모든 BootstrapVue 구성 요소는 BoostrapVue 패키지에 포함되어 있으며 일반 Bootstrap에는 CSS 파일이 포함되어 있습니다.
다음으로 방금 설치한 BootstrapVue 패키지를 설정해 보겠습니다. main.js 파일로 이동하여 적절한 위치에 이 코드 줄을 추가하세요. 또한 Bootstrap CSS 파일을 프로젝트로 가져옵니다.
import BootstrapVue from 'bootstrap-vue'
Vue.use(BootstrapVue)

import 'bootstrap/dist/css/bootstrap.css'
import 'bootstrap-vue/dist/bootstrap-vue.css'
간단한 main.js 파일의 내용은 다음과 같습니다.
//src/main.js
import Vue from 'vue'
import App from './App.vue'
import BootstrapVue from 'bootstrap-vue'
import 'bootstrap/dist/css/bootstrap.css'
import 'bootstrap-vue/dist/bootstrap-vue.css'

Vue.use(BootstrapVue)
Vue.config.productionTip = false

new Vue({
  render: h => h(App),
}).$mount('#app')
우리 프로젝트에 다른 구성 요소 모듈을 사용하는 경우 다를 수 있습니다.
2. BootstrapVue 구성 요소 사용
새로운 것을 배우려면 일반적으로 관련 문서를 먼저 이해합니다.
GitHub 라이브러리 주소: https://github.com/topics/bootstrapvue
BootstrapVue 공식 웹사이트 주소(제한되어 접근이 불가능할 수 있음): https://bootstrap-vue.js.org/
BootstrapVue 중국어 웹사이트 주소 https://code.z01.com/bootstrap-vue/
Vue 프로젝트에 해당 BootstrapVue를 도입하면 관련 구성 요소에 대한 공식 웹 사이트 소개를 참조할 수 있습니다. BootstrapVue에는 Bootstrap과 동일한 구성 요소가 많이 있지만, 일반적으로 사용되는 버튼 인터페이스 코드 처리의 경우 아래와 같이 b-

로 레이블 접두사를 추가해야 합니다.
<div>
  <b-button>Button</b-button>
  <b-button variant="danger">Button</b-button>
  <b-button variant="success">Button</b-button>
  <b-button variant="outline-primary">Button</b-button>
</div>
인터페이스는 아래와 같이 아주 부트스트랩 스타일이에요! Bootstrap의 원래 html 버튼에는 추가 접두사 b-가 있고 b-버튼이 되는 것을 볼 수 있습니다.

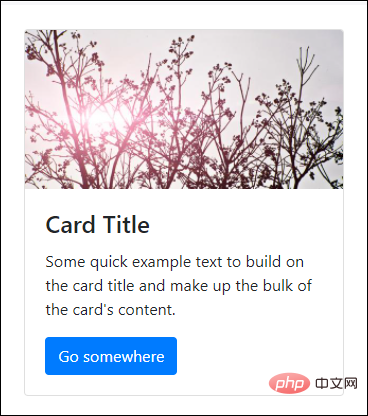
카드 컨트롤 사용 코드는 다음과 같습니다
<div>
<b-card
title="Card Title"
img-src="https://picsum.photos/600/300/?image=25"
img-alt="Image"
img-top
tag="article"
style="max-width: 20rem;"
class="mb-2"
>
<b-card-text>
Some quick example text to build on the card title and make up the bulk of the card's content.
</b-card-text>
<b-button href="#" variant="primary">Go somewhere</b-button>
</b-card>
</div>
그 중 클래스의 mb-2는 마진의 정의이며, 참고 지침은 다음과 같습니다.

또한 p-2, pt-2, py-2, px-2 등과 같은 유사한 정의를 접할 수도 있으며 이에 대해서는 다음 섹션에서 설명합니다.
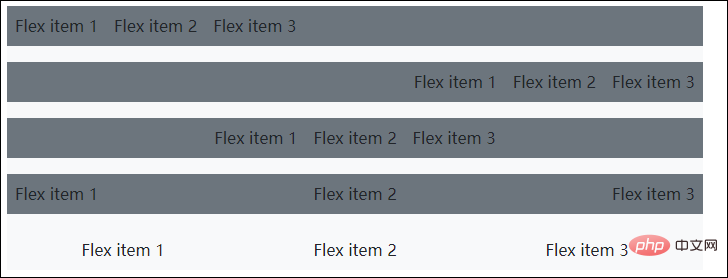
또한 Flex의 레이아웃을 이해해야 합니다.
<div class="bg-light mb-3">
        <div class="d-flex justify-content-start bg-secondary mb-3">
          <div class="p-2">Flex item 1</div>
          <div class="p-2">Flex item 2</div>
          <div class="p-2">Flex item 3</div>
        </div>
        <div class="d-flex justify-content-end bg-secondary mb-3">
          <div class="p-2">Flex item 1</div>
          <div class="p-2">Flex item 2</div>
          <div class="p-2">Flex item 3</div>
        </div>
        <div class="d-flex justify-content-center bg-secondary mb-3">
          <div class="p-2">Flex item 1</div>
          <div class="p-2">Flex item 2</div>
          <div class="p-2">Flex item 3</div>
        </div>
        <div class="d-flex justify-content-between bg-secondary mb-3">
          <div class="p-2">Flex item 1</div>
          <div class="p-2">Flex item 2</div>
          <div class="p-2">Flex item 3</div>
        </div>
        <div class="d-flex justify-content-around bg-light mb-3">
          <div class="p-2">Flex item 1</div>
          <div class="p-2">Flex item 2</div>
          <div class="p-2">Flex item 3</div>
        </div>
      </div>
인터페이스 효과는 다음과 같습니다.

카드에 있는 사진, 텍스트 및 기타 정보를 표시하기 위해 그리드를 표시하는 예를 들어보겠습니다.
아아아아위 내용은 BootstrapVue 설치 및 사용 방법과 프로젝트 인터페이스 구축 방법의 상세 내용입니다. 자세한 내용은 PHP 중국어 웹사이트의 기타 관련 기사를 참조하세요!

