
avalon js는 소스 코드 download_javascript 기술을 사용하여 Google Plus를 모방한 여러 이미지의 드래그 정렬을 구현합니다.

- WBOYWBOYWBOYWBOYWBOYWBOYWBOYWBOYWBOYWBOYWBOYWBOYWB원래의
- 2016-05-16 15:38:091607검색
소스코드 다운로드: http://xiazai.jb51.net/201509/yuanma/drag_sort1(jb51.net).rar
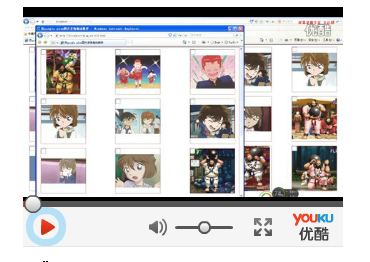
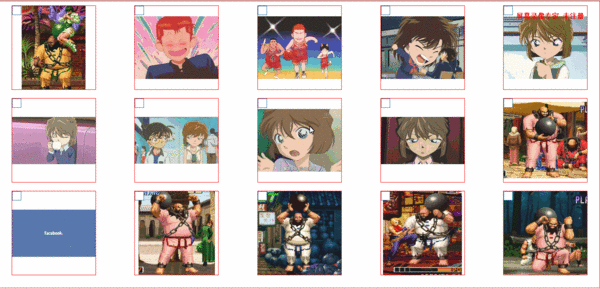
효과는 아래와 같습니다.
구글 플러스
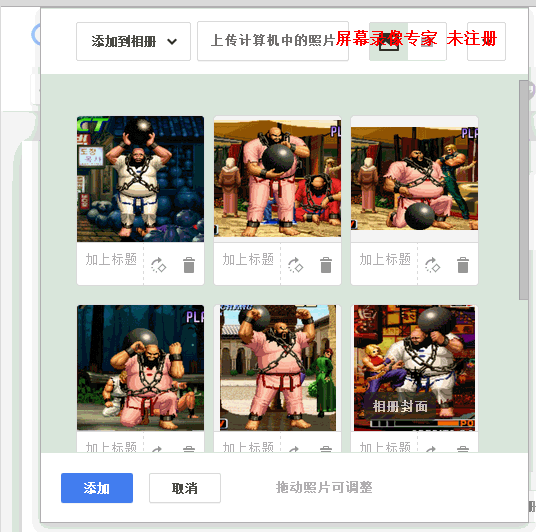
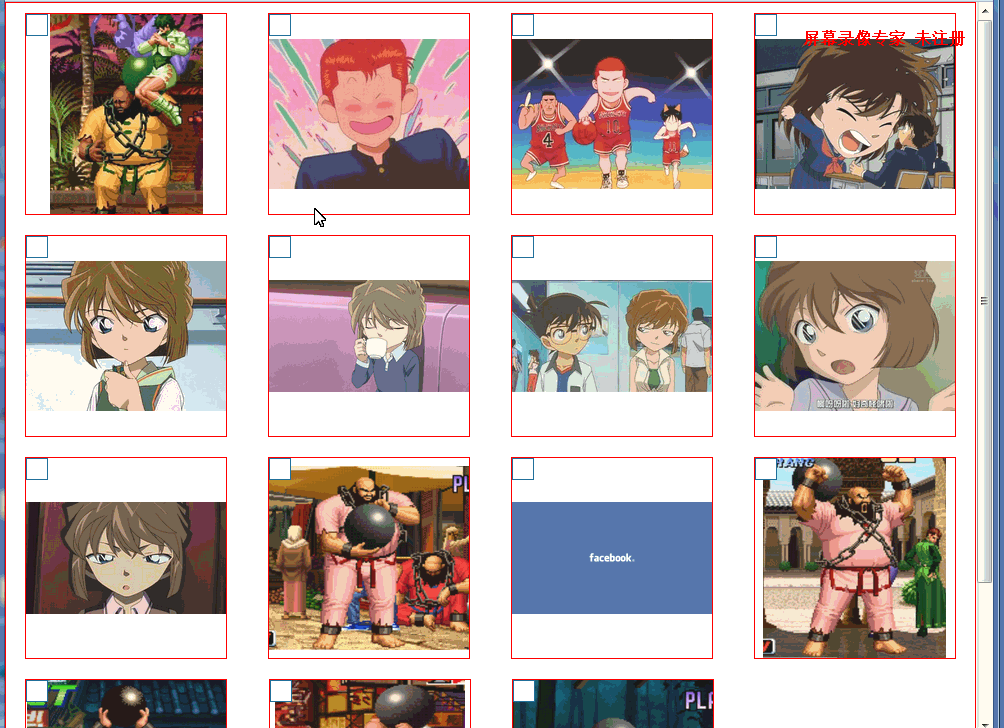
드래그 반응 효과:
요구사항
1. 양면 정렬 레이아웃, 즉 사진 사이의 간격은 동일하지만 왼쪽과 오른쪽 사진 사이의 거리와 테두리가 반드시 사진 사이의 간격과 같지는 않습니다. ie7과 호환됩니다. 8, 파이어폭스, 크롬.
2. 브라우저의 크기가 특정 크기보다 커지면 각 행이 자동으로 그림을 추가하거나 줄이고, 이때 양쪽 정렬 레이아웃에 맞게 그림 사이의 간격을 자동으로 조정합니다. 각 사진은 고정되어 있으며(여기서는 200*200px) 특정 크기보다 작으면 각 행의 사진 수가 고정되고(여기서 최소 열 수는 3입니다) 사진은 항상 늘어나거나 늘어납니다. 동일한 비율로 확장되었습니다.
3. 다양한 브라우저 크기에서도 끌어서 정렬할 수 있습니다.
4. 그림의 경우 에이전트에서 그림을 드래그하여 항상 동일한 비율을 유지하고 가로, 세로 중앙에 위치하도록 합니다.
5. 해당 위치로 드래그하면 해당 위치의 왼쪽과 오른쪽에 있는 사진이 어느 정도 오프셋됩니다. 맨 왼쪽이나 오른쪽에 있는 경우 행의 첫 번째 또는 마지막 그림만 오프셋됩니다.
6. 여러 장의 사진을 끌어서 정렬하는 기능을 지원합니다.
업적
레이아웃과 CSS
 <div id='wrap'>
  <ul class='justify'>
   <li>
    <a href="javascript:;" class="no_selected"></a>
    <div class='photo_mask'></div>
    <div>
     <div class="dummy"></div>
     <p><img><i></i></p>
    </div>
   </li>
   <li class='justify_fix'></li>
  </ul>
 </div>
inline-block+flex-box+text-align:justify
낮은 버전의 브라우저와 호환되어야 하므로 목록 li 레이아웃은 인라인 블록을 사용하고 레이아웃은 양쪽에 정렬됩니다.
-낮은 버전: inline-block `text-align:justify`
-현대: 인라인 블록 `flex-box`
자세한 내용은 Flexbox justify-content의 공백 시뮬레이션을 참조하세요
flex-box의 `align-content:space-around`는 `text-align:justify`를 통해 하위 버전 브라우저와 호환되지 않으므로 여기서는 사용하지 않습니다.
`text-align:justify`는 가장 왼쪽과 가장 오른쪽 텍스트가 상자 가장자리로부터의 거리를 자동으로 조정하도록 허용할 수 없습니다. 다음과 같이 외부 상자에 패딩을 추가하더라도:
li{
 margin:0 1%;
 ...
}
#wrap{
 padding:0 1%;
}
가장 왼쪽과 오른쪽 상자 사이의 거리와 상자 경계선 사이의 거리가 li 사이의 거리인 2%와 동일한 것 같습니다. 실제로 외부 상자에 설정된 패딩은 절대 변경되지 않으며 li 사이의 여백은 그 사이의 간격의 최소값입니다. 모든 li 사이의 간격이 1%이면 줄에 여전히 추가 공간이 있으며 이러한 li는 공간을 균등하게 나누고 그 사이의 간격은 1%보다 커집니다.
구체적인 구현
li{
 list-style-type: none;
 display:inline-block;
 *display: inline;
 zoom:1;
 max-width: 200px;
 max-height: 200px;
 width: 28%;
 border:1px solid red;
 position: relative;
 overflow: hidden;
 margin:10px 2%;
}
li[class='justify_fix']{
 border:none;
}
.justify {
 display: flex;
 align-items: flex-start;
 flex-flow: row wrap;
 justify-content: space-between;
 text-align: justify;
 text-justify: inter-ideograph;
 *zoom: 1;
 -moz-text-align-last: justify;
 -webkit-text-align-last: justify;
 text-align-last: justify;
}
@media (-webkit-min-device-pixel-ratio:0) {
 .justify:after {
  content: "";
  display: inline-block;
  width: 100%;
 }
}
여기에 `max-width`와 `max-height`를 추가해야 합니다. 나중에 셀이 백분율로 채워지고 최대 크기는 외부로 제한되어야 함을 알 수 있습니다.
가로 및 세로 중앙에 위치한 반응형 이미지
자세한 내용은 세로 및 가로 가운데 맞춤 반응형 CSS 이미지를 참조하세요
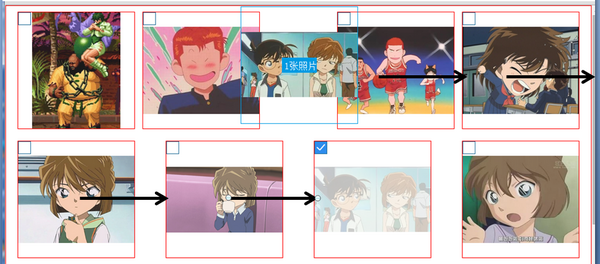
사진 선택
Google Plus에서 Ctrl 키를 누른 채 사진을 클릭하면 여러 항목을 선택할 수 있습니다. 여기에서 '상자'(`7551d6eed0d1abb8ee13940238e494625db79b134e9f6b82c0b36e0489ee08ed`)를 클릭하세요.
클릭하면 현재 사진의 인덱스가 선택한 사진의 인덱스를 저장하는 배열(여기서는 selected_index)로 전달됩니다. 인덱스가 없으면 추가하고, 이미 있으면 삭제합니다. "상자"는 인덱스가 배열에 존재하는지 여부에 따라 스타일을 조정합니다.
<div id='wrap' ms-controller='photo_sort'>
  <ul class='justify'>
   <li ms-repeat='photo_list'>
    <a href="javascript:;" class="no_selected" ms-class-selected_icon='selected_index.indexOf($index)>-1' ms-click='select($index)'></a>
    ...
   </li>
   <li class='justify_fix'></li>
  </ul>
 </div>

var photo_sort=avalon.define({
 selected_index:[],//选中图片的index列表,
 ...
 select:function(i){
  var selected_index=photo_sort.selected_index;
  if(selected_index.indexOf(i)==-1)//选中图片的index列表不存在,添加
   photo_sort.selected_index.ensure(i);
  else
   photo_sort.selected_index.remove(i);
 }
});
마우스다운
여기에서는 마스크 레이어가 사용되며 mousedown 이벤트가 여기에 바인딩됩니다.
<a href="javascript:;" class="no_selected" ms-class-selected_icon='selected_index.indexOf($index)>-1' ms-click='select($index)'></a>
<div class='photo_mask' ms-mousedown='start_drag($event,$index)'></div>
  var photo_sort=avalon.define({
   $id:'photo_sort',
   photo_list:[],//图片列表
   selected_index:[],//选中图片的index列表
   drag_flag:false,
   sort_array:[],//范围列表,
   cell_size:0,//每个单元格尺寸,这里宽高比为1
   target_index:-1,//最终目标位置的index
   col_num:0,//列数
   x_index:-1,//当前拖动位置的x方向index
   ...
  });
start_drag:function(e,index){
 if(photo_sort.selected_index.size()){//有选中的图片
  photo_sort.target_index=index;//避免用户没有拖动图片,但点击了图片,设置默认目标即当前点击图片
  photo_sort.cell_size=this.clientWidth;
  var xx=e.clientX-photo_sort.cell_size/2,yy=e.clientY-photo_sort.cell_size/2;//点下图片,设置代理位置以点击点为中心
  $('drag_proxy').style.top=yy+avalon(window).scrollTop()+'px';
  $('drag_proxy').style.left=xx+'px';
  $('drag_proxy').style.width=photo_sort.cell_size+'px';
  $('drag_proxy').style.height=photo_sort.cell_size+'px';
  drag_proxy.select_num=photo_sort.selected_index.length;//设置代理中选择图片的数量
  if(drag_proxy.select_num>0){
   var drag_img=photo_sort.photo_list[photo_sort.selected_index[drag_proxy.select_num-1]];
   drag_proxy.src=drag_img.src;//将选中的图片中最后一张作为代理对象的"封面"
   photo_sort.drag_flag=true;
   $('drag_proxy').style.display='block';
  }
  //cell_gap:图片间间距,first_gap:第一张图片和外部div间间距
  var wrap_width=avalon($('wrap')).width(),wrap_offset=$('wrap').offsetLeft,first_left=$('wrap_photo0').offsetLeft,
  second_left=$('wrap_photo1').offsetLeft,first_gap=first_left-wrap_offset,cell_gap=second_left-first_left;
  photo_sort.col_num=Math.round((wrap_width-2*first_gap+(cell_gap-photo_sort.cell_size))/cell_gap);
  for(var i=0;i<photo_sort.col_num;i++)//把一行图片里的每张图片中心坐标x方向的值作为分割点,添加到范围列表
   photo_sort.sort_array.push(first_gap+cell_gap*i+photo_sort.cell_size/2);
  var target=this.parentNode;
  avalon.bind(document,'mouseup',function(e){
   onMouseUp(target);
  });
  if(isIE)
   target.setCapture();//让ie下拖动顺滑
  e.stopPropagation();
  e.preventDefault();
 }
}
마우스를 클릭하면 선택한 사진의 마스크가 나타납니다. 여기에 `.photo_maskon`을 추가합니다
<div class='photo_mask' ms-class-photo_maskon='drag_flag&&selected_index.indexOf($index)>-1'
ms-mousedown='start_drag($event,$index)'></div>
마우스이동
drag_move:function(e){
 if(photo_sort.drag_flag){
  var xx=e.clientX,yy=e.clientY,offset=avalon($('wrap')).offset();
  var offsetX=xx-offset.left,offsetY=yy-offset.top;
  photo_sort.sort_array.push(offsetX);//把当前鼠标位置添加的范围列表
  photo_sort.sort_array.sort(function(a,b){//对范围列表排序
   return parseInt(a)-parseInt(b);//转为数值类型,否则会出现'1234'<'333'
  });
  //从已排序的范围列表中找出当前鼠标位置的index,即目标位置水平方向的index
  var x_index=photo_sort.sort_array.indexOf(offsetX),y_index=Math.floor(offsetY/(photo_sort.cell_size+20)),
  size=photo_sort.photo_list.size();
  photo_sort.x_index=x_index;
  photo_sort.target_index=photo_sort.col_num*y_index+x_index;//目标在所有图片中的index
  if(photo_sort.target_index>size)//目标位置越界
   photo_sort.target_index=size;
  photo_sort.sort_array.remove(offsetX);//移除当前位置
  $('drag_proxy').style.top=avalon(window).scrollTop()+yy-photo_sort.cell_size/2+'px';
  $('drag_proxy').style.left=xx-photo_sort.cell_size/2+'px';
 }
 e.stopPropagation();
}
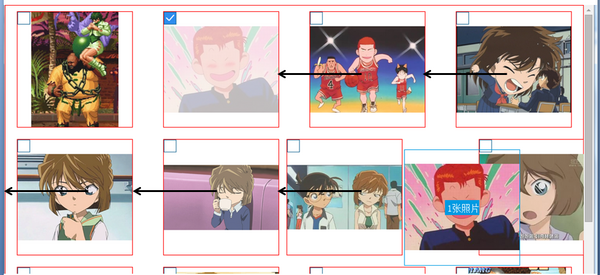
몇 가지 참고사항
- 현재 드래그된 위치 판단
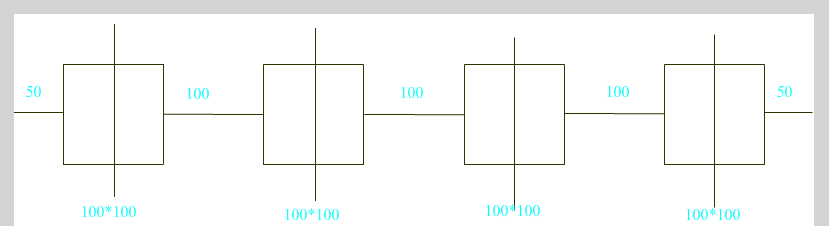
사진 속 각 셀의 세로선은 셀을 가로 방향으로 양쪽으로 나눕니다. 각 수직선은 한 줄을 5개 부분으로 나누어 판단할 때 현재 마우스의 'e.clientX'가 5개 부분 중 어느 부분인지 살펴보세요.
- 여기서는 심사할 때 정렬을 사용합니다. 구체적으로는 각 수직선의 x좌표와 현재 마우스 위치의 x좌표를 배열(여기서는 `sort_array`)에 저장하고 정렬한 후 `indexOf`를 사용하여 현재 마우스의 x좌표 위치를 확인한다. 현재 드래그 대상 위치를 얻을 수 있습니다.
정렬할 필요가 없으면 코드는 다음과 같습니다
var target;
if(x>50+50){
 if(x>3*100+3*100+50+50){//最后一部分
  target=4;
 }else{
  target=(x-50-50)/(50+100+50);
 }
}else
 target=0;
- 나중에 현재 마우스 위치의 x 좌표를 삭제하고 다음 마우스 이동 이벤트의 x 좌표를 위해 위치를 비워 둡니다.
- 현재 드래그된 대상 위치의 좌우 사진의 오프셋은 대상 위치의 좌우 사진에 해당 클래스를 추가하는 것에 불과합니다.
.prev{
 right: 40px;
}
.next{
 left: 40px;
}
 <div id='wrap' ms-controller='photo_sort'>
  <ul class='justify' ms-mousemove='drag_move($event)'>
   <li ms-repeat='photo_list' ms-attr-id='wrap_photo{{$index}}' ms-class-prev='$index==target_index-1'
   ms-class-next='$index==target_index'>
   ...
   </li>
   <li class='justify_fix'></li>
  </ul>
 </div>
这里需要注意,当代理拖动到最左边或最右边时,由于布局是`inline-block`,此时目标位置所在行的上一行(如果有)的最后一个单元格或下一行(如果有)的第一个单元格也会发生偏移。
解决方法是设置变量`x_index`,表示单元格在x方向的index.在添加偏移class的时候,增加判定条件
<li ms-repeat='photo_list' ms-attr-id='wrap_photo{{$index}}' ms-class-prev='$index==target_index-1&&x_index>0'
ms-class-next='$index==target_index&&x_index<col_num'>
...
</li>
mouseup
function onMouseUp(target){
   if(photo_sort.drag_flag){
    for(var i=0,len=photo_sort.selected_index.size();i<len;i++){//遍历选中图片
     var item_index=photo_sort.selected_index[i],data=photo_sort.photo_list,
     target_index=photo_sort.target_index,temp;
     if(item_index<target_index){//目标位置在选中图片之后
      temp=data[item_index].src;
      for(var j=item_index;j<target_index;j++)
       data[j].src=data[j+1].src;
      data[target_index-1].src=temp;
     }else{//目标位置在选中图片之前
      temp=data[item_index].src;
      for(var j=item_index;j>target_index;j--)
       data[j].src=data[j-1].src;
      data[target_index].src=temp;
     }
    }
    photo_sort.target_index=-1;//各种重置,初始化
    photo_sort.sort_array=[];
    photo_sort.col_num=0;
    photo_sort.x_index=-1;
    photo_sort.selected_index=[];
    $('drag_proxy').style.display='none';
    photo_sort.drag_flag=false;
    avalon.unbind(document,'mouseup');
    if(isIE)
     target.releaseCapture();
   }
  }
这里主要就是对图片列表的重排。
- 目标位置在选中图片之前
先把原始图片保存在`temp`,然后把从目标位置图片到原始图片前一位置的图片,依次后移一个位置,最后把`temp`放到目标位置。
- 目标位置在选中图片之后
和上面差不多,只不过这里是把从目标位置图片到原始图片后一位置的图片,依次前移一个位置。
注意
不能像`data[j]=data[j+1]`这样赋值,因为avalon不支持单个转换,如果想更新,需要将整个子VM重新赋以一个新的对象。也就是定义一个arr,然后从头开始向里面添加model,最后`photo_sort.photo_list.clear()`删除所有图片,`photo_sort.photo_list=arr`重新赋值,更新视图。
后记
事实上,google plus在细节上还做了
- 框选图片
- 如果有滚动条,且拖动位置快要超出当前界面,滚动条会自动上移或下移。
这两个本屌就不做了,原理也是很简单的。