Angular에서의 라우팅 및 사용법에 대한 자세한 설명
- 青灯夜游앞으로
- 2021-03-03 10:01:481909검색
이 기사에서는 Angular의 라우팅과 Angular 라우팅 사용 방법을 안내합니다. 도움이 필요한 친구들이 모두 참고할 수 있기를 바랍니다.

관련 권장사항: "angular Tutorial"
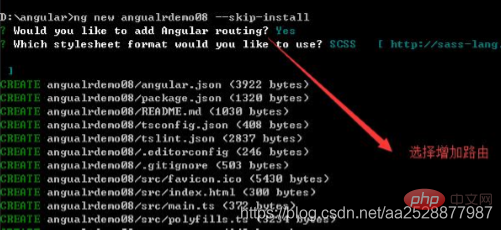
1. Angular는 기본적으로 라우팅을 사용하여 프로젝트를 생성합니다
1. 프로젝트를 생성하는 명령
ng new ng-demo --skip-install

2. 필수 구성요소를 생성합니다
ng g component components/home
ng g component components/news
ng g component components/newscontent
3. app-routing.module.ts를 찾아 라우팅을 구성합니다
구성요소 소개
import { HomeComponent } from './components/home/home.component';
import { NewsComponent } from './components/news/news.component';
import { ProductComponent } from './components/product/product.component';
라우팅 구성
const routes: Routes = [
{path: 'home', component: HomeComponent},
{path: 'news', component: NewsComponent},
{path:'product', component:ProductComponent },
{path: '*', redirectTo: '/home', pathMatch: 'full' }
];
4. router-outlet은 동적으로 로드된 경로를 표시합니다
<h1>
    <a>首页</a>
    <a>新闻</a>
</h1>
<router-outlet></router-outlet>
2. Angular routerLink 점프 페이지 기본 경로
<a>首页</a>
<a>新闻</a>
//匹配不到路由的时候加载的组件 或者跳转的路由
{
    path: '**', /*任意的路由*/
    // component:HomeComponent
    redirectTo:'home'
}
3. Angular routerLinkActive는 기본적으로 경로를 선택하도록 routerLink를 설정합니다
<h1>
  <a>
    首页
  </a>
  <a>
    新闻
  </a>
</h1>
<h1>
    <a>首页</a>
    <a>新闻</a>
</h1>
4. 4.1. 아니요. 매개변수 전달
Jump 방법, 페이지 점프 또는 js 점프 물음표 전달 매개변수의 URL 주소는.../list-item?id=1
queryParams 속성이 고정됩니다
{
{ item.name }}
//js 점프
// 라우터는 ActivatedRoute의 인스턴스입니다.
import { Router } from '@angular/router';
.
constructor(private router: Router) {}
.
this.router.navigate(['/newscontent'],{
  queryParams:{
    name:'laney',
    id:id
  },
  skipLocationChange: true
  //可以不写,默认为false,设为true时路由跳转浏览器中的url会保持不变,传入的参数依然有效
});
매개변수를 얻는 방법
import { ActivatedRoute } from '@angular/router';

constructor(public route:ActivatedRoute) { }
ngOnInit() {
    this.route.queryParams.subscribe((data)=>{
      console.log(data);
 })
}
4.2 경로 매개변수
경로 매개변수의 URL 주소는.../list-item/1<a [routerLink]="[’/list-item’, item.id]"> {{ item.name }}
//js跳转 //router为ActivatedRoute的实例
this.router.navigate([’/list-item’, item.id]);
경로 구성: {path: ‘list-item/:id’, component: ListItemComponent}로 표시됩니다. 매개변수를 얻는 방법
this.route.params.subscribe(
  param => {
      this.id= param['id'];
  }
)
5, 상위-하위 라우팅
1. 컴포넌트를 생성하고 import { WelcomeComponent } from ‘./components/home/welcome/welcome.component’;
import { SettingComponent } from ‘./components/home/setting/setting.component’;
2. 라우팅을 구성합니다
{
    path:'home',
    component:HomeComponent,
    children:[{
      path:'welcome',
      component:WelcomeComponent
    },{
      path:'setting',
      component:SettingComponent
    },
    {path: '**', redirectTo: 'welcome'}
  ]
},
3. 프로그래밍 관련 지식을 더 보려면 프로그래밍 비디오
를 방문하세요! !위 내용은 Angular에서의 라우팅 및 사용법에 대한 자세한 설명의 상세 내용입니다. 자세한 내용은 PHP 중국어 웹사이트의 기타 관련 기사를 참조하세요!
성명:
이 기사는 csdn.net에서 복제됩니다. 침해가 있는 경우 admin@php.cn으로 문의하시기 바랍니다. 삭제

