집 >데이터 베이스 >MySQL 튜토리얼 >MySQL의 최적화 제한
MySQL의 최적화 제한
- 咔咔원래의
- 2021-01-18 22:42:212750검색
"마지막으로 MySQL 최적화를 시작하겠습니다. 이 기사에서는 페이징 최적화에 대해 설명하겠습니다. 귀하에게 적합한 솔루션을 얻을 수 있기를 바랍니다
"
머리말
페이징이라는 주제는 이미 진부한 표현이지만, 프로젝트에서 자신만의 고유한 개성을 유지하면서 자신의 시스템을 최적화하고 싶어하는 친구들이 얼마나 많습니까?
최적화를 위해서는 스스로 주도권을 잡고 자신만의 테스트 데이터를 얻어야 합니다. 테스트하는 동안에만 모르는 것을 더 많이 발견할 수 있습니다.
이 글에서는 페이지 매김 최적화 주제도 설명합니다.
1. 테이블 구조
이 데이터베이스 구조는 Kaka가 필드 이름을 변경하고 시간 필드를 취소한 것을 제외하면 Kaka의 현재 온라인 프로젝트의 테이블입니다.
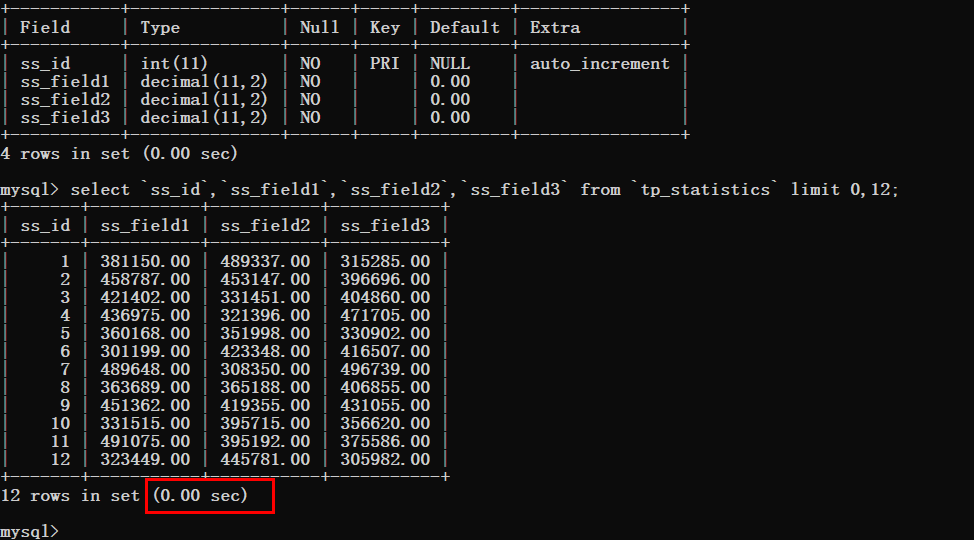
데이터베이스 구조는 다음과 같습니다
<span style="display: block; background: url(https://files.mdnice.com/point.png); height: 30px; width: 100%; background-size: 40px; background-repeat: no-repeat; background-color: #282c34; margin-bottom: -7px; border-radius: 5px; background-position: 10px 10px;"></span><code class="hljs" style="overflow-x: auto; padding: 16px; color: #abb2bf; display: -webkit-box; font-family: Operator Mono, Consolas, Monaco, Menlo, monospace; font-size: 12px; -webkit-overflow-scrolling: touch; padding-top: 15px; background: #282c34; border-radius: 5px;"><span class="hljs-keyword" style="color: #c678dd; line-height: 26px;">CREATE</span> <span class="hljs-keyword" style="color: #c678dd; line-height: 26px;">TABLE</span> <span class="hljs-string" style="color: #98c379; line-height: 26px;">`tp_statistics`</span> (<br/> <span class="hljs-string" style="color: #98c379; line-height: 26px;">`ss_id`</span> <span class="hljs-built_in" style="color: #e6c07b; line-height: 26px;">int</span>(<span class="hljs-number" style="color: #d19a66; line-height: 26px;">11</span>) <span class="hljs-keyword" style="color: #c678dd; line-height: 26px;">NOT</span> <span class="hljs-literal" style="color: #56b6c2; line-height: 26px;">NULL</span> AUTO_INCREMENT,<br/> <span class="hljs-string" style="color: #98c379; line-height: 26px;">`ss_field1`</span> <span class="hljs-built_in" style="color: #e6c07b; line-height: 26px;">decimal</span>(<span class="hljs-number" style="color: #d19a66; line-height: 26px;">11</span>,<span class="hljs-number" style="color: #d19a66; line-height: 26px;">2</span>) <span class="hljs-keyword" style="color: #c678dd; line-height: 26px;">NOT</span> <span class="hljs-literal" style="color: #56b6c2; line-height: 26px;">NULL</span> <span class="hljs-keyword" style="color: #c678dd; line-height: 26px;">DEFAULT</span> <span class="hljs-string" style="color: #98c379; line-height: 26px;">'0.00'</span>,<br/> <span class="hljs-string" style="color: #98c379; line-height: 26px;">`ss_field2`</span> <span class="hljs-built_in" style="color: #e6c07b; line-height: 26px;">decimal</span>(<span class="hljs-number" style="color: #d19a66; line-height: 26px;">11</span>,<span class="hljs-number" style="color: #d19a66; line-height: 26px;">2</span>) <span class="hljs-keyword" style="color: #c678dd; line-height: 26px;">NOT</span> <span class="hljs-literal" style="color: #56b6c2; line-height: 26px;">NULL</span> <span class="hljs-keyword" style="color: #c678dd; line-height: 26px;">DEFAULT</span> <span class="hljs-string" style="color: #98c379; line-height: 26px;">'0.00'</span>,<br/> <span class="hljs-string" style="color: #98c379; line-height: 26px;">`ss_field3`</span> <span class="hljs-built_in" style="color: #e6c07b; line-height: 26px;">decimal</span>(<span class="hljs-number" style="color: #d19a66; line-height: 26px;">11</span>,<span class="hljs-number" style="color: #d19a66; line-height: 26px;">2</span>) <span class="hljs-keyword" style="color: #c678dd; line-height: 26px;">NOT</span> <span class="hljs-literal" style="color: #56b6c2; line-height: 26px;">NULL</span> <span class="hljs-keyword" style="color: #c678dd; line-height: 26px;">DEFAULT</span> <span class="hljs-string" style="color: #98c379; line-height: 26px;">'0.00'</span>,<br/> PRIMARY <span class="hljs-keyword" style="color: #c678dd; line-height: 26px;">KEY</span> (<span class="hljs-string" style="color: #98c379; line-height: 26px;">`ss_id`</span>)<br/>) <span class="hljs-keyword" style="color: #c678dd; line-height: 26px;">ENGINE</span>=<span class="hljs-keyword" style="color: #c678dd; line-height: 26px;">InnoDB</span> AUTO_INCREMENT=<span class="hljs-number" style="color: #d19a66; line-height: 26px;">3499994</span> <span class="hljs-keyword" style="color: #c678dd; line-height: 26px;">DEFAULT</span> <span class="hljs-keyword" style="color: #c678dd; line-height: 26px;">CHARSET</span>=utf8 <span class="hljs-keyword" style="color: #c678dd; line-height: 26px;">COLLATE</span>=utf8mb4_general_ci ROW_FORMAT=<span class="hljs-keyword" style="color: #c678dd; line-height: 26px;">COMPACT</span>;<br/><br/></code>
위 정보에 따르면 현재 테이블에 350만 개의 레코드가 있음을 알 수 있습니다. 다음으로 이 350만 개의 레코드에 대해 쿼리를 최적화하겠습니다. .
2. 쿼리 효율성 사전 탐색
먼저 쿼리 SQL 문을 작성하고 쿼리에 소요되는 시간을 살펴보겠습니다.
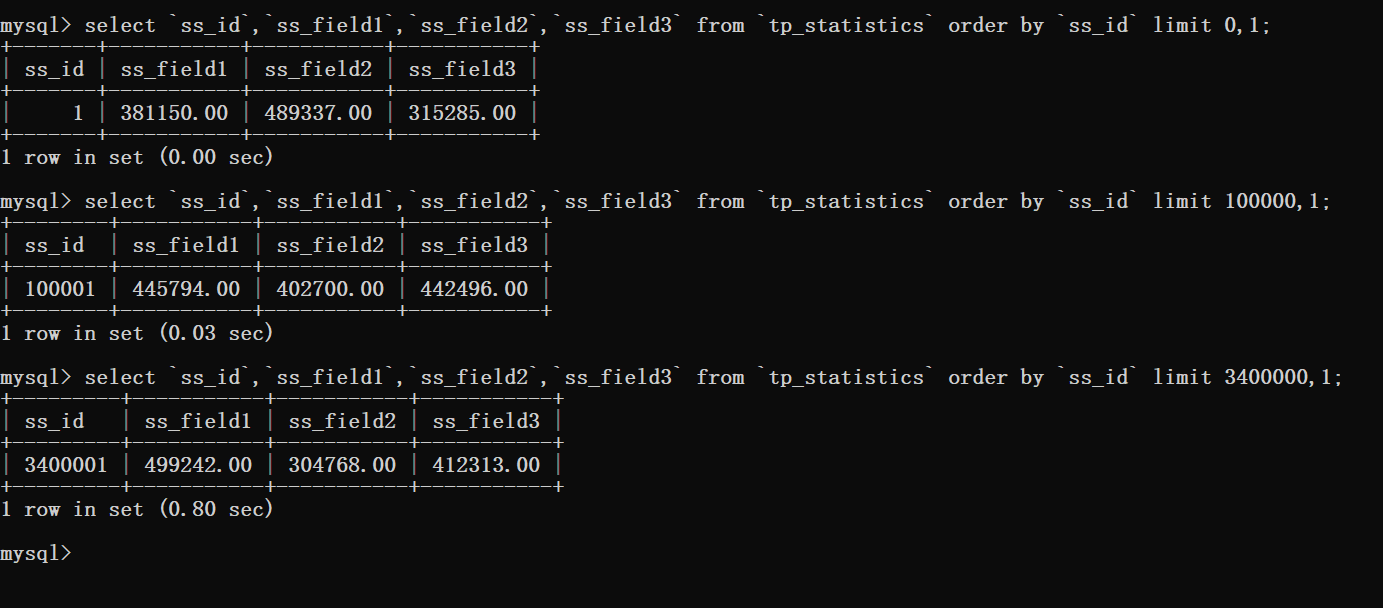
아래 그림을 보면 쿼리 시간은 기본적으로 무시되는 것을 알 수 있는데, 주목해야 할 점은 한도의 오프셋 값입니다.
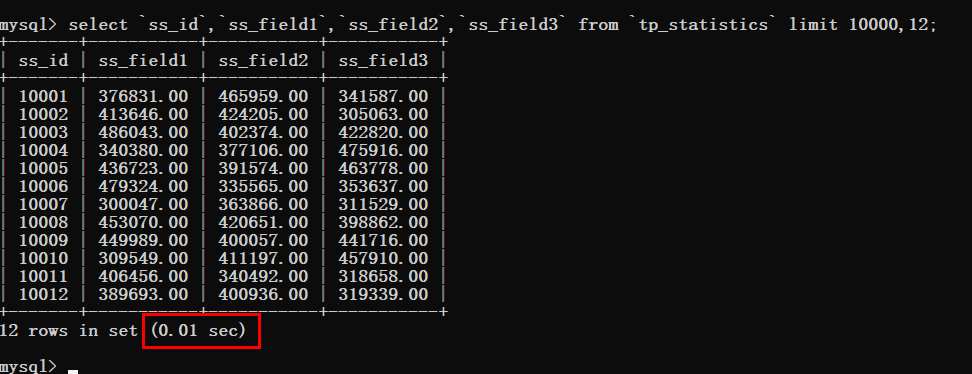
그래서 오프셋을 단계별로 늘려서 테스트해야 합니다. 먼저 오프셋을 10000으로 변경합니다
쿼리 시간이 여전히 매우 이상적인 것을 볼 수 있습니다.
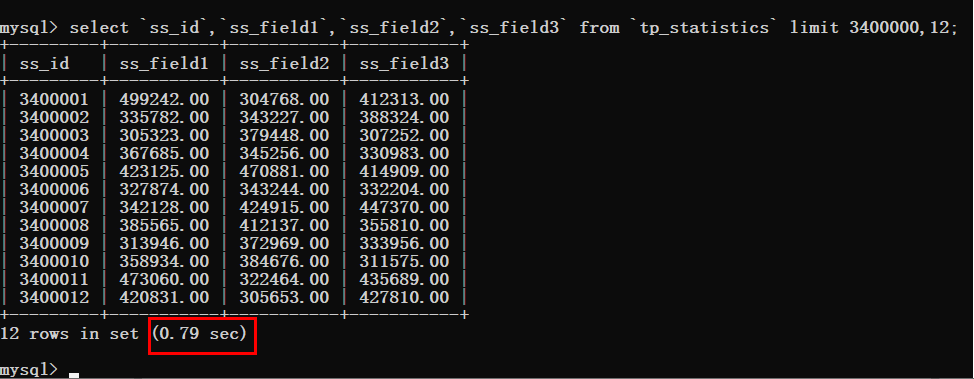
시간을 절약하려면 클릭하고 오프셋 값을 직접 340W로 조정하세요.
이때 아주 확연한 변화를 볼 수 있는데, 쿼리 시간이 0.79초까지 치솟았습니다.
이러한 상황이 발생하면 반드시 최적화가 필요합니다. 키보드를 들고 하시면 됩니다.
3. 쿼리에 시간이 걸리는 이유 분석
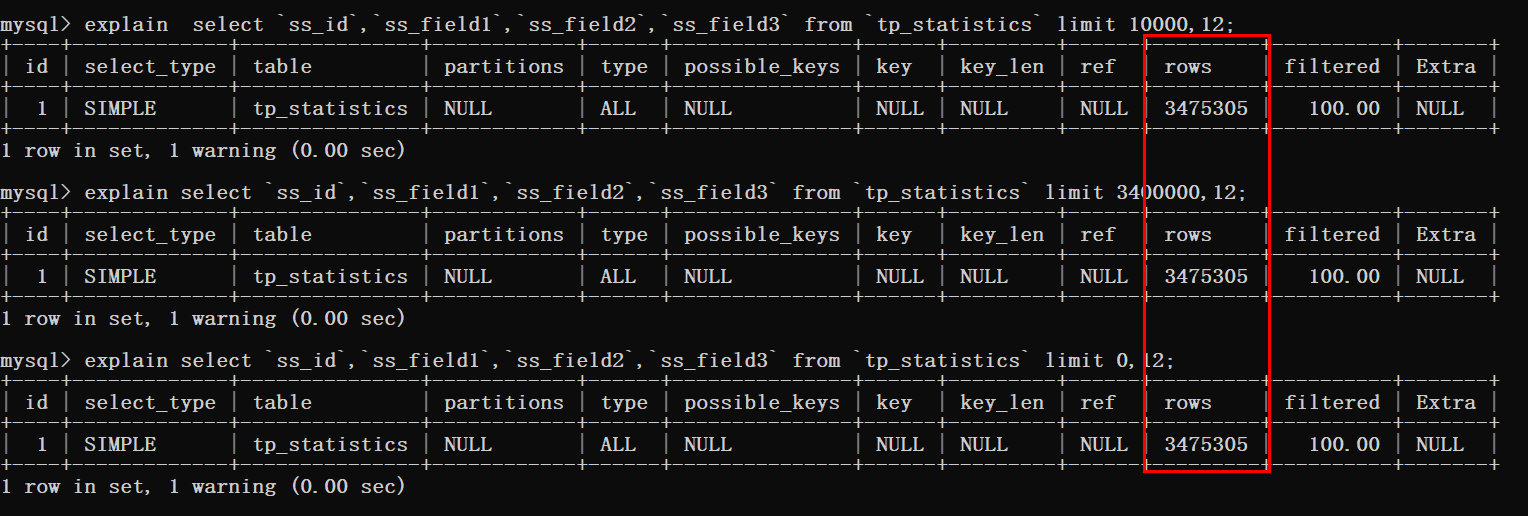
SQL 문 분석에 있어서 필수 지식 포인트는 설명입니다. MySQL의 기본 부분을 살펴보십시오.
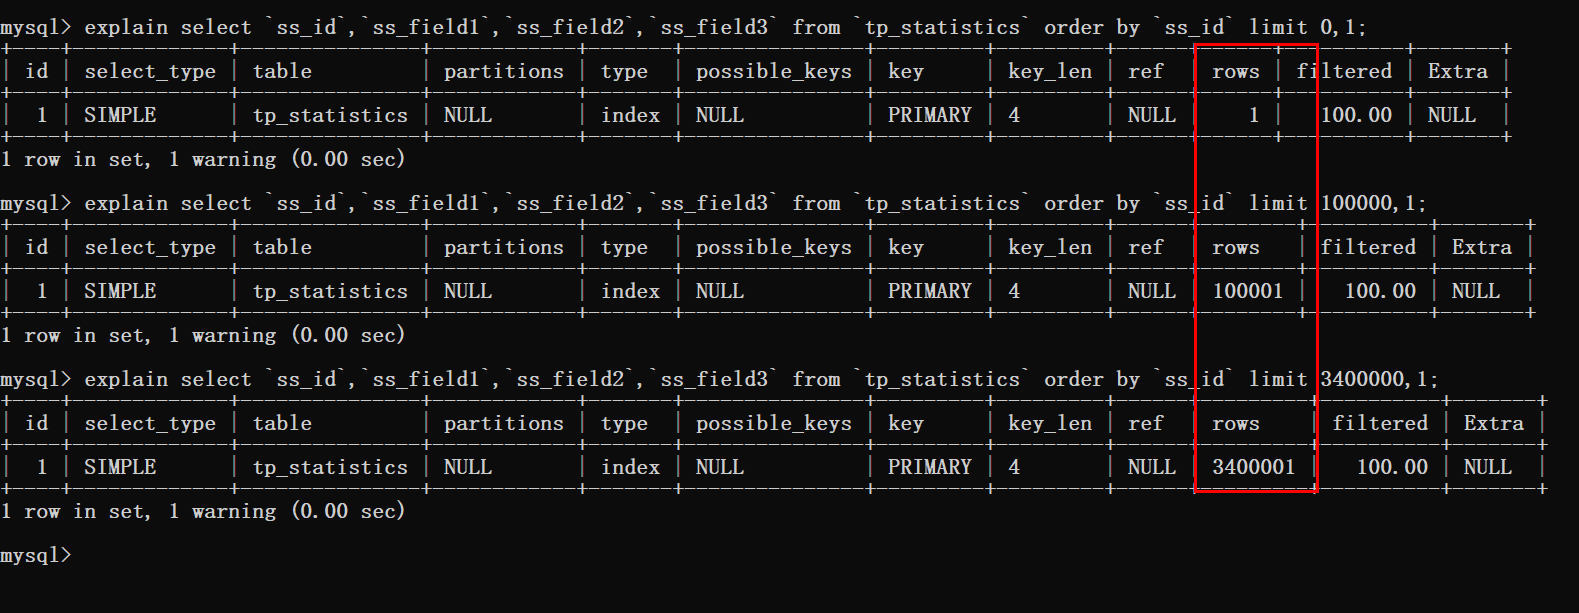
아래 그림에서 볼 수 있듯이 세 가지 쿼리문 모두에 대해 테이블 스캔이 수행되었습니다.
페이징이 있는 이상 정렬도 있다는 사실은 다들 아시겠지만, 정렬을 추가해서 쿼리 효율성을 살펴보세요.
그런 다음 정렬된 문을 분석하고 봅니다.
정렬을 사용할 때 데이터베이스에서 스캔한 행 수는 오프셋에 필요한 쿼리 수를 더한 값임을 알 수 있습니다.
이 시점에서 알 수 있는 것은 오프셋이 매우 큰 경우 위의 경우 쿼리 제한인 3400000,12와 같다는 것입니다.
이때 MySQL은 3400012개의 데이터 행을 쿼리한 다음 마지막 12개의 데이터를 반환해야 합니다.
이전에 쿼리한 340W 데이터는 폐기됩니다. 이러한 실행 결과는 우리가 원하는 것이 아닙니다.
Kaka 예전에 관련 기사를 봤는데 이 문제의 해결 방법은 페이징 수를 직접 제한하거나 오프셋이 매우 클 때 성능을 최적화하는 것이라고 했습니다.
이 기사를 여기까지 읽었다면 어떻게 실망할 수 있습니까? 이는 큰 오프셋을 최적화하는 성능 문제임에 틀림없습니다.
4. 최적화
최적화가 언급되었으므로 요점은 두 가지뿐입니다. 인덱스를 추가하고 다른 솔루션을 사용하여 이 솔루션을 대체합니다.
카카에서 제공하는 데이터 테이블 구조 정보는 도서관의 대출기록으로 완벽하게 이해될 수 있으므로 해당 필드에 대해서는 걱정하지 않으셔도 됩니다.
정렬의 경우 이 시나리오에서는 시간은 정렬되지 않지만 기본 키는 정렬되며 테스트 데이터 추가로 인해 시간 필드가 취소됩니다.
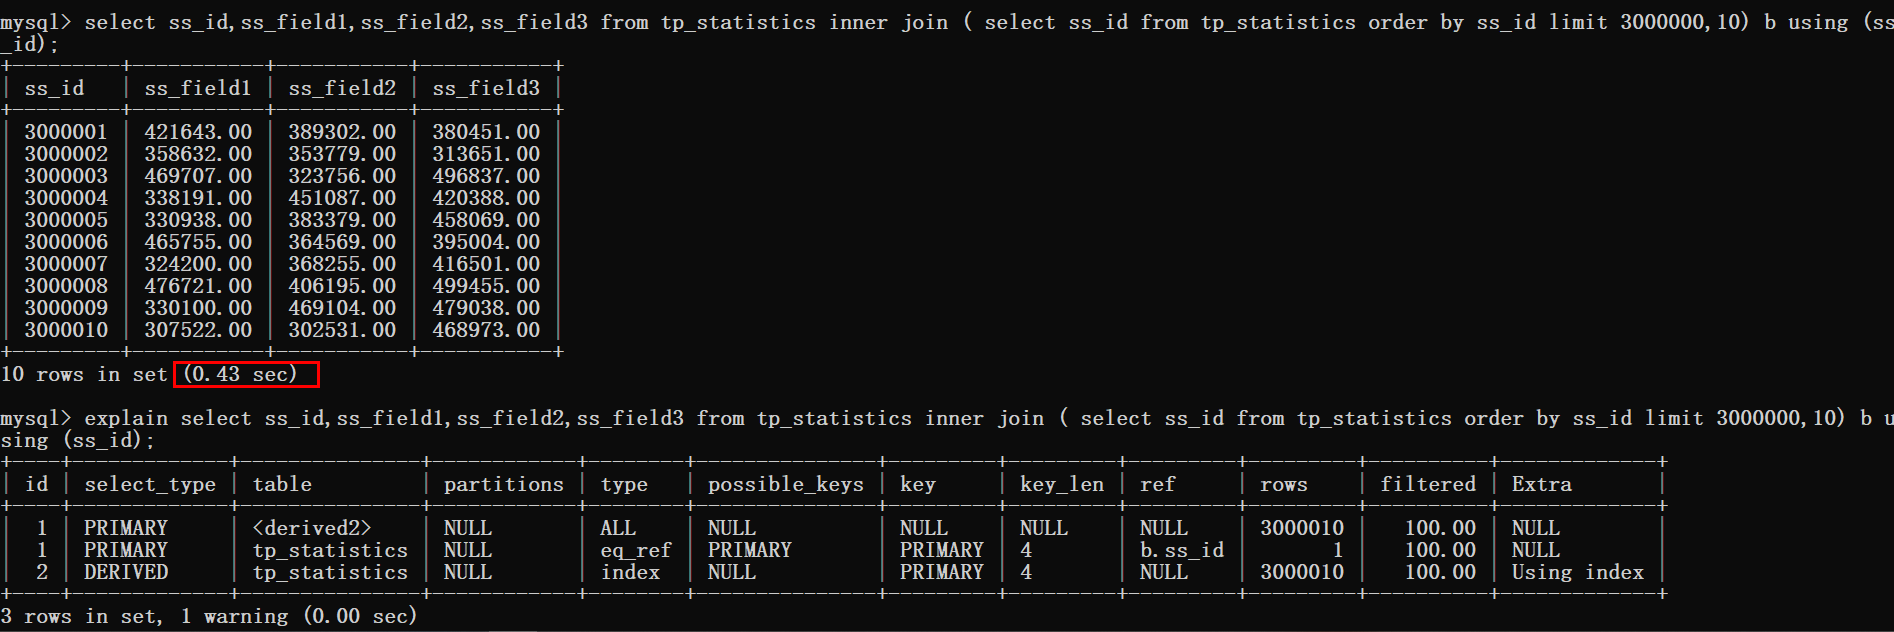
接下来使用覆盖索引加inner join的方式来进行优化。
<span style="display: block; background: url(https://files.mdnice.com/point.png); height: 30px; width: 100%; background-size: 40px; background-repeat: no-repeat; background-color: #282c34; margin-bottom: -7px; border-radius: 5px; background-position: 10px 10px;"></span><code class="hljs" style="overflow-x: auto; padding: 16px; color: #abb2bf; display: -webkit-box; font-family: Operator Mono, Consolas, Monaco, Menlo, monospace; font-size: 12px; -webkit-overflow-scrolling: touch; padding-top: 15px; background: #282c34; border-radius: 5px;"><span class="hljs-keyword" style="color: #c678dd; line-height: 26px;">select</span> ss_id,ss_field1,ss_field2,ss_field3 <span class="hljs-keyword" style="color: #c678dd; line-height: 26px;">from</span> tp_statistics <span class="hljs-keyword" style="color: #c678dd; line-height: 26px;">inner</span> <span class="hljs-keyword" style="color: #c678dd; line-height: 26px;">join</span> ( <span class="hljs-keyword" style="color: #c678dd; line-height: 26px;">select</span> ss_id <span class="hljs-keyword" style="color: #c678dd; line-height: 26px;">from</span> tp_statistics <span class="hljs-keyword" style="color: #c678dd; line-height: 26px;">order</span> <span class="hljs-keyword" style="color: #c678dd; line-height: 26px;">by</span> ss_id <span class="hljs-keyword" style="color: #c678dd; line-height: 26px;">limit</span> <span class="hljs-number" style="color: #d19a66; line-height: 26px;">3000000</span>,<span class="hljs-number" style="color: #d19a66; line-height: 26px;">10</span>) b <span class="hljs-keyword" style="color: #c678dd; line-height: 26px;">using</span> (ss_id);<br/></code>
从上图可以看到查询时间从0.8s优化到了0.4s,但是这样的效果还是不尽人意。
于是只能更换一下思路再进行优化。
既然优化最大偏移量这条路有点坎坷,能不能从其它方面进行入手。
估计有很多同学已经知道咔咔将要抛出什么话题了。
没错,就是使用where > id 然后使用limit。
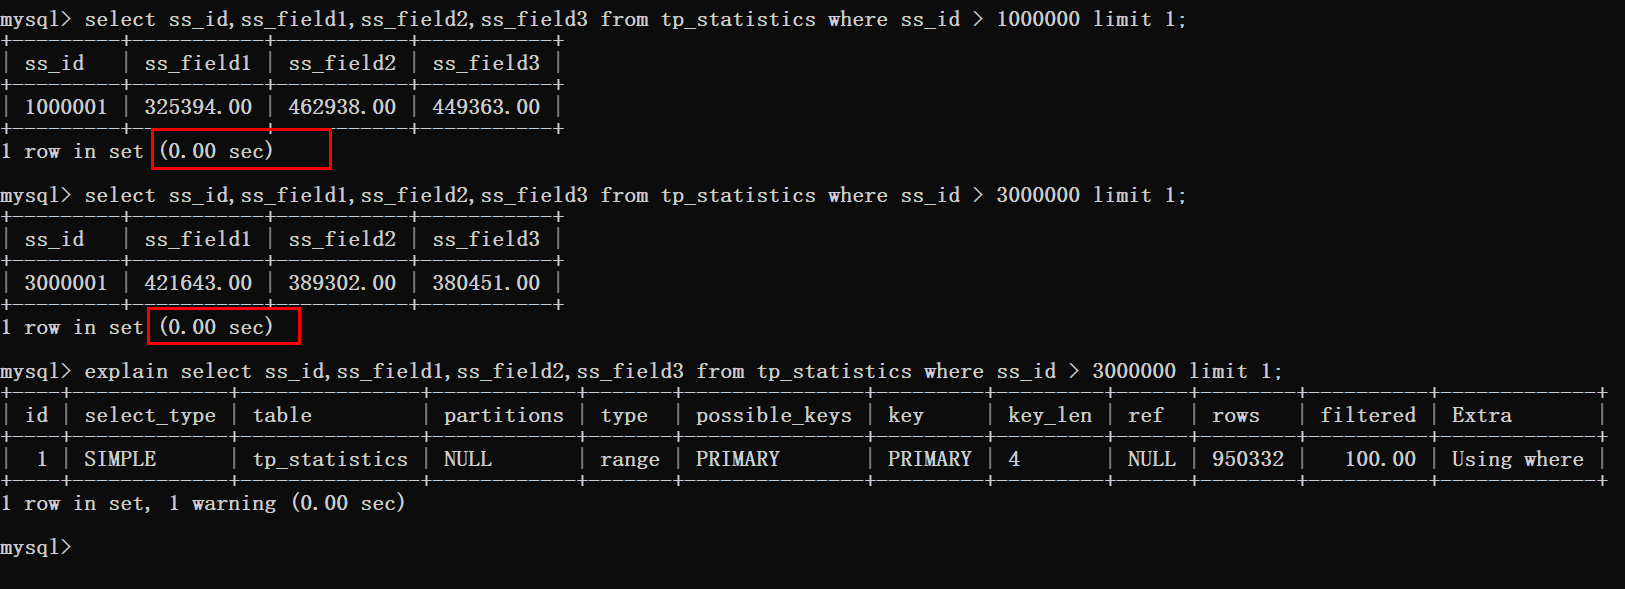
先来测试一波结果,在写具体实现方案。
根据上图可以看到这种方式是十分可行的,分页在300W条数据以后的查询时间也基本忽略不计。
那么这种方案要怎么实现呢!
五、方案落地
其实这个方案真的很简单,只需要简单的转换一下思路即可。
클라이언트가 처음으로 데이터를 얻을 때 오프셋 및 제한 매개변수가 정상적으로 전달됩니다.
첫 번째 반환된 데이터는 클라이언트가 전달한 오프셋과 제한을 사용하여 가져옵니다.
첫 번째 데이터 반환이 성공했을 때.
클라이언트가 두 번째로 데이터를 가져오면 매개변수가 변경되어 더 이상 오프셋 및 제한을 설정할 수 없습니다.
이때 전달해야 하는 매개변수는 처음으로 얻은 마지막 데이터의 ID입니다.
이때 파라미터는 last_id,limit 입니다.
백그라운드에서 last_id를 가져온 후 SQL 문
Kaka에서 where 조건을 사용할 수 있습니다. 여기에 주어진 상황은 데이터가 플래시백에 있을 때 양수 시퀀스가 last_id보다 큰 경우입니다.
다음으로 카카가 사례를 이용해 직접적이고 명료하게 설명을 해드리겠습니다.
실용 사례
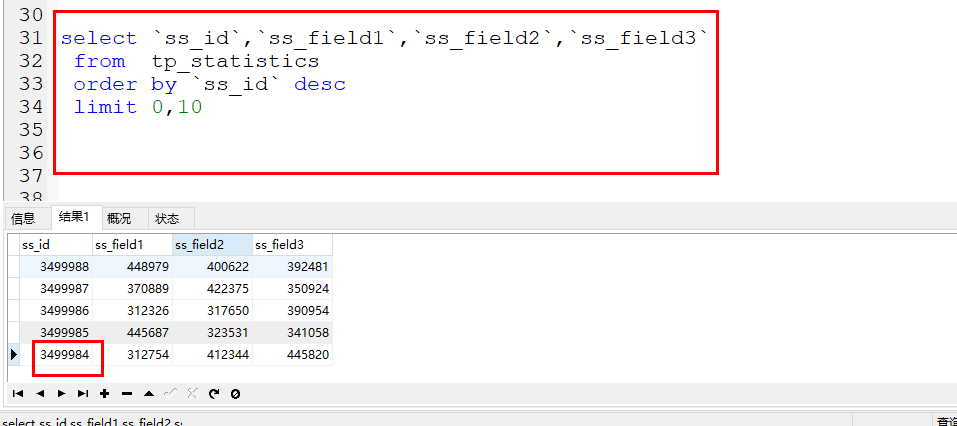
다음은 실제로 시연할 사례입니다. 예를 들어 처음으로 페이지와 제한을 사용하여 데이터를 얻습니다.
반환된 결과의 마지막 데이터 조각의 ID는 3499984
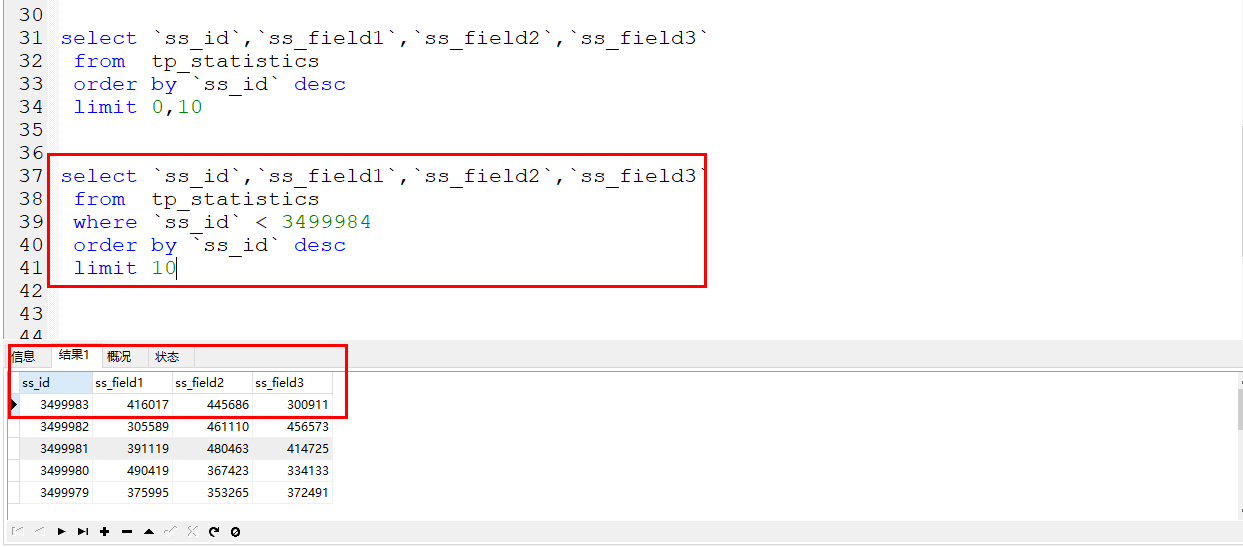
이때, 두 번째 레코드를 얻는 경우 오프셋과 제한을 사용하지 않으며, 하지만 last_id와 제한을 전달하게 됩니다.
아래와 같이
이때 데이터를 직접 필터링하는 조건은 id가 마지막 데이터의 마지막 id보다 작다는 것입니다.
시간 비교
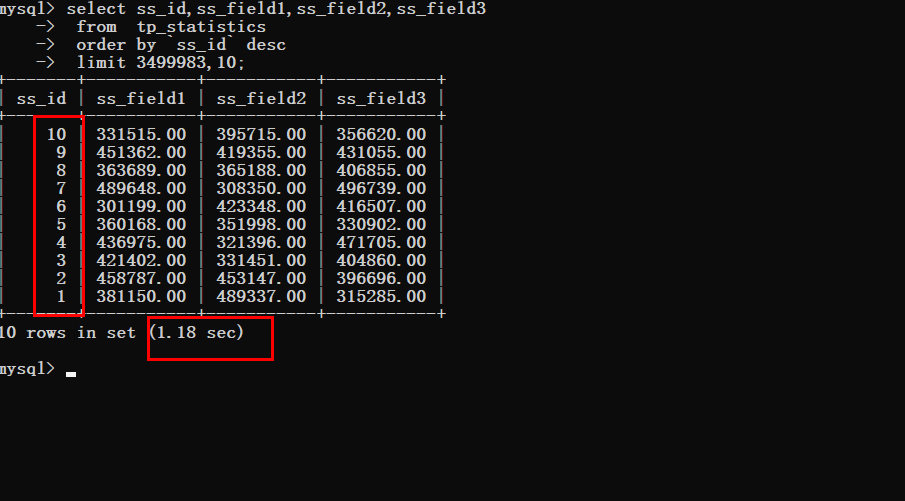
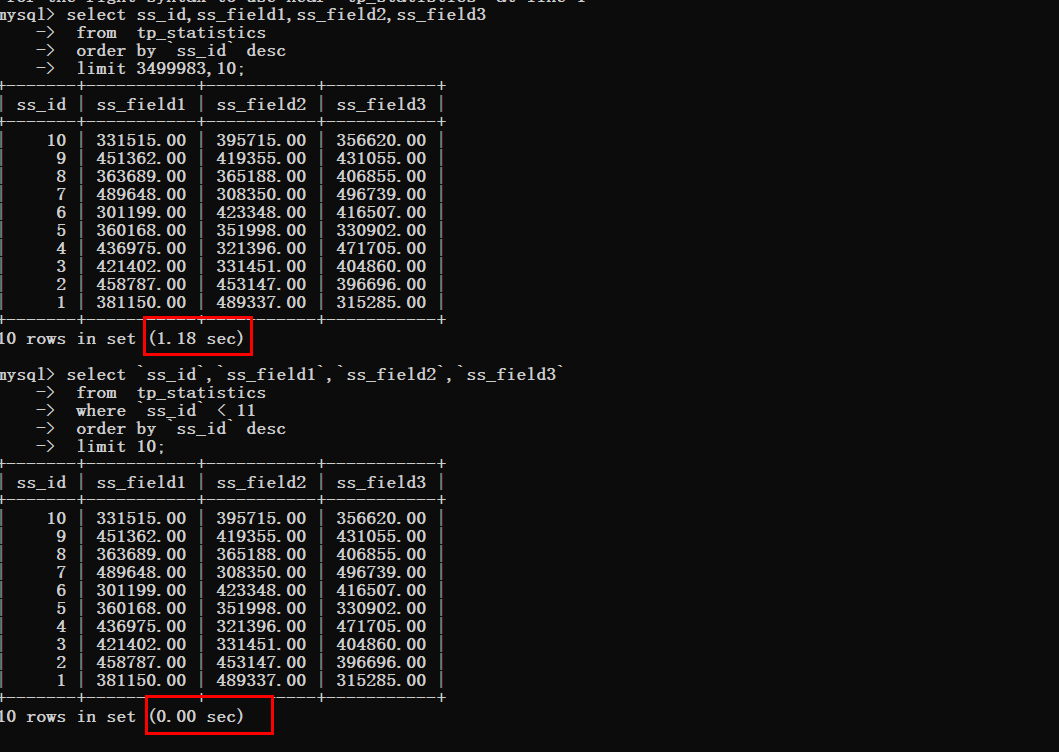
지금 마지막 데이터를 가져오고 싶다고 가정해보세요
최적화 전
최적화 후에는 쿼리 시간 변경
6. 요약
제한 최적화에 대한 몇 마디입니다.
데이터 양이 많은 경우 페이징에 오프셋과 제한을 사용할 수 없습니다. 오프셋이 클수록 쿼리 시간이 길어지기 때문입니다. 물론 모든 페이징이 불가능하다고 말할 수는 없습니다. 데이터에 수천 또는 수만 개의 항목만 포함되어 있다면 상관없습니다. 그냥 아무렇게나 사용하세요. 구현 계획은 위의 Kaka와 같습니다. 처음으로 데이터를 얻으려면 오프셋과 제한을 사용하고, 두 번째는 where 조건을 사용하여 첫 번째 데이터의 마지막 ID까지 데이터를 얻습니다.
“배움에 대한 끈기, 블로그에 대한 끈기, 공유에 대한 끈기는 카카가 경력 이후 늘 지켜온 신념입니다. 거대한 인터넷에 올라온 카카의 글이 여러분에게 조금이나마 도움이 되기를 바랍니다. 저는 카카입니다 다음에 또 만나요
”
위 내용은 MySQL의 최적화 제한의 상세 내용입니다. 자세한 내용은 PHP 중국어 웹사이트의 기타 관련 기사를 참조하세요!


