
Python을 사용하여 나만의 블록체인 구축

- coldplay.xixi앞으로
- 2020-09-01 17:46:103919검색

【관련 학습 권장 사항: python 튜토리얼】
저처럼 암호화된 디지털 화폐의 기본 블록체인 기술에 관심이 많으며, 특히 그 운영 메커니즘을 이해하고 싶으신가요?
하지만 블록체인 기술을 배우는 것은 쉽지 않습니다. 동영상 튜토리얼과 다양한 강좌를 많이 봤지만 실제로 이용할 수 있는 실습 강좌가 너무 적다는 느낌이 들었습니다.
저는 실제로 배우는 것을 좋아하며, 특히 코드를 기반으로 전체 작동 메커니즘을 이해하는 것을 좋아합니다. 나만큼 이러한 학습 방식을 좋아한다면 이 튜토리얼을 마칠 때쯤에는 블록체인 기술이 어떻게 작동하는지 알게 될 것입니다.
시작하기 전에 작성하세요
기억하세요. 블록체인은 블록이라고 불리는 불변, 순서 기록 체인입니다. 여기에는 거래, 파일 또는 원하는 데이터가 포함될 수 있습니다. 하지만 중요한 것은 hash를 사용하여 서로 연결된다는 것입니다.
해시가 익숙하지 않다면 여기에 설명이 있습니다.
이 가이드의 목적은 무엇인가요?
HTTP를 통해 블록체인에 대해 논의할 것이므로 기본적인 Python을 읽고 작성하는 것이 편안할 수 있으므로 HTTP가 어떻게 작동하는지 이해해야 합니다.
무엇을 준비해야 하나요?
Python 3.6 이상이 설치되어 있는지 확인하세요(그리고 pip). Flask와 Requests 라이브러리도 설치해야 합니다: pip) ,你还需要安装 Flask、 Requests 库:
pip install Flask==0.12.2 requests==2.18.4
对了, 你还需要一个支持HTTP的客户端, 比如 Postman 或者 cURL,其他也可以。
源码在哪儿?
可以点击这里
Step 1: 创建一个区块链
打开你最喜欢的文本编辑器或者IDE, 我个人比较喜欢 PyCharm. 新建一个名为blockchain.py的文件。 我们将只用这一个文件就可以。但是如果你还是不太清楚, 你也可以参考 源码.
描述区块链
我们要创建一个 Blockchain 类 ,他的构造函数创建了一个初始化的空列表(要存储我们的区块链),并且另一个存储交易。下面是我们这个类的实例:
blockchain.py
class Blockchain(object):
    def __init__(self):
        self.chain = []
        self.current_transactions = []

    def new_block(self):
        # Creates a new Block and adds it to the chain
        pass

    def new_transaction(self):
        # Adds a new transaction to the list of transactions
        pass

    @staticmethod
    def hash(block):
        # Hashes a Block
        pass

    @property
    def last_block(self):
        # Returns the last Block in the chain
        pass
我们的 Blockchain 类负责管理链式数据,它会存储交易并且还有添加新的区块到链式数据的Method。让我们开始扩充更多Method。
块是什么样的 ?
每个块都有一个 索引,一个 时间戳(Unix时间戳),一个事务列表, 一个 校验(稍后详述) 和 前一个块的散列 。
下面是一个Block的例子 :
blockchain.py
block = {
    'index': 1,
    'timestamp': 1506057125.900785,
    'transactions': [
        {
            'sender': "8527147fe1f5426f9dd545de4b27ee00",
            'recipient': "a77f5cdfa2934df3954a5c7c7da5df1f",
            'amount': 5,
        }
    ],
    'proof': 324984774000,
    'previous_hash': "2cf24dba5fb0a30e26e83b2ac5b9e29e1b161e5c1fa7425e73043362938b9824"
}
在这一点上,一个 区块链 的概念应该是明显的 - 每个新块都包含在其内的前一个块的 散列 。 这是至关重要的,因为这是 区块链 不可改变的原因:如果攻击者损坏 区块链 中较早的块,则所有后续块将包含不正确的哈希值。
这有道理吗? 如果你还没有想通,花点时间仔细思考一下 - 这是区块链背后的核心理念。
添加交易到区块
我们将需要一个添加交易到区块的方式。我们的 new_transaction() 方法的责任就是这个, 并且它非常的简单:
blockchain.py
class Blockchain(object):
    ...

    def new_transaction(self, sender, recipient, amount):
        """
        Creates a new transaction to go into the next mined Block
        :param sender: <str> Address of the Sender
        :param recipient: <str> Address of the Recipient
        :param amount: <int> Amount
        :return: <int> The index of the Block that will hold this transaction
        """

        self.current_transactions.append({
            'sender': sender,
            'recipient': recipient,
            'amount': amount,
        })

        return self.last_block['index'] + 1</int></int></str></str>
new_transaction() 方法添加了交易到列表,它返回了交易将被添加到的区块的索引---讲开采下一个这对稍后对提交交易的用户有用。
创建新的区块
当我们的 Blockchain 被实例化后,我们需要将 创世 区块(一个没有前导区块的区块)添加进去进去。我们还需要向我们的起源块添加一个 证明,这是挖矿的结果(或工作证明)。 我们稍后会详细讨论挖矿。
除了在构造函数中创建 创世 区块外,我们还会补全 new_block() 、 new_transaction() 和 hash()
import hashlib
import json
from time import time

class Blockchain(object):
    def __init__(self):
        self.current_transactions = []
        self.chain = []

        # 创建创世区块
        self.new_block(previous_hash=1, proof=100)

    def new_block(self, proof, previous_hash=None):
        """
        创建一个新的区块到区块链中
        :param proof: <int> 由工作证明算法生成的证明
        :param previous_hash: (Optional) <str> 前一个区块的 hash 值
        :return: <dict> 新区块
        """

        block = {
            'index': len(self.chain) + 1,
            'timestamp': time(),
            'transactions': self.current_transactions,
            'proof': proof,
            'previous_hash': previous_hash or self.hash(self.chain[-1]),
        }

        # 重置当前交易记录
        self.current_transactions = []

        self.chain.append(block)
        return block

    def new_transaction(self, sender, recipient, amount):
        """
        创建一笔新的交易到下一个被挖掘的区块中
        :param sender: <str> 发送人的地址
        :param recipient: <str> 接收人的地址
        :param amount: <int> 金额
        :return: <int> 持有本次交易的区块索引
        """
        self.current_transactions.append({
            'sender': sender,
            'recipient': recipient,
            'amount': amount,
        })

        return self.last_block['index'] + 1

    @property
    def last_block(self):
        return self.chain[-1]

    @staticmethod
    def hash(block):
        """
        给一个区块生成 SHA-256 值
        :param block: <dict> Block
        :return: <str>
        """

        # 我们必须确保这个字典(区块)是经过排序的,否则我们将会得到不一致的散列
        block_string = json.dumps(block, sort_keys=True).encode()
        return hashlib.sha256(block_string).hexdigest()</str></dict></int></int></str></str></dict></str></int>
그런데. , Postman 또는 cURL과 같은 지원 HTTP 클라이언트도 필요하며 다른 클라이언트도 사용할 수 있습니다. 소스 코드는 어디에 있나요?
여기를 클릭하세요1단계: 블록체인 만들기좋아하는 텍스트 편집기나 IDE를 엽니다. 저는 개인적으로 PyCharm을 선호합니다.
blockchain이라는 이름의 새 파일을 만듭니다. .py 파일. 이 파일 하나만 사용하겠습니다. 하지만 여전히 확실하지 않은 경우 소스 코드를 참조할 수도 있습니다.블록체인 설명우리는 Blockchain 클래스를 생성할 예정이며, 그 생성자는 초기화된 빈 목록을 생성합니다( 우리의 블록체인에 저장됨) 및 다른 저장 거래. 다음은 클래스의 예입니다. 🎜🎜🎜blockchain.py🎜🎜from hashlib import sha256
x = 5
y = 0 # We don't know what y should be yet...
while sha256(f'{x*y}'.encode()).hexdigest()[-1] != "0":
y += 1
print(f'The solution is y = {y}')🎜우리의 Blockchain 클래스는 체인 데이터 관리를 담당하며 트랜잭션을 저장하고 체인에 새 블록을 추가합니다. 데이터 방법. 더 많은 메소드로 확장을 시작해 보겠습니다. 🎜🎜블록은 어떻게 생겼나요? 🎜🎜각 블록에는 인덱스, 타임스탬프(Unix 타임스탬프) 및 트랜잭션 목록이 있습니다. , 검사(나중에 자세히 설명) 및 이전 블록의 해시입니다. 🎜🎜다음은 블록의 예입니다. 🎜🎜🎜blockchain.py🎜🎜hash(5 * 21) = 1253e9373e...5e3600155e860🎜이 시점에서
블록체인의 개념이 분명해져야 합니다. 각각의 새로운 블록은 내에 포함되어 있습니다. 안에 있는 이전 블록의 해시입니다. 이는 블록체인을 불변으로 만들기 때문에 중요합니다. 공격자가 블록체인의 이전 블록을 손상시키는 경우 모든 후속 블록에는 잘못된 해시 값이 포함됩니다. 🎜🎜🎜이게 말이 되나요? 아직 이해하지 못했다면 잠시 생각해보세요. 이것이 블록체인의 핵심 아이디어입니다. 🎜🎜🎜블록에 트랜잭션 추가🎜🎜블록에 트랜잭션을 추가하는 방법이 필요합니다. new_transaction() 메소드가 이를 담당하며 매우 간단합니다. 🎜🎜🎜blockchain.py🎜🎜import hashlib
import json
from time import time
from uuid import uuid4
class Blockchain(object):
...
def proof_of_work(self, last_proof):
"""
Simple Proof of Work Algorithm:
- Find a number p' such that hash(pp') contains leading 4 zeroes, where p is the previous p'
- p is the previous proof, and p' is the new proof
:param last_proof: <int>
:return: <int>
"""
proof = 0
while self.valid_proof(last_proof, proof) is False:
proof += 1
return proof
@staticmethod
def valid_proof(last_proof, proof):
"""
Validates the Proof: Does hash(last_proof, proof) contain 4 leading zeroes?
:param last_proof: <int> Previous Proof
:param proof: <int> Current Proof
:return: <bool> True if correct, False if not.
"""
guess = f'{last_proof}{proof}'.encode()
guess_hash = hashlib.sha256(guess).hexdigest()
return guess_hash[:4] == "0000"</bool></int></int></int></int>🎜 new_transaction() 메소드는 목록에 거래를 추가합니다. , 트랜잭션이 추가될 블록의 🎜 인덱스 🎜를 반환합니다. --- 🎜 다음 채굴에 대해 🎜 이는 나중에 트랜잭션을 제출하는 사용자에게 유용합니다. 🎜🎜새 블록 만들기🎜🎜블록체인이 인스턴스화되면 🎜Genesis🎜 블록(이전 블록이 없는 블록)을 추가해야 합니다. 또한 채굴(또는 작업 증명)의 결과인 🎜proof🎜을 원본 블록에 추가해야 합니다. 마이닝에 대해서는 나중에 자세히 다루겠습니다. 🎜🎜생성자에서 🎜genesis🎜 블록을 생성하는 것 외에도 new_block() , new_transaction() 및 hash()도 완료합니다. > 기능: 🎜🎜🎜blockchain.py🎜🎜import hashlib
import json
from textwrap import dedent
from time import time
from uuid import uuid4
from flask import Flask
class Blockchain(object):
...
# Instantiate our Node(实例化我们的节点)
app = Flask(__name__)
# Generate a globally unique address for this node(为这个节点生成一个全球唯一的地址)
node_identifier = str(uuid4()).replace('-', '')
# Instantiate the Blockchain(实例化 Blockchain类)
blockchain = Blockchain()
@app.route('/mine', methods=['GET'])
def mine():
return "We'll mine a new Block"
@app.route('/transactions/new', methods=['POST'])
def new_transaction():
return "We'll add a new transaction"
@app.route('/chain', methods=['GET'])
def full_chain():
response = {
'chain': blockchain.chain,
'length': len(blockchain.chain),
}
return jsonify(response), 200
if __name__ == '__main__':
app.run(host='0.0.0.0', port=5000)🎜 위의 코드는 간단해야 합니다. --- 코드를 명확하게 하기 위해 몇 가지 설명과 문서를 추가했습니다. 블록체인 작업이 거의 완료되었습니다. 하지만 이 시점에서 여러분은 어떻게 새로운 블록이 생성되고, 위조되고, 채굴되는지 궁금할 것입니다. 🎜🎜작업 증명 알고리즘🎜🎜작업 증명(PoW) 알고리즘을 사용하여 블록체인에서 새 블록이 생성되거나 채굴되는 방법을 증명합니다. PoW의 목표는 특정 조건을 충족하는 숫자를 계산하는 것인데, 이는 계산적으로 모든 사람이 확인하기는 어렵지만 확인하기는 쉽습니다. 이것이 작업 증명의 핵심 아이디어입니다. 🎜🎜이해를 돕기 위해 간단한 예를 살펴보겠습니다. 🎜假设一个整数 x 乘以另一个整数 y 的积的 Hash 值必须以 0 结尾,即 hash(x * y) = ac23dc...0。设 x = 5,求y 。
用 Python 实现:
from hashlib import sha256
x = 5
y = 0  # We don't know what y should be yet...
while sha256(f'{x*y}'.encode()).hexdigest()[-1] != "0":
    y += 1
print(f'The solution is y = {y}')
结果是:y = 21。因为,生成的 Hash 值结尾必须为 0。
hash(5 * 21) = 1253e9373e...5e3600155e860
在比特币中,工作量证明算法被称为 Hashcash ,它和上面的问题很相似,只不过计算难度非常大。这就是矿工们为了争夺创建区块的权利而争相计算的问题。 通常,计算难度与目标字符串需要满足的特定字符的数量成正比,矿工算出结果后,就会获得一定数量的比特币奖励(通过交易)。
验证结果,当然非常容易。
实现工作量证明
让我们来实现一个相似 PoW 算法。规则类似上面的例子:
找到一个数字 P ,使得它与前一个区块的 Proof 拼接成的字符串的 Hash 值以 4 个零开头。
blockchain.py
import hashlib
import json

from time import time
from uuid import uuid4

class Blockchain(object):
    ...

    def proof_of_work(self, last_proof):
        """
        Simple Proof of Work Algorithm:
         - Find a number p' such that hash(pp') contains leading 4 zeroes, where p is the previous p'
         - p is the previous proof, and p' is the new proof
        :param last_proof: <int>
        :return: <int>
        """

        proof = 0
        while self.valid_proof(last_proof, proof) is False:
            proof += 1

        return proof

    @staticmethod
    def valid_proof(last_proof, proof):
        """
        Validates the Proof: Does hash(last_proof, proof) contain 4 leading zeroes?
        :param last_proof: <int> Previous Proof
        :param proof: <int> Current Proof
        :return: <bool> True if correct, False if not.
        """

        guess = f'{last_proof}{proof}'.encode()
        guess_hash = hashlib.sha256(guess).hexdigest()
        return guess_hash[:4] == "0000"</bool></int></int></int></int>
衡量算法复杂度的办法是修改零开头的个数。使用 4 个来用于演示,你会发现多一个零都会大大增加计算出结果所需的时间。
现在 Blockchain 类基本已经完成了,接下来使用 HTTP Requests 来进行交互。
Step 2: Blockchain 作为 API 接口
我们将使用 Python Flask 框架,这是一个轻量 Web 应用框架,它方便将网络请求映射到 Python 函数,现在我们来让 Blockchain 运行在基于 Flask web 上。
我们将创建三个接口:
-
/transactions/new创建一个交易并添加到区块 -
/mine告诉服务器去挖掘新的区块 -
/chain返回整个区块链
创建节点
我们的 Flask 服务器 将扮演区块链网络中的一个节点。我们先添加一些框架代码:
blockchain.py
import hashlib
import json
from textwrap import dedent
from time import time
from uuid import uuid4

from flask import Flask

class Blockchain(object):
    ...

# Instantiate our Node(实例化我们的节点)
app = Flask(__name__)

# Generate a globally unique address for this node(为这个节点生成一个全球唯一的地址)
node_identifier = str(uuid4()).replace('-', '')

# Instantiate the Blockchain(实例化 Blockchain类)
blockchain = Blockchain()

@app.route('/mine', methods=['GET'])
def mine():
    return "We'll mine a new Block"

@app.route('/transactions/new', methods=['POST'])
def new_transaction():
    return "We'll add a new transaction"

@app.route('/chain', methods=['GET'])
def full_chain():
    response = {
        'chain': blockchain.chain,
        'length': len(blockchain.chain),
    }
    return jsonify(response), 200

if __name__ == '__main__':
    app.run(host='0.0.0.0', port=5000)
简单的说明一下以上代码:
- 第 15 行:实例化节点。阅读更多关于 Flask 内容。
- 第 18 行:为节点创建一个随机的名称。.
- 第 21 行:实例化 Blockchain 类。
- 第 24--26 行:创建 /mine 接口,GET 方式请求。
- 第 28--30 行:创建 /transactions/new 接口,POST 方式请求,可以给接口发送交易数据。
- 第 32--38 行:创建 /chain 接口,返回整个区块链。
- 第 40--41 行:服务器运行端口 5000 。
发送交易
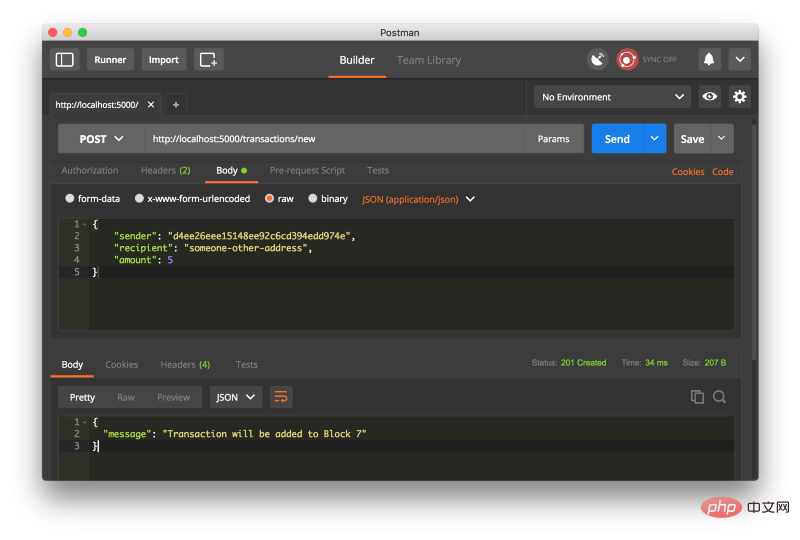
发送到节点的交易数据结构如下:
{
 "sender": "my address",
 "recipient": "someone else's address",
 "amount": 5
}
因为我们已经有了添加交易的方法,所以基于接口来添加交易就很简单了。让我们为添加事务写函数:
blockchain.py
import hashlib
import json
from textwrap import dedent
from time import time
from uuid import uuid4

from flask import Flask, jsonify, request

...

@app.route('/transactions/new', methods=['POST'])
def new_transaction():
    values = request.get_json()

    # Check that the required fields are in the POST'ed data
    required = ['sender', 'recipient', 'amount']
    if not all(k in values for k in required):
        return 'Missing values', 400

    # Create a new Transaction
    index = blockchain.new_transaction(values['sender'], values['recipient'], values['amount'])

    response = {'message': f'Transaction will be added to Block {index}'}
    return jsonify(response), 201
挖矿
挖矿正是神奇所在,它很简单,做了一下三件事:
- 计算工作量证明 PoW
- 通过新增一个交易授予矿工(自己)一个币
- 构造新区块并将其添加到链中
blockchain.py
import hashlib
import json

from time import time
from uuid import uuid4

from flask import Flask, jsonify, request

...

@app.route('/mine', methods=['GET'])
def mine():
    # We run the proof of work algorithm to get the next proof...
    last_block = blockchain.last_block
    last_proof = last_block['proof']
    proof = blockchain.proof_of_work(last_proof)

    # We must receive a reward for finding the proof.
    # The sender is "0" to signify that this node has mined a new coin.
    blockchain.new_transaction(
        sender="0",
        recipient=node_identifier,
        amount=1,
    )

    # Forge the new Block by adding it to the chain
    previous_hash = blockchain.hash(last_block)
    block = blockchain.new_block(proof, previous_hash)

    response = {
        'message': "New Block Forged",
        'index': block['index'],
        'transactions': block['transactions'],
        'proof': block['proof'],
        'previous_hash': block['previous_hash'],
    }
    return jsonify(response), 200
注意交易的接收者是我们自己的服务器节点,我们做的大部分工作都只是围绕 Blockchain 类方法进行交互。到此,我们的区块链就算完成了,我们来实际运行下。
Step 3: 运行区块链
你可以使用 cURL 或 Postman 去和 API 进行交互
启动 Server:
$ python blockchain.py
* Running on http://127.0.0.1:5000/ (Press CTRL+C to quit)
让我们通过请求 http://localhost:5000/mine ( GET )来进行挖矿:
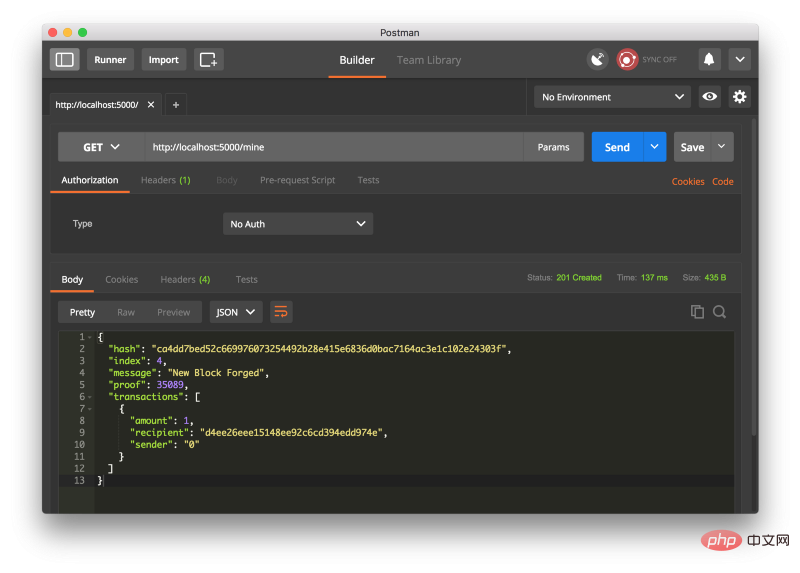
用 Postman 发起一个 GET 请求.
创建一个交易请求,请求 http://localhost:5000/transactions/new (POST),如图
如果不是使用 Postman,则用一下的 cURL 语句也是一样的:
$ curl -X POST -H "Content-Type: application/json" -d '{
 "sender": "d4ee26eee15148ee92c6cd394edd974e",
 "recipient": "someone-other-address",
 "amount": 5
}' "http://localhost:5000/transactions/new"
在挖了两次矿之后,就有 3 个块了,通过请求 http://localhost:5000/chain 可以得到所有的块信息
{
  "chain": [
    {
      "index": 1,
      "previous_hash": 1,
      "proof": 100,
      "timestamp": 1506280650.770839,
      "transactions": []
    },
    {
      "index": 2,
      "previous_hash": "c099bc...bfb7",
      "proof": 35293,
      "timestamp": 1506280664.717925,
      "transactions": [
        {
          "amount": 1,
          "recipient": "8bbcb347e0634905b0cac7955bae152b",
          "sender": "0"
        }
      ]
    },
    {
      "index": 3,
      "previous_hash": "eff91a...10f2",
      "proof": 35089,
      "timestamp": 1506280666.1086972,
      "transactions": [
        {
          "amount": 1,
          "recipient": "8bbcb347e0634905b0cac7955bae152b",
          "sender": "0"
        }
      ]
    }
  ],
  "length": 3
}
Step 4: 一致性(共识)
我们已经有了一个基本的区块链可以接受交易和挖矿。但是区块链系统应该是分布式的。既然是分布式的,那么我们究竟拿什么保证所有节点有同样的链呢?这就是一致性问题,我们要想在网络上有多个节点,就必须实现一个一致性的算法。
注册节点
在实现一致性算法之前,我们需要找到一种方式让一个节点知道它相邻的节点。每个节点都需要保存一份包含网络中其它节点的记录。因此让我们新增几个接口:
-
/nodes/register接收 URL 形式的新节点列表. -
/nodes/resolve执行一致性算法,解决任何冲突,确保节点拥有正确的链.
我们修改下 Blockchain 的 init 函数并提供一个注册节点方法:
blockchain.py
...
from urllib.parse import urlparse
...

class Blockchain(object):
    def __init__(self):
        ...
        self.nodes = set()
        ...

    def register_node(self, address):
        """
        Add a new node to the list of nodes
        :param address: <str> Address of node. Eg. 'http://192.168.0.5:5000'
        :return: None
        """

        parsed_url = urlparse(address)
        self.nodes.add(parsed_url.netloc)</str>
我们用 set 来储存节点,这是一种避免重复添加节点的简单方法.
实现共识算法
就像先前讲的那样,当一个节点与另一个节点有不同的链时,就会产生冲突。 为了解决这个问题,我们将制定最长的有效链条是最权威的规则。换句话说就是:在这个网络里最长的链就是最权威的。 我们将使用这个算法,在网络中的节点之间达成共识。
blockchain.py
...
import requests

class Blockchain(object)
    ...

    def valid_chain(self, chain):
        """
        Determine if a given blockchain is valid
        :param chain: <list> A blockchain
        :return: <bool> True if valid, False if not
        """

        last_block = chain[0]
        current_index = 1

        while current_index  True if our chain was replaced, False if not
        """

        neighbours = self.nodes
        new_chain = None

        # We're only looking for chains longer than ours
        max_length = len(self.chain)

        # Grab and verify the chains from all the nodes in our network
        for node in neighbours:
            response = requests.get(f'http://{node}/chain')

            if response.status_code == 200:
                length = response.json()['length']
                chain = response.json()['chain']

                # Check if the length is longer and the chain is valid
                if length > max_length and self.valid_chain(chain):
                    max_length = length
                    new_chain = chain

        # Replace our chain if we discovered a new, valid chain longer than ours
        if new_chain:
            self.chain = new_chain
            return True

        return False</bool></list>
第一个方法 valid_chain() 负责检查一个链是否有效,方法是遍历每个块并验证散列和证明。
resolve_conflicts() 是一个遍历我们所有邻居节点的方法,下载它们的链并使用上面的方法验证它们。 如果找到一个长度大于我们的有效链条,我们就取代我们的链条。
我们将两个端点注册到我们的API中,一个用于添加相邻节点,另一个用于解决冲突:
blockchain.py
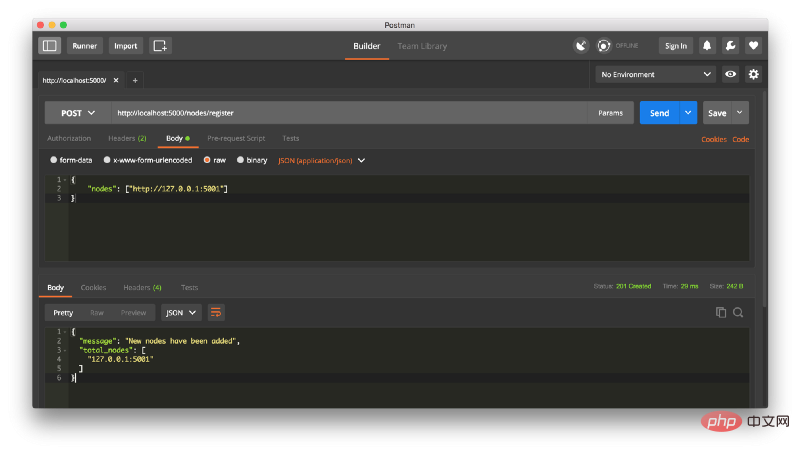
@app.route('/nodes/register', methods=['POST'])
def register_nodes():
values = request.get_json()
nodes = values.get('nodes')
if nodes is None:
return "Error: Please supply a valid list of nodes", 400
for node in nodes:
blockchain.register_node(node)
response = {
'message': 'New nodes have been added',
'total_nodes': list(blockchain.nodes),
}
return jsonify(response), 201
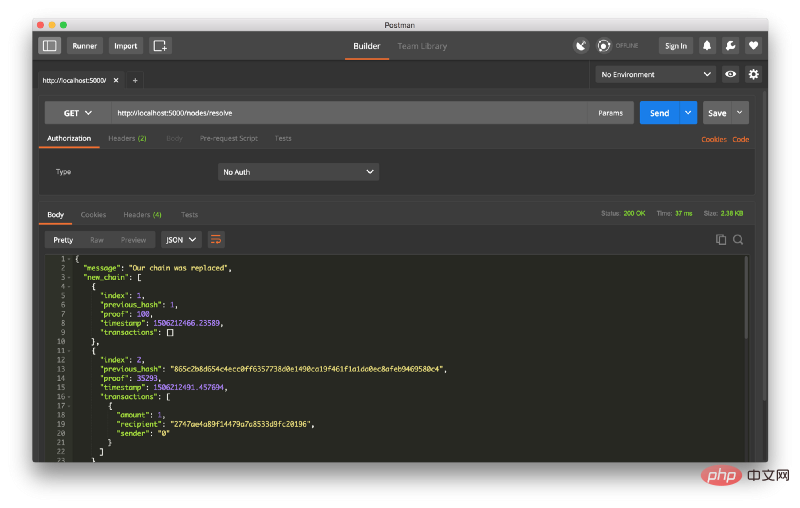
@app.route('/nodes/resolve', methods=['GET'])
def consensus():
replaced = blockchain.resolve_conflicts()
if replaced:
response = {
'message': 'Our chain was replaced',
'new_chain': blockchain.chain
}
else:
response = {
'message': 'Our chain is authoritative',
'chain': blockchain.chain
}
return jsonify(response), 200
在这一点上,如果你喜欢,你可以使用一台不同的机器,并在你的网络上启动不同的节点。 或者使用同一台机器上的不同端口启动进程。 我在我的机器上,不同的端口上创建了另一个节点,并将其注册到当前节点。 因此,我有两个节点:http://localhost:5000 和 http://localhost:5001。 注册一个新节点:
然后我在节点 2 上挖掘了一些新的块,以确保链条更长。 之后,我在节点1上调用 GET /nodes/resolve,其中链由一致性算法取代:
这是一个包,去找一些朋友一起,以帮助测试你的区块链。
我希望本文能激励你创造更多新东西。我之所以对数字货币入迷,是因为我相信区块链会很快改变我们看待事物的方式,包括经济、政府、档案管理等。
更新:我计划在接下来的第2部分中继续讨论区块链交易验证机制,并讨论一些可以让区块链进行生产的方法。
相关推荐:编程视频课程
위 내용은 Python을 사용하여 나만의 블록체인 구축의 상세 내용입니다. 자세한 내용은 PHP 중국어 웹사이트의 기타 관련 기사를 참조하세요!