centos7에서 postfix를 사용하여 이메일을 보내는 방법
- 王林원래의
- 2020-04-02 10:49:063383검색

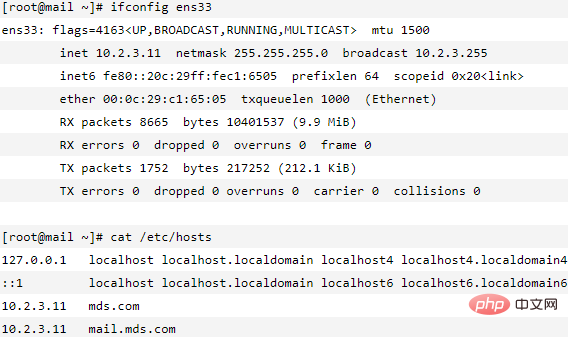
1. 호스트 매핑 구성

2. Postfix 및 Mailx 도구 설치
[root@mail ~]# yum -y install postfix mailx
[root@mail ~]# systemctl start postfix
[root@mail ~]# systemctl enable postfix
[root@mail ~]# netstat -anput | grep 25
tcp        0      0 0.0.0.0:25              0.0.0.0:*               LISTEN      1820/master
4. 163 이메일 인증서를 신청하세요
[root@mail ~]# vim /etc/postfix/main.cf
myhostname = mail.mds.com
mydomain = mds.com
myorigin = $mydomain
inet_interfaces = all
mydestination = $myhostname,$mydomain
5. emails
[root@mail ~]# mkdir /root/.certs
[root@mail ~]# echo -n | openssl s_client -connect smtp.163.com:465 | sed -ne '/-BEGIN CERTIFICATE-/,/-END CERTIFICATE-/p' > ~/.certs/163.crt
[root@mail ~]# certutil -A -n "GeoTrust Global CA" -t "C,," -d ~/.certs -i ~/.certs/163.crt
[root@mail ~]# certutil -A -n "GeoTrust SSL CA" -t "C,," -d ~/.certs -i ~/.certs/163.crt
[root@mail ~]# certutil -L -d /root/.certs
[root@mail ~]# certutil -A -n "GeoTrust SSL CA - G3" -t "Pu,Pu,Pu" -d ~/.certs/ -i ~/.certs/163.crt
6. 서비스를 다시 시작하고 테스트 이메일을 보냅니다
[root@mail ~]# vim /etc/mail.rc
set ssl-verify="ignore"
set smtp-auth="login"
set from="mds302587@163.com"
set smtp="smtps://smtp.163.com:465"
set smtp-auth-user="mds302587@163.com"
set smtp-auth-password="123456"
set nss-config-dir="/root/.certs"
7. 이메일 수신 확인
추천 관련 튜토리얼:
centos tutorial위 내용은 centos7에서 postfix를 사용하여 이메일을 보내는 방법의 상세 내용입니다. 자세한 내용은 PHP 중국어 웹사이트의 기타 관련 기사를 참조하세요!
성명:
본 글의 내용은 네티즌들의 자발적인 기여로 작성되었으며, 저작권은 원저작자에게 있습니다. 본 사이트는 이에 상응하는 법적 책임을 지지 않습니다. 표절이나 침해가 의심되는 콘텐츠를 발견한 경우 admin@php.cn으로 문의하세요.

