간단한 용어로 LinkedHashMap 분석(그림 및 텍스트)
- angryTom앞으로
- 2019-11-28 13:44:492076검색

1. 요약
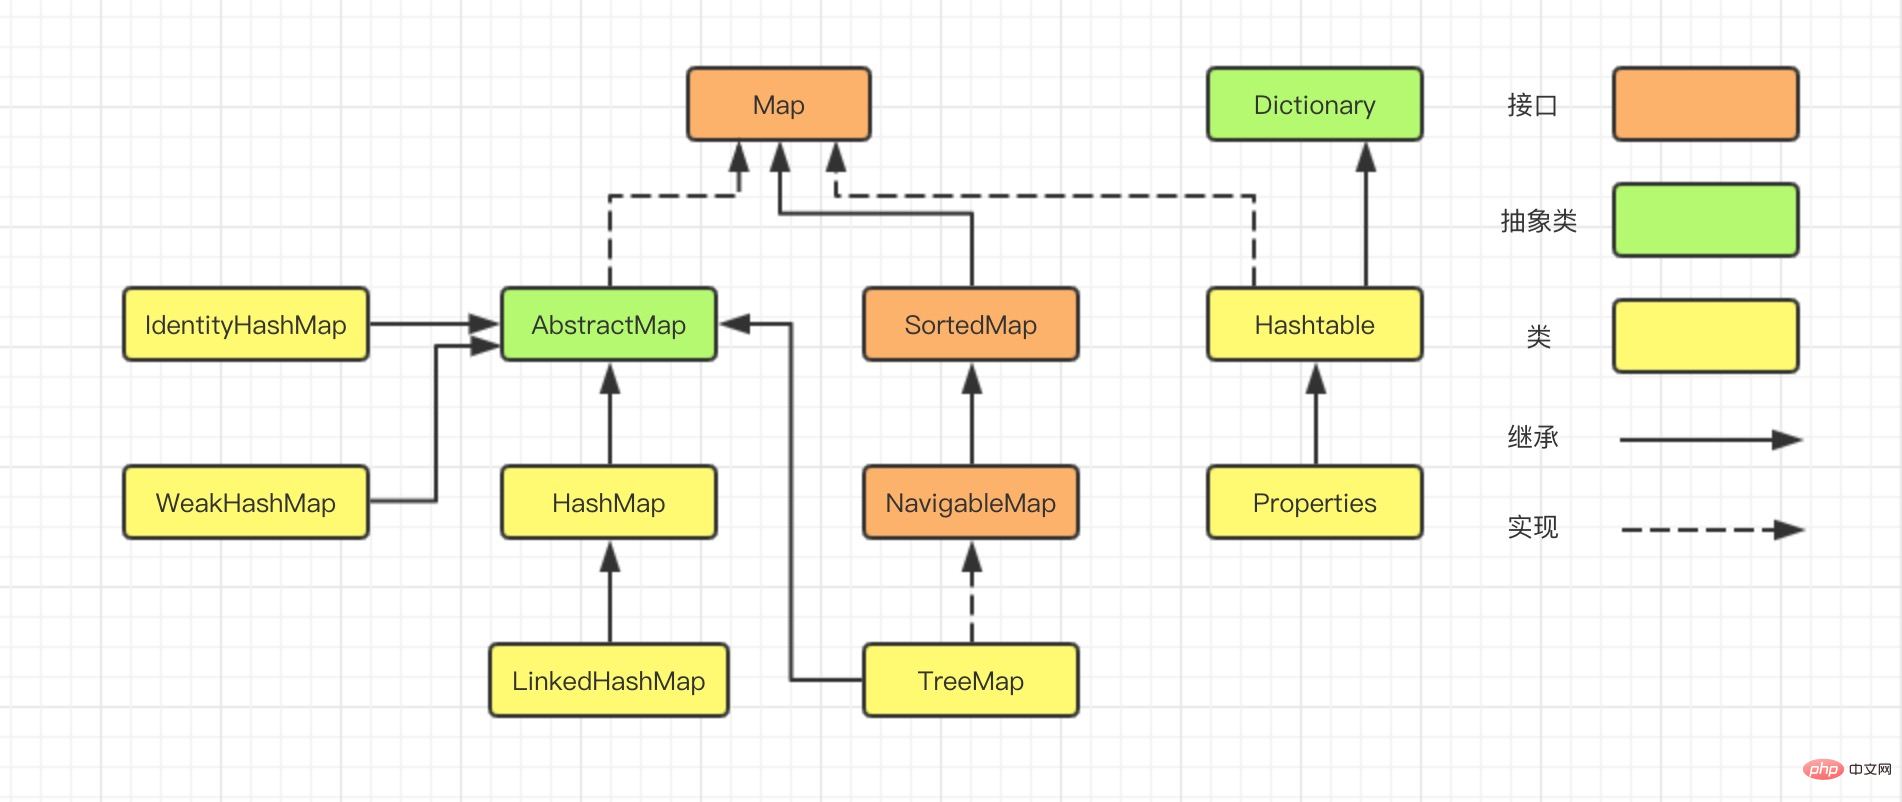
컬렉션 시리즈의 첫 번째 장에서 Map의 구현 클래스에는 HashMap, LinkedHashMap, TreeMap, IdentityHashMap, WeakHashMap, Hashtable, Properties 등이 포함된다는 것을 배웠습니다.

이 글에서는 주로 LinkedHashMap의 구현을 데이터 구조와 알고리즘 수준에서 논의합니다.
(추천 학습: Java 비디오 튜토리얼)
2. 소개
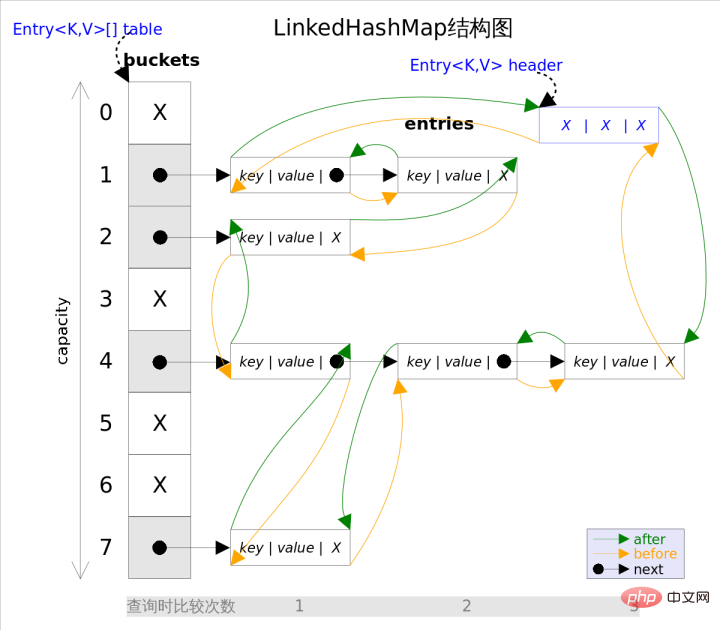
LinkedHashMap은 HashMap을 사용하여 데이터 구조를 작동하고 LinkedList를 사용하여 데이터 구조를 유지하는 HashMap+LinkedList로 간주할 수 있습니다. 삽입된 요소. 모든 요소(항목)는 순서대로 이중 연결 목록 형태로 내부적으로 연결됩니다.
LinkedHashMap은 HashMap을 상속하고 null 키가 있는 요소를 삽입하고 null 값이 있는 요소를 삽입할 수 있습니다. 이름에서 알 수 있듯이 이 컨테이너는 LinkedList와 HashMap이 혼합되어 있습니다. 이는 HashMap과 LinkedHashMap의 특정 특성을 모두 충족한다는 것을 의미하며 Linked List로 강화된 HashMap으로 간주할 수 있습니다.
LinkedHashMap 소스 코드를 열면 세 가지 주요 핵심 속성을 볼 수 있습니다.
public class LinkedHashMap<K,V>
    extends HashMap<K,V>
    implements Map<K,V>{

    /**双向链表的头节点*/
    transient LinkedHashMap.Entry<K,V> head;

    /**双向链表的尾节点*/
    transient LinkedHashMap.Entry<K,V> tail;

    /**
      * 1、如果accessOrder为true的话,则会把访问过的元素放在链表后面,放置顺序是访问的顺序
      * 2、如果accessOrder为false的话,则按插入顺序来遍历
      */
      final boolean accessOrder;
}
LinkedHashMap 초기화 단계에서는 기본적으로 삽입 순서대로 통과됩니다.
public LinkedHashMap() {
        super();
        accessOrder = false;
}
LinkedHashMap은 HashMap과 동일한 해시 알고리즘을 사용하지만 차이점은 Entry에 저장된 Entry 요소는 현재 객체의 참조뿐만 아니라 이전 요소와 이후 요소의 참조도 저장하여 해시 테이블을 기반으로 양방향 연결 목록을 구성합니다. .
소스 코드는 다음과 같습니다.
static class Entry<K,V> extends HashMap.Node<K,V> {
        //before指的是链表前驱节点,after指的是链表后驱节点
        Entry<K,V> before, after;
        Entry(int hash, K key, V value, Node<K,V> next) {
            super(hash, key, value, next);
        }
}

이중 연결 리스트의 선두에 삽입된 데이터가 연결 리스트의 입구이고, 반복자 순회 방향이 이중 연결 리스트의 선두부터 시작되는 것을 직관적으로 알 수 있습니다. 연결리스트는 연결리스트의 끝에서 끝난다.

이 구조에는 반복 순서를 유지하는 것 외에도 또 다른 장점이 있습니다. LinkedHashMap을 반복할 때 HashMap처럼 전체 테이블을 순회할 필요가 없고, 가리키는 이중 연결 목록만 직접 순회하면 됩니다. 이는 LinkedHashMap의 반복 시간이 항목 수에만 관련되고 테이블 크기와는 아무 관련이 없음을 의미합니다.
3. 일반적인 메소드 소개
3.1.Get 메소드
get 메소드는 지정된 키 값에 따라 해당 값을 반환합니다. 이 메소드의 프로세스는 HashMap.get() 메소드의 프로세스와 거의 동일하며 기본적으로 삽입 순서대로 탐색됩니다.
public V get(Object key) {
        Node<K,V> e;
        if ((e = getNode(hash(key), key)) == null)
            return null;
        if (accessOrder)
            afterNodeAccess(e);
        return e.value;
}
accessOrder가 true이면 방문한 요소는 연결 목록 뒤에 배치되며 배치 순서는 액세스 순서입니다.
void afterNodeAccess(Node<K,V> e) { // move node to last
        LinkedHashMap.Entry<K,V> last;
        if (accessOrder && (last = tail) != e) {
            LinkedHashMap.Entry<K,V> p =
                (LinkedHashMap.Entry<K,V>)e, b = p.before, a = p.after;
            p.after = null;
            if (b == null)
                head = a;
            else
                b.after = a;
            if (a != null)
                a.before = b;
            else
                last = b;
            if (last == null)
                head = p;
            else {
                p.before = last;
                last.after = p;
            }
            tail = p;
            ++modCount;
        }
}
테스트 사례:
public static void main(String[] args) {
        //accessOrder默认为false
        Map<String, String> accessOrderFalse = new LinkedHashMap<>();
        accessOrderFalse.put("1","1");
        accessOrderFalse.put("2","2");
        accessOrderFalse.put("3","3");
        accessOrderFalse.put("4","4");
        System.out.println("acessOrderFalse:"+accessOrderFalse.toString());

        //accessOrder设置为true
        Map<String, String> accessOrderTrue = new LinkedHashMap<>(16, 0.75f, true);
        accessOrderTrue.put("1","1");
        accessOrderTrue.put("2","2");
        accessOrderTrue.put("3","3");
        accessOrderTrue.put("4","4");
        accessOrderTrue.get("2");//获取键2
        accessOrderTrue.get("3");//获取键3
        System.out.println("accessOrderTrue:"+accessOrderTrue.toString());
}
출력 결과:
acessOrderFalse:{1=1, 2=2, 3=3, 4=4}
accessOrderTrue:{1=1, 4=4, 2=2, 3=3}
3.2, put method
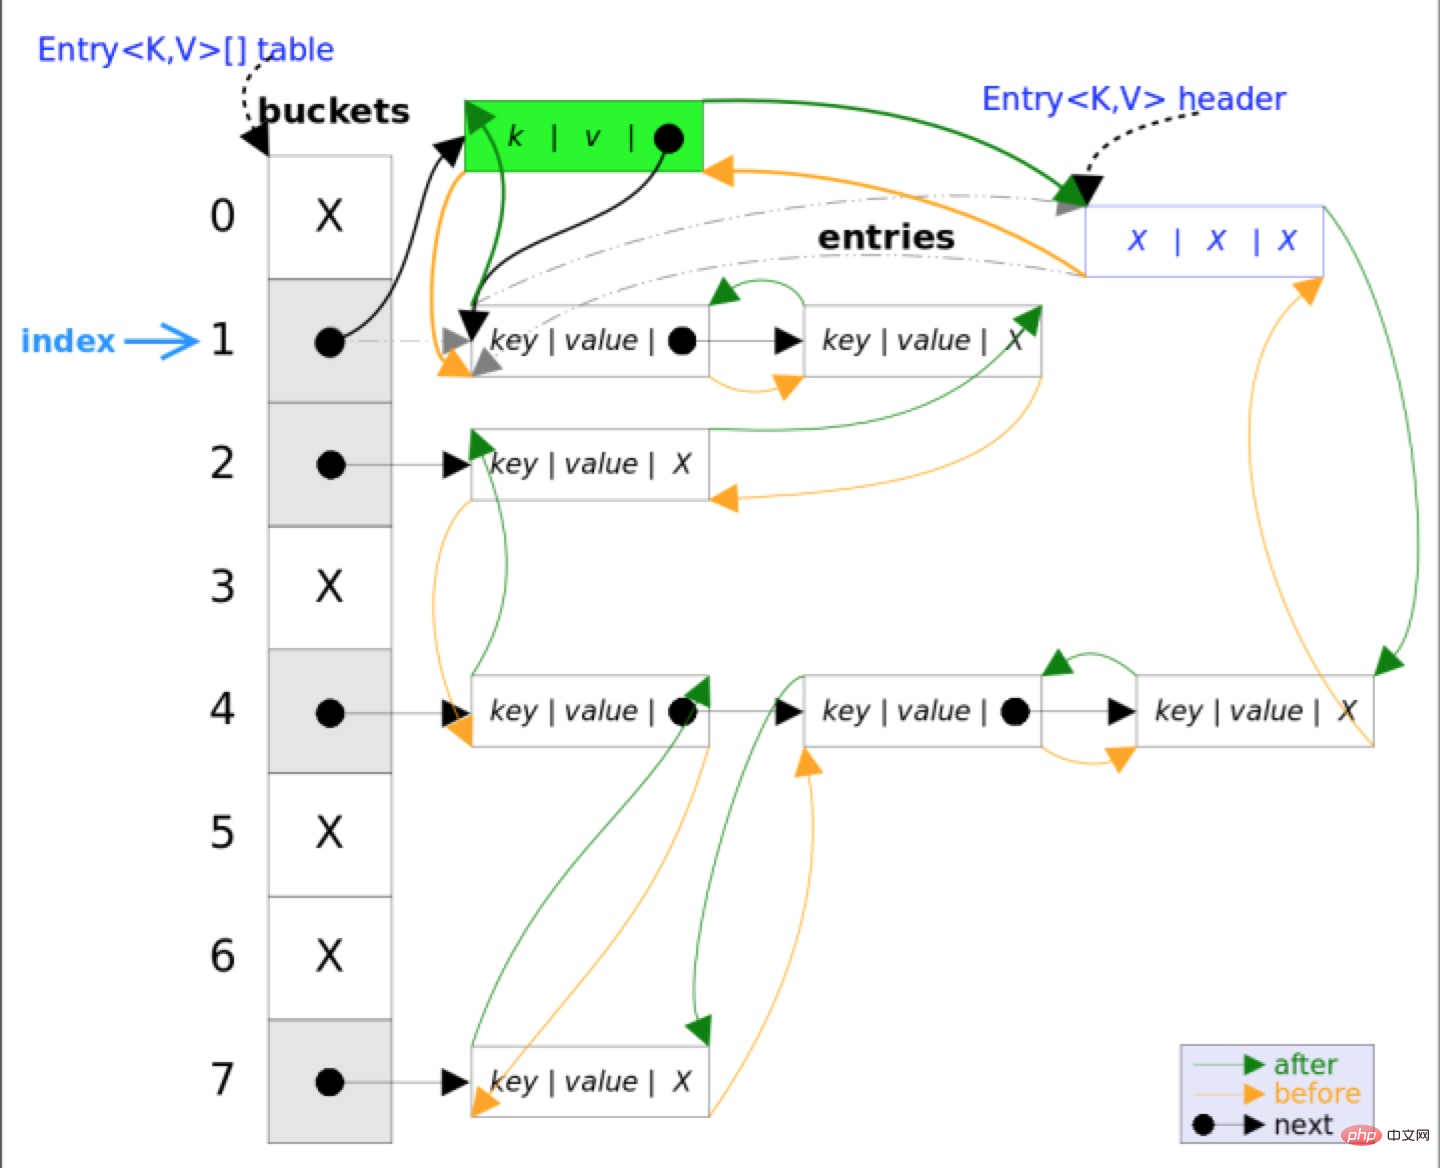
put (K 키, V 값) 메서드는 지정된 키, 값 쌍을 맵에 추가합니다. 이 메소드는 먼저 HashMap의 삽입 메소드를 호출하고 맵에 요소가 포함되어 있는지 검색합니다. 요소가 포함되어 있으면 검색 프로세스가 발견되지 않으면 get() 메소드와 유사합니다. 요소가 컬렉션에 삽입됩니다.
/**HashMap 中实现*/
public V put(K key, V value) {
    return putVal(hash(key), key, value, false, true);
}

final V putVal(int hash, K key, V value, boolean onlyIfAbsent,
                   boolean evict) {
        Node<K,V>[] tab; Node<K,V> p; int n, i;
        if ((tab = table) == null || (n = tab.length) == 0)
            n = (tab = resize()).length;
        if ((p = tab[i = (n - 1) & hash]) == null)
            tab[i] = newNode(hash, key, value, null);
        else {
            Node<K,V> e; K k;
            if (p.hash == hash &&
                ((k = p.key) == key || (key != null && key.equals(k))))
                e = p;
            else if (p instanceof TreeNode)
                e = ((TreeNode<K,V>)p).putTreeVal(this, tab, hash, key, value);
            else {
                for (int binCount = 0; ; ++binCount) {
                    if ((e = p.next) == null) {
                        p.next = newNode(hash, key, value, null);
                        if (binCount >= TREEIFY_THRESHOLD - 1) // -1 for 1st
                            treeifyBin(tab, hash);
                        break;
                    }
                    if (e.hash == hash &&
                        ((k = e.key) == key || (key != null && key.equals(k))))
                        break;
                    p = e;
                }
            }
            if (e != null) { // existing mapping for key
                V oldValue = e.value;
                if (!onlyIfAbsent || oldValue == null)
                    e.value = value;
                afterNodeAccess(e);
                return oldValue;
            }
        }
        ++modCount;
        if (++size > threshold)
            resize();
        afterNodeInsertion(evict);
        return null;
}
LinkedHashMap
// LinkedHashMap 中覆写
Node<K,V> newNode(int hash, K key, V value, Node<K,V> e) {
    LinkedHashMap.Entry<K,V> p =
        new LinkedHashMap.Entry<K,V>(hash, key, value, e);
    // 将 Entry 接在双向链表的尾部
    linkNodeLast(p);
    return p;
}

private void linkNodeLast(LinkedHashMap.Entry<K,V> p) {
    LinkedHashMap.Entry<K,V> last = tail;
    tail = p;
    // last 为 null,表明链表还未建立
    if (last == null)
        head = p;
    else {
        // 将新节点 p 接在链表尾部
        p.before = last;
        last.after = p;
    }
}

3.3에서 재정의된 메소드입니다. 제거 메소드
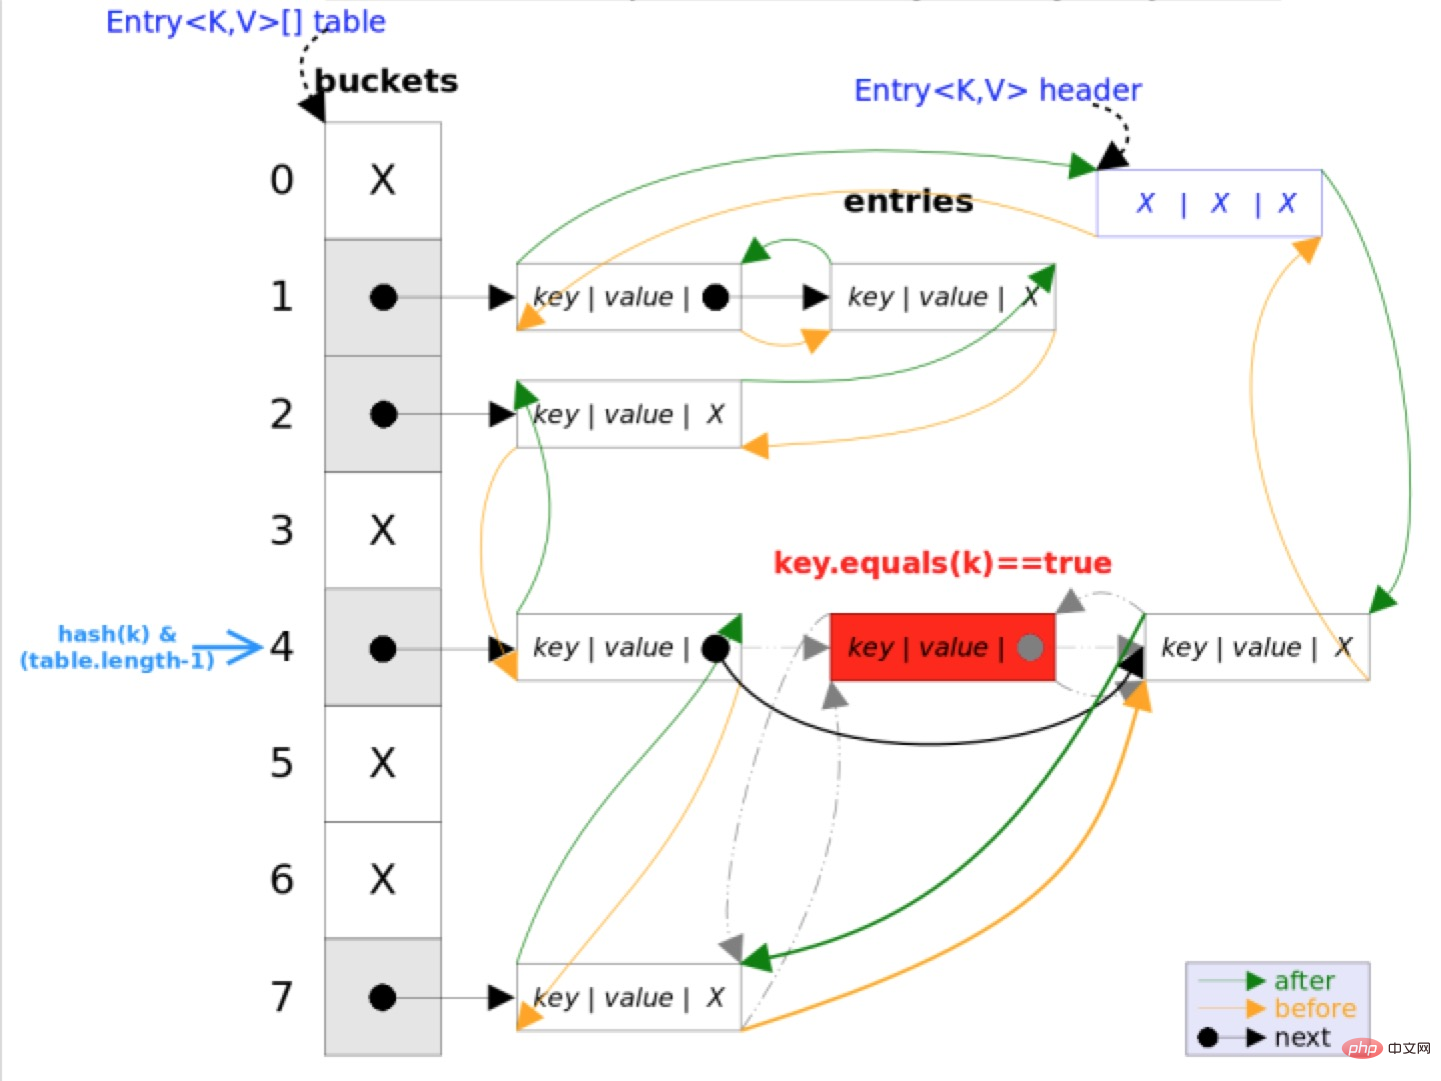
remove(객체 키)는 키 값에 해당하는 항목을 삭제하는 데 사용됩니다. 이 메소드의 구현 논리는 주로 다음과 같습니다. HashMap.먼저 키 값에 해당하는 항목을 찾은 다음 항목을 삭제합니다(연결된 목록의 해당 참조 수정). 마지막으로 LinkedHashMap의 재정의된 메서드는 다음과 같습니다. 삭제하라고 전화했어요!
/**HashMap 中实现*/
public V remove(Object key) {
    Node<K,V> e;
    return (e = removeNode(hash(key), key, null, false, true)) == null ?
        null : e.value;
}

final Node<K,V> removeNode(int hash, Object key, Object value,
                           boolean matchValue, boolean movable) {
    Node<K,V>[] tab; Node<K,V> p; int n, index;
    if ((tab = table) != null && (n = tab.length) > 0 &&
        (p = tab[index = (n - 1) & hash]) != null) {
        Node<K,V> node = null, e; K k; V v;
        if (p.hash == hash &&
            ((k = p.key) == key || (key != null && key.equals(k))))
            node = p;
        else if ((e = p.next) != null) {
            if (p instanceof TreeNode) {...}
            else {
                // 遍历单链表,寻找要删除的节点,并赋值给 node 变量
                do {
                    if (e.hash == hash &&
                        ((k = e.key) == key ||
                         (key != null && key.equals(k)))) {
                        node = e;
                        break;
                    }
                    p = e;
                } while ((e = e.next) != null);
            }
        }
        if (node != null && (!matchValue || (v = node.value) == value ||
                             (value != null && value.equals(v)))) {
            if (node instanceof TreeNode) {...}
            // 将要删除的节点从单链表中移除
            else if (node == p)
                tab[index] = node.next;
            else
                p.next = node.next;
            ++modCount;
            --size;
            afterNodeRemoval(node);    // 调用删除回调方法进行后续操作
            return node;
        }
    }
    return null;
}
LinkedHashMap에서 재정의된 afterNodeRemoval 메소드
void afterNodeRemoval(Node<K,V> e) { // unlink
    LinkedHashMap.Entry<K,V> p =
        (LinkedHashMap.Entry<K,V>)e, b = p.before, a = p.after;
    // 将 p 节点的前驱后后继引用置空
    p.before = p.after = null;
    // b 为 null,表明 p 是头节点
    if (b == null)
        head = a;
    else
        b.after = a;
    // a 为 null,表明 p 是尾节点
    if (a == null)
        tail = b;
    else
        a.before = b;
}

IV. Summary
LinkedHashMap은 HashMap을 상속하며, 둘 사이의 유일한 차이점은 LinkedHashMap이 HashMap 기반을 사용한다는 것입니다. on 모든 항목은 요소의 반복 순서가 삽입 순서와 동일하도록 이중 연결 목록 형태로 연결됩니다.
이중 연결 목록의 머리 부분을 가리키는 헤더와 이중 연결 목록의 꼬리를 가리키는 꼬리가 추가된 주요 부분은 HashMap과 정확히 동일합니다. 이중 연결 목록의 기본 반복 순서는 삽입입니다. 항목의 순서.
이 기사는 PHP 중국어 웹사이트, java tutorial 칼럼에서 가져온 것입니다. 환영합니다!
위 내용은 간단한 용어로 LinkedHashMap 분석(그림 및 텍스트)의 상세 내용입니다. 자세한 내용은 PHP 중국어 웹사이트의 기타 관련 기사를 참조하세요!

