한 기사에서 Swoole을 사용하여 채팅방 프로그램을 구축하는 방법을 알아보세요.
- 爱喝马黛茶的安东尼앞으로
- 2019-11-22 17:15:132747검색

1. 웹소켓 서버 만들기
swoole에는 버전 1.7.9부터 웹소켓 서버 기능이 내장되어 있습니다. 간단한 PHP 몇 줄만으로 비동기식 비차단 다중 프로세스를 만들 수 있습니다. 코드.WebSocket 서버.
먼저 apache 작업공간에 swoole이라는 새 프로젝트를 생성한 후, 그 안에 새로운 ws-server.php 파일을 생성합니다. 이 php 파일은 주로 websocket 서버를 생성하고 사용자 요청에 응답합니다. :
<?php
//创建websocket服务器对象,监听0.0.0.0:9502端口
$ws_server = new swoole_websocket_server('192.168.1.169', 9502);
//设置server运行时的各项参数
$ws_server->set(array(
'daemonize' => true, //是否作为守护进程
));
//监听WebSocket连接打开事件
$ws_server->on('open', function ($ws, $request) {
file_put_contents( __DIR__ .'/log.txt' , $request->fd);
//$ws->push($request->fd, "Hello, Welcome\n");
});
//监听WebSocket消息事件
$ws_server->on('message', function ($ws, $frame) {
pushMessage($ws,$frame);
});
//监听WebSocket连接关闭事件
$ws_server->on('close', function ($ws, $fd) {
echo "client-{$fd} is closed\n";
});
$ws_server->start();
//消息推送
function pushMessage($ws,$frame){
$data = $frame->data;
$msg = file_get_contents( __DIR__ .'/log.txt');
for ($i=1 ; $i<= $msg ; $i++) {
$ws->push($i, $frame->fd.' : '.$data);
}
}위 코드는 IP 주소가 192.168.1.169이고 포트가 9502인 WebSocket 서버를 생성합니다. 이 정보는 실제 상황에 따라 조정될 수 있습니다.
2. 채팅 대화형 페이지 만들기
마찬가지로 swoole 디렉토리에 새 chat.html 파일을 만듭니다. 이것은 순전히 정적 html5 페이지입니다. html5를 통해 websocket 서버와 상호 작용합니다. WebSocket 프로토콜의 내용은 다음과 같습니다.
<!DOCTYPE html>
<html>
<head>
<title></title>
<meta charset="UTF-8">
<script type="text/javascript">
if(window.WebSocket){
var webSocket = new WebSocket("ws://192.168.1.169:9502");
webSocket.onopen = function (event) {
//webSocket.send("Hello,WebSocket!");
};
webSocket.onmessage = function (event) {
var content = document.getElementById('content');
content.innerHTML = content.innerHTML.concat('<p style="margin-left:20px;height:20px;line-height:20px;">
用户id-'+event.data+'</p>');
}
var sendMessage = function(){
var data = document.getElementById('message').value;
webSocket.send(data);
}
}else{
console.log("您的浏览器不支持WebSocket");
}
</script>
</head>
<body>
<div style="width:600px;margin:0 auto;border:1px solid #ccc;">
<div id="content" style="overflow-y:auto;height:300px;"></div>
<hr/>
<div style="height:40px">
<input type="text" id="message" style="margin-left:10px;height:25px;width:450px;">
<button οnclick="sendMessage()" style="height:28px;width:75px;">发送</button>
</div>
</div>
</body>
</html>3.Testing
지금까지 필요한 두 파일이 예상대로 작동하는지 테스트해 보겠습니다.
3.1 WebSocket 서버 시작
프로젝트의 루트 디렉터리로 전환한 후 php 명령줄을 통해 ws-server.php 스크립트를 실행하여 WebSocket 서버를 시작합니다.
cd /var/www/html/swoole
php ws-server.php
As 그림에 표시됨:

3.2 WebSocket 서버가 성공적으로 시작되었는지 확인합니다.
netstat -tunlp|grep 9502 명령을 입력합니다. 다음 인터페이스가 표시되면 WebSocket 서버가 성공적으로 시작된 것입니다.

3.3 채팅 시작
브라우저를 몇 개 더 준비한 후 각 브라우저에 http://192.168.1.169/swoole/chat.html을 입력하고 각 브라우저는 한 명의 사용자에 해당하며, 다음을 시뮬레이션할 수 있습니다. 그룹 채팅.
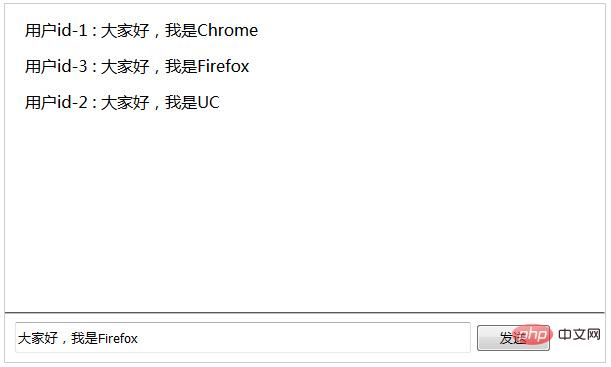
Chrome 브라우저의 채팅창에 "안녕하세요 여러분, 저는 Chrome입니다"라고 입력하세요. 이때 UC와 Firefox 브라우저의 채팅창에는 이 메시지가 표시됩니다. 마찬가지로 UC 및 Firefox 브라우저의 채팅 창에 정보를 입력하면 다른 두 창도 볼 수 있습니다. 다음은 채팅 창 중 하나의 스크린샷입니다.

채팅 인터페이스 조금 추악하지만 기능은 달성되었습니다. 그렇습니다. 인터페이스는 UI 프런트엔드를 더 아름답게 만들 수 있습니다. 다음으로는 즐겁게 대화를 나누시면 됩니다. 아주 간단하지 않나요?
PHP 중국어 웹사이트, 수많은 무료 swoole 입문 튜토리얼, 온라인 학습을 환영합니다!
이 기사는 https://blog.csdn.net/tdcqfyl/article/details/52370804
에서 복제되었습니다.위 내용은 한 기사에서 Swoole을 사용하여 채팅방 프로그램을 구축하는 방법을 알아보세요.의 상세 내용입니다. 자세한 내용은 PHP 중국어 웹사이트의 기타 관련 기사를 참조하세요!

