ES6의 비동기 기능에 대한 자세한 소개(예제 포함)
- 不言앞으로
- 2018-10-24 10:33:492861검색
이 기사는 ES6의 Async 기능에 대한 자세한 소개를 제공합니다(예제 포함). 도움이 필요한 친구들이 참고할 수 있기를 바랍니다.
async
ES2017 표준에는 비동기 기능이 도입되어 비동기 작업이 더욱 편리해졌습니다.
비동기 처리 측면에서 비동기 함수는 생성기 함수의 구문 설탕입니다.
예:
// 使用 generator
var fetch = require('node-fetch');
var co = require('co');

function* gen() {
    var r1 = yield fetch('https://api.github.com/users/github');
    var json1 = yield r1.json();
    console.log(json1.bio);
}

co(gen);
async를 사용할 때:
// 使用 async
var fetch = require('node-fetch');

var fetchData = async function () {
    var r1 = await fetch('https://api.github.com/users/github');
    var json1 = await r1.json();
    console.log(json1.bio);
};

fetchData();
실제로 비동기 함수의 구현 원리는 Generator 함수와 자동 실행기를 함수로 래핑하는 것입니다.
async function fn(args) {
  // ...
}

// 等同于

function fn(args) {
  return spawn(function* () {
    // ...
  });
}
spawn 함수는 co와 같은 자동 실행기를 말합니다.
또한 async 함수는 Promise 객체를 반환하므로 async 함수는 Promise와 Generator를 기반으로 한 캡슐화 계층이라는 것도 이해할 수 있습니다.
async 및 Promise
엄밀히 말하면 async는 구문이고 Promise는 내장 개체입니다. async 함수도 Promise 개체를 반환한다는 점은 말할 것도 없고...
여기에서는 주로 보여줍니다. 일부 시나리오에서는 async를 사용하면 Promise를 사용하는 것보다 비동기 프로세스를 더 우아하게 처리할 수 있습니다.
1. 코드가 더 간결해졌습니다
/**
 * 示例一
 */
function fetch() {
  return (
    fetchData()
    .then(() => {
      return "done"
    });
  )
}

async function fetch() {
  await fetchData()
  return "done"
};
/**
 * 示例二
 */
function fetch() {
  return fetchData()
  .then(data => {
    if (data.moreData) {
        return fetchAnotherData(data)
        .then(moreData => {
          return moreData
        })
    } else {
      return data
    }
  });
}

async function fetch() {
  const data = await fetchData()
  if (data.moreData) {
    const moreData = await fetchAnotherData(data);
    return moreData
  } else {
    return data
  }
};
/**
 * 示例三
 */
function fetch() {
  return (
    fetchData()
    .then(value1 => {
      return fetchMoreData(value1)
    })
    .then(value2 => {
      return fetchMoreData2(value2)
    })
  )
}

async function fetch() {
  const value1 = await fetchData()
  const value2 = await fetchMoreData(value1)
  return fetchMoreData2(value2)
};
2. 오류 처리
function fetch() {
  try {
    fetchData()
      .then(result => {
        const data = JSON.parse(result)
      })
      .catch((err) => {
        console.log(err)
      })
  } catch (err) {
    console.log(err)
  }
}
이 코드에서 try/catch는 fetchData()에서 일부 Promise 생성 오류를 포착할 수 있지만, JSON.parse에서 발생하는 예외는 포착할 수 없습니다. JSON.parse에서 발생한 예외를 처리하려면 예외 처리 논리를 반복하는 catch 함수를 추가해야 합니다.
실제 프로젝트에서는 오류 처리 논리가 복잡하여 코드가 중복될 수 있습니다.
async function fetch() {
  try {
    const data = JSON.parse(await fetchData())
  } catch (err) {
    console.log(err)
  }
};
async/await의 출현으로 try/catch를 통해 동기 및 비동기 오류를 캡처할 수 있습니다.
3. 디버깅
const fetchData = () => new Promise((resolve) => setTimeout(resolve, 1000, 1))
const fetchMoreData = (value) => new Promise((resolve) => setTimeout(resolve, 1000, value + 1))
const fetchMoreData2 = (value) => new Promise((resolve) => setTimeout(resolve, 1000, value + 2))

function fetch() {
  return (
    fetchData()
    .then((value1) => {
      console.log(value1)
      return fetchMoreData(value1)
    })
    .then(value2 => {
      return fetchMoreData2(value2)
    })
  )
}

const res = fetch();
console.log(res);

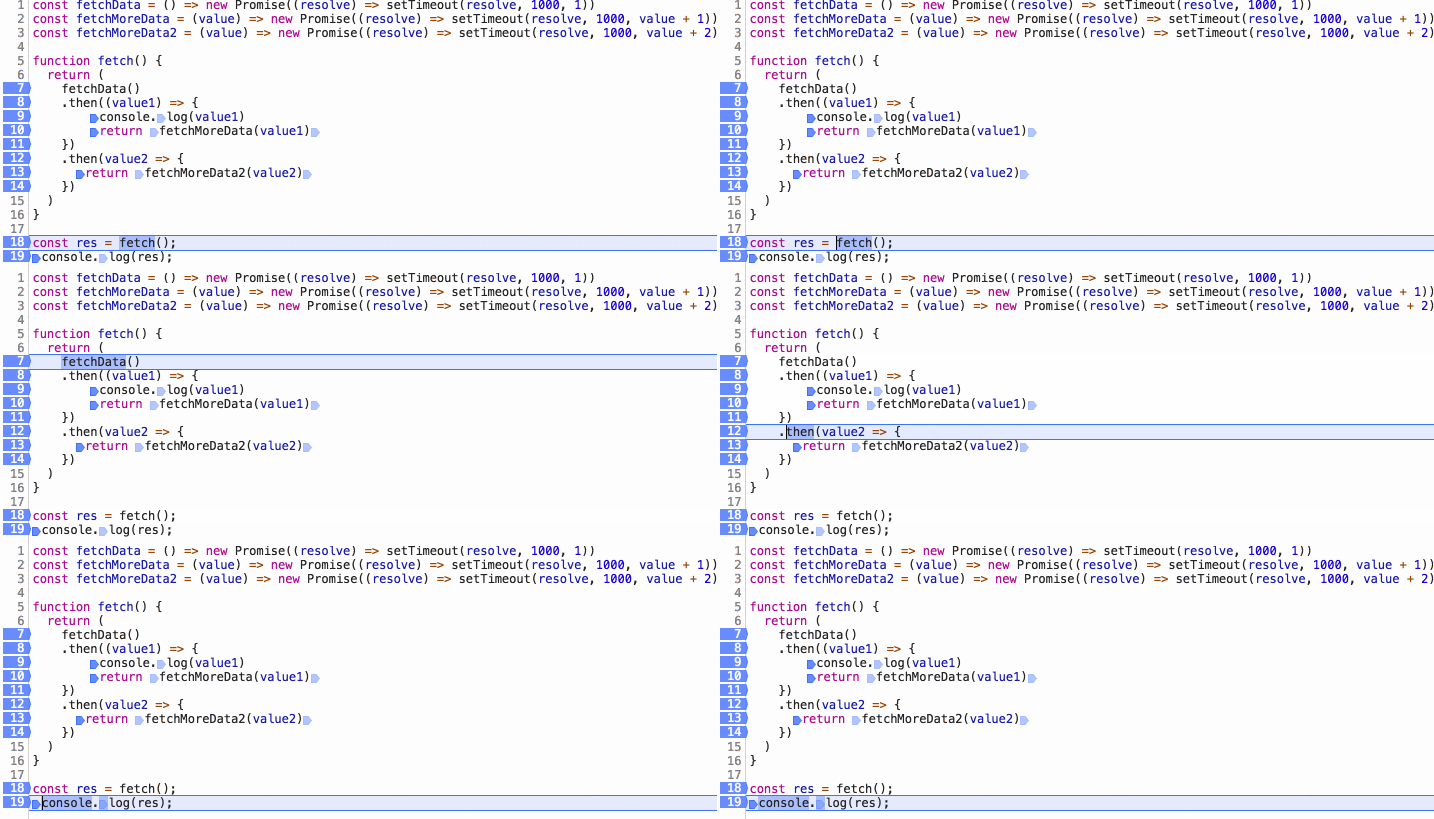
then의 코드는 비동기적으로 실행되기 때문에 포인트를 중단하면 코드가 순차적으로 실행되지 않으며, 특히 step over를 사용할 경우 then 함수가 직접 실행됩니다. 다음 then 함수를 입력하세요.
const fetchData = () => new Promise((resolve) => setTimeout(resolve, 1000, 1))
const fetchMoreData = () => new Promise((resolve) => setTimeout(resolve, 1000, 2))
const fetchMoreData2 = () => new Promise((resolve) => setTimeout(resolve, 1000, 3))

async function fetch() {
  const value1 = await fetchData()
  const value2 = await fetchMoreData(value1)
  return fetchMoreData2(value2)
};

const res = fetch();
console.log(res);

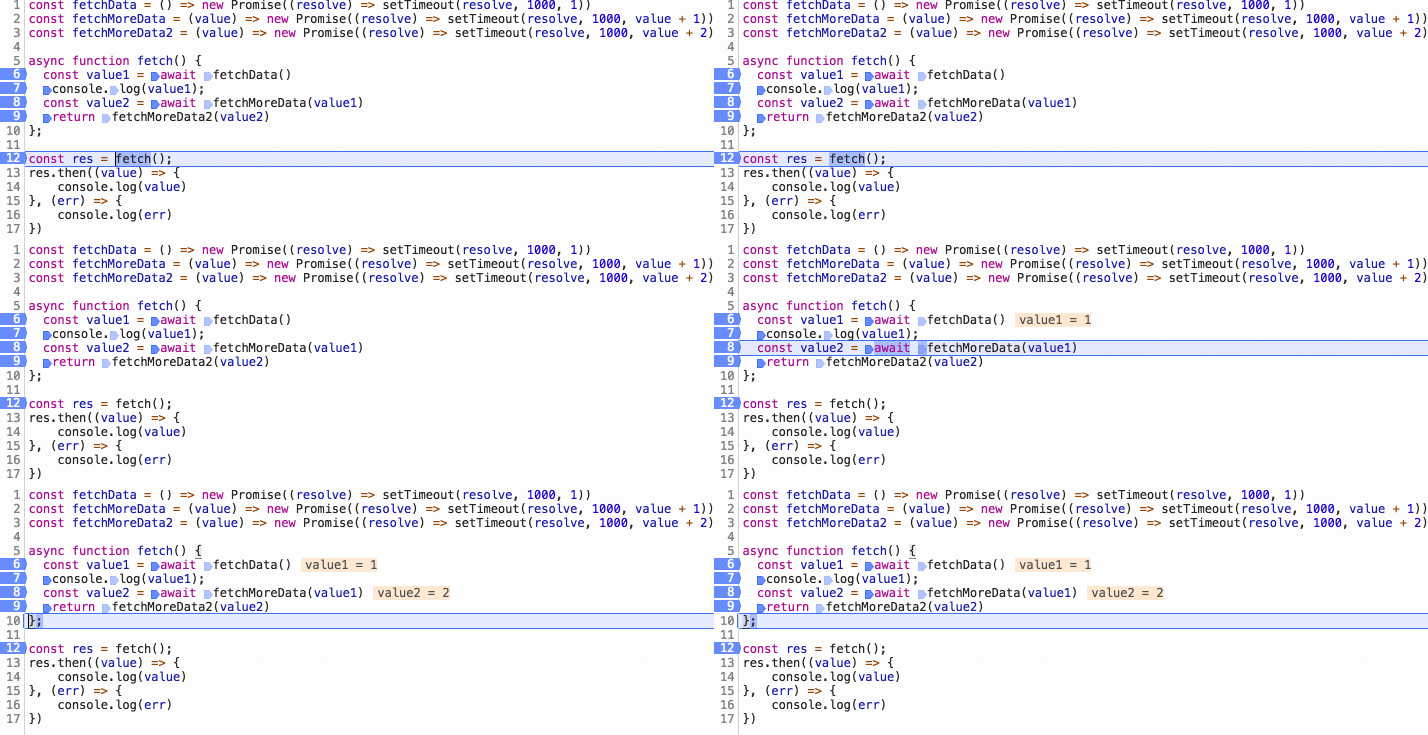
비동기를 사용하면 동기 코드를 디버깅하는 것처럼 디버깅할 수 있습니다.
async hell
async hell은 주로 개발자들이 문법적 단순함을 탐하고 병렬로 실행할 수 있는 내용을 순차적 실행으로 전환하여 성능에 영향을 미치는 것을 일컫는 말인데, 지옥이라고 표현하는 것은 좀 과장된 표현입니다...
예
For 예:
(async () => {
  const getList = await getList();
  const getAnotherList = await getAnotherList();
})();
getList() 및 getAnotherList()는 실제로 종속성이 없지만 현재 작성 방법은 간단하지만 getList()가 반환된 후에만 getAnotherList()가 실행되도록 하여 요청 시간이 두 배가 됩니다.
이 문제를 해결하기 위해 다음과 같이 변경할 수 있습니다:
(async () => {
  const listPromise = getList();
  const anotherListPromise = getAnotherList();
  await listPromise;
  await anotherListPromise;
})();
Promise.all()을 사용할 수도 있습니다:
(async () => {
  Promise.all([getList(), getAnotherList()]).then(...);
})();
예제 2
물론 위의 예는 비교적 간단하므로 다시 확장해 보겠습니다.
(async () => {
  const listPromise = await getList();
  const anotherListPromise = await getAnotherList();

  // do something

  await submit(listData);
  await submit(anotherListData);

})();
await 기능으로 인해 전체 예제에는 명확한 순서가 있지만 getList() 및 getAnotherList()는 실제로 종속성이 없으며 submit(listData) 및 submit(anotherListData)에는 종속성이 없으므로 이 예제를 어떻게 다시 작성해야 합니까? ?
기본적으로 세 단계로 나뉩니다.
1. 종속성을 확인합니다.
여기서 submit(listData)는 getList() 뒤에 와야 하고 submit(anotherListData)는 anotherListPromise() 뒤에 와야 합니다.
2. 비동기 함수에 상호 의존적인 명령문을 래핑합니다
async function handleList() {
  const listPromise = await getList();
  // ...
  await submit(listData);
}

async function handleAnotherList() {
  const anotherListPromise = await getAnotherList()
  // ...
  await submit(anotherListData)
}
3. 비동기 함수를 동시에 실행합니다
async function handleList() {
  const listPromise = await getList();
  // ...
  await submit(listData);
}

async function handleAnotherList() {
  const anotherListPromise = await getAnotherList()
  // ...
  await submit(anotherListData)
}

// 方法一
(async () => {
  const handleListPromise = handleList()
  const handleAnotherListPromise = handleAnotherList()
  await handleListPromise
  await handleAnotherListPromise
})()

// 方法二
(async () => {
  Promise.all([handleList(), handleAnotherList()]).then()
})()
성공 및 동시성
질문: URL 배열이 주어지면 인터페이스 계승을 구현하는 방법 개발 및 동시성이 있습니까?
async 후속 구현:
// 继发一
async function loadData() {
  var res1 = await fetch(url1);
  var res2 = await fetch(url2);
  var res3 = await fetch(url3);
  return "whew all done";
}
// 继发二
async function loadData(urls) {
  for (const url of urls) {
    const response = await fetch(url);
    console.log(await response.text());
  }
}
async 동시 구현:
// 并发一
async function loadData() {
  var res = await Promise.all([fetch(url1), fetch(url2), fetch(url3)]);
  return "whew all done";
}
// 并发二
async function loadData(urls) {
  // 并发读取 url
  const textPromises = urls.map(async url => {
    const response = await fetch(url);
    return response.text();
  });

  // 按次序输出
  for (const textPromise of textPromises) {
    console.log(await textPromise);
  }
}
async 오류 캡처
try catch를 사용하여 오류를 캡처할 수 있지만 여러 오류를 캡처하고 다른 처리를 수행해야 할 경우 빠르게 catch를 시도하면 다음과 같은 결과가 발생합니다. 복잡한 코드(예:
async function asyncTask(cb) {
    try {
       const user = await UserModel.findById(1);
       if(!user) return cb('No user found');
    } catch(e) {
        return cb('Unexpected error occurred');
    }

    try {
       const savedTask = await TaskModel({userId: user.id, name: 'Demo Task'});
    } catch(e) {
        return cb('Error occurred while saving task');
    }

    if(user.notificationsEnabled) {
        try {
            await NotificationService.sendNotification(user.id, 'Task Created');
        } catch(e) {
            return cb('Error while sending notification');
        }
    }

    if(savedTask.assignedUser.id !== user.id) {
        try {
            await NotificationService.sendNotification(savedTask.assignedUser.id, 'Task was created for you');
        } catch(e) {
            return cb('Error while sending notification');
        }
    }

    cb(null, savedTask);
}
) 이 오류 캡처를 단순화하려면 Wait 후에 promise 개체에 catch 함수를 추가할 수 있습니다.
// to.js
export default function to(promise) {
   return promise.then(data => {
      return [null, data];
   })
   .catch(err => [err]);
}
전체 오류 캡처 코드는 다음과 같습니다. 단순화:
import to from './to.js';

async function asyncTask() {
     let err, user, savedTask;

     [err, user] = await to(UserModel.findById(1));
     if(!user) throw new CustomerError('No user found');

     [err, savedTask] = await to(TaskModel({userId: user.id, name: 'Demo Task'}));
     if(err) throw new CustomError('Error occurred while saving task');

    if(user.notificationsEnabled) {
       const [err] = await to(NotificationService.sendNotification(user.id, 'Task Created'));
       if (err) console.error('Just log the error and continue flow');
    }
}
비동기에 대한 토론
비동기가 Generator를 대체할까요?
Generator는 원래 생성기로 사용됩니다. 비동기식 요청을 처리하기 위해 Generator를 사용하는 것은 단지 해킹된 사용법일 뿐입니다. 비동기화는 Generator를 대체할 수 있지만 async 및 Generator 자체의 두 가지 구문은 서로 다른 문제를 해결하는 데 사용됩니다.
비동기가 Promise를 대체하게 될까요?
async 함수는 Promise 객체를 반환합니다
복잡한 비동기 프로세스에 직면하면 Promise가 제공하는 all과 race가 더 유용할 것입니다
Promise 자체가 객체이므로 코드에서 임의로 전달할 수 있습니다.
Async 지원률은 아직 매우 낮습니다. Babel을 사용하더라도 컴파일 후에 약 1000줄이 추가됩니다.
위 내용은 ES6의 비동기 기능에 대한 자세한 소개(예제 포함)의 상세 내용입니다. 자세한 내용은 PHP 중국어 웹사이트의 기타 관련 기사를 참조하세요!

