CSS를 사용하여 트럭 로더의 효과를 얻는 방법
- 不言원래의
- 2018-08-13 17:55:242328검색
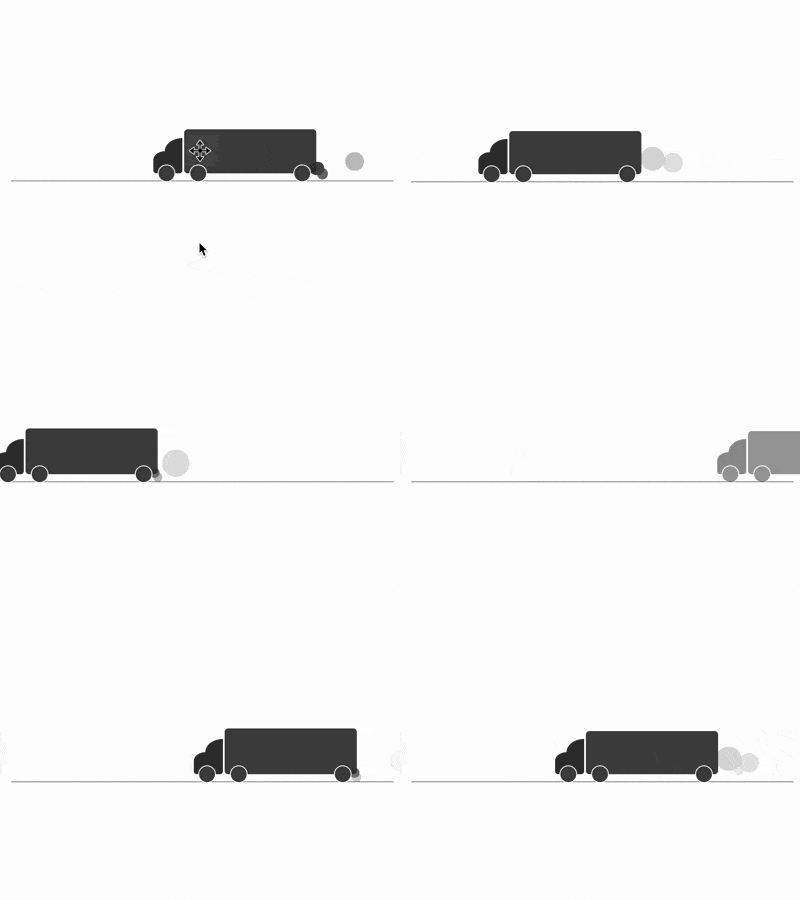
이 기사의 내용은 CSS를 사용하여 트럭 로더의 효과를 얻는 방법에 대한 것입니다. 도움이 필요한 친구들이 참고할 수 있기를 바랍니다.
효과 미리보기

돔 정의, 컨테이너는 트럭을 나타내고 포함된 2개의 하위 요소는 전면과 배기 장치를 나타냅니다.
<div>
    <span></span>
    <span></span>
</div>
<hr>
# 🎜🎜#이 중앙에 표시됩니다. 동시에 도로와 페이지 사이에 공간을 남겨두세요:
body {
    margin: 10%;
    padding-top: 10%;
}
<hr>트럭 칸 그리기: .truck {
width: 15em;
height: 5em;
font-size: 10px;
background-color: #444;
border-radius: 0.4em;
}
의사 요소를 사용하여 구획의 바퀴 그리기:
.truck {
    position: relative;
}

.truck::before,
.truck::after {
    content: '';
    position: absolute;
    box-sizing: border-box;
    width: 2em;
    height: 2em;
    background-color: #444;
    border: 0.1em solid white;
    border-radius: 50%;
    bottom: -1em;
}

.truck::before {
    left: 0.6em;
}

.truck::after {
    right: 0.6em;
}
#🎜🎜 # 자동차의 앞쪽 그리기:
.cab {
    position: absolute;
    width: 3.3em;
    height: 2.5em;
    background-color: #333;
    left: -3.5em;
    bottom: 0;
    border-radius: 40% 0 0.4em 0.4em;
}

.cab::before {
    content: '';
    position: absolute;
    width: 2em;
    height: 1.5em;
    background-color: #333;
    top: -1.5em;
    right: 0;
    border-radius: 100% 0 0 0;
}
자동차 앞쪽의 바퀴 그리기:
.cab::after {
    content: '';
    position: absolute;
    box-sizing: border-box;
    width: 2em;
    height: 2em;
    background-color: #444;
    border: 0.1em solid white;
    border-radius: 50%;
    bottom: -1em;
    left: 0.5em;
}
#🎜🎜 #배기의 초기 상태 그리기: .smoke,
.smoke::before,
.smoke::after {
content: '';
position: absolute;
width: 1em;
height: 1em;
background-color: #333;
right: -0.1em;
bottom: -0.5em;
border-radius: 50%;
}
배기 가스 애니메이션 추가:
.smoke {
    animation: smoke-1 2s infinite;
}

.smoke::before {
    animation: smoke-2 2s infinite;
}

.smoke::after {
    animation: smoke-3 2s infinite;
}

@keyframes smoke-1 {
    to {
        width: 3em;
        height: 3em;
        right: -3em;
        bottom: 0.5em;
    }
}

@keyframes smoke-2 {
    to {
        width: 2.5em;
        height: 2.5em;
        right: -6em;
        bottom: 0.8em;
    }
}

@keyframes smoke-3 {
    to {
        width: 3.5em;
        height: 3.5em;
        right: -4em;
        bottom: 0.2em;
    }
}
배기 가스 표류 효과 증가:
.smoke {
    animation:
        drift 2s infinite,
        smoke-1 2s infinite;
}

.smoke::before {
    animation:
        drift 3s infinite,
        smoke-2 3s infinite;
}

.smoke::after {
    animation:
        drift 4s infinite,
        smoke-3 4s infinite;
}

@keyframes drift {
    0%, 100% {
        filter: opacity(0);
    }

    15% {
        filter: opacity(0.9);
    }
}
#🎜🎜 # 트럭 운전 애니메이션 효과 높이기:
.truck {
    animation:
        move 5s infinite;
}

@keyframes move {
    0% {
        margin-left: 90%;
    }

    50% {
        margin-left: 45%;
    }

    100% {
        margin-left: 0;
    }

    0%, 100% {
        filter: opacity(0);
    }

    10%, 90% {
        filter: opacity(1);
    }
}
카드 운전 시 범프 애니메이션 효과 높이기:
.truck {
    animation:
        put-put 2s infinite,
        move 10s infinite;
}

@keyframes put-put {
    0% {
        margin-top: 0;
        height: 5em;
    }

    5% {
        margin-top: -0.2em;
        height: 5.2em;
    }

    20% {
        margin-top: -0.1em;
        height: 5em;
    }

    35% {
        margin-top: 0.1em;
        height: 4.9em;
    }

    40% {
        margin-top: -0.1em;
        height: 5.1em;
    }

    60% {
        margin-top: 0.1em;
        height: 4.9em;
    }

    75% {
        margin-top: 0;
        height: 5em;
    }

    80% {
        margin-top: -0.4em;
        height: 5.2em;
    }

    100% {
        margin-top: 0.1em;
        height: 4.9em;
    }
}
완료! 관련 권장 사항:
순수한 CSS를 사용하여 미소 짓고 명상하는 작은 스님을 구현하는 방법
#🎜 🎜# CSS와 D3를 사용하여 사이클로이드 스윙 효과 애니메이션을 구현하는 방법위 내용은 CSS를 사용하여 트럭 로더의 효과를 얻는 방법의 상세 내용입니다. 자세한 내용은 PHP 중국어 웹사이트의 기타 관련 기사를 참조하세요!
성명:
본 글의 내용은 네티즌들의 자발적인 기여로 작성되었으며, 저작권은 원저작자에게 있습니다. 본 사이트는 이에 상응하는 법적 책임을 지지 않습니다. 표절이나 침해가 의심되는 콘텐츠를 발견한 경우 admin@php.cn으로 문의하세요.

