MixPHP를 사용하여 API 인터페이스를 개발하는 방법
- 不言원래의
- 2018-07-11 14:11:233855검색
이 글은 MixPHP를 사용하여 API 인터페이스를 개발하는 방법을 주로 소개합니다. 이제는 필요한 친구들이 참고할 수 있도록 공유합니다.
MixPHP는 Swoole 기반의 고성능 상주 메모리 PHP입니다. 프레임워크의 고성능 특성은 API 인터페이스 개발에 매우 적합하며, MixPHP는 기존 MVC 프레임워크와 매우 유사하여 인터페이스 개발이 매우 간단합니다.
다음은 API 인터페이스 개발의 간단한 예입니다.
articles 表,通过 id에서 기사를 가져옵니다.
이 인터페이스에 액세스하는 URL:
http://www.e.com/articles/details?id=1
데이터베이스 테이블 구조는 다음과 같습니다.
CREATE TABLE `articles` (
  `id` int(10) unsigned NOT NULL AUTO_INCREMENT,
  `title` varchar(255) NOT NULL,
  `content` varchar(255) NOT NULL,
  `dateline` timestamp NOT NULL DEFAULT CURRENT_TIMESTAMP,
  PRIMARY KEY (`id`)
) ENGINE=InnoDB DEFAULT CHARSET=utf8;
1단계
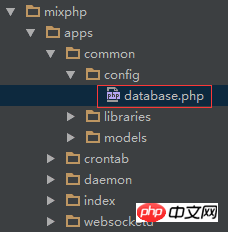
데이터베이스 구성 파일을 수정합니다. MixPHP 애플리케이션 구성 파일에서 데이터베이스에 대한 모든 정보는 common/config를 참조합니다. /database.php 파일입니다.

2단계
애플리케이션 구성 파일을 수정합니다.
응답 구성 요소의 기본 출력 형식을 JSON 형식으로 수정합니다.
404/500 오류 출력 형식을 JSON 형식으로 수정합니다.

프레임워크의 기본 404/500 응답은 웹 페이지이며 API 서비스는 일반적으로 MixPHP 자체에서 제공하는 이 요구 사항을 완료하기 위해 JSON 데이터에 응답해야 합니다. 이 구성은 구성만 수정하면 됩니다.
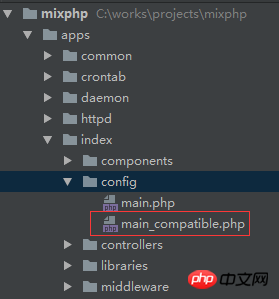
MixPHP의 기본 웹 애플리케이션에는 두 개의 구성 파일이 있습니다. 즉,
main.php: mix-httpd에 배포할 때 사용됩니다.
main_ Compatible.php: Apache/PHP-FPM에 배포할 때 사용됩니다.
API를 개발할 때는 Apache/PHP-FPM에서 개발한 다음 온라인 상태가 된 후 mix-httpd에 배포하는 것이 좋습니다. 어쨌든 전환은 원활합니다.
이제 다음과 같이 응답 키 이름 아래의 defaultFormat 키를 mixhttpError::FORMAT_JSON으로 수정합니다.
// 响应
'response' => [
    // 类路径
    'class'         => 'mix\http\compatible\Response',
    // 默认输出格式
    'defaultFormat' => mix\http\Response::FORMAT_JSON,
    // json
    'json'          => [
        // 类路径
        'class' => 'mix\http\Json',
    ],
    // jsonp
    'jsonp'         => [
        // 类路径
        'class' => 'mix\http\Jsonp',
        // callback键名
        'name'  => 'callback',
    ],
    // xml
    'xml'           => [
        // 类路径
        'class' => 'mix\http\Xml',
    ],
],
그런 다음 main_ Compatible.php 파일의 오류 키 이름 아래에 있는 형식 키를 다음과 같이 mixhttpError::FORMAT_JSON으로 수정합니다.
// 错误
'error'    => [
    // 类路径
    'class'  => 'mix\http\Error',
    // 输出格式
    'format' => mix\http\Error::FORMAT_JSON,
],
3단계
컨트롤러 생성:
apps/index/controllers/ArticlesController.php
<?php namespace apps\index\controllers;

use mix\facades\Request;
use mix\http\Controller;
use apps\index\messages\ErrorCode;
use apps\index\models\ArticlesForm;

class ArticlesController extends Controller
{

    public function actionDetails()
    {
        // 使用模型
        $model             = new ArticlesForm();
        $model->attributes = Request::get();
        $model->setScenario('actionDetails');
        if (!$model->validate()) {
            return ['code' => ErrorCode::INVALID_PARAM];
        }
        // 获取数据
        $data = $model->getDetails();
        if (!$data) {
            return ['code' => ErrorCode::ERROR_ID_UNFOUND];
        }
        // 响应
        return ['code' => ErrorCode::SUCCESS, 'data' => $data];
    }

}
오류 코드 클래스 생성:
apps/index/messages/ErrorCode.php
<?php namespace apps\index\messages;

class ErrorCode
{

    const SUCCESS = 0;
    const INVALID_PARAM = 100001;
    const ERROR_ID_UNFOUND = 200001;

}
폼 검증 모델 생성:
apps/index/models/ArticlesForm.php
<?php namespace apps\index\models;
use mix\validators\Validator;
use apps\common\models\ArticlesModel;
class ArticlesForm extends Validator
{
public $id;
// 规则
public function rules()
{
return [
'id' => ['integer', 'unsigned' => true, 'maxLength' => 10],
];
}
// 场景
public function scenarios()
{
return [
'actionDetails' => ['required' => ['id']],
];
}
// 获取详情
public function getDetails()
{
return (new ArticlesModel())->getRowById($this->id);
}
}데이터 테이블 모델 생성:
apps/common/models/ArticlesModel.php
<?php namespace apps\common\models;
use mix\facades\RDB;
class ArticlesModel
{
const TABLE = 'articles';
// 获取一行数据通过id
public function getRowById($id)
{
$sql = "SELECT * FROM `" . self::TABLE . "` WHERE id = :id";
$row = RDB::createCommand($sql)->bindParams([
'id' => $id,
])->queryOne();
return $row;
}
}위는 모든 코드 작성입니다.
4단계
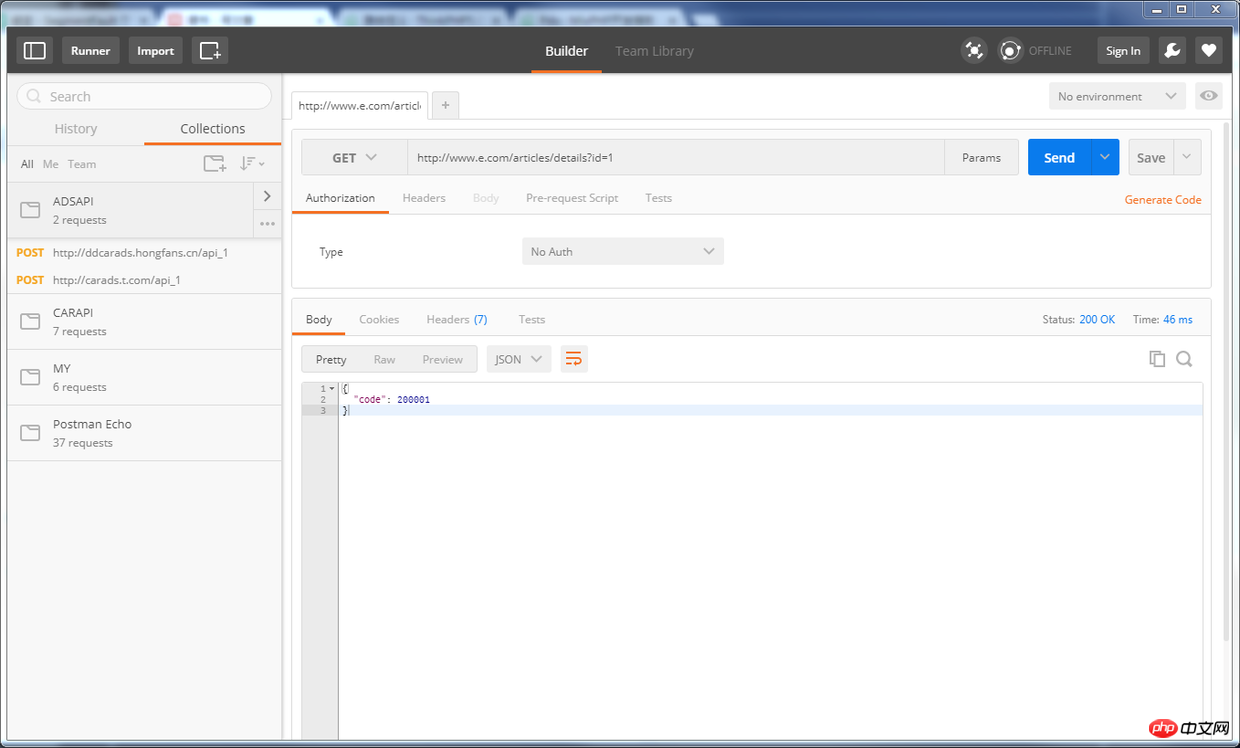
Postman을 사용하여 다음과 같이 테스트합니다.

인터페이스 개발 및 테스트가 완료되었습니다. 아주 간단하지 않나요?
위 내용은 이 글의 전체 내용입니다. 모든 분들의 학습에 도움이 되었으면 좋겠습니다. 더 많은 관련 내용은 PHP 중국어 홈페이지를 주목해주세요!
관련 추천:
위 내용은 MixPHP를 사용하여 API 인터페이스를 개발하는 방법의 상세 내용입니다. 자세한 내용은 PHP 중국어 웹사이트의 기타 관련 기사를 참조하세요!

