
React-Native의 ART 그리기 방법에 대해

- 不言원래의
- 2018-06-30 11:57:082266검색
이 글은 주로 React-Native의 ART 그리기 방법에 대한 자세한 설명을 소개합니다. 내용이 꽤 좋아서 지금 공유하고 참고하겠습니다.
Background
모바일 애플리케이션 개발 과정에서는 기본적인 2D 그래픽이나 애니메이션을 그리는 것이 필수적입니다. 그러나 Android와 iOS 모두 자체 API 솔루션이 있다는 점을 고려하면 보다 일반적으로 수용되는 기술 솔루션을 채택하는 것이 코드의 이중 플랫폼 호환성에 더 도움이 됩니다.
art는 다중 브라우저와 호환되도록 설계된 노드 스타일 CommonJS 모듈입니다. 이를 바탕으로 페이스북은 프론트엔드 SVG 라이브러리를 구현한 React.js에서 사용할 수 있도록 아트를 캡슐화하는 React-art를 개발했습니다. 하지만 React.js의 JSX 구문을 고려하면 이미 svg 태그 등을 dom에 직접 삽입하는 것을 지원합니다(물론 현재로서는 React-art 라이브러리가 사용되지 않습니다). 게다가 HTML도 있습니다. 캔버스이므로 프론트엔드에서 React-Art는 대체 불가능하지 않습니다.
그러나 모바일 측면에서는 크로스 플랫폼 요구 사항과 웹 측면의 기술 축적을 고려하여 React-Art는 그래픽 그리기를 위한 기성 솔루션이 되었습니다. React-native는 각각 0.10.0 및 0.18.0의 iOS 및 Android 플랫폼에서 React-Art에 대한 지원을 추가했습니다.
예제 코드
React.js와 React-Native의 차이점은 아래에서 설명하는 ART 획득에만 있습니다. 그러면 이 예는 웹과 모바일 단말 모두에 적용 가능합니다. 반응 아트와 함께 제공되는 공식 예제: Vector-Widget
Vector-Widget은 마우스 클릭 이벤트에 대한 회전 및 회전 가속 응답을 추가로 구현합니다. 클릭 가속은 웹 측에서는 볼 수 있지만 모바일 측에서는 유효하지 않습니다. 그 이유는 React Native가 Group에서 onMouseDown 및 onMouseUp 속성을 처리하지 않기 때문입니다. 이 문서에서는 정적 SVG 구현에 중점을 두고 일부 애니메이션 효과를 일시적으로 무시합니다.
ART
ART는 반응 네이티브에서 매우 중요한 라이브러리로, 매우 멋진 그림과 애니메이션을 가능하게 합니다. React Native에 ART를 도입하는 동안 Android에는 기본적으로 ART 라이브러리가 포함되어 있으며 IOS에서는 종속 라이브러리를 별도로 추가해야 한다는 점에 유의해야 합니다.
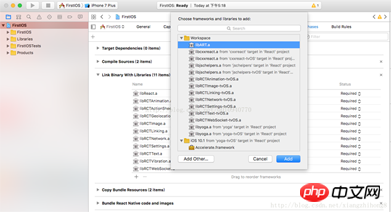
ios 종속 라이브러리 추가
1. xcode를 사용하여 React-native에서 iOS 프로젝트를 열고 '라이브러리' 디렉토리를 선택합니다 ——> 'node_modules/react -native/Libraries/ART/ART.xcodeproj' 추가;

2. 'Build Phases'를 클릭합니다. ——> ——> 왼쪽 하단의 '+'를 클릭하세요. ——> 추가할 'libART.a'를 선택하세요.
기본 구성 요소
ART에서 노출하는 구성 요소는 7개입니다. 이 문서에서는 일반적으로 사용되는 4가지 구성 요소인 Surface, Group, Shape 및 Text를 소개합니다.
Surface - 다른 요소의 컨테이너인 렌더링 가능한 직사각형 영역
Group - 여러 모양, 텍스트 및 기타 그룹을 보유할 수 있음
Shape - 모양 정의, 채울 수 있음
텍스트 - 텍스트 모양 정의
속성
Surface
width: 렌더링 영역의 너비
height: 렌더링 영역의 높이를 정의합니다
Shape
- d : 도면 경로 정의
- 획: 획 색상
- strokeWidth: 획 너비
- 스트로크Dash: 점선 정의
- fill: 채우기 색상
- fun t: 글꼴 스타일, 글꼴 정의, 크기, 굵게 표시 여부(예: 굵게 표시) 35px Heiti SC
- moveTo(x,y): 좌표로 이동(x,y)
- lineTo(x,y): 연결 선을 (x, y)로
- arc() : 호 그리기
- close() : 공백 닫기
직선 그리기
import React from 'react'
import {
View,
ART
} from 'react-native'
export default class Line extends React.Component{
render(){
const path = ART.Path();
path.moveTo(1,1); //将起始点移动到(1,1) 默认(0,0)
path.lineTo(300,1); //连线到目标点(300,1)
return(
<View style={this.props.style}>
<ART.Surface width={300} height={2}>
<ART.Shape d={path} stroke="#000000" strokeWidth={1} />
</ART.Surface>
</View>
)
}
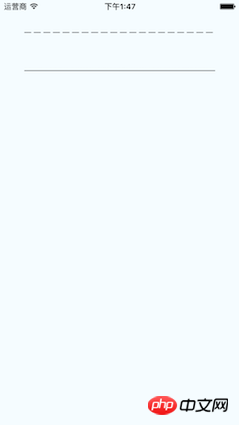
} 점선 그리기
StrokeDash의 매개변수를 이해하세요.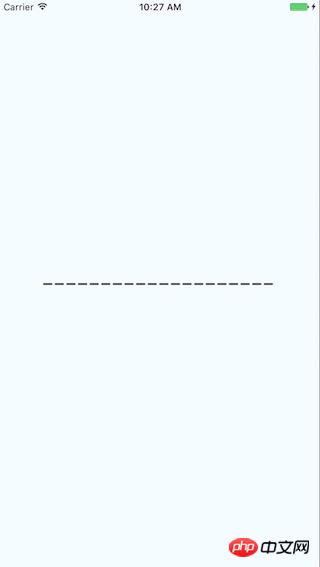
import React from 'react'
import {
  View,
  ART
} from 'react-native'

const {Surface, Shape, Path} = ART;

export default class DashLine extends React.Component{

  render(){

    const path = Path()
      .moveTo(1,1)
      .lineTo(300,1);

    return(
      <View style={this.props.style}>
        <Surface width={300} height={2}>
          <Shape d={path} stroke="#000000" strokeWidth={2} strokeDash={[10,5]}/>
        </Surface>
      </View>
    )
  }
}
직사각형 그리기
첫 번째 그리기 세 변을 lineTo로 통과하고 close를 사용하여 네 번째 변을 연결합니다. 채우기는 색상 채우기를 수행합니다.import React from 'react'
import {
View,
ART
} from 'react-native'
const {Surface, Shape, Path} = ART;
export default class Rect extends React.Component{
render(){
const path = new Path()
.moveTo(1,1)
.lineTo(1,99)
.lineTo(99,99)
.lineTo(99,1)
.close();
return(
<View style={this.props.style}>
<Surface width={100} height={100}>
<Shape d={path} stroke="#000000" fill="#892265" strokeWidth={1} />
</Surface>
</View>
)
}
}
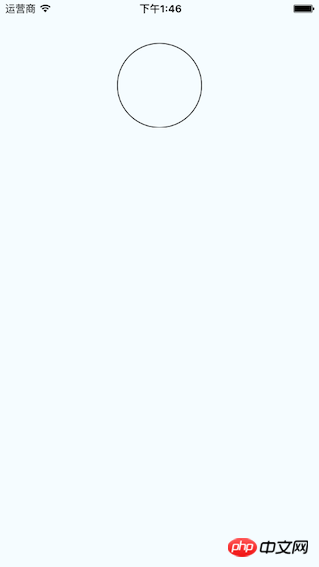
绘圆
了解arc(x,y,radius)的使用, 终点坐标距离起点坐标的相对距离。
import React from 'react'
import {
  View,
  ART
} from 'react-native'

const {Surface, Shape, Path} = ART;

export default class Circle extends React.Component{

  render(){

    const path = new Path()
      .moveTo(50,1)
      .arc(0,99,25)
      .arc(0,-99,25)
      .close();


    return(
      <View style={this.props.style}>
        <Surface width={100} height={100}>
          <Shape d={path} stroke="#000000" strokeWidth={1}/>
        </Surface>
      </View>
    )
  }
}
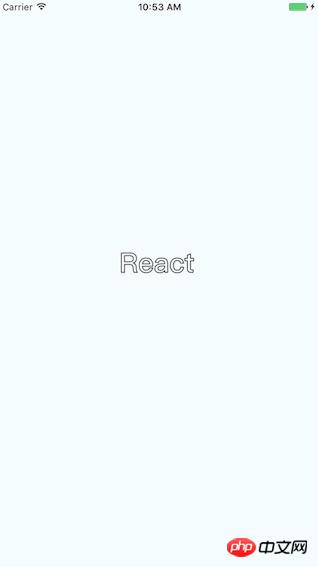
绘制文字
了解funt属性的使用,规则是“粗细 字号 字体”
注意: 字体应该是支持path属性的,应该是实现bug并没有不生效。 Android通过修改源码是可以解决的,IOS没看源码。
import React, {Component} from 'react';
import {
AppRegistry,
StyleSheet,
ART,
View
} from 'react-native';
const {Surface, Text, Path} = ART;
export default class ArtTextView extends Component {
render() {
return (
<View style={styles.container}>
<Surface width={100} height={100}>
<Text strokeWidth={1} stroke="#000" font="bold 35px Heiti SC" path={new Path().moveTo(40,40).lineTo(99,10)} >React</Text>
</Surface>
</View>
);
}
}
const styles = StyleSheet.create({
container: {
flex: 1,
justifyContent: 'center',
alignItems: 'center',
backgroundColor: '#F5FCFF',
},
});
绘制扇形
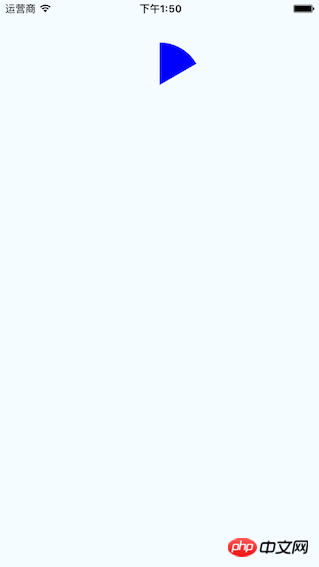
在这里需要使用arc做路径绘制。
Wedge.js
import React, { Component, PropTypes } from 'react';
import { ART } from 'react-native';
const { Shape, Path } = ART;
/**
* Wedge is a React component for drawing circles, wedges and arcs. Like other
* ReactART components, it must be used in a <Surface>.
*/
export default class Wedge extends Component<void, any, any> {
static propTypes = {
outerRadius: PropTypes.number.isRequired,
startAngle: PropTypes.number.isRequired,
endAngle: PropTypes.number.isRequired,
originX: PropTypes.number.isRequired,
originY: PropTypes.number.isRequired,
innerRadius: PropTypes.number,
};
constructor(props : any) {
super(props);
(this:any).circleRadians = Math.PI * 2;
(this:any).radiansPerDegree = Math.PI / 180;
(this:any)._degreesToRadians = this._degreesToRadians.bind(this);
}
/**
* _degreesToRadians(degrees)
*
* Helper function to convert degrees to radians
*
* @param {number} degrees
* @return {number}
*/
_degreesToRadians(degrees : number) : number {
if (degrees !== 0 && degrees % 360 === 0) { // 360, 720, etc.
return (this:any).circleRadians;
}
return degrees * (this:any).radiansPerDegree % (this:any).circleRadians;
}
/**
* _createCirclePath(or, ir)
*
* Creates the ReactART Path for a complete circle.
*
* @param {number} or The outer radius of the circle
* @param {number} ir The inner radius, greater than zero for a ring
* @return {object}
*/
_createCirclePath(or : number, ir : number) : Path {
const path = new Path();
path.move(0, or)
.arc(or * 2, 0, or)
.arc(-or * 2, 0, or);
if (ir) {
path.move(or - ir, 0)
.counterArc(ir * 2, 0, ir)
.counterArc(-ir * 2, 0, ir);
}
path.close();
return path;
}
/**
* _createArcPath(sa, ea, ca, or, ir)
*
* Creates the ReactART Path for an arc or wedge.
*
* @param {number} startAngle The starting degrees relative to 12 o'clock
* @param {number} endAngle The ending degrees relative to 12 o'clock
* @param {number} or The outer radius in pixels
* @param {number} ir The inner radius in pixels, greater than zero for an arc
* @return {object}
*/
_createArcPath(originX : number, originY : number, startAngle : number, endAngle : number, or : number, ir : number) : Path {
const path = new Path();
// angles in radians
const sa = this._degreesToRadians(startAngle);
const ea = this._degreesToRadians(endAngle);
// central arc angle in radians
const ca = sa > ea ? (this:any).circleRadians - sa + ea : ea - sa;
// cached sine and cosine values
const ss = Math.sin(sa);
const es = Math.sin(ea);
const sc = Math.cos(sa);
const ec = Math.cos(ea);
// cached differences
const ds = es - ss;
const dc = ec - sc;
const dr = ir - or;
// if the angle is over pi radians (180 degrees)
// we will need to let the drawing method know.
const large = ca > Math.PI;
// TODO (sema) Please improve theses comments to make the math
// more understandable.
//
// Formula for a point on a circle at a specific angle with a center
// at (0, 0):
// x = radius * Math.sin(radians)
// y = radius * Math.cos(radians)
//
// For our starting point, we offset the formula using the outer
// radius because our origin is at (top, left).
// In typical web layout fashion, we are drawing in quadrant IV
// (a.k.a. Southeast) where x is positive and y is negative.
//
// The arguments for path.arc and path.counterArc used below are:
// (endX, endY, radiusX, radiusY, largeAngle)
path.move(or + or * ss, or - or * sc) // move to starting point
.arc(or * ds, or * -dc, or, or, large) // outer arc
.line(dr * es, dr * -ec); // width of arc or wedge
if (ir) {
path.counterArc(ir * -ds, ir * dc, ir, ir, large); // inner arc
}
return path;
}
render() : any {
// angles are provided in degrees
const startAngle = this.props.startAngle;
const endAngle = this.props.endAngle;
// if (startAngle - endAngle === 0) {
// return null;
// }
// radii are provided in pixels
const innerRadius = this.props.innerRadius || 0;
const outerRadius = this.props.outerRadius;
const { originX, originY } = this.props;
// sorted radii
const ir = Math.min(innerRadius, outerRadius);
const or = Math.max(innerRadius, outerRadius);
let path;
if (endAngle >= startAngle + 360) {
path = this._createCirclePath(or, ir);
} else {
path = this._createArcPath(originX, originY, startAngle, endAngle, or, ir);
}
return <Shape {...this.props} d={path} />;
}
}
示例代码:
import React from 'react'
import {
  View,
  ART
} from 'react-native'

const {Surface} = ART;
import Wedge from './Wedge'

export default class Fan extends React.Component{

  render(){

    return(
      <View style={this.props.style}>
        <Surface width={100} height={100}>
          <Wedge
           outerRadius={50}
           startAngle={0}
           endAngle={60}
           originX={50}
           originY={50}
           fill="blue"/>

        </Surface>
      </View>
    )
  }
}
综合示例
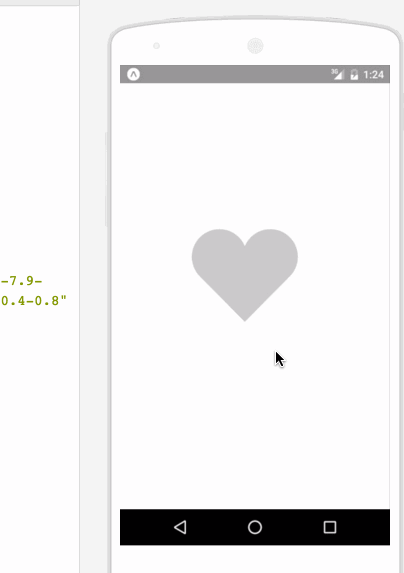
相关代码:
/**
* Sample React Native App
* https://github.com/facebook/react-native
* @flow
*/
import React, {
Component
}from 'react';
import {
ART as Art,
StyleSheet,
View,
Dimensions,
TouchableWithoutFeedback,
Animated
} from 'react-native';
var HEART_SVG = "M130.4-0.8c25.4 0 46 20.6 46 46.1 0 13.1-5.5 24.9-14.2 33.3L88 153.6 12.5 77.3c-7.9-8.3-12.8-19.6-12.8-31.9 0-25.5 20.6-46.1 46-46.2 19.1 0 35.5 11.7 42.4 28.4C94.9 11 111.3-0.8 130.4-0.8"
var HEART_COLOR = 'rgb(226,38,77,1)';
var GRAY_HEART_COLOR = "rgb(204,204,204,1)";
var FILL_COLORS = [
'rgba(221,70,136,1)',
'rgba(212,106,191,1)',
'rgba(204,142,245,1)',
'rgba(204,142,245,1)',
'rgba(204,142,245,1)',
'rgba(0,0,0,0)'
];
var PARTICLE_COLORS = [
'rgb(158, 202, 250)',
'rgb(161, 235, 206)',
'rgb(208, 148, 246)',
'rgb(244, 141, 166)',
'rgb(234, 171, 104)',
'rgb(170, 163, 186)'
]
getXYParticle = (total, i, radius) => {
var angle = ( (2 * Math.PI) / total ) * i;
var x = Math.round((radius * 2) * Math.cos(angle - (Math.PI / 2)));
var y = Math.round((radius * 2) * Math.sin(angle - (Math.PI / 2)));
return {
x: x,
y: y,
}
}
getRandomInt = (min, max) => {
return Math.floor(Math.random() * (max - min)) + min;
}
shuffleArray = (array) => {
for (var i = array.length - 1; i > 0; i--) {
var j = Math.floor(Math.random() * (i + 1));
var temp = array[i];
array[i] = array[j];
array[j] = temp;
}
return array;
}
var {
Surface,
Group,
Shape,
Path
} = Art;
//使用Animated.createAnimatedComponent对其他组件创建对话
//创建一个灰色的新型图片
var AnimatedShape = Animated.createAnimatedComponent(Shape);
var {
width: deviceWidth,
height: deviceHeight
} = Dimensions.get('window');
export default class ArtAnimView extends Component {
constructor(props) {
super(props);
this.state = {
animation: new Animated.Value(0)
};
}
explode = () => {
Animated.timing(this.state.animation, {
duration: 1500,
toValue: 28
}).start(() => {
this.state.animation.setValue(0);
this.forceUpdate();
});
}
getSmallExplosions = (radius, offset) => {
return [0, 1, 2, 3, 4, 5, 6].map((v, i, t) => {
var scaleOut = this.state.animation.interpolate({
inputRange: [0, 5.99, 6, 13.99, 14, 21],
outputRange: [0, 0, 1, 1, 1, 0],
extrapolate: 'clamp'
});
var moveUp = this.state.animation.interpolate({
inputRange: [0, 5.99, 14],
outputRange: [0, 0, -15],
extrapolate: 'clamp'
});
var moveDown = this.state.animation.interpolate({
inputRange: [0, 5.99, 14],
outputRange: [0, 0, 15],
extrapolate: 'clamp'
});
var color_top_particle = this.state.animation.interpolate({
inputRange: [6, 8, 10, 12, 17, 21],
outputRange: shuffleArray(PARTICLE_COLORS)
})
var color_bottom_particle = this.state.animation.interpolate({
inputRange: [6, 8, 10, 12, 17, 21],
outputRange: shuffleArray(PARTICLE_COLORS)
})
var position = getXYParticle(7, i, radius)
return (
<Group
x={position.x + offset.x }
y={position.y + offset.y}
rotation={getRandomInt(0, 40) * i}
>
<AnimatedCircle
x={moveUp}
y={moveUp}
radius={15}
scale={scaleOut}
fill={color_top_particle}
/>
<AnimatedCircle
x={moveDown}
y={moveDown}
radius={8}
scale={scaleOut}
fill={color_bottom_particle}
/>
</Group>
)
}, this)
}
render() {
var heart_scale = this.state.animation.interpolate({
inputRange: [0, .01, 6, 10, 12, 18, 28],
outputRange: [1, 0, .1, 1, 1.2, 1, 1],
extrapolate: 'clamp'
});
var heart_fill = this.state.animation.interpolate({
inputRange: [0, 2],
outputRange: [GRAY_HEART_COLOR, HEART_COLOR],
extrapolate: 'clamp'
})
var heart_x = heart_scale.interpolate({
inputRange: [0, 1],
outputRange: [90, 0],
})
var heart_y = heart_scale.interpolate({
inputRange: [0, 1],
outputRange: [75, 0],
})
var circle_scale = this.state.animation.interpolate({
inputRange: [0, 1, 4],
outputRange: [0, .3, 1],
extrapolate: 'clamp'
});
var circle_stroke_width = this.state.animation.interpolate({
inputRange: [0, 5.99, 6, 7, 10],
outputRange: [0, 0, 15, 8, 0],
extrapolate: 'clamp'
});
var circle_fill_colors = this.state.animation.interpolate({
inputRange: [1, 2, 3, 4, 4.99, 5],
outputRange: FILL_COLORS,
extrapolate: 'clamp'
})
var circle_opacity = this.state.animation.interpolate({
inputRange: [1, 9.99, 10],
outputRange: [1, 1, 0],
extrapolate: 'clamp'
})
return (
<View style={styles.container}>
<TouchableWithoutFeedback onPress={this.explode} style={styles.container}>
<View style={{transform: [{scale: .8}]}}>
<Surface width={deviceWidth} height={deviceHeight}>
<Group x={75} y={200}>
<AnimatedShape
d={HEART_SVG}
x={heart_x}
y={heart_y}
scale={heart_scale}
fill={heart_fill}
/>
<AnimatedCircle
x={89}
y={75}
radius={150}
scale={circle_scale}
strokeWidth={circle_stroke_width}
stroke={FILL_COLORS[2]}
fill={circle_fill_colors}
opacity={circle_opacity}
/>
{this.getSmallExplosions(75, {x: 89, y: 75})}
</Group>
</Surface>
</View>
</TouchableWithoutFeedback>
</View>
);
}
};
class AnimatedCircle extends Component {
render() {
var radius = this.props.radius;
var path = Path().moveTo(0, -radius)
.arc(0, radius * 2, radius)
.arc(0, radius * -2, radius)
.close();
return React.createElement(AnimatedShape);
}
}
var styles = StyleSheet.create({
container: {
flex: 1,
}
});
以上就是本文的全部内容,希望对大家的学习有所帮助,更多相关内容请关注PHP中文网!
相关推荐:
위 내용은 React-Native의 ART 그리기 방법에 대해의 상세 내용입니다. 자세한 내용은 PHP 중국어 웹사이트의 기타 관련 기사를 참조하세요!