캔버스 링 카운트다운 구성요소를 구현하는 방법
- 不言원래의
- 2018-06-14 16:08:341931검색
이 글은 주로 캔버스 링 카운트다운 컴포넌트의 샘플 코드를 소개하고 있습니다. 내용이 꽤 괜찮아서 참고용으로 올려보겠습니다.
이 글에서는 캔버스 링 카운트다운 컴포넌트의 샘플 코드를 소개하고 자세한 내용을 공유합니다.
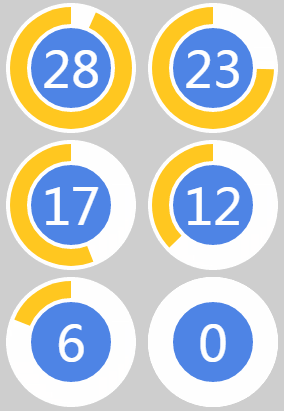
효과는 그림 1과 같습니다.

캔버스 링 카운트다운 컴포넌트
캔버스 링 카운트다운은 캔버스 기반의 카운트다운입니다. 모바일측에서는
캔버스 링 카운트다운 다운로드 주소를 사용하는 것을 권장합니다.
1.
1.html 코드
ID 속성을 사용할 수 있습니다.
<canvas id="canvas"></canvas>
2. process.js 파일을 소개합니다.
페이지 re<script src="js/process.js"></script>3 초기화 매개변수 를
<script>
    window.onload = function () {
        let ctd = new Countdown();
        ctd.init();
    };

</script>
할 수 있습니다. 2, 설정 매개변수는 설명합니다. 다음 매개변수는 필요하지 않으며 특정 요구에 따라 구성할 수 있습니다.
window.onload = function () {
        let ctd = new Countdown();
        ctd.init({
            id: "canvas",         // ID,canvas一定要有ID属性
            size: 130,            // 绘制圆形的最大尺寸,宽=高
            borderWidth: 4,       // 边框宽度
            borderColor:"#fff",   // 边框颜色
            outerColor:"#fff",    // 最外层底圆颜色
            scheduleColor:"#fff", // 进度条动画颜色
            fontColor: "#fff",    // 字体颜色
            ringColor: "#ffc720", // 进度条环形颜色
            innerColor: "#4e84e5",// 最内圆底色
            fontSize: 50,
            time: 5
        });
    };
3, 샘플 코드html
Title
<script src="js/process.js"></script>
<script>
window.onload = function () {
let ctd = new Countdown();
ctd.init();
};
</script>
js
rreee
four, 추가 - 캔버스 준비 작업캔버스에는 실제로가 없습니다. 너무 신비스러워서 다른 HTML 태그와 마찬가지로 H5 태그에 지나지 않습니다.
/**
 * Created by 谭瞎 on 2018/3/15.
 */

function Countdown() {
    // 设置默认参数
    this.settings = {
        id: "canvas",         // ID,canvas一定要有ID属性
        size: 130,            // 绘制圆形的最大尺寸,宽=高
        borderWidth: 4,       // 边框宽度
        borderColor:"#fff",   // 边框颜色
        outerColor:"#fff",    // 最外层底圆颜色
        scheduleColor:"#fff", // 进度条动画颜色
        fontColor: "#fff",    // 字体颜色
        ringColor: "#ffc720", // 进度条环形颜色
        innerColor: "#4e84e5",// 最内圆底色
        fontSize: 50,
        time: 5
    }
}

Countdown.prototype.init = function (opt) {
    this.obj = document.getElementById(this.settings.id);
    this.obj.width = this.settings.size;
    this.obj.height = this.settings.size;
    this.ctx = this.obj.getContext("2d");
    extend(this.settings, opt);
    this.countdown();
};

// 绘制底色
Countdown.prototype.drawBackground = function () {
    this.drawCircle(0, 360, 0, this.settings.outerColor);
};
// 绘制进度条动画背景
Countdown.prototype.drawProcess = function () {
    this.drawCircle(0, 360, 4, this.settings.ringColor);
};

// 绘制倒计时
Countdown.prototype.drawInner = function () {
    this.drawCircle(0, 360, 23, this.settings.innerColor);
    this.strokeBorder(this.settings.borderWidth);
};

// 绘制进度条动画
Countdown.prototype.drawAnimate = function () {
    // 旋转的角度
    let deg = Math.PI / 180;
    let v = schedule * 360,
        startAng = -90,
        endAng = -90 + v;

    this.ctx.beginPath();
    this.ctx.moveTo(this.settings.size / 2, this.settings.size / 2);
    this.ctx.arc(this.settings.size / 2, this.settings.size / 2, this.settings.size / 2 -3, startAng * deg, endAng * deg, false);
    this.ctx.fillStyle = this.settings.scheduleColor;
    this.ctx.fill();
    this.ctx.closePath();

};
// 绘制边框
Countdown.prototype.strokeBorder = function (borderWidth) {
    this.ctx.lineWidth = borderWidth;
    this.ctx.strokeStyle = this.settings.borderColor;
    this.ctx.stroke();
};
// 绘制文字
Countdown.prototype.strokeText = function (text) {
    this.ctx.textAlign = "center";
    this.ctx.textBaseline = "middle";
    this.ctx.font = this.settings.fontSize+"px"+ " microsoft yahei";
    this.ctx.fillStyle = this.settings.fontColor;
    this.ctx.fillText(text, this.settings.size / 2, this.settings.size / 2);
};
// 绘制圆
Countdown.prototype.drawCircle = function (startAng, endAng, border, fillColor) {
    let deg = Math.PI / 180;
    this.ctx.beginPath();
    this.ctx.arc(this.settings.size / 2, this.settings.size / 2, this.settings.size / 2 -border, startAng * deg, endAng * deg, false);
    this.ctx.fillStyle = fillColor;
    this.ctx.fill();
    this.ctx.closePath();
};
// 进度条动画
Countdown.prototype.countdown = function () {
    let oldTime = +new Date();
    timer = setInterval(() => {
        let allMs = this.settings.time * 1000,// 如30*1000=30 000ms
            currentTime = +new Date();
        // 步长=(当前的时间-过去的时间)/总秒数
        schedule = (currentTime - oldTime) / allMs;
        this.schedule = schedule;

        this.drawAll(schedule);
        if (currentTime - oldTime >= allMs) {
            // 重绘
            this.drawBackground();
            this.drawProcess();
            this.drawAnimate();
            this.drawInner();
            this.strokeText(0);
            clearInterval(timer);
        }
    }, 100);
};

// 绘制所有
Countdown.prototype.drawAll = function (schedule) {
    schedule = schedule >= 1 ? 1 : schedule;
    let text = parseInt(this.settings.time * (1 - schedule)) + 1;
    // 清除画布
    this.ctx.clearRect(0, 0, this.settings.size, this.settings.size);
    this.drawBackground();
    this.drawProcess();
    this.drawAnimate();
    this.drawInner();
    this.strokeText(text);
};

// 对象拷贝
function extend(obj1,obj2){
    for(let attr in obj2){
        obj1[attr] = obj2[attr];
    }
}
주의하세요. 처음에 캔버스의 너비와 높이를 설정하는 것이 가장 좋으며(너비와 높이를 설정하지 않으면 브라우저는 기본적으로 캔버스 크기를 너비 300픽셀, 높이 100픽셀로 설정합니다) CSS를 사용하여 설정할 수 없습니다. (늘어납니다.) 캔버스 태그 안에 직접 작성하는 것이 좋습니다:
<canvas id="canvas"></canvas>캔버스 자체에는 그리기 기능이 없으며 모든 그리기 작업은 js를 통해 구현됩니다. 일반적으로 우리는 js에서 캔버스를 작동시키기 위해 getElementById를 사용합니다. 즉, 캔버스에 ID를 설정해야 합니다.
<canvas id="canvas" width="130" height="130"></canvas>1. 브러시를 준비한 후 링을 시작할 수 있습니다. 실제로는 반지름이 다른 동심원 모양입니다. 중심 좌표는 (크기/2, 크기/2)입니다. 먼저 흰색 배경에 반지름이 크기/2인 가장 큰 원을 그립니다.
var c = document.getElementById("canvas");
var ctx = c.getContext("2d");
2. 두 번째 노란색 하단 원 그리기를 시작합니다. 원의 중심도 (크기/2, 크기/2)이지만 반경은 흰색 하단 원보다 4px 작습니다. 노란색 하단 원의 반경은 (크기/2-4)
let deg = Math.PI / 180;
// beginPath()可以做到隔离路径绘制效果的作用,防止之前的效果被污染。
ctx.beginPath();

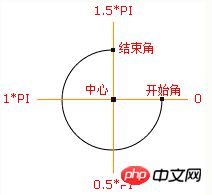
// tcx.arc(圆心X,圆心Y,半径,起始角度,结束角度,顺逆时针);
ctx.arc(size / 2, size / 2, size / 2, 0* deg, 360 * deg, false);
ctx.fillStyle = "#fff";
ctx.fill();
ctx.closePath();
3입니다. 마찬가지로 원의 중심은 (크기/2, 크기/2)입니다. ), 반경은 (size-23)이고 4px 흰색 테두리가 추가됩니다. 
let deg = Math.PI / 180;
// beginPath()可以做到隔离路径绘制效果的作用,防止之前的效果被污染。
ctx.beginPath();

// tcx.arc(圆心X,圆心Y,半径,起始角度,结束角度,顺逆时针);
ctx.arc(size / 2, size / 2, size / 2-4, 0* deg, 360 * deg, false);
ctx.fillStyle = "#fff";
ctx.fill();
ctx.closePath();
4. 세로 중앙에 텍스트를 그립니다. 
let deg = Math.PI / 180;
// beginPath()可以做到隔离路径绘制效果的作用,防止之前的效果被污染。
ctx.beginPath();

// tcx.arc(圆心X,圆心Y,半径,起始角度,结束角度,顺逆时针);
ctx.arc(size / 2, size / 2, size / 2-23, 0* deg, 360 * deg, false);
ctx.fillStyle = "#fff";
ctx.fill();
ctx.closePath();

// 白色边框
ctx.lineWidth = 4;
ctx.strokeStyle = #fff;
ctx.stroke();
5. 사실 흰색 원을 그리는 과정이기도 합니다. 노란색 진행 표시줄을 천천히 덮는 과정입니다. 이때 흰색 원이 먼저 그려지면 흰색 애니메이션 원이 덮이게 됩니다. , 마지막 파란색 원이 그려집니다. 
ctx.textAlign = "center";
ctx.textBaseline = "middle";
ctx.fillStyle = "#fff";
// ctx.fillText(文字,相对画布的X坐标,相对画布的Y坐标)
ctx.fillText(30, size / 2, size / 2);
6. 다음으로 애니메이션을 숫자와 연결하여 가장 빠른 시간을 얻은 다음 총 시간을 나누어야 합니다. 키. 백분율은 흰색 애니메이션 원이 그려지는 숫자와 각도의 변화를 결정합니다. 
let deg = Math.PI / 180;
ctx.beginPath();
// tcx.arc(圆心X,圆心Y,半径,起始角度,结束角度,顺逆时针);
ctx.arc(size / 2, size / 2, size / 2-4, 0* deg, 360 * deg, false);
ctx.fillStyle = "#fff";
ctx.fill();
ctx.closePath();
프로세스 중심 버전
Countdown.prototype.countdown = function () {
    let oldTime = +new Date();// 过去的时间:1522136419291
    timer = setInterval(() => {
        let currentTime = +new Date();// 现在的时间:1522136419393
        let allMs = this.settings.time * 1000;// 总时间豪秒数:如30*1000=30 000ms
        schedule = (currentTime - oldTime) / allMs;// 绘制百分比:(1522136419393-1522136419291)/30000=0.0204
        this.schedule = schedule;
        this.drawAll(schedule);
        if (currentTime - oldTime >= allMs) {
            // 重绘
            this.drawBackground();
            this.drawProcess();
            this.drawAnimate();
            this.drawInner();
            this.strokeText(0);
            clearInterval(timer);
        }
    }, 10);
};

// 绘制所有
Countdown.prototype.drawAll = function (schedule) {
    schedule = schedule >= 1 ? 1 : schedule;
    let text = parseInt(this.settings.time * (1 - schedule)) + 1;
    // 清除画布
    this.ctx.clearRect(0, 0, this.settings.size, this.settings.size);
    this.drawBackground();
    this.drawProcess();
    this.drawAnimate();
    this.drawInner();
    this.strokeText(text);
};

// 绘制进度条动画
Countdown.prototype.drawAnimate = function () {
    // 旋转的角度
    let deg = Math.PI / 180;
    let v = schedule * 360,
        startAng = -90,// 开始角度
        endAng = -90 + v;// 结束角度

    this.ctx.beginPath();
    this.ctx.moveTo(this.settings.size / 2, this.settings.size / 2);
    this.ctx.arc(this.settings.size / 2, this.settings.size / 2, this.settings.size / 2 - 3, startAng * deg, endAng * deg, false);
    this.ctx.fillStyle = this.settings.scheduleColor;
    this.ctx.fill();
    this.ctx.closePath();
};
위 내용은 모두의 학습에 도움이 되기를 바랍니다. PHP 중국어 웹사이트! 관련 추천:
캔버스를 사용하여 픽셀을 조작하는 방법
위 내용은 캔버스 링 카운트다운 구성요소를 구현하는 방법의 상세 내용입니다. 자세한 내용은 PHP 중국어 웹사이트의 기타 관련 기사를 참조하세요!

