
element-ui를 구축하는 방법(자세한 튜토리얼)
- 亚连원래의
- 2018-06-05 09:40:4621487검색
아래에서는 Element-UI 구축을 위한 Vue 프런트엔드 엔지니어링 작업의 예를 공유하겠습니다. 이는 좋은 참고 가치가 있으며 모든 사람에게 도움이 되기를 바랍니다.
1. npm 이미지 설치
(1) node.js를 다운로드하고 node.js의 환경 변수를 구성합니다.
PATH 환경 변수가 Node.js로 구성되어 있는지 확인하고 시작을 클릭합니다=》 실행=》 "cmd" 입력 => "path" 명령 입력
Node.js 버전 확인
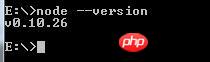
명령 창에 npm install -g cnpm –registry=https://registry.npm을 입력하세요. taobao.org
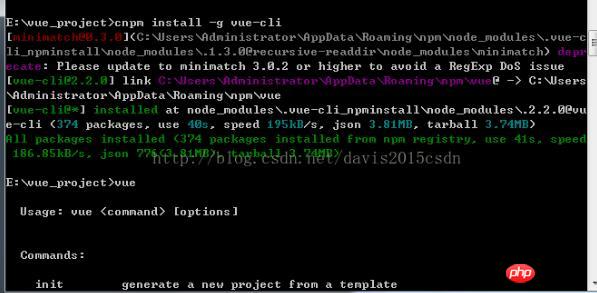
2. 전역 vue-cli 설치
(1) npm install -g vue-cli를 누르고 Enter를 눌러 설치가 성공했는지 확인합니다. vue 정보에 설치가 성공했다는 메시지가 표시됩니다
3. 전역적으로 vue-cli 설치
(1) npm install --global vue-cli
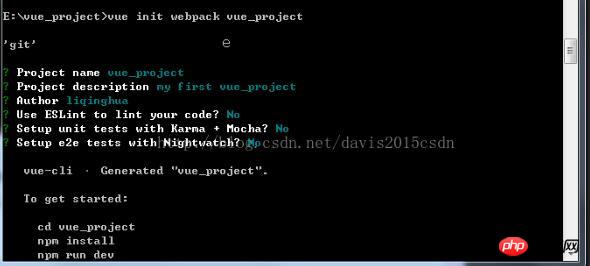
4. webpack 템플릿을 기반으로 새 프로젝트 생성
(1) vue init webpack my -project (프로젝트 이름)
(2) cd my-project
(3) npm install
(4) npm run dev
5. 필요한 환경 설치 예정
(1) npm install sass -loader --save-dev
(2) npm install gulp-sass
(3) npm install --save axios
(4) npm install element-ui -S
(5) npm install vuex --save
6. 가져와야 하는 패키지(element-ui)
(1) import ElementUI from 'element-ui'
(2) import 'element- ui/lib/theme-default/index.css'
(3 ) import Vue from 'vue'
(4) 사용: Vue.use(ElementUI)
7. 프로젝트 코드 구조
프로젝트 소스 코드 : https://github.com/davis0511/school-ui
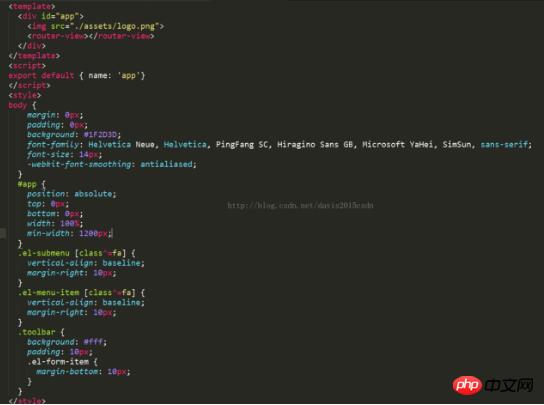
(1)
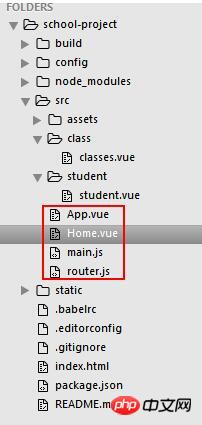
(2) Home.vue
<template>
<el-row class="container">
<el-col :span="24" class="header">
<el-col :span="20" class="logo">
<img src="./assets/logo4.png" /> <span>学校管理<i class="txt">系统</i></span>
</el-col>
<el-col :span="4" class="userinfo">
<el-dropdown trigger="click">
<span class="el-dropdown-link userinfo-inner"><img :src="this.sysUserAvatar" /> {{sysUserName}}</span>
<el-dropdown-menu slot="dropdown">
<el-dropdown-item>我的消息</el-dropdown-item>
<el-dropdown-item>设置</el-dropdown-item>
<el-dropdown-item pided @click.native="logout">退出登录</el-dropdown-item>
</el-dropdown-menu>
</el-dropdown>
</el-col>
</el-col>
<el-col :span="24" class="main">
<aside>
<el-menu :default-active="$route.path" class="el-menu-vertical-demo" @open="handleopen" @close="handleclose" @select="handleselect"
theme="dark" unique-opened router>
<template v-for="(item,index) in $router.options.routes" v-if="!item.hidden">
<el-submenu :index="index+''" v-if="!item.leaf">
<template slot="title"><i :class="item.iconCls"></i>{{item.name}}</template>
<el-menu-item v-for="child in item.children" :index="child.path" v-if="!child.hidden">{{child.name}}</el-menu-item>
</el-submenu>
<el-menu-item v-if="item.leaf&&item.children.length>0" :index="item.children[0].path"><i :class="item.iconCls"></i>{{item.children[0].name}}</el-menu-item>
</template>
</el-menu>
</aside>
<section class="content-container">
<p class="grid-content bg-purple-light">
<el-col :span="24" class="breadcrumb-container">
<strong class="title">{{$route.name}}</strong>
<el-breadcrumb separator="/" class="breadcrumb-inner">
<el-breadcrumb-item v-for="item in $route.matched">
{{ item.name }}
</el-breadcrumb-item>
</el-breadcrumb>
</el-col>
<el-col :span="24" class="content-wrapper">
<transition>
<router-view></router-view>
</transition>
</el-col>
</p>
</section>
</el-col>
</el-row>
</template>
<script>
export default{
data() {
return {
sysUserName:''
}
},
methods:{
onSubmit() {
console.log('submit!');
},
handleopen() {
//console.log('handleopen');
},
handleclose() {
//console.log('handleclose');
},
handleselect: function (a, b) {
},
//退出登录
logout: function () {
var _this = this;
this.$confirm('确认退出吗?', '提示', {
//type: 'warning'
}).then(() => {
sessionStorage.removeItem('user');
_this.$router.push('/login');
}).catch(() => {
});
}
}
}
</script>
<style scoped lang="scss">
.container {
position: absolute;
top: 0px;
bottom: 0px;
width: 100%;
.header {
height: 60px;
line-height: 60px;
background: #1F2D3D;
color: #c0ccda;
.userinfo {
text-align: right;
padding-right: 35px;
.userinfo-inner {
color: #c0ccda;
cursor: pointer;
img {
width: 40px;
height: 40px;
border-radius: 20px;
margin: 10px 0px 10px 10px;
float: right;
}
}
}
.logo {
font-size: 22px;
img {
width: 40px;
float: left;
margin: 10px 10px 10px 18px;
}
.txt {
color: #20a0ff
}
}
}
.main {
background: #324057;
position: absolute;
top: 60px;
bottom: 0px;
overflow: hidden;
aside {
width: 230px;
}
.content-container {
background: #f1f2f7;
position: absolute;
right: 0px;
top: 0px;
bottom: 0px;
left: 230px;
overflow-y: scroll;
padding: 20px;
.breadcrumb-container {
margin-bottom: 15px;
.title {
width: 200px;
float: left;
color: #475669;
}
.breadcrumb-inner {
float: right;
}
}
.content-wrapper {
background-color: #fff;
box-sizing: border-box;
}
}
}
}
</style>
(3) App.vue
(4) ) main.js
import Vue from 'vue'
import Router from 'vue-router'
import App from './App'
import routes from './router'
import ElementUI from 'element-ui'
import 'element-ui/lib/theme-default/index.css'
Vue.use(Router)
Vue.use(ElementUI)
const router = new Router({
 routes
});
Vue.config.productionTip = false
new Vue({
 router,
 render: h => h(App)
}).$mount('#app')
(5 )router .js
import Home from './Home'
import classes from './class/classes'
import student from './student/student'
let router = [
 {
  path: '/',
  name: '学校',
  component: Home,
  redirect: '/classes',
 iconCls: 'fa fa-id-card-o',
 children: [
{ path: '/classes', component: classes, name: '班级管理' },
{ path: '/student', component: student, name: '学生管理' }
  ]
 }
];
export default router;
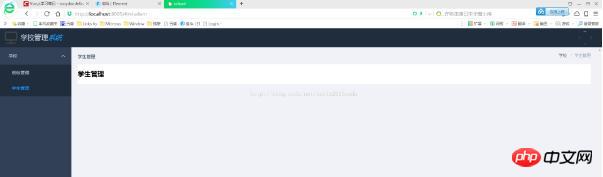
8 완료 후 인터페이스 렌더링은 다음과 같습니다.
The 위의 내용은 모든 사람을 위해 정리한 내용입니다. 앞으로 모든 사람에게 도움이 되기를 바랍니다.
관련 기사:
Puppeteer를 사용하여 가장 인기 있는 슬라이딩 인증 코드를 해독하는 방법
elementUI를 사용하여 Vue에서 사용자 정의 테마 메서드를 구현하는 방법
jquery에서 동적으로 생성된 태그에 이벤트 바인딩( 자세한 튜토리얼)
위 내용은 element-ui를 구축하는 방법(자세한 튜토리얼)의 상세 내용입니다. 자세한 내용은 PHP 중국어 웹사이트의 기타 관련 기사를 참조하세요!