Node.js 노트 프로세스 모듈 사용에 대한 자세한 설명
- php中世界最好的语言원래의
- 2018-06-01 09:46:001783검색
이번에는 Node.js 노트 작성 프로세스 모듈 사용에 대한 자세한 설명을 가져왔습니다. Node.js 노트 작성 프로세스 모듈 사용 시 주의사항은 무엇인가요? .
프로세스는 전역 개체에 존재하며 이를 로드하기 위해 require()를 사용하지 않고도 사용할 수 있습니다. 프로세스 모듈은 주로 두 가지 작업을 수행합니다
-
읽기: 프로세스 정보 가져오기(리소스 사용량, 운영 환경, 운영 상태)
쓰기: 프로세스 작업 수행(이벤트 듣기, 작업 예약, 경고 발행) 리소스 사용량
리소스 사용량
은 이 프로세스를 실행하는 데 소비되는 시스템 리소스를 나타냅니다. 예를 들어, 메모리 구성인 cpu
memory
process.memoryUsage())
{ rss: 21848064,
 heapTotal: 7159808,
 heapUsed: 4431688,
 external: 8224
 }
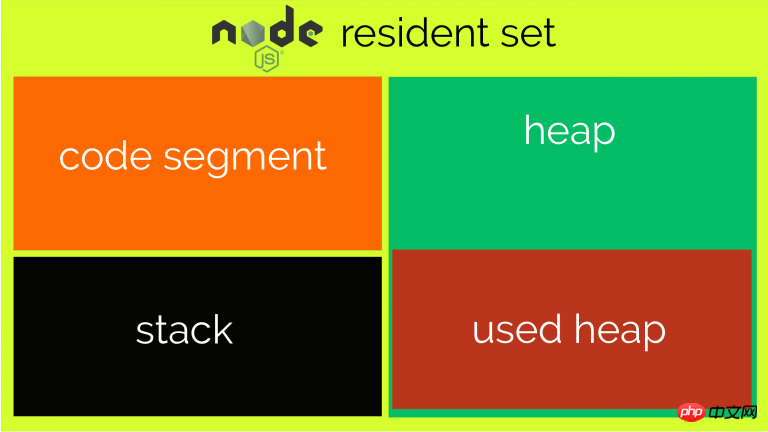
rss(상주 메모리)는 아래 그림과 같습니다

코드 세그먼트는 현재 실행 중인 코드에 해당하고
external은 C++ 객체에 해당합니다( V8 Binding으로 관리되는 JS 객체 사용), 예를 들어 버퍼
Buffer.allocUnsafe(1024 * 1024 * 1000);
console.log(process.memoryUsage());
{ rss: 22052864,
 heapTotal: 6635520,
 heapUsed: 4161376,
 external: 1048584224 }
cpu
const startUsage = process.cpuUsage();
console.log(startUsage);
const now = Date.now();
while (Date.now() - now < 500);
console.log(process.cpuUsage());
console.log(process.cpuUsage(startUsage)); //相对时间
// { user: 59459, system: 18966 }
// { user: 558135, system: 22312 }
// { user: 498432, system: 3333 }
user는 사용자 시간에 해당하고, 시스템은 시스템 시간을 나타냅니다.
실행 환경
실행 환경은 실행 디렉터리, 노드 환경, CPU 아키텍처, 사용자 환경, 시스템 플랫폼을 포함하여 이 프로세스가 실행되는 호스트 환경
실행 디렉터리
const startUsage = process.cpuUsage();
console.log(startUsage);
const now = Date.now();
while (Date.now() - now < 500);
console.log(process.cpuUsage());
console.log(process.cpuUsage(startUsage)); //相对时间
// { user: 59459, system: 18966 }
// { user: 558135, system: 22312 }
// { user: 498432, system: 3333 }
노드 환경
console.log(process.version)
// v9.1.0
노드 버전 정보만 얻고 싶지 않다면, v8, zlib, libuv 버전 및 기타 정보도 포함됩니다. 그렇다면 process.versions
console.log(process.versions);
{ http_parser: '2.7.0',
 node: '9.1.0',
 v8: '6.2.414.32-node.8',
 uv: '1.15.0',
 zlib: '1.2.11',
 ares: '1.13.0',
 modules: '59',
 nghttp2: '1.25.0',
 openssl: '1.0.2m',
 icu: '59.1',
 unicode: '9.0',
 cldr: '31.0.1',
 tz: '2017b' }
cpu Architecture
console.log(`This processor architecture is ${process.arch}`);
// This processor architecture is x64
를 사용해야 합니다. 지원되는 값은 다음을 포함합니다: 'arm', 'arm64', 'ia32 ', 'mips', 'mipsel', 'ppc' 코드>, <code>'ppc64', 's390', 's390x', 'x32' ' x64''arm', 'arm64', 'ia32', 'mips', 'mipsel', 'ppc', 'ppc64', 's390', 's390x', 'x32' 'x64'
用户环境
console.log(process.env.NODE_ENV); // dev
NODE_ENV=dev node b.js
除了启动时的自定义信息之外,process.env还可以获得其他的用户环境信息(比如PATH、SHELL、HOME等),感兴趣的可以自己打印一下试试
系统平台
console.log(`This platform is ${process.platform}`);
This platform is darwin
支持的系统平台包括:'aix' 'darwin' 'freebsd' 'linux' 'openbsd' 'sunos' 'win32'
console.log(process.argv)
console.log(process.argv0)
console.log(process.execArgv)
node --harmony b.js foo=bar --version
// 输出结果
[ '/Users/xiji/.nvm/versions/node/v9.1.0/bin/node',
 '/Users/xiji/workspace/learn/node-basic/process/b.js',
 'foo=bar',
 '--version' ]
node
[ '--harmony' ]
just 시작 시 사용자 정의 정보 외에도 관심이 있는 경우 process.env는 다른 사용자 환경 정보(예: PATH, SHELL, HOME 등)를 얻을 수도 있습니다. , 직접 인쇄하여 사용해 볼 수 있습니다.
시스템 플랫폼
console.log(process.execPath);
// /Users/xxxx/.nvm/versions/node/v9.1.0/bin/node
지원되는 시스템 플랫폼:
'aix' 'darwin' 'freebsd' code> <code>'linux' 'openbsd'code> 'sunos' 'win32'android는 아직 실험 단계실행 상태
실행 상태는 시작 매개변수, 실행 디렉터리, 메인 파일, PID 정보, 실행 시간시작 매개변수
를 포함하여 현재 프로세스의 실행과 관련된 정보를 말합니다. 시작 매개변수를 얻는 세 가지 방법 execArgv는 Node.js의 명령줄 옵션을 가져옵니다(공식 웹사이트 문서 참조) argv는 명령줄이 아닌 옵션 정보를 가져오고, argv0은 argv[0]의 값을 가져옵니다(약간 다름)var date = new Date();
while(new Date() - date < 500) {}
console.log(process.uptime()); // 0.569 실행 디렉터리
//a.js
console.log(`module A: ${process.mainModule === module}`);
//b.js
require('./a');
console.log(`module B: ${process.mainModule === module}`);
node b.js
// 输出
module A: false
module B: true
실행 시간
console.log(`This process is pid ${process.pid}`); //This process is pid 12554
메인 파일require.main 외에도 process.mainModule을 통해 모듈을 판단할 수도 있습니다. 메인 파일인지process.on('beforeExit', function(code) {
console.log('before exit: '+ code);
});
process.on('exit', function(code) {
setTimeout(function() {
console.log('exit: ' + code);
}, 0);
});
a.b();PID 정보
process.on('uncaughtException', function() {
console.log('uncaught listener');
});
process.setUncaughtExceptionCaptureCallback(function() {
console.log('uncaught fn');
});
a.b();
// uncaught fn
이벤트 듣기
- 일반적으로 사용되는 이벤트에는 beforeExit, 종료, uncaught
Exception
, message - beforeExit 및 종료가 두 가지 측면에서 다릅니다.
process.on('beforeExit', function(code) {
 console.log('before exit: '+ code);
});
process.on('exit', function(code) {
 setTimeout(function() {
  console.log('exit: ' + code);
 }, 0);
});
a.b();
当异常一直没有被捕获处理的话,最后就会触发'uncaughtException'事件。默认情况下,Node.js会打印堆栈信息到stderr然后退出进程。不要试图阻止uncaughtException退出进程,因此此时程序的状态可能已经不稳定了,建议的方式是及时捕获处理代码中的错误,uncaughtException里面只做一些清理工作(可以执行异步代码)。
注意:node的9.3版本增加了process.setUncaughtExceptionCaptureCallback方法
当process.setUncaughtExceptionCaptureCallback(fn)指定了监听函数的时候,uncaughtException事件将会不再被触发。
process.on('uncaughtException', function() {
 console.log('uncaught listener');
});
process.setUncaughtExceptionCaptureCallback(function() {
 console.log('uncaught fn');
});
a.b();
// uncaught fn
message适用于父子进程之间发送消息,关于如何创建父子进程会放在child_process模块中进行。
调度任务
process.nextTick(fn)
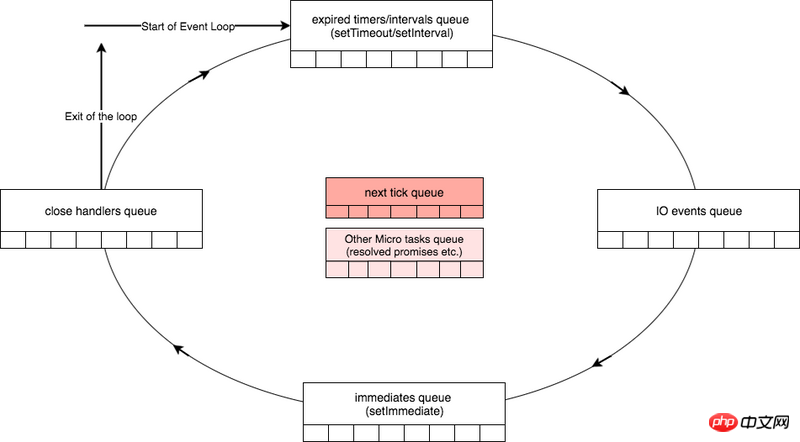
通过process.nextTick调度的任务是异步任务,EventLoop是分阶段的,每个阶段执行特定的任务,而nextTick的任务在阶段切换的时候就会执行,因此nextTick会比setTimeout(fn, 0)更快的执行,关于EventLoop见下图,后面会做进一步详细的讲解

发出警告
process.emitWarning('Something warning happened!', {
 code: 'MY_WARNING',
 type: 'XXXX'
});
// (node:14771) [MY_WARNING] XXXX: Something warning happened!
当type为DeprecationWarning时,可以通过命令行选项施加影响
--throw-deprecation会抛出异常--no-deprecation不输出DeprecationWarning--trace-deprecation打印详细堆栈信息
process.emitWarning('Something warning happened!', {
 type: 'DeprecationWarning'
});
console.log(4);
node --throw-deprecation index.js
node --no-deprecation index.js
node --trace-deprecation index.js
相信看了本文案例你已经掌握了方法,更多精彩请关注php中文网其它相关文章!
推荐阅读:
怎么使用webpack3.0配置webpack-dev-server
위 내용은 Node.js 노트 프로세스 모듈 사용에 대한 자세한 설명의 상세 내용입니다. 자세한 내용은 PHP 중국어 웹사이트의 기타 관련 기사를 참조하세요!

