
mpvue 애플릿 프로젝트를 빌드하는 방법
- php中世界最好的语言원래의
- 2018-05-28 11:15:043360검색
이번에는 mpvue 애플릿 프로젝트를 빌드하는 방법과 mpvue 애플릿 프로젝트를 빌드할 때 주의 사항이 무엇인지 보여드리겠습니다. 다음은 실제 사례입니다.
Foreword
mpvue는 vue.js와 동일한 구문을 가지며 작은 프로그램을 빠르게 개발할 수 있는 Meituan의 오픈 소스 프론트엔드 프레임워크입니다. 공식 웹사이트에 따르면 작은 프로그램과 H5 인터페이스를 구현할 수 있습니다. 하나의 코드 세트를 사용합니다. 이 프레임워크를 사용하여 개발자는 완전한 Vue.js 개발 경험을 얻는 동시에 H5 및 미니 프로그램에 대한 코드 재사용 기능을 제공합니다. H5 프로젝트를 작은 프로그램으로 변환하고 싶거나, 작은 프로그램을 개발하여 H5로 변환하고 싶다면 mpvue가 매우 적합한 솔루션이 될 것입니다.
Mpvue 공식 홈페이지: http://mpvue.com/
데모 주소: https://github.com/ccwyn/mpvuedemo/tree/master/my-project
mpvue를 사용하는 이유
우선 모두 WeChat Mini 프로그램은 다중 페이지 집계를 통해 경량 제품 기능을 완성하기 위한 간결한 개발 방법을 권장합니다. 미니 프로그램은 오프라인 패키지로 로컬에 다운로드되어 WeChat 클라이언트를 통해 로드 및 시작됩니다. 개발 사양이 간단하고 기술이 철저하게 캡슐화되어 있으며 자체 개발 시스템이 간단한 논리적 뷰 레이어 프레임워크로 자리잡고 있습니다. 복잡한 애플리케이션 개발에는 공식적으로 권장되지 않지만 비즈니스 요구 사항은 단순화하기 어렵습니다. 복잡한 애플리케이션은 구성 요소 및 모듈화, 자동 구성 및 통합, 코드 재사용 및 개발 효율성 등과 같은 개발 방법에 대한 요구 사항이 더 높습니다. 그러나 작은 프로그램 개발 사양으로 인해 이러한 기능이 크게 제한됩니다. 따라서 위의 문제를 해결하고 개발 효율성을 향상시키며 더 나은 개발 경험을 제공하기 위해 WeChat 애플릿은 Vue.js 기반의 mpvue 프레임워크를 사용하여 개발되었습니다.
mpvue의 기능
완벽한 Vue.js 개발 경험
편리한 Vuex 데이터 관리 솔루션: 복잡한 애플리케이션 구축에 편리함
빠른 웹팩 빌드 메커니즘: 맞춤형 빌드 전략, 개발 중 hotReload Phase
npm 외부 종속성 사용을 지원합니다
-
Vue.js 명령줄 도구인 vue-cli를 사용하여 신속하게
프로젝트를 초기화 - 프로젝트 구성
프로젝트 구성
1. mpvue 공식 스캐폴딩을 사용하여 프로젝트 기본 구조를 구축합니다2. Fly.js를 http 요청 라이브러리로 사용합니다3. 프로젝트 CSS 전처리 도구.
프로젝트 프레임워크 구조 및 파일
주로 애플리케이션 코드가 있는 src 디렉토리에 집중├── src // 我们的项目的源码编写文件
│ ├── components // 组件目录
│ │ └── head //导航组件
│ ├── config //公共配置
│ │ └── tips // 提示与加载工具类
│ ├── http //http请求配置文件
│ │ └── api // 接口调用文件
│ │ └── config //fly 配置文件
│ ├── pages //项目页面目录
│ ├── store //状态管理 vuex配置目录
│ │ └── actions.js //actions异步修改状态
│ │ └── getters.js //getters计算过滤操作
│ │ └── mutation-types.js //mutations 类型
│ │ └── mutations.js //修改状态
│ │ └── index.js //我们组装模块并导出 store 的地方
│ │ └── state.js //数据源定义
│ ├── stylus //stylus css处理器目录
│ │ └── common.styl // 全局css样式
│ │ └── index.styl // stylus 出口
│ │ └── mixin.styl //mixin 方法
│ │ └── reset.styl //reset css
│ ├── untils //工具函数目录
│ │ └── index.js
│ ├── App.vue // APP入口文件
│ ├── main.js // 主配置文件
빌딩 프로세스
1. 공식을 통해 작은 프로그램을 빠르게 생성 documenthttp://mpvue.com/mpvue/
# 全局安装 vue-cli
$ npm install --global vue-cli
# 创建一个基于 mpvue-quickstart 模板的新项目
$ vue init mpvue/mpvue-quickstart my-project
# 安装依赖
$ cd my-project
$ npm install
# 启动构建
$ npm run dev
2. WeChat 개발자 도구에서 dist 디렉터리를 열고 페이지가 표시되는지 확인하세요.
3. fly
# npm安装 flyio
$ npm install flyio --save
1. src 아래에 http 디렉터리를 만듭니다. 디렉터리 구조는 config.js │ ├── http //http请求配置文件
│ │ └── api.js // 接口调用文件
│ │ └── config.js //fly 配置文件
3입니다.
//引入 fly
var Fly=require("flyio/dist/npm/wx")
var fly=new Fly;
//配置请求基地址
// //定义公共headers
// fly.config.headers={xx:5,bb:6,dd:7}
// //设置超时
// fly.config.timeout=10000;
// //设置请求基地址
// fly.config.baseURL="https://wendux.github.io/"
//添加拦截器
fly.interceptors.request.use((config,promise)=>{
 //给所有请求添加自定义header
 config.headers["X-Tag"]="flyio";
 return config;
})
// Vue.prototype.$http=fly //将fly实例挂在vue原型上
export default fly
1. src 아래에 stylus 디렉터리를 만듭니다. 디렉터리 구조는
import fly from './config'
import qs from 'qs'
// 配置API接口地址
let root ='接口域名';
/**
 * 接口模版====post
 *
 * export const test = params => {return fly.post(`${root}/xx/xx`, qs.stringify(params))};
 *
 * 接口模版====get
 *
 * export const test1 = function(){return fly.get(`${root}/api/getNewsList`)}
 *
 *
 * 用法:
 * 在 页面用引入 test
 * import {test} from '../../http/api.js'
 *
 * test(params).then(res=>{ console.log(res) })
 */
export const test = params => {return fly.post(`${root}/xx/xx`, qs.stringify(params))};
2입니다. mixin.stylus
향후 h5 프로젝트에서 재사용할 수 있다는 점을 고려하여 단위 변환 방법은 다음과 같습니다. 여기에 [px2rem]을 작성했으며, 플랫폼 차이로 rpx를 사용하지 않습니다. 향후 웹으로 마이그레이션하더라도 [px2rem]# npm安装 flyio $ npm install stylus --save-dev $ npm install stylus-loader --save-dev3의 단위 변환 로직만 처리하면 됩니다.
 │ ├── stylus //stylus css处理器目录
 │ │ └── common.styl // 全局css样式
 │ │ └── index.styl // stylus 出口
 │ │ └── mixin.styl //mixin 方法
 │ │ └── reset.styl //reset css
4. 소개 app.vue에
// 单行显示省略号
no-wrap()
 text-overflow: ellipsis
 overflow: hidden
 white-space: nowrap
// 多行显示省略号
no-wrap-more($col)
 display: -webkit-box
 -webkit-box-orient: vertical
 -webkit-line-clamp: $col
 overflow: hidden
//rem转换 $px / 75 *1rem
px2rem($px)
 $px * 1rpx
**를 소개합니다. mixin.stylus의 메소드를 사용하려면 해당 페이지의 스타일러스 파일에서 mixin.stylus를 별도로 참조해야 합니다
5개의 구성 config 디렉터리
1. src 아래에 config 디렉터리 디렉터리 구조를 다음과 같이 만듭니다.
│ ├── config      //公共配置
│ │  └── tips.js     // 提示与加载工具类
2、tips.js
考虑到将来可能要复用到h5项目中 所以这里将微信提供的提示与加载框封装成工具类,以后即便迁移到web 端, 只需要删除tips.js的wx api就可以了。
可以在 main.js中引入,绑定到原型上
import Tips from './config/tip'
Vue.prototype.$tips=Tips
在页面中 this.$tips.alert("请输入手机号")调用
/**
 * 提示与加载工具类
 */
export default class Tips {
 constructor() {
 this.isLoading = false;
 }
 /**
 * 弹出提示框
 */
 static success(title, duration = 500) {
 setTimeout(() => {
  wx.showToast({
  title: title,
  icon: "success",
  mask: true,
  duration: duration
  });
 }, 300);
 if (duration > 0) {
  return new Promise((resolve, reject) => {
  setTimeout(() => {
   resolve();
  }, duration);
  });
 }
 }
 /**
 * 弹出确认窗口
 */
 static confirm(text, payload = {}, title = "提示") {
 return new Promise((resolve, reject) => {
  wx.showModal({
  title: title,
  content: text,
  showCancel: true,
  success: res => {
   if (res.confirm) {
   resolve(payload);
   } else if (res.cancel) {
   reject(payload);
   }
  },
  fail: res => {
   reject(payload);
  }
  });
 });
 }
 static toast(title, onHide, icon = "success") {
 setTimeout(() => {
  wx.showToast({
  title: title,
  icon: icon,
  mask: true,
  duration: 500
  });
 }, 300);
 // 隐藏结束回调
 if (onHide) {
  setTimeout(() => {
  onHide();
  }, 500);
 }
 }
 /**
 * 弹出加载提示
 */
 static loading(title = "加载中") {
 if (Tips.isLoading) {
  return;
 }
 Tips.isLoading = true;
 wx.showLoading({
  title: title,
  mask: true
 });
 }
 /**
 * 加载完毕
 */
 static loaded() {
 if (Tips.isLoading) {
  Tips.isLoading = false;
  wx.hideLoading();
 }
 }
 static share(title, url, desc) {
 return {
  title: title,
  path: url,
  desc: desc,
  success: function(res) {
  Tips.toast("分享成功");
  }
 };
 }
 static alert (text, ok) {
 if (ok === void 0) { ok = function (res) { }; }
 if (!text) {
  return;
 }
 wx.showModal({
  content: text,
  showCancel: false,
  confirmColor: '#000000',
  cancelColor: '#000000',
  success: ok
 });
 };
}
/**
 * 静态变量,是否加载中
 */
Tips.isLoading = false;
六、配置vuex
1、在src下 创建 store目录 目录结构为:
│ ├── store      //状态管理 vuex配置目录
│ │  └── actions.js    //actions异步修改状态
│ │  └── getters.js    //getters计算过滤操作
│ │  └── mutation-types.js    //mutations 类型
│ │  └── mutations.js    //修改状态
│ │  └── index.js    //我们组装模块并导出 store 的地方
│ │  └── state.js    //数据源定义
2、main.js中引入store, 并绑定到Vue构造函数的原型上,这样在每个vue的组件都可以通过this.$store访问store对象。
import store from './store'
Vue.prototype.$store=store;
3、state.js
在数据源文件中定义变量:
const state={
 test: 0,
}
export default state
4、mutation-types.js
在mutation-types.js中定义你的Mutation的名字
export const TEST = 'TEST' // 这是测试的
5、mutations.js
在mutations.js中写处理方法
import * as types from './mutation-types'
const matations={
 /**
  * state:当前状态树
  * data: 提交matations时传的参数
  */
 //是否有渠道
 [types.TEST] (state,data) {
  state.TEST = data;
 },
}
export default matations
6、使用方法
# 在 store index.js 中引入
import Vue from 'vue';
import Vuex from 'vuex';
import state from './state'
import mutations from './mutations'
Vue.use(Vuex);
export default new Vuex.Store({
 state,
 mutations,
})
在页面中引用
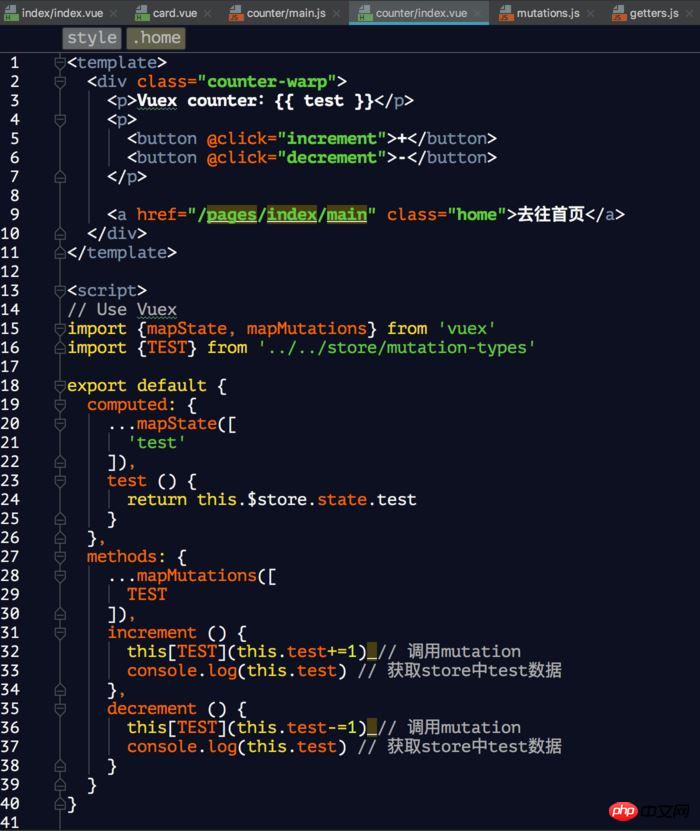
7、将vuex中的数据持久化到本地 (使用vuex-persistedstate)
# 安装vuex-persistedstate
$ npm install vuex-persistedstate --save
在 store index.js 引入
import Vue from 'vue';
import Vuex from 'vuex';
import state from './state'
import mutations from './mutations'
import createPersistedState from 'vuex-persistedstate'
Vue.use(Vuex);
export default new Vuex.Store({
 state,
 mutations,
 plugins: [
 createPersistedState({
  storage: {
  getItem: key => wx.getStorageSync(key),
  setItem: (key, value) => wx.setStorageSync(key, value),
  removeItem: key => {}
  }
 })
 ]
})
相信看了本文案例你已经掌握了方法,更多精彩请关注php中文网其它相关文章!
推荐阅读:
위 내용은 mpvue 애플릿 프로젝트를 빌드하는 방법의 상세 내용입니다. 자세한 내용은 PHP 중국어 웹사이트의 기타 관련 기사를 참조하세요!