lnmp 빌드(Nginx1.12.1; mysql5.7.20; php7.2.0)
- 不言원래의
- 2018-04-21 16:29:391712검색
이 기사에서는 특정 참조 값이 있는 lnmp 구성(Nginx1.12.1; mysql5.7.20; php7.2.0)의 내용을 소개합니다. 이제 필요한 친구들이 참조할 수 있습니다.
종속성 패키지 설치:
#yum install gcc bison bison-devel zlib-devel libmcrypt-devel mcrypt mhash-devel openssl-devel libxml2-devel libcurl-devel bzip2-devel readline-devel libedit-devel sqlite-devel libpng-devel libjpeg-devel freetype freetype-devel
1
www 사용자 만들기:
#groupadd www#useradd -g www -s /sbin/nologin -M www
1
2
1. Nginx1.12.1 설치:
centos6.8 미러 N ginx 버전은 1.12.1
#yum install -y nginx #/etc/init.d/nginx start
1
2
2. mysql5.7.20 설치:
#wget
#rpm -Uvh mysql57-community-release-el6-9.noarch.rpm
#yum install mysql-community-server
#service mysqld start
#grep 'temporary password' /var/log/mysqld.log  | awk '{print $NF}'
#mysql -uroot -p
mysql>set global validate_password_policy=0;
mysql>set global validate_password_length=6;
mysql>SET PASSWORD FOR 'root'@'localhost' =PASSWORD('******');
3. PHP7.2.0 설치
3.1 소스 코드 컴파일 및 설치
#wget rm -php-7.2.0.tar.xz
#tar xvJf php-7.2.0.tar -C /usr/local/
#cd /usr/local/php-7.2.0
#./configure --prefix=/usr/local/php --with-config-file-path=/usr/local/php/etc --enable-fpm --with-fpm-user=www --with-fpm-group=www --with-mysqli --with-pdo-mysql --with-iconv-dir --with-freetype-dir --with-jpeg-dir --with-png-dir --with-zlib --with-libxml-dir=/usr --enable-xml --disable-rpath --enable-bcmath --enable-shmop --enable-sysvsem --enable-inline-optimization --with-curl --enable-mbregex --enable-mbstring --enable-ftp  --with-openssl --with-mhash --enable-pcntl --enable-sockets --with-xmlrpc --enable-zip --enable-soap --without-pear --with-gettext --disable-fileinfo --enable-maintainer-zts --with-libdir=lib64
# make
# make install
위 구성 단계는 종속성 패키지 및 오류가 보고되었습니다. 컴파일할 때 나타나는 오류 메시지에 따라 상황이 다를 수 있습니다. 컴파일 후 종속 패키지를 찾아 설치하세요. 완료되면 오류가 발생하지 않습니다! ! !
make 설치가 완료되고 오류가 없으면 다음 단계로 진행하시면 됩니다.
#cp /usr/local/php-7.2.0/php.ini-development /usr/local/php/etc/php.ini
- 1
<p style="margin-bottom: 7px;">#cp /usr/local/php/etc/php-fpm.conf.default /usr/local/php/etc/php-fpm.conf<br/></p>
- 1
#cp /usr/local/php-7.2.0/sapi/fpm/init.d.php-fpm /etc/init.d/php-fpm
- 1
#chmod +x /etc/init.d/php-fpm
- 1
#cp /usr/local/php/etc/php-fpm.d/www.conf.default/usr/local/php/etc/php-fpm.d/www.conf
- 1
- 3.3 PHP 시작 -fpm
# /etc/init.d/php-fpm startStarting php-fpm done
- 1
- 2
- 3.4 환경 변수
vim ~/.bash_profile
cat ~/.bash_profile# .bash_profile# Get the aliases and functionsif [ -f ~/.bashrc ]; then
    . ~/.bashrcfi# User specific environment and startup programsPATH=$PATH:$HOME/bin:/usr/local/php/binexport PATH
에 PHP 명령을 추가하여
#. ~/.bash_profile
- 1
- 3. 5 PH P 버전 보기:
# php -vPHP 7.2.0 (cli) (built: Dec 17 2017 19:58:31) ( ZTS )
Copyright (c) 1997-2017 The PHP Group
Zend Engine v3.2.0, Copyright (c) 1998-2017 Zend Technologies
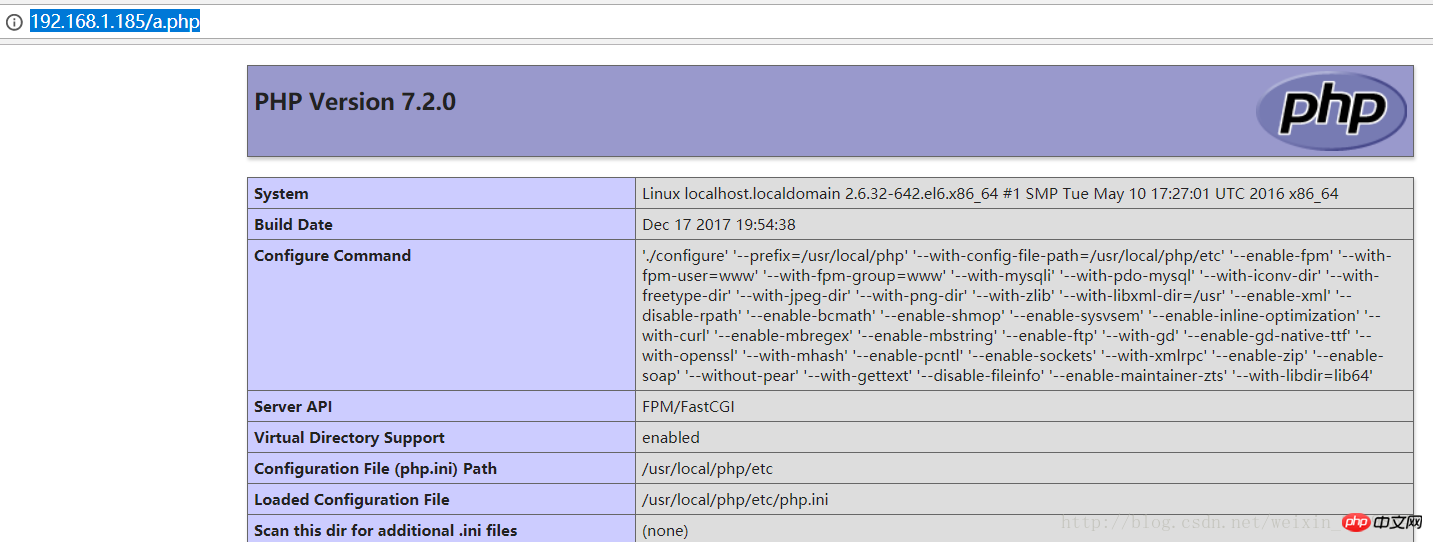
3.6 테스트 결과:
vim /usr/share/nginx/html/a.php<?php
        phpinfo();    ?>
vim /etc/nginx/conf.d/default.confcat /etc/nginx/conf.d/default.confserver {
    listen       80;
    server_name  localhost;

    #charset koi8-r;
    #access_log  /var/log/nginx/host.access.log  main;

    location / {
        root   /usr/share/nginx/html;
        index index.php index.html index.htm;
    }
    location ~ \.php$ {
        root           html;
        fastcgi_pass   127.0.0.1:9000;
        fastcgi_index  index.php;
        fastcgi_param  SCRIPT_FILENAME  /usr/share/nginx/html$fastcgi_script_name;
        include        fastcgi_params;
    }    #error_page  404              /404.html;

    # redirect server error pages to the static page /50x.html
    #
    error_page   500 502 503 504  /50x.html;
    location = /50x.html {
        root   /usr/share/nginx/html;
    }    # proxy the PHP scripts to Apache listening on 127.0.0.1:80
    #
    #location ~ \.php$ {
    #    proxy_pass   http://127.0.0.1;
    #}

    # pass the PHP scripts to FastCGI server listening on 127.0.0.1:9000
    #
    #location ~ \.php$ {
    #    root           html;
    #    fastcgi_pass   127.0.0.1:9000;
    #    fastcgi_index  index.php;
    #    fastcgi_param  SCRIPT_FILENAME  /scripts$fastcgi_script_name;
    #    include        fastcgi_params;
    #}

    # deny access to .htaccess files, if Apache's document root
    # concurs with nginx's one
    #
    #location ~ /\.ht {
    #    deny  all;
    #}}
Nginx配置文件修改的地方(在server里面添加 index.php格式的文件。增加一个location模块)
重新加载Nginx,重启php-fpm
# /etc/init.d/nginx restartStopping nginx:                                            [  OK  ]
Starting nginx:                                            [  OK  ]
# /etc/init.d/php-fpm restartGracefully shutting down php-fpm . doneStarting php-fpm  done
测试:
# curl 192.168.1.185/a.php
1
或者直接到网页上访问。 
至此,lnmp环境搭建成功
相关推荐:
위 내용은 lnmp 빌드(Nginx1.12.1; mysql5.7.20; php7.2.0)의 상세 내용입니다. 자세한 내용은 PHP 중국어 웹사이트의 기타 관련 기사를 참조하세요!
성명:
본 글의 내용은 네티즌들의 자발적인 기여로 작성되었으며, 저작권은 원저작자에게 있습니다. 본 사이트는 이에 상응하는 법적 책임을 지지 않습니다. 표절이나 침해가 의심되는 콘텐츠를 발견한 경우 admin@php.cn으로 문의하세요.
이전 기사:PHP 내장 메소드의 전체 목록다음 기사:PHP 내장 메소드의 전체 목록

