
신경망(BP) 알고리즘 Python 구현 및 응용

- 不言원래의
- 2018-04-17 11:04:1514668검색
이 글은 주로 신경망(BP) 알고리즘의 구현과 Python에서의 간단한 응용을 자세히 소개합니다. 관심 있는 친구들이 참고할 수 있습니다.
이 글의 예는 신경망 알고리즘의 구현을 공유합니다. 그리고 참고할 수 있는 애플리케이션의 구체적인 코드는 다음과 같습니다
먼저 Python을 사용하여 간단한 신경망 알고리즘을 구현합니다.
import numpy as np


# 定义tanh函数
def tanh(x):
  return np.tanh(x)


# tanh函数的导数
def tan_deriv(x):
  return 1.0 - np.tanh(x) * np.tan(x)


# sigmoid函数
def logistic(x):
  return 1 / (1 + np.exp(-x))


# sigmoid函数的导数
def logistic_derivative(x):
  return logistic(x) * (1 - logistic(x))


class NeuralNetwork:
  def __init__(self, layers, activation='tanh'):
    """
    神经网络算法构造函数
    :param layers: 神经元层数
    :param activation: 使用的函数(默认tanh函数)
    :return:none
    """
    if activation == 'logistic':
      self.activation = logistic
      self.activation_deriv = logistic_derivative
    elif activation == 'tanh':
      self.activation = tanh
      self.activation_deriv = tan_deriv

    # 权重列表
    self.weights = []
    # 初始化权重(随机)
    for i in range(1, len(layers) - 1):
      self.weights.append((2 * np.random.random((layers[i - 1] + 1, layers[i] + 1)) - 1) * 0.25)
      self.weights.append((2 * np.random.random((layers[i] + 1, layers[i + 1])) - 1) * 0.25)

  def fit(self, X, y, learning_rate=0.2, epochs=10000):
    """
    训练神经网络
    :param X: 数据集(通常是二维)
    :param y: 分类标记
    :param learning_rate: 学习率(默认0.2)
    :param epochs: 训练次数(最大循环次数,默认10000)
    :return: none
    """
    # 确保数据集是二维的
    X = np.atleast_2d(X)

    temp = np.ones([X.shape[0], X.shape[1] + 1])
    temp[:, 0: -1] = X
    X = temp
    y = np.array(y)

    for k in range(epochs):
      # 随机抽取X的一行
      i = np.random.randint(X.shape[0])
      # 用随机抽取的这一组数据对神经网络更新
      a = [X[i]]
      # 正向更新
      for l in range(len(self.weights)):
        a.append(self.activation(np.dot(a[l], self.weights[l])))
      error = y[i] - a[-1]
      deltas = [error * self.activation_deriv(a[-1])]

      # 反向更新
      for l in range(len(a) - 2, 0, -1):
        deltas.append(deltas[-1].dot(self.weights[l].T) * self.activation_deriv(a[l]))
        deltas.reverse()
      for i in range(len(self.weights)):
        layer = np.atleast_2d(a[i])
        delta = np.atleast_2d(deltas[i])
        self.weights[i] += learning_rate * layer.T.dot(delta)

  def predict(self, x):
    x = np.array(x)
    temp = np.ones(x.shape[0] + 1)
    temp[0:-1] = x
    a = temp
    for l in range(0, len(self.weights)):
      a = self.activation(np.dot(a, self.weights[l]))
    return a
자신이 정의한 신경망 알고리즘을 사용하여 일부를 구현합니다. 간단한 함수:
작은 경우:
X: Y
0 0 0
0 1 1
1 0 1
1 1 0
from NN.NeuralNetwork import NeuralNetwork
import numpy as np

nn = NeuralNetwork([2, 2, 1], 'tanh')
temp = [[0, 0], [0, 1], [1, 0], [1, 1]]
X = np.array(temp)
y = np.array([0, 1, 1, 0])
nn.fit(X, y)
for i in temp:
  print(i, nn.predict(i))
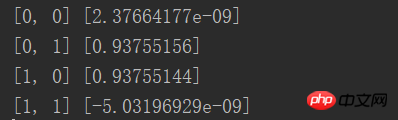
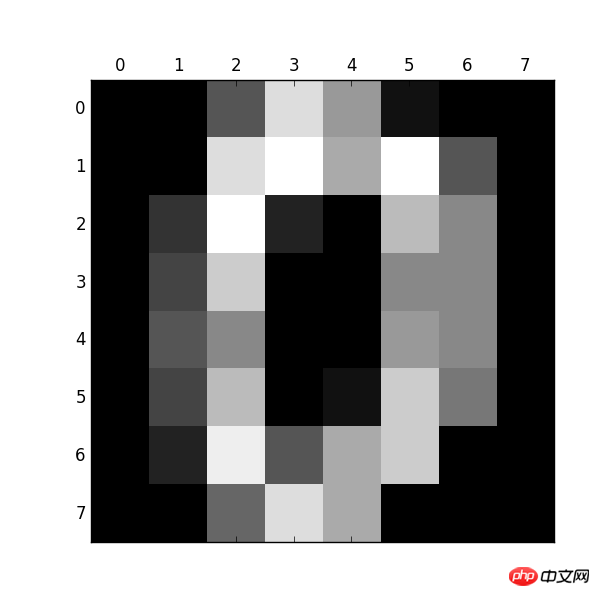
결과의 기본 메커니즘을 무한히 발견하세요. 0에 가깝거나 1 초에 가까운 예 : 그림의 숫자 식별
inmport 데이터 :
from sklearn.datasets import load_digits
import pylab as pl

digits = load_digits()
print(digits.data.shape)
pl.gray()
pl.matshow(digits.images[0])
pl.show()
observe : size : (1797, 64)
number 0
 다음 코드 이를 식별하는 것입니다:
import numpy as np
from sklearn.datasets import load_digits
from sklearn.metrics import confusion_matrix, classification_report
from sklearn.preprocessing import LabelBinarizer
from NN.NeuralNetwork import NeuralNetwork
from sklearn.cross_validation import train_test_split
# 加载数据集
digits = load_digits()
X = digits.data
y = digits.target
# 处理数据,使得数据处于0,1之间,满足神经网络算法的要求
X -= X.min()
X /= X.max()
# 层数:
# 输出层10个数字
# 输入层64因为图片是8*8的,64像素
# 隐藏层假设100
nn = NeuralNetwork([64, 100, 10], 'logistic')
# 分隔训练集和测试集
X_train, X_test, y_train, y_test = train_test_split(X, y)
# 转化成sklearn需要的二维数据类型
labels_train = LabelBinarizer().fit_transform(y_train)
labels_test = LabelBinarizer().fit_transform(y_test)
print("start fitting")
# 训练3000次
nn.fit(X_train, labels_train, epochs=3000)
predictions = []
for i in range(X_test.shape[0]):
o = nn.predict(X_test[i])
# np.argmax:第几个数对应最大概率值
predictions.append(np.argmax(o))
# 打印预测相关信息
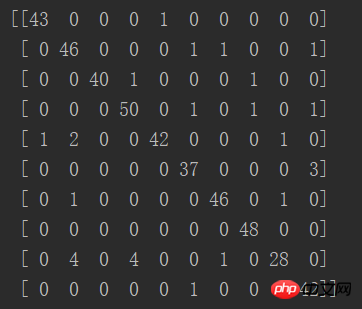
print(confusion_matrix(y_test, predictions))
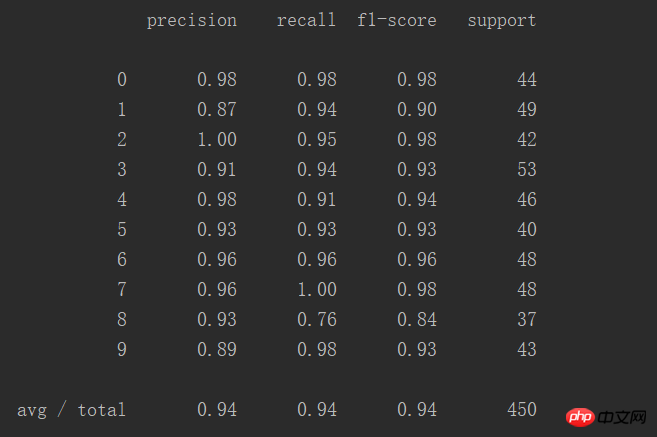
print(classification_report(y_test, predictions))
결과:
행렬의 대각선은 정확한 예측의 수를 나타내며, 정확한 비율이 매우 높다는 것을 알 수 있습니다
이 표는 다음과 같습니다. 보다 직관적으로 예측 정확도:
총 450개 사례, 성공률 94%
 관련 권장 사항:
위 내용은 신경망(BP) 알고리즘 Python 구현 및 응용의 상세 내용입니다. 자세한 내용은 PHP 중국어 웹사이트의 기타 관련 기사를 참조하세요!
성명:
본 글의 내용은 네티즌들의 자발적인 기여로 작성되었으며, 저작권은 원저작자에게 있습니다. 본 사이트는 이에 상응하는 법적 책임을 지지 않습니다. 표절이나 침해가 의심되는 콘텐츠를 발견한 경우 admin@php.cn으로 문의하세요.