
vue axios 요청 시간 초과를 처리하는 방법
- php中世界最好的语言원래의
- 2018-04-08 14:48:043569검색
이번에는 vue axios 요청 시간 초과 처리 방법과 vue axios 요청 시간 초과 처리 시 주의사항은 무엇인지 알려드리겠습니다. 실제 사례를 살펴보겠습니다.
Vue2를 사용하면서 공식적으로 추천하는 axios 플러그인을 사용해 API를 호출했는데, 사용 중 서버나 네트워크가 불안정하고 패킷이 끊기는 경우 어떻게 대처해야 할까요? .
특정 이유
최근에 회사에서 프로젝트를 진행 중인데, PHP의 API 출력을 사용합니다. Google Chrome에 임시 헤더가 표시되는 경우가 있습니다.
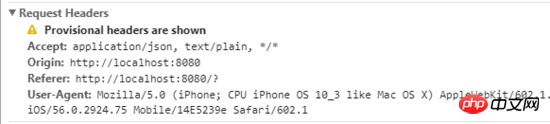
검색엔진에서 제공하는 해결 방법으로는 문제가 해결되지 않습니다.
최근 AOP 개발 및 프로그래밍 개념과 axios에서 언급되는 컬럼 인터셉터(axios.Interceptors)에 대해 공부하고 있습니다. 개발 지침 코드 결합을 줄이고, 프로그램 재사용성을 향상시키며, 개발 효율성을 높이는 것은 바로 이 메커니즘이어야 합니다.
함정이 있는 해결 방법 1
제 경험은 제한되어 있고 제가 할 수 있는 유일한 일은 Axios 요청 시간이 초과된 후 새로운 요청을 하는 것뿐입니다. Axios의 사용 지침을 연구하여 타임아웃 = 6000
axios.defaults.timeout = 6000;
을 설정한 다음 열 인터셉터를 추가합니다.
// Add a request interceptor
axios.interceptors.request.use(function (config) {
 // Do something before request is sent
 return config;
 }, function (error) {
 // Do something with request error
 return Promise.reject(error);
});
// Add a response interceptor
axios.interceptors.response.use(function (response) {
 // Do something with response data
 return response;
 }, function (error) {
 // Do something with response error
 return Promise.reject(error);
});
이 열 인터셉터의 역할은 요청 타임아웃 후 정보를 캡처하고 다음 단계로 이동합니다. 즉, 재요청을 사용하고 싶습니다.
관련 페이지 데이터 요청은 다음과 같습니다.
this.$axios.get(url, {params:{load:'noload'}}).then(function (response) {
	//dosomething();
}).catch(error => {
	//超时之后在这里捕抓错误信息.
	if (error.response) {
		console.log('error.response')
		console.log(error.response);
	} else if (error.request) {
		console.log(error.request)
		console.log('error.request')
		if(error.request.readyState == 4 && error.request.status == 0){
			//我在这里重新请求
		}
	} else {
		console.log('Error', error.message);
	}
	console.log(error.config);
});
시간 초과 후, 포착되지 않음(약속 있음) 오류: 시간 초과 xxx ms 초과 오류가 보고됩니다.

catch에서는 error.request 오류를 반환하므로 여기서 재시도 기능을 수행하게 되는데, 테스트 후 재요청 기능을 구현할 수도 있지만, 매우 번거롭습니다. API를 요청하는 모든 페이지에서 다시 요청을 설정해야 합니다.

위를 보면 내 프로젝트에 수십 개의 .vue 파일이 있습니다. 모든 페이지에서 시간 초과 및 재요청 기능을 설정해야 한다면 정말 미칠 것 같습니다.
그리고 이 메커니즘에는 심각한 문제가 있습니다. 버그는 요청한 링크가 실패하거나 다른 이유로 인해 정상적으로 액세스할 수 없는 경우 이 메커니즘이 실패한다는 것입니다. 내가 설정한 6초 동안 기다리지 않고 계속 새로 고쳐지며 1초에 수십 번씩 요청하므로 쉽습니다. 아래 사진을 보시면 눈 깜짝할 사이에 146번 요청을 하셨습니다.

함정이 있는 두 번째 솔루션
은 Axios의 소스 코드를 연구했습니다. 시간 초과 후 오류 메시지는 인터셉터 axios.interceptors.response에 캡처되며 error.code = "ECONNABORTED ", 특정 링크
https://github.com/axios/axios/blob/26b06391f831ef98606ec0ed406d2be1742e9850/lib/adapters/xhr.js#L95-L101
// Handle timeout
 request.ontimeout = function handleTimeout() {
  reject(createError('timeout of ' + config.timeout + 'ms exceeded', config, 'ECONNABORTED',
  request));
  // Clean up request
  request = null;
 };
그래서 저의 글로벌 타임아웃 재획득 솔루션은 이렇습니다.
axios.interceptors.response.use(function(response){
....
}, function(error){
	var originalRequest = error.config;
	if(error.code == 'ECONNABORTED' && error.message.indexOf('timeout')!=-1 && !originalRequest._retry){
			originalRequest._retry = true
			return axios.request(originalRequest);
	}
});
이 방법도 새로운 요청을 구현할 수 있지만 두 가지 문제가 있습니다. 1. 한 번만 다시 요청하면 다시 시간이 초과되면 중지되고 다시 요청하지 않습니다. 두 번째 문제는 this.$axios.get(url).then 이후의 작업과 같이 데이터 요청으로 각 페이지에서 많은 작업을 수행한다는 것입니다. this.$axios.get(url).then之后操作。
完美的解决方法
以AOP编程方式,我需要的是一个 超时重新请求的全局功能, 要在axios.Interceptors下功夫,在github的axios的issue找了别人的一些解决方法,终于找到了一个完美解决方案,就是下面这个。
https://github.com/axios/axios/issues/164#issuecomment-327837467
//在main.js设置全局的请求次数,请求的间隙
axios.defaults.retry = 4;
axios.defaults.retryDelay = 1000;
axios.interceptors.response.use(undefined, function axiosRetryInterceptor(err) {
 var config = err.config;
 // If config does not exist or the retry option is not set, reject
 if(!config || !config.retry) return Promise.reject(err);
 // Set the variable for keeping track of the retry count
 config.retryCount = config.retryCount || 0;
 // Check if we've maxed out the total number of retries
 if(config.retryCount >= config.retry) {
  // Reject with the error
  return Promise.reject(err);
 }
 // Increase the retry count
 config.retryCount += 1;
 // Create new promise to handle exponential backoff
 var backoff = new Promise(function(resolve) {
  setTimeout(function() {
   resolve();
  }, config.retryDelay || 1);
 });
 // Return the promise in which recalls axios to retry the request
 return backoff.then(function() {
  return axios(config);
 });
});
其他的那个几十个.vue页面的 this.$axios
import axios from 'axios';
//安装方法
npm install axios
//或
bower install axios
🎜 수십 개의 다른 .vue 페이지에 대한
this.$axios 가져오기 및 게시 방법은 그렇지 않습니다. 코드를 전혀 수정해야 합니다. 🎜在这个过程中,谢谢jooger给予大量的技术支持,这是他的个人信息 https://github.com/jo0ger , 谢谢。
以下是我做的一个试验。。把axios.defaults.retryDelay = 500, 请求 www.facebook.com

如有更好的建议,请告诉我,谢谢。
补充:
axios基本用法
vue更新到2.0之后,作者就宣告不再对vue-resource更新,而是推荐的axios,前一段时间用了一下,现在说一下它的基本用法。
首先就是引入axios,如果你使用es6,只需要安装axios模块之后
import axios from 'axios';
//安装方法
npm install axios
//或
bower install axios
当然也可以用script引入
axios提供了一下几种请求方式
axios.request(config)
axios.get(url[, config])
axios.delete(url[, config])
axios.head(url[, config])
axios.post(url[, data[, config]])
axios.put(url[, data[, config]])
axios.patch(url[, data[, config]])
这里的config是对一些基本信息的配置,比如请求头,baseURL,当然这里提供了一些比较方便配置项
//config
import Qs from 'qs'
{
 //请求的接口,在请求的时候,如axios.get(url,config);这里的url会覆盖掉config中的url
 url: '/user',
 // 请求方法同上
 method: 'get', // default
 // 基础url前缀
 baseURL: 'https://some-domain.com/api/',


 transformRequest: [function (data) {
  // 这里可以在发送请求之前对请求数据做处理,比如form-data格式化等,这里可以使用开头引入的Qs(这个模块在安装axios的时候就已经安装了,不需要另外安装)
  data = Qs.stringify({});
  return data;
 }],
 transformResponse: [function (data) {
  // 这里提前处理返回的数据
  return data;
 }],
 // 请求头信息
 headers: {'X-Requested-With': 'XMLHttpRequest'},
 //parameter参数
 params: {
  ID: 12345
 },
 //post参数,使用axios.post(url,{},config);如果没有额外的也必须要用一个空对象,否则会报错
 data: {
  firstName: 'Fred'
 },
 //设置超时时间
 timeout: 1000,
 //返回数据类型
 responseType: 'json', // default
}
有了配置文件,我们就可以减少很多额外的处理代码也更优美,直接使用
axios.post(url,{},config)
  .then(function(res){
    console.log(res);
  })
  .catch(function(err){
    console.log(err);
  })
//axios请求返回的也是一个promise,跟踪错误只需要在最后加一个catch就可以了。
//下面是关于同时发起多个请求时的处理
axios.all([get1(), get2()])
 .then(axios.spread(function (res1, res2) {
  // 只有两个请求都完成才会成功,否则会被catch捕获
 }));
最后还是说一下配置项,上面讲的是额外配置,如果你不想另外写也可以直接配置全局
axios.defaults.baseURL = 'https://api.example.com';
axios.defaults.headers.common['Authorization'] = AUTH_TOKEN;
axios.defaults.headers.post['Content-Type'] = 'application/x-www-form-urlencoded';
//当然还可以这么配置
var instance = axios.create({
 baseURL: 'https://api.example.com'
});
本文只是介绍基本的用法,详细看官方文档https://github.com/axios
我写的两个例子:
使用vue2.0+mintUI+axios+vue-router: https://github.com/Stevenzwzhai/vue-mobile-application
使用vue2.0+elementUI+axios+vue-router: https://github.com/Stevenzwzhai/vue2.0-elementUI-axios-vueRouter, 之前由于没做后端接口,所以运行没数据,现在加了mockjs来返回一些数据,以便于参考。
相信看了本文案例你已经掌握了方法,更多精彩请关注php中文网其它相关文章!
推荐阅读:
위 내용은 vue axios 요청 시간 초과를 처리하는 방법의 상세 내용입니다. 자세한 내용은 PHP 중국어 웹사이트의 기타 관련 기사를 참조하세요!