JS 단순 버전 리치 텍스트 편집기 구현 코드
- 小云云원래의
- 2018-03-26 13:22:263653검색
저는 오늘까지 오지도 않았고 대략적인 이해도 있습니다. 물론 과정은 처음 1초가 고통스럽고 마지막 3초가 쉽습니다. 이 리치 텍스트 편집기는 주로 p와 함께 제공되는 contenteditable 속성 document.execCommand() 메서드를 사용하여 구현됩니다. 레이아웃을 용이하게 하기 위해 저는 아쉽게도 그 당시 프런트 엔드 개발자로서 테이블 레이아웃을 직접 사용했습니다. 직원분, 정말 무슨 말을 해야 할지 모르겠습니다.
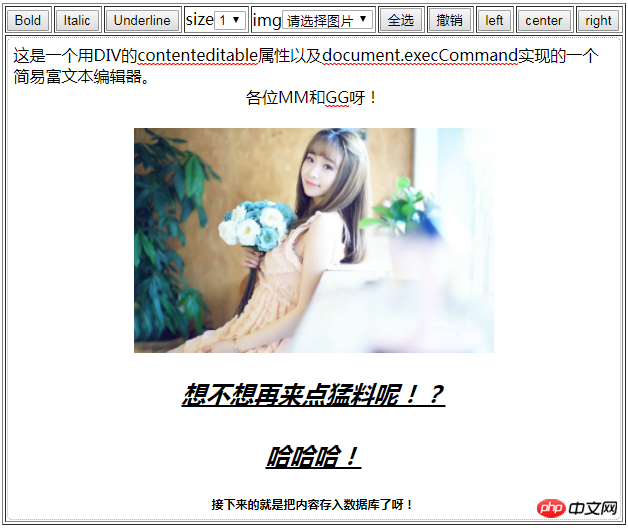
다음은 구현 효과를 보여줍니다.

본문 구현 프로세스:
(1) HTML 구조:
<table border='1' class="tablebox" id='tablebox'>
<tr>
<td>
<input type="button" name="bold" value='Bold' class="bold">
</td>
<td>
<input type="button" name="italic" value='Italic' class="italic">
</td>
<td>
<input type="button" name="underline" value='Underline' class="decotation">
</td>
<td>size
<select name="fontSize" class="font">
<option value="1">1</option>
<option value="3">3</option>
<option value="5">5</option>
<option value="6">6</option>
<option value="7">7</option>
</select>
</td>
<td>img
<select name="insertImage">
<option value="">请选择图片</option>
<option value="timg.jpg">timg.jpg</option>
<option value="timg1.jpg">timg1.jpg</option>
<option value="timg2.jpg">timg2.jpg</option>
<option value="timg3.jpg">timg3.jpg</option>
<option value="timg4.jpg">timg4.jpg</option>
</select>
</td>
<td>
<input type="button" name="selectAll" value='全选' class="selectAll">
</td>
<td>
<input type="button" name="undo" value='撤销' class="undo">
</td>
<td>
<input type="button" name="justifyLeft" value='left' class="justifyLeft">
</td>
<td>
<input type="button" name="justifyCenter" value='center' class="justifyCenter">
</td>
<td>
<input type="button" name="justifyRight" value='right' class="justifyRight">
</td>
</tr>
<tr>
<td colspan='10'>
<p class="text" contenteditable="true">这是一个用p的contenteditable属性以及document.execCommand实现的一个简易富文本编辑器。</p>
</td>
</tr>
</table>(2) JS 구현 로직:
(function() {
	//富文本编辑器类
	class Editor {

		constructor() {
			this.bindElem();
		}


		bindElem() {
			var text = document.querySelector('.text');
			var txt = null;
			var tablebox = document.getElementById_x('tablebox');
			var inputbs = tablebox.querySelectorAll('input,select');

			for (var i = 0; i {
					if (inputbs[i].tagName.toLowerCase() == 'input') {
						this.action(inputbs[i], inputbs[i].name);
					} else if (inputbs[i].tagName.toLowerCase() == 'select') {
						inputbs[i].onchange = function() {
							document.execCommand(this.name, true, this.value);
						}
					}
				}
			}


			action(obj, attr) {
				obj.onclick = function() {
					document.execCommand(attr, true);
				}
			}

		}

	new Editor();

})();
관련 추천 :
JavaScript 리치 텍스트 편집기를 구현하는 간단한 방법
위 내용은 JS 단순 버전 리치 텍스트 편집기 구현 코드의 상세 내용입니다. 자세한 내용은 PHP 중국어 웹사이트의 기타 관련 기사를 참조하세요!
성명:
본 글의 내용은 네티즌들의 자발적인 기여로 작성되었으며, 저작권은 원저작자에게 있습니다. 본 사이트는 이에 상응하는 법적 책임을 지지 않습니다. 표절이나 침해가 의심되는 콘텐츠를 발견한 경우 admin@php.cn으로 문의하세요.
이전 기사:태그가 JavaScript를 호출하는 방법다음 기사:태그가 JavaScript를 호출하는 방법

