CSS3 채팅 풍선 스타일
- php中世界最好的语言원래의
- 2018-03-16 14:23:045569검색
이번에는 CSS3 채팅 버블 스타일을 가져오겠습니다. CSS3 채팅 버블 스타일을 만들 때 주의 사항은 무엇인가요?
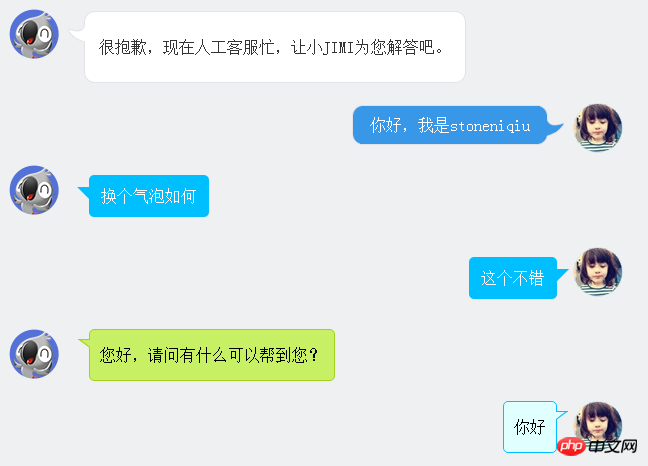
채팅 장면에서는 아래와 같이 채팅 내용을 버블로 수정해야 합니다. 아래에서 하나씩 설명하겠습니다.

그림 스타일:
첫 번째 스타일은 JD 고객 서비스입니다. 둥근 모서리와 거품의 고리는 모두 그림으로 만들어졌습니다. 테이블은 둥근 프레임을 형성하는 데 사용됩니다. 작품 스타일은 후크를 강조합니다.
 <p class="jimi_lists clearfix">
                <p class="header_img jimi3 fl"></p>
                <table class="msg" cellspacing="0" cellpadding="0">
                    <tbody><tr><td class="lt"></td><td class="tt"></td><td class="rt"></td></tr>
                    <tr><td class="lm"><span></span></td><td class="mm"><span class="wel"><span class="visitor"><p>很抱歉,现在人工客服忙,让小JIMI为您解答吧。</p></span></span></td><td class="rm"></td></tr>
                    <tr><td class="lb"></td><td class="bm"></td><td class="rb"></td></tr><tr><td></td></tr>
                    </tbody>
                </table>
            </p>
            <p class="customer_lists clearfix">
                <p class="header_img jimi3" style="background: url(img/mine.jpg) no-repeat center;">
                    <p class="header_img_hover"></p>
                </p>
                <table class="msg" cellspacing="0" cellpadding="0"><tbody><tr><td class="lt"></td><td class="tt"></td><td class="rt"></td></tr><tr><td class="lm"></td><td class="mm">你好,我是stoneniqiu</td><td class="rm"><span></span></td></tr><tr><td class="lb"></td><td class="bm"></td><td class="rb"></td></tr><tr><td></td><td class="time"></td><td></td></tr></tbody></table>
            </p>
스타일:
 .jimi_lists {
    margin: 0 -10px 20px 10px;
    position: relative;
}
 .jimi_lists .header_img.jimi3 {
    background: url(../img/jimi_50_3.png) no-repeat 0 0;
}
 .jimi_lists .header_img {
    width: 50px;
    height: 50px;
    position: absolute;
    top: 0;
    left: 0;
}.fl {
    float: left;
}
 .jimi_lists .msg {
    margin-left: 59px;
    margin-right: 40px;
    margin-top: 2px;
    float: left;
    display: inline;
}
 .jimi_lists .lt {
    background: url(../img/msg_bg_lr.png) no-repeat 0 0;
    width: 26px;
    height: 10px;
}
 .jimi_lists .tt {
    background: url(../img/msg_bg_tb.png) repeat-x 0 -23px;
    height: 10px;
}.jimi_lists .rt {
    background: url(../img/msg_bg_lr.png) no-repeat -35px 0;
    width: 10px;
    height: 10px;
}.jimi_lists .lm {
    background: url(../img/msg_bg_lr.png) repeat-y -94px 0;
    width: 26px;
    vertical-align: top;
    position: relative;
}.jimi_lists .mm {
    padding: 0 5px;
    background-color: #FFF;
    word-break: break-all;
    word-wrap: break-word;
    color: #333;
    line-height: 20px;
}.jimi_lists .lm span {
    background: url(../img/msg_bg_lr.png) no-repeat 0 -14px;
    display: inline-block;
    width: 26px;
    height: 16px;
    position: absolute;
    top: 5px;
}.jimi_lists .rm {
    background: url(../img/msg_bg_lr.png) repeat-y -113px 0;
    width: 10px;
}.jimi_lists .lb {
    background: url(../img/msg_bg_lr.png) no-repeat 0 -43px;
    width: 10px;
    height: 10px;
}.jimi_lists .bm {
    background: url(../img/msg_bg_tb.png) repeat-x 0 -25px;
    height: 10px;
}.jimi_lists .rb {
    background: url(../img/msg_bg_lr.png) no-repeat -35px -43px;
    width: 10px;
    height: 10px;
}.customer_lists {
    position: relative;
    margin: 0 12px 20px 20px;
}.customer_lists .msg {
    float: right;
    margin-right: 73px;
    _margin-right: 38px;
    margin-top: 2px;
}.customer_lists .lt {
    background: url(../img/msg_bg_lr.png) no-repeat -47px -0;
    width: 10px;
    height: 10px;
}.customer_lists .tt {
    background: url(../img/msg_bg_tb.png) repeat-x 0 0;
    height: 10px;
}.customer_lists .rt {
    background: url(../img/msg_bg_lr.png) no-repeat -63px 0;
    width: 26px;
    height: 10px;
}.customer_lists .lm {
    background: url(../img/msg_bg_lr.png) repeat-y -126px 0;
    width: 10px;
}.customer_lists .mm {
    padding: 1px 8px;
    background-color: #3897E7;
    word-break: break-all;
    word-wrap: break-word;
    color: #FFF;
}.customer_lists .rm {
    background: url(../img/msg_bg_lr.png) repeat-y -129px 0;
    width: 26px;
    vertical-align: top;
    position: relative;
}.customer_lists .lb {
    background: url(../img/msg_bg_lr.png) no-repeat -47px -36px;
    width: 10px;
    height: 10px;
}.customer_lists .bm {
    background: url(../img/msg_bg_tb.png) repeat-x -106px -4px;
    height: 10px;
}.customer_lists .rb {
    background: url(../img/msg_bg_lr.png) no-repeat -63px -36px;
    width: 26px;
    height: 10px;
}.customer_lists .rm span {
    background: url(../img/msg_bg_lr.png) no-repeat -63px -14px;
    display: inline-block;
    width: 26px;
    height: 16px;
    position: absolute;
    top: 5px;
}.customer_lists .header_img_hover {
    position: absolute;
    background: url(../img/avatar_mask_01.png);
    top: 0;
    width: 50px;
    height: 50px;
}.customer_lists .header_img {
    position: absolute;
    top: 0;
    right: 14px;
    width: 50px;
    height: 50px;
}
 .clearfix:after {
    content: " .";
    display: block;
    clear: both;
    visibility: hidden;
    height: 0;
}
코드 보기
배경 스타일:
두 번째는 주로 의사 클래스 이전에 삼각형을 그린 다음 위치 지정을 사용하여 결합합니다.
  <p class="jimi_lists clearfix">
                <p class="header_img jimi3 fl"></p>
                <p class="bkbubble right">
                     <p>换个气泡如何</p>
                </p>
            </p>
            <p class="customer_lists clearfix">
                <p class="header_img jimi3" style="background: url(img/mine.jpg) no-repeat center;">
                    <p class="header_img_hover"></p>
                </p>
                <p class="bkbubble left">
                    <p>这个不错</p>
                </p>
            </p>
스타일:
  .bkbubble.right p:before, .bkbubble.left p:before {
      width: 0;
    position: absolute;
    top: 12px;
    border-style: solid;
    content: "";
  }
  .bkbubble.left {
      text-align: right;
  }
 .bkbubble.right p:before {
     left: -12px;
    border-color: transparent #00bfff;
    border-width: 0 12px 12px 0; }
 .bkbubble.left p:before {
     right: -12px;
    border-color: transparent #00bfff;
    border-width: 0 0 12px 12px ; }
추가 삼각형: http://www.cnblogs.com/lhb25/p/css-and-css3-triangle.html
테두리 스타일:
테두리 색상과 배경 색상이 일치하지 않는 경우 필수 동일합니까? 위의 방법은 작동하지 않습니다. 왜냐하면 :before를 사용하여 삼각형을 그리는 것은 테두리의 원리를 사용하기 때문입니다. 즉, 위의 방법에서 거품 가장자리의 작은 삼각형은 테두리가 하나뿐이므로 두 가지 색상을 표시할 수 없습니다. . 색상. 그런 다음 테두리가 있는 삼각형을 만드는 방법을 찾아야 합니다.
  <p class="jimi_lists lim_operator clearfix">
                <p class="header_img jimi3 fl"></p>
                <p class="lim_bubble lim_shadow"><p class="lim_dot">您好,请问有什么可以帮到您?</p></p>
                <p class="lim_tale"><p class="radiusborder"></p></p>
            </p>
1. 먼저 작은 직사각형을 그려주세요.
.lim_operator .lim_tale {
    left: -1px;
    background-color: #c8f064;
    border-color: #a5d01b;
    margin-left: 70px;
}.lim_tale {
    position: absolute;
    width: 12px;
    height: 8px;
    overflow: hidden !important;
    top: 10px;
    z-index: 2;
    border-top-style: solid;
    border-top-width: 1px;
}

2. 대각선을 그립니다.
CSS에는 슬래시가 없습니다. 여기서는 원호를 사용하여 철자를 표시합니다. 큰 원에서 호를 가로채는 것은 대각선입니다.
.lim_operator .radiusborder {
    position: absolute;
    background-color: #EFF0F2;
    top: -29px;
    left: -94px;
    height: 160px;
    width: 160px;
    border-top-style: solid;
    border-top-width: 1px;
    border-right-style: solid;
    border-right-width: 1px;
    border-top-right-radius: 154px;
    border-color: #a5d01b;
}
오버레이 유형:
원리는 before를 사용하여 컬러 배경을 그린 다음 after를 사용하여 흰색 배경을 그린 다음 상단 1-2px를 오버레이하고 엇갈리게 하여 테두리와 배경이 나타납니다. 웹 WeChat이 이 작업을 수행합니다.
.expression:before {
    content: '';
    position: absolute;
    left: 16px;
    top: 100%;
    margin-left: -7px;
    border: 7px solid transparent;
    border-top-color: #CFCFCF}.expression:after {
    content: '';
    position: absolute;
    left: 16px;
    top: 100%;
    margin-left: -7px;
    margin-top: -1px;
    border: 7px solid transparent;
    border-top-color: #FFF}
이 기사의 사례를 읽은 후 방법을 마스터했다고 생각합니다. 더 흥미로운 정보를 보려면 PHP 중국어 웹사이트의 다른 관련 기사를 주목하세요!
추천 자료:
JavaScript의 var 및 this, {} 및 function
위 내용은 CSS3 채팅 풍선 스타일의 상세 내용입니다. 자세한 내용은 PHP 중국어 웹사이트의 기타 관련 기사를 참조하세요!

