먼저 설명할 점은 우리 프로젝트에 사용되는 테이블은 크게 두 가지 범주로 나누어진다는 것입니다. 하나는 헤더가 고정되지 않은 일반 테이블이고, 다른 하나는 현재 너비를 제어할 수 있는 고정 헤더입니다. 열. tbody部分是可以滚动的。需要说明的是,表头固定的那种是需要用两个table去实现,做过的人应该也都明白。前者看起来比较简单,因为宽度是受thead里的th影响的,后者看起来就不好处理,因为你用两个table就会出现下面的情况:

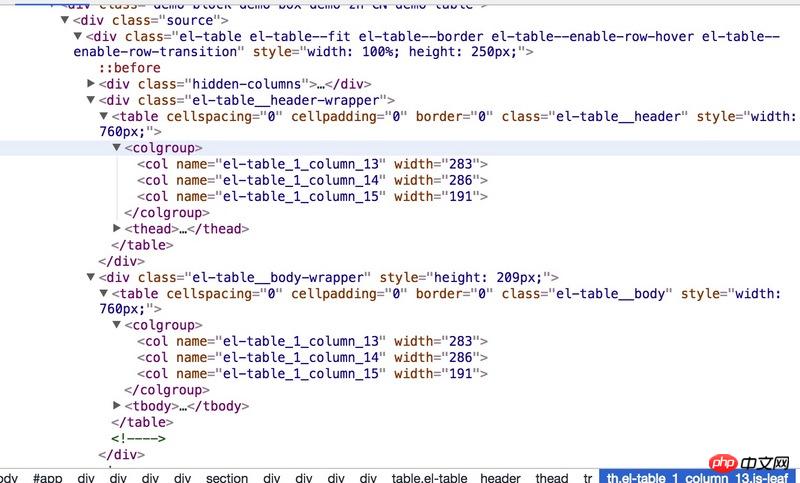
emmm,这和我们想象的应该不一样,这可咋整,感觉处理起来很麻烦啊。想起看过element-ui中的表格,似乎有拖动表头的实现,先打开控制台看下结构吧:

呃,话说长这么大我都没用过<colgroup>和<col>这两个标签,但仔细观察上面有个width,看到这大概也知道是怎么回事了,打开MDN看下相关属性的描述,和想的一样,width너비 조절은 해결했지만 또 다른 문제가 있습니다. 드래그 후 다른 열의 너비를 변경하는 방법은 다음과 같습니다.
a | b | c | d |
열 a를 드래그하면 변경된 너비가 b, c, d에 어떻게 분배되어야 할까요? 여기서는 B, c, d에 열이 드래그되었는지 여부를 나타내는 속성이 있습니다. , c, d를 드래그하지 않은 경우 a의 변경된 너비는 b, c, d 세 열의 너비로 균등하게 나누어집니다. b, c, d가 모두 변경되면 a의 너비만 변경됩니다. 마지막 열 d가 변경되었습니다. 좋습니다. 아이디어가 있으니 구현해 보겠습니다.
위 디자인을 따르는 것은 너무 어리석은 일이라는 것이 밝혀졌습니다. 드래그된 열 뒤에 있는 열만 변경하도록 변경되었으며 이 열의 너비는 변경되지 않았습니다.
Implementation
우선 html 구조는 대략 다음과 같습니다:
<table>
  <thead>
    <tr>
      <th>a<th>
      <th>b<th>
    </tr>
  </thead>
  <tbody>
    <tr>
      <th>1<th>
      <th>2<th>
    </tr>
  </tbody>
</table>
js 양상
  constructor (id, options) {
    this._el = document.querySelector(`#${id}`);
    // 实际使用中需要对dom结构进行判断,这里就不做了
    this._tables = Array.from(this._el.querySelectorAll('table'));
    setTimeout(() => this._resolveDom());

    this.store = {
      dragging: false,                 //是否拖动
      draggingColumn: null,            //拖动的对象
      miniWidth: 30,                   //拖动的最小宽度
      startMouseLeft: undefined,       //鼠标点击时的clientX
      startLeft: undefined,            //th右离table的距离
      startColumnLeft: undefined,      //th左离table的距离
      tableLeft: undefined,            //table离页面左边的距离,
      HColumns: [],
      BColumns: [],
    };
  };
Add dom:
const [ THeader ] = this._tables;
let TBody;
const Tr = THeader.tHead.rows[0];
const columns = Array.from(Tr.cells);
const Bcolgroup = document.createElement('colgroup');
const cols = columns.map((item, index) => {
  const col = document.createElement('col');
  item.dataset.index = index;
  col.width = +item.offsetWidth;
  return col;
});
cols.reduce((newDom, item) => {
  newDom.appendChild(item);
  return newDom;
}, Bcolgroup);
const HColgroup = Bcolgroup.cloneNode(true);
THeader.appendChild(HColgroup);

//不管是一个table还是两个,都把header和body提出来
if (this._tables.length === 1) {
  const [ , tbody ] = Array.from(THeader.children);
  tbody.remove();
  TBody = THeader.cloneNode();
  TBody.appendChild(Bcolgroup);
  TBody.appendChild(tbody);
  this._el.appendChild(TBody);
} else {
  [ , TBody ] = this._tables;
  TBody.appendChild(Bcolgroup);
}

//拖动时的占位线
const hold = document.createElement('p');
hold.classList.add('resizable-hold');
this._el.appendChild(hold);
위 블록은 노드를 추가하고 재사용을 위해 dom을 처리하는 것입니다. , 여기서는 테이블 헤더가 고정되어 있는지 여부에 상관하지 않고 두 개의 테이블로 분할하여 처리하기가 훨씬 쉽습니다. dom进行处理,为了复用,这里我们不管你是表头固定还是表头不固定,我们都拆分为两个table,这样处理起来也方便的多。
然后就是处理手指移到列右侧cursor的值设为col-resize:
handleMouseMove(evt) {
//...
if (!this.store.dragging) {
const rect = target.getBoundingClientRect();
const bodyStyle = document.body.style;
if (rect.width > 12 && rect.right - event.pageX < 8) {
bodyStyle.cursor = 'col-resize';
target.style.cursor = 'col-resize';
this.store.draggingColumn = target;
} else {
bodyStyle.cursor = '';
target.style.cursor = 'pointer';
this.store.draggingColumn = null;
}
}
};需要注意的是,getBoundingClientRect()获取的rigth是元素右侧距离页面左边缘的距离,不是离页面右边缘的距离。这里就是给thead的tr添加mousemove事件,当鼠标指针距离右边缘小于8的时候,改变指针形状,然后改变store里的状态,表示此时点击是可以拖动的了。
然后就是mousedown+mousemove+mouseup그런 다음 손가락을 열 오른쪽으로 이동하고 cursor 값을 col-resize로 설정하는 과정이 진행됩니다.
rrreee주의해야 할 점은, <code>getBoundingClientRect()</code >구입된 <code>rigth</code>는 페이지 오른쪽 가장자리로부터의 거리가 아니라 요소 오른쪽과 페이지 왼쪽 가장자리 사이의 거리입니다. <code>thead</code>의 <code>tr</code>에 <code>mousemove</code> 이벤트를 추가하는 방법은 마우스 포인터가 오른쪽 가장자리에서 8 미만일 때 포인터를 변경하는 것입니다. 모양을 변경한 다음 <code >store</code>의 상태는 현재 클릭하여 드래그할 수 있음을 나타냅니다. 🎜그런 다음 <code>mousedown</code>+<code>mousemove</code>+<code>mouseup</code>을 사용하여 드래그를 처리합니다. 🎜🎜const handlerMouseDown = (evt) =>
if (this.store.dragingColumn) {
This.store.draging = true;
{ 대상 } = evt;
(!target)이 반환되면;
const tableEle = THeader;
const tableLeft = tableEle.getBoundingClientRect().left;
const columnRect = target.getBoundingClientRect();
const minLeft = columnRect.left - tableLeft + 30;
Target.classList.add('noclick');
This.store.startMouseLeft = evt.clientX;
This.store.startLeft = columnRect.right - tableLeft;
This.store.startColumnLeft = columnRect.left - tableLeft;
This.store.tableLeft = 테이블왼쪽;
Document.onselectstart = () =>
Document.ondragstart = () =>
Hold.style.display = '차단';
Hold.style.left = this.store.startLeft + 'px';
const handlerOnMouseMove = (이벤트) =>
const deltaLeft = event.clientX - this.store.startMouseLeft;
Const ProxyLeft = this.store.startLeft + deltaLeft;
Hold.style.left = Math.max(minLeft, ProxyLeft) + 'px';
};
//너비는 다음과 같이 할당됩니다. 예를 들어
위 내용은 드래그 가능한 테이블 헤더를 구현하는 방법의 상세 내용입니다. 자세한 내용은 PHP 중국어 웹사이트의 기타 관련 기사를 참조하세요!


