
집 >위챗 애플릿 >미니 프로그램 개발 >MinUI 컴포넌트의 Abnor 예외 흐름 컴포넌트에 대한 자세한 설명
MinUI 컴포넌트의 Abnor 예외 흐름 컴포넌트에 대한 자세한 설명

- 小云云원래의
- 2018-01-29 13:33:112658검색
이 글에서 공유하고 싶은 것은 위챗 미니 프로그램 MinUI 컴포넌트 라이브러리 시리즈의 이상 예외 흐름 컴포넌트입니다. MinUI는 커스텀 컴포넌트를 기반으로 개발된 간단하고 사용하기 쉬우며 효율적인 컴포넌트 라이브러리 세트입니다. WeChat 미니 프로그램의 기능은 기본 미니 프로그램 프레임워크, 미니 프로그램 구성 요소의 다양한 주류 프레임워크 등을 다루며 효율적인 명령줄 도구를 제공하는 등 광범위한 시나리오에 적용 가능합니다.
MinUI 구성 요소 라이브러리에는 많은 기능 구성 요소가 포함되어 있으며 그 중 abnor 예외 흐름 구성 요소는 매우 일반적으로 사용되는 기능 구성 요소입니다. MinUI에서 abnor 구성 요소를 렌더링하는 방법은 다음과 같습니다.
다양한 유형이 있습니다. 정말 편리하고 빨라보이네요(^_^). WeChat을 열고 아래 미니 프로그램의 QR 코드를 스캔하여 먼저 살펴볼 수 있습니다.

다음은 abnor 구성 요소 사용 방법을 소개합니다.
1. Min-Cli를 설치하려면 다음 명령을 사용하세요. 이미 설치되어 있으면 다음 단계로 진행하세요. Min-Cli 문서를 보려면 여기를 클릭하십시오: Min-Cli 사용자 매뉴얼
npm install -g @mindev/min-cli
2. 소규모 프로그램 프로젝트를 초기화합니다.
min init my-project
미니 프로그램 프로젝트를 초기화하려면 새 미니 프로그램 옵션을 선택하세요. 프로젝트를 생성한 후 편집기에서 프로젝트를 엽니다. src 디렉터리는 소스 코드 디렉터리이고, dist 디렉터리는 컴파일 후 WeChat 개발자 도구에 지정된 디렉터리입니다. 새로 생성된 프로젝트에는 이미 홈 페이지가 있습니다. 자세한 문서: 최소 초기화 애플릿 프로젝트home 页面。详细文档:Min 初始化小程序项目
3、安装 abnor 组件。
进入刚才新建的小程序项目的目录中:
cd my-project
安装组件:
min install @minui/wxc-abnor
4、开启dev。
min dev
开启之后,修改源码后都会重新编译。
5、在页面中引入组件。
在编辑器中打开 src/pages 目录下的 home/index.wxp 文件,在 script 中添加 config 字段,配置小程序自定义组件字段,代码如下:
export default {
    config: {
        "usingComponents": {
            'wxc-abnor': "@minui/wxc-abnor"
        }
    }
}
wxc-abnor 即为异常流组件的标签名,可以在 wxml 中使用。
6、在 wxml 中使用 wxc-abnor标签。
在 home/index.wxp 文件的 template 中添加 wxc-abnor 标签,代码如下:
<wxc-abnor type="SHOP"></wxc-abnor>
7、打开微信开发者工具,指定 dist 目录,预览项目。
home/index.wxp 文件的代码如下所示:
  <wxc-abnor type="SHOP"></wxc-abnor>


<script>
  export default {
    config: {
      usingComponents: {
        'wxc-abnor': '@minui/wxc-abnor'
      }
    },
    data: {}
  }
</script>
图示:
至此,minui 组件库的 abnor 异常流组件在 Min 工具生成的小程序项目中的方法已介绍完毕,其他场景,在原生小程序或其他小程序框架项目中的使用方式请移步至如下链接:
在已有小程序项目中使用 MinUI 组件介绍
了解组件的使用方式后,下面开始介绍 abnor 组件的 API 。
Abnor【props】
| 名称 | 描述 |
|---|---|
type |
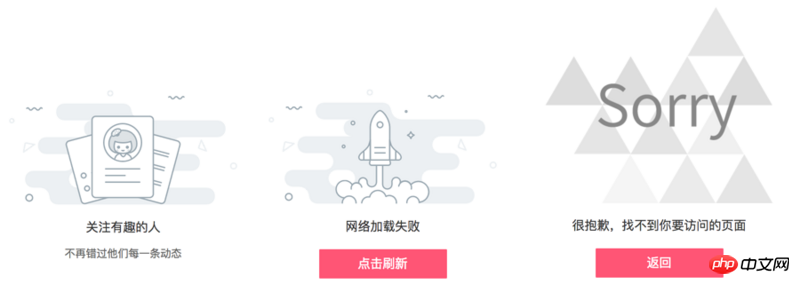
[说明]:异常状态类型,其优先级低于其他属性。 [类型]: String默认值: "" [可选值]: REQUEST_ERROR, NOT_FOUND, DATA, FOLLOW, FEED,SHOP, WEIBO, SEARCH, TAG, MESSAGE, LIVE, ORDER, CART, FOOTPRINT, COUPON
|
image |
[说明]:背景图。若与 type 同时指定,将覆盖 type 对应的 image 。[类型]: String[默认值]: "" |
title |
[说明]:标题。若与 type 同时指定,将覆盖 type 对应的 title 。[类型]: String[默认值]: "" |
tip |
[说明]:副标题。若与 type 同时指定,将覆盖 type 对应的 tip 。[类型]: String[默认值]: "" |
button |
[说明]:按钮文案。若与 type 同时指定,将覆盖 type 对应的 button 。[类型]: String[默认值]: "" |
bindabnortap |
[说明]:按钮事件。若配置了 button 属性,则需要指定事件。其中 REQUEST_ERROR, NOT_FOUND 两种 type
|
<template>
  <wxc-abnor type="REQUEST_ERROR" bind:abnortap="onAbnorTap"></wxc-abnor>
</template>

<script>
export default {
  config: {
    usingComponents: {
      'wxc-abnor': '@minui/wxc-abnor'
    }
  },
  data: {},
  onAbnorTap() {
      wx.showToast({
        title: 'success',
        duration: 2000
      });
    }
}
</script>

<style>
</style>
🎜컴포넌트 설치: 🎜<template>
<wxc-abnor type="NOT_FOUND" bind:abnortap="onAbnorTap"></wxc-abnor>
</template>
<script>
export default {
config: {
usingComponents: {
'wxc-abnor': '@minui/wxc-abnor'
}
},
data: {},
onAbnorTap() {
wx.showToast({
title: 'back',
duration: 2000
});
}
}
</script>
<style>
</style>🎜🎜4.개발을 시작하세요. 🎜🎜<template>
<wxc-abnor
type="REQUEST_ERROR"
image="{{image}}"
title="{{title}}"
tip="{{tip}}"
button="{{button}}"
bind:abnortap="onAbnorTap"
></wxc-abnor>
</template>
<script>
export default {
config: {
usingComponents: {
'wxc-abnor': '@minui/wxc-abnor'
}
},
data: {
image: 'https://s10.mogucdn.com/p2/161213/upload_76h1c5hjc8heecjehlfgekjdl2ki0_514x260.png',
title: '自定义标题',
tip: '自定义副标题',
button: '点我'
},
onAbnorTap() {
wx.showToast({
title: 'custom',
duration: 2000
});
}
}
</script>
<style>
</style>🎜켜고 나면 소스코드 수정 후 다시 컴파일됩니다. 🎜🎜🎜5. 페이지에 구성요소를 소개합니다. 🎜🎜🎜편집기에서 src/pages 디렉터리에 있는 home/index.wxp 파일을 열고 script에 config를 추가하세요. 필드에서 미니 프로그램 사용자 정의 구성 요소 필드를 구성하며 코드는 다음과 같습니다. 🎜<template>
<wxc-abnor type="DATA"></wxc-abnor>
</template>
<script>
export default {
config: {
usingComponents: {
'wxc-abnor': '@minui/wxc-abnor'
}
},
data: {}
}
</script>
<style>
</style>🎜wxc-abnor는 wxml에서 사용할 수 있는 예외 흐름 구성 요소의 태그 이름입니다. 🎜🎜🎜6. wxml에 wxc-abnor 태그를 사용하세요. 🎜🎜🎜home/index.wxp 파일의 template에 wxc-abnor 태그를 추가하세요. 코드는 다음과 같습니다. 🎜<template>
<wxc-abnor type="FOLLOW"></wxc-abnor>
</template>
<script>
export default {
config: {
usingComponents: {
'wxc-abnor': '@minui/wxc-abnor'
}
},
data: {},
methods: {}
}
</script>
<style>
</style> 🎜🎜7. WeChat 개발자 도구를 열고 dist 디렉터리를 지정하고 프로젝트를 미리 봅니다. 🎜🎜🎜home/index.wxp 파일의 코드는 다음과 같습니다. 🎜<template>
<wxc-abnor type="FOLLOW"></wxc-abnor>
</template>
<script>
export default {
config: {
usingComponents: {
'wxc-abnor': '@minui/wxc-abnor'
}
},
data: {}
}
</script>
<style>
</style>🎜Illustration: 🎜🎜🎜 🎜🎜🎜이때 Min 툴로 생성한 미니 프로그램 프로젝트에서 minui 컴포넌트 라이브러리의 abnor 예외 흐름 컴포넌트를 활용하는 방법이 소개되었습니다. 다른 시나리오, 네이티브 미니 프로그램 또는 다른 미니 프로그램 프레임워크 프로젝트에서의 사용 방법은 다음 링크로 이동하세요. 🎜🎜기존 미니 프로그램 프로젝트에서 MinUI 컴포넌트 사용 소개🎜🎜컴포넌트 사용 방법을 이해한 후 , abnor 구성 요소의 API부터 시작하겠습니다. 🎜🎜🎜Abnor【소품】🎜🎜
| 이름 | 설명 | 🎜
|---|---|
type🎜 |
[설명]: 예외 상태 유형으로, 다른 속성보다 우선순위가 낮습니다. [유형]: 문자열기본값: "" [선택값]: REQUEST_ERROR, NOT_FOUND, DATA , 팔로우, 피드, 쇼핑, 웨이보, 검색, 태그, 메시지, 라이브, 주문, 장바구니, 발자국, 쿠폰🎜🎜 |
이미지🎜 |
[설명] : 배경 이미지입니다. type과 함께 지정하면 type에 해당하는 이미지를 덮어씁니다. [유형]: 문자열[기본값]: "" 🎜🎜 |
제목 🎜 |
[설명]: 제목. type과 함께 지정하면 type에 해당하는 제목을 덮어씁니다. [유형]: 문자열[기본값]: "" 🎜🎜 |
tip 🎜 |
[설명]: 부제목. type과 함께 지정하면 type에 해당하는 tip을 덮어씁니다. [유형]: 문자열[기본값]: "" 🎜🎜 |
버튼 🎜 |
[설명]: 버튼 복사. type과 함께 지정하면 type에 해당하는 버튼을 덮어씁니다. [유형]: 문자열[기본값]: "" 🎜🎜 |
bindabnortap 🎜 |
[설명]: 버튼 이벤트입니다. 버튼 속성이 구성된 경우 이벤트를 지정해야 합니다. 그 중 REQUEST_ERROR, NOT_FOUND에는 type 🎜🎜🎜🎜 두 가지 모두에 기본 버튼 복사가 설정되어 있습니다.更多demo 1、网络异常 <template>
<wxc-abnor type="REQUEST_ERROR" bind:abnortap="onAbnorTap"></wxc-abnor>
</template>
<script>
export default {
config: {
usingComponents: {
'wxc-abnor': '@minui/wxc-abnor'
}
},
data: {},
onAbnorTap() {
wx.showToast({
title: 'success',
duration: 2000
});
}
}
</script>
<style>
</style>
图示:
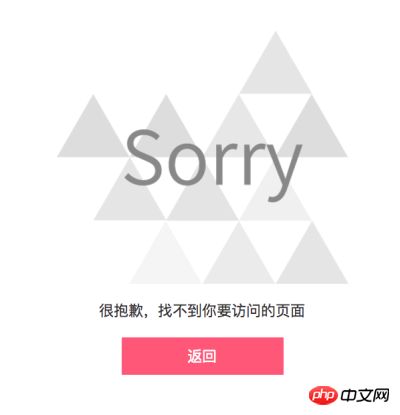
2、页面不存在 <template>
<wxc-abnor type="NOT_FOUND" bind:abnortap="onAbnorTap"></wxc-abnor>
</template>
<script>
export default {
config: {
usingComponents: {
'wxc-abnor': '@minui/wxc-abnor'
}
},
data: {},
onAbnorTap() {
wx.showToast({
title: 'back',
duration: 2000
});
}
}
</script>
<style>
</style>
图示:
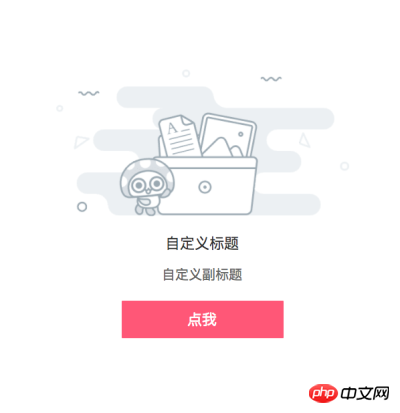
3、自定义数据 <template>
<wxc-abnor
type="REQUEST_ERROR"
image="{{image}}"
title="{{title}}"
tip="{{tip}}"
button="{{button}}"
bind:abnortap="onAbnorTap"
></wxc-abnor>
</template>
<script>
export default {
config: {
usingComponents: {
'wxc-abnor': '@minui/wxc-abnor'
}
},
data: {
image: 'https://s10.mogucdn.com/p2/161213/upload_76h1c5hjc8heecjehlfgekjdl2ki0_514x260.png',
title: '自定义标题',
tip: '自定义副标题',
button: '点我'
},
onAbnorTap() {
wx.showToast({
title: 'custom',
duration: 2000
});
}
}
</script>
<style>
</style>
图示:
4、空数据状态 <template>
<wxc-abnor type="DATA"></wxc-abnor>
</template>
<script>
export default {
config: {
usingComponents: {
'wxc-abnor': '@minui/wxc-abnor'
}
},
data: {}
}
</script>
<style>
</style>
图示:
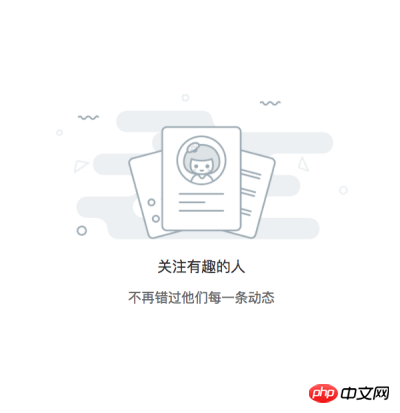
5、无关注数据 <template>
<wxc-abnor type="FOLLOW"></wxc-abnor>
</template>
<script>
export default {
config: {
usingComponents: {
'wxc-abnor': '@minui/wxc-abnor'
}
},
data: {},
methods: {}
}
</script>
<style>
</style>
图示:
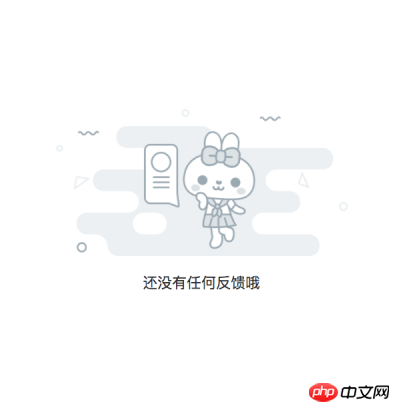
6、无反馈数据 <template>
<wxc-abnor type="FOLLOW"></wxc-abnor>
</template>
<script>
export default {
config: {
usingComponents: {
'wxc-abnor': '@minui/wxc-abnor'
}
},
data: {}
}
</script>
<style>
</style>
图示:
7、无搜索数据 <template>
<wxc-abnor type="SEARCH"></wxc-abnor>
</template>
<script>
export default {
config: {
usingComponents: {
'wxc-abnor': '@minui/wxc-abnor'
}
},
data: {}
}
</script>
<style>
</style>
图示:
8、无消息通知 <template>
<wxc-abnor type="FOLLOW"></wxc-abnor>
</template>
<script>
export default {
config: {
usingComponents: {
'wxc-abnor': '@minui/wxc-abnor'
}
},
data: {}
}
</script>
<style>
</style>
图示:
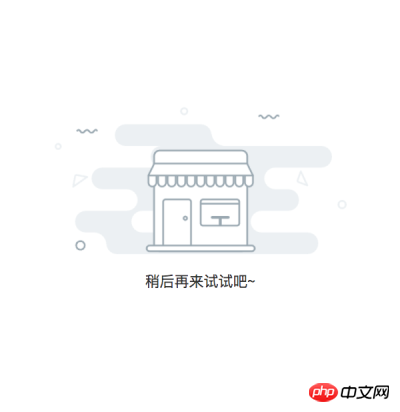
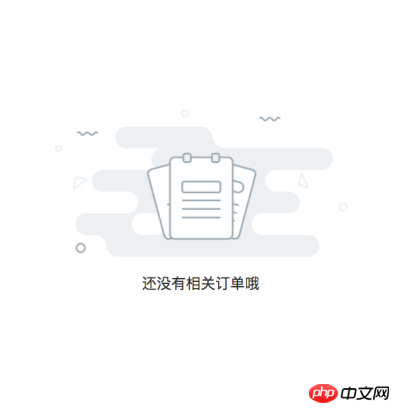
9、空订单列表 <template>
<wxc-abnor type="ORDER"></wxc-abnor>
</template>
<script>
export default {
config: {
usingComponents: {
'wxc-abnor': '@minui/wxc-abnor'
}
},
data: {}
}
</script>
<style>
</style>
图示:
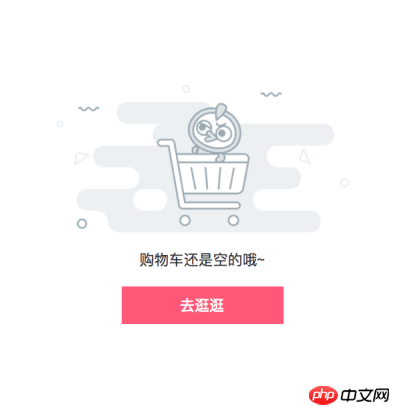
10、空购物车 <template>
<wxc-abnor type="CART"></wxc-abnor>
</template>
<script>
export default {
config: {
usingComponents: {
'wxc-abnor': '@minui/wxc-abnor'
}
},
data: {}
}
</script>
<style>
</style>
图示:
11、空足迹 <template>
<wxc-abnor type="FOOTPRINT"></wxc-abnor>
</template>
<script>
export default {
config: {
usingComponents: {
'wxc-abnor': '@minui/wxc-abnor'
}
},
data: {}
}
</script>
<style>
</style>
图示:
12、无优惠券数据 <template>
<wxc-abnor type="COUPON"></wxc-abnor>
</template>
<script>
export default {
config: {
usingComponents: {
'wxc-abnor': '@minui/wxc-abnor'
}
},
data: {}
}
</script>
<style>
</style>
图示:
|


위 내용은 MinUI 컴포넌트의 Abnor 예외 흐름 컴포넌트에 대한 자세한 설명의 상세 내용입니다. 자세한 내용은 PHP 중국어 웹사이트의 기타 관련 기사를 참조하세요!