React 컴포넌트 라이프사이클 예시 분석
- 小云云원래의
- 2018-01-29 11:31:262084검색
이 글에서는 주로 React 구성요소의 라이프사이클을 공유합니다. React 구성요소의 라이프사이클에는 실제로 푸시훅 기능에 불과한 관련 기능이 많이 있습니다. React 구성 요소 생성의 다양한 단계에서 특정 후크 기능을 트리거합니다. 그것이 모두에게 도움이 되기를 바랍니다.
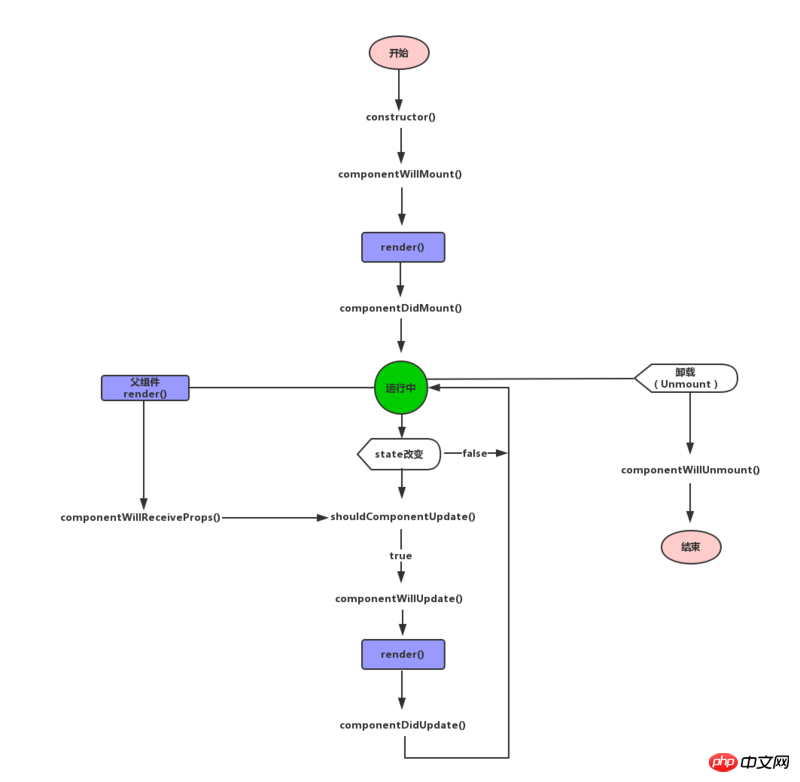
먼저 아래 그림을 보시면 됩니다. 
constructor
생성자는 컴포넌트를 생성할 때 한 번 호출됩니다.
constructor(props, context)
comComponentWillMount
는 컴포넌트가 마운트되기 전에 한 번 호출됩니다. 이 함수에서 setState가 호출되면 render()는 상태가 변경되었음을 알고 한 번만 렌더링합니다.
void componentWillMount()
render
render는 React 컴포넌트의 필수적인 핵심 기능입니다. 렌더링 시 상태를 수정하지 마세요. DOM을 읽거나 쓰거나 서버와 상호작용하지 말고, render() 메서드를 순수하게 유지하세요.
ReactElement render()
comComponentDidMount
는 컴포넌트가 마운트된 후 한 번 호출됩니다. 이때 하위 컴포넌트도 마운트되는데 여기서 refs를 사용할 수 있습니다.
void componentDidMount()
shouldComponentUpdate
이 메서드는 렌더 초기화 시 실행되지 않고, props나 상태가 변경될 때 실행됩니다. 이 함수는 기본적으로 true를 반환하므로 다시 렌더링해야 합니다. false를 반환하면 다시 렌더링되지 않습니다. 구성 요소WillUpdate 및 구성 요소DidUpdate 메서드도 호출되지 않습니다. 더 복잡한 응용 프로그램에서는 일부 데이터 변경 사항이 인터페이스 표시에 영향을 주지 않습니다. 여기서 판단하여 렌더링 효율성을 최적화할 수 있습니다.
boolean shouldComponentUpdate(
    object nextProps, object nextState
)
comComponentWillUpdate
shouldComponentUpdate가 true를 반환한 후, componentWillUpdate가 호출됩니다. 특별한 주의가 필요한 것은 이 함수에서 상태를 수정하기 위해 this.setState를 사용하지 않는다는 것입니다. 그렇지 않으면 이 함수는 무한 루프에서 실행됩니다. 이 함수가 호출된 후 nextProps 및 nextState는 각각 this.props 및 this.state로 설정됩니다. 이 함수 바로 다음에 render()가 호출되어 인터페이스를 업데이트합니다.
void componentWillUpdate(
  object nextProps, object nextState
)
comComponentDidUpdate
첫 번째 렌더링 이후에 componentDidMount를 호출하는 것을 제외하고, 다른 모든 렌더링 이후에 componentDidUpdate가 호출됩니다.
void componentDidUpdate()
comComponentWillReceiveProps
props는 상위 구성 요소에 의해 하위 구성 요소로 전달됩니다. 상위 구성 요소가 렌더링되면 하위 구성 요소는 props가 업데이트되었는지 여부 또는 상위 구성 요소와 하위 구성 요소 간에 데이터 교환이 있는지 여부에 관계없이 componentWillReceiveProps를 호출합니다. 이 콜백 함수에서는 속성 변경에 따라 this.setState()를 호출하여 구성 요소 상태를 업데이트할 수 있습니다. 이전 속성은 여전히 this.props를 통해 얻을 수 있으며 여기서 업데이트 상태를 호출하는 것이 안전하며 추가 렌더링을 트리거하지 않습니다. 전화.
void componentWillReceiveProps(nextProps) {
    this.setState({...});
}
comComponentWillUnmount
구성 요소가 인터페이스에서 제거될 때, componentWillUnmount()가 호출됩니다. 이 함수에서는 타이머 취소 및 네트워크 요청 취소와 같은 일부 구성 요소 관련 정리 작업을 수행할 수 있습니다. 기다리다.
void componentWillUnmount()
다음은 React 구성 요소 수명 주기의 테스트 예입니다.
var React = require('react');
var ReactDOM = require('react-dom');
class Parent extends React.Component {
constructor(){
super()
console.log("%cparent -- constructor","color:green");
this.state = {
name : 'Lucy'
}
}
componentWillMount(){
console.log("%cparent -- componentWillMount","color:green");
}
componentDidMount(){
console.log("%cparent -- componentDidMount","color:green");
}
componentWillReceiveProps(){
console.log("%cparent -- componentWillReceiveProps","color:green");
}
shouldComponentUpdate(){
console.log("%cparent -- shouldComponentUpdate","color:green");
return true;
}
componentWillUpdate(){
console.log("%cparent -- componentWillUpdate","color:green");
}
componentDidUpdate(){
console.log("%cparent -- componentDidUpdate","color:green");
}
componentWillUnmount(){
console.log("%cparent -- componentWillUnmount","color:green");
}
changeName(){
this.setState({name : 'Jone'})
}
unmountComponent(){
ReactDOM.unmountComponentAtNode(document.getElementById("app"));
}
render(){
console.log("%cparent -- render","color:green");
return(
<p style={{border:'1px solid #000',color:'green'}}>
<h2>Parent:</h2>
<h3>hello {this.state.name}</h3>
<button onClick={this.changeName.bind(this)}>state改变</button>
<button onClick={this.unmountComponent.bind(this)}>卸载组件</button>
<Child props1="haha"></Child>
</p>
)
}
}
class Child extends React.Component {
constructor(){
super()
console.log(" %cchild -- constructor","color:blue");
this.state = {
}
}
componentWillMount(){
console.log(" %cchild -- componentWillMount","color:blue");
}
componentDidMount(){
console.log(" %cchild -- componentDidMount","color:blue");
}
componentWillReceiveProps(){
console.log(" %cchild -- componentWillReceiveProps","color:blue");
}
shouldComponentUpdate(){
console.log(" %cchild -- shouldComponentUpdate","color:blue");
return true;
}
componentWillUpdate(){
console.log(" %cchild -- componentWillUpdate","color:blue");
}
componentDidUpdate(){
console.log(" %cchild -- componentDidUpdate","color:blue");
}
componentWillUnmount(){
console.log(" %cchild -- componentWillUnmount","color:blue");
}
changeName(){
this.setState({name : 'Jone'})
}
render(){
console.log(" %cchild -- render","color:blue");
return(
<p style={{border:'1px solid #000',margin:'10px',color:'blue'}}>
<h2>Child:</h2>
</p>
)
}
}
ReactDOM.render(
<Parent></Parent>,
document.getElementById('app')
);
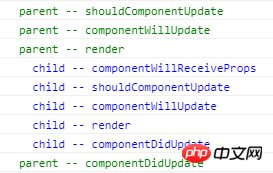
테스트 예 스크린샷은 다음과 같습니다.

상위 구성 요소의 상태 변경:
컴포넌트 제거 후:

관련 권장 사항:
WeChat 애플릿의 라이프 사이클에 대한 자세한 설명
의 수명주기위 내용은 React 컴포넌트 라이프사이클 예시 분석의 상세 내용입니다. 자세한 내용은 PHP 중국어 웹사이트의 기타 관련 기사를 참조하세요!

