Cordova를 webapp에 패키징하는 방법에 대한 자세한 설명
- 小云云원래의
- 2018-01-09 14:35:403289검색
이 기사는 주로 cordova를 webapp으로 패키징하는 방법을 소개합니다. 관심 있는 친구들이 참고할 수 있기를 바랍니다.
프로젝트 개발 시 h5 페이지를 앱으로 패키징해야 합니다. 이때 cordova를 사용하여 패키징할 수 있습니다. 공식 문서에서 우리는 앱을 만드는 것이 매우 간단하다는 것을 알 수 있습니다. 컴퓨터에 nodejs만 있으면 공식 문서를 단계별로 따라 Android 플랫폼과 iOS 플랫폼을 추가할 수 있습니다. 전체 프로젝트 구조가 구축된 후에는 프로젝트 구조에 패키징하는 데 필요한 모든 웹앱 페이지를 채울 수 있습니다. 다음 단계는 플랫폼 개발을 수행하는 방법, 즉 프로젝트를 설치 가능한 파일로 패키징하는 방법에 대한 번거로운 부분입니다.
1: 환경 변수 설정:
1. JAVA_HOME 환경 변수를 설정하고 이를 JDK 설치 경로로 지정합니다.
2. ANDROID_HOME 환경 변수를 설정하고 Android SDK 설치 경로로 지정합니다.
3. 또한 Android SDK 도구 및 플랫폼 도구 디렉터리를 PATH
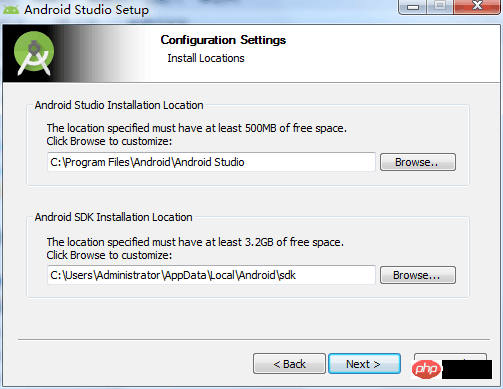
여기에서 주목해야 할 것은 ANDROID_HOME 환경 변수를 설정하는 것입니다. 설치 프로세스 중에 android studio가 자동으로 Android를 설치합니다. SDK to our 컴퓨터에서 그림과 같이 지금 이 주소를 기억해 두세요(다음 줄의 경로는 Android SDK입니다):

2: 이 오류를 보고할 때: 오류: 최소 지원 Gradle 버전은 xxxx입니다.
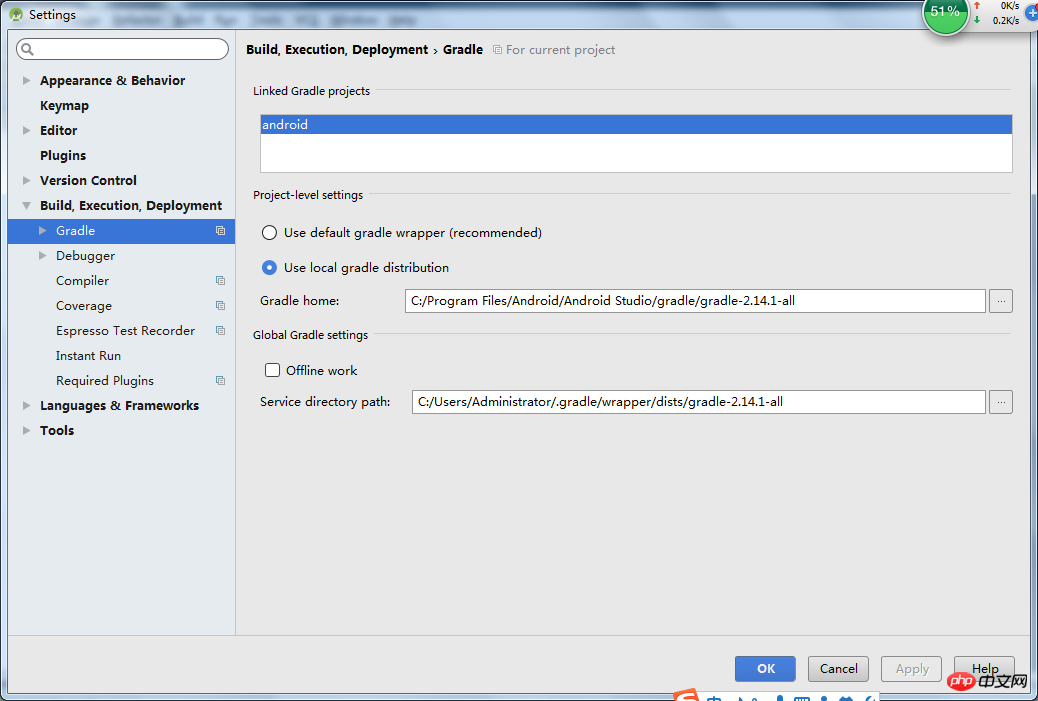
당시 패키징할 때 이 오류가 발생했다고 인터넷에서 찾아보니 안드로이드 스튜디오가 Gradle 버전을 업데이트했기 때문이었습니다. :
1: android studio를 열고 설정을 찾습니다. gradle을 검색하고 그림과 같이 설정합니다(구체적인 경로는 다양함):

3: Windows cordova 빌드 오류: Android SDK 내에서 gradle 래퍼를 찾을 수 없습니다. . 업데이트가 필요할 수 있습니다
해결책:
Android SDK 도구 패키지 다운로드(https://dl.google.com/android/repository/tools_r25.2.3-windows.zip)
C:Users 입력 \AppDataLocalAndroidsdk 디렉터리
도구 디렉터리 백업
이 압축됩니다. 패키지의 도구 디렉터리를 이 디렉터리에 압축을 푼다.
프로젝트 디렉터리를 입력하고 "cordova build android"를 다시 실행합니다.
4: cordova-plugin-splashscreen 설치 시 오류:
이때 가능한 이유는 이미 apk 파일을 패키지했기 때문입니다. apk 파일을 삭제한 후 다시 설치해야 합니다.
Five: vue 프로젝트 패키징 시 발생하는 문제
1: npm run build를 사용하여 패키징할 위치는 어디입니까?

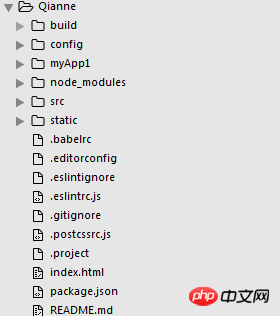
그림에 표시된 대로 Qianne은 내 vue 프로젝트 이름입니다. 이 폴더에서 dos 창을 연 다음 myApp1이라는 앱 프레임워크를 만들었습니다. 그런 다음 구성에서 index.js를 수정했습니다.
index: path.resolve(__dirname, '../myApp1/www/index.html'),
 assetsRoot: path.resolve(__dirname, '../myApp1/www'),
 assetsSubDirectory: 'static',
 assetsPublicPath: './',
여기의 경로는 myApp1 아래의 www 폴더를 직접 가리킵니다. 그런 다음 vue 프로젝트에서 npm run build를 실행합니다. 이때 패키지 파일을 myApp1 아래의 www 폴더에 직접 배치했습니다. 이때
cordova.js 및 cordova_plugins.js 파일도 index.html과 동일한 수준의 www 폴더에 넣어야 합니다. (이때 index.html을 덮어쓰게 된다는 점을 기억하세요. index.html에서 cordova.js를 참조하는 코드를 패키지된 index.html에 복사해야 합니다.)
2: 패키징된 index.html을 직접 열었는데 라우팅이 작동하지 않나요?
내 해결 방법:
vue 프로젝트에서 main.js를 찾아 라우팅 코드 모드를 "hash"로 변경했습니다. 저는 "history"를 사용했기 때문에 라우팅이 쓸모가 없었습니다.
const router = new VueRouter({

 mode: 'hash',

 routes

})
그 후 우리는 다시 패키징하겠습니다. 패키징된 index.html을 연 후 라우팅이 정상이면 축하합니다. 이때 myApp1 아래 dos창에 들어가서 cordova build android를 입력하고 apk파일로 패키징해보겠습니다.
Six: 앱의 로고 시작 페이지는 어디에 배치해야 하나요?

프로젝트 구조에서 스플래시스크린 플러그인을 설치해야 합니다:
cordova plugin add cordova-plugin-splashscreen
config.xml에 다음 코드를 삽입합니다:
 <platform name="android">

  <allow-intent href="market:*" rel="external nofollow" />

   <icon density="ldpi" src="./res/icon/android/mipmap-ldpi/icon.png" />

  <icon density="mdpi" src="./res/icon/android/mipmap-mdpi/icon.png" />

  <icon density="hdpi" src="./res/icon/android/mipmap-hdpi/icon.png" />

  <icon density="xhdpi" src="./res/icon/android/mipmap-xhdpi/icon.png" />


  <!-- 以下是欢迎页面,可根据需要进行添加 -->

  <splash density="land-hdpi" src="./res/screen/android/drawable-land-hdpi/screen.png" />

  <splash density="land-ldpi" src="./res/screen/android/drawable-land-ldpi/screen.png" />

  <splash density="land-mdpi" src="./res/screen/android/drawable-land-mdpi/screen.png" />

  <splash density="land-xhdpi" src="./res/screen/android/drawable-land-xhdpi/screen.png" />

  <splash density="port-hdpi" src="./res/screen/android/drawable-port-hdpi/screen.png" />

  <splash density="port-ldpi" src="./res/screen/android/drawable-port-ldpi/screen.png" />

  <splash density="port-mdpi" src="./res/screen/android/drawable-port-mdpi/screen.png" />

  <splash density="port-xhdpi" src="./res/screen/android/drawable-port-xhdpi/screen.png" />

 </platform>

<platform name="ios">

 <!-- iOS 8.0+ -->

 <!-- iPhone 6 Plus -->

 <icon src="./res/icon/ios/icon-60@3x.png" width="180" height="180" />

 <!-- iOS 7.0+ -->

 <!-- iPhone / iPod Touch -->

 <icon src="./res/icon/ios/icon-60.png" width="60" height="60" />

 <icon src="./res/icon/ios/icon-60@2x.png" width="120" height="120" />

 <!-- iPad -->

 <icon src="./res/icon/ios/icon-76.png" width="76" height="76" />

 <icon src="./res/icon/ios/icon-76@2x.png" width="152" height="152" />

 <!-- iOS 6.1 -->

 <!-- Spotlight Icon -->

 <icon src="./res/icon/ios/icon-40.png" width="40" height="40" />

 <icon src="./res/icon/ios/icon-40@2x.png" width="80" height="80" />

 <!-- iPhone / iPod Touch -->

 <icon src="./res/icon/ios/icon.png" width="57" height="57" />

 <icon src="./res/icon/ios/icon@2x.png" width="114" height="114" />

 <!-- iPad -->

 <icon src="./res/icon/ios/icon-72.png" width="72" height="72" />

 <icon src="./res/icon/ios/icon-72@2x.png" width="144" height="144" />

 <!-- iPhone Spotlight and Settings Icon -->

 <icon src="./res/icon/ios/icon-small.png" width="29" height="29" />

 <icon src="./res/icon/ios/icon-small@2x.png" width="58" height="58" />

 <!-- iPad Spotlight and Settings Icon -->

 <icon src="./res/icon/ios/icon-50.png" width="50" height="50" />

 <icon src="./res/icon/ios/icon-50@2x.png" width="100" height="100" />

 <!-- 以下是欢迎页面,可根据需要进行添加 -->

 <splash src="./res/screen/ios/Default~iphone.png" width="320" height="480"/>

 <splash src="./res/screen/ios/Default@2x~iphone.png" width="640" height="960"/>

 <splash src="./res/screen/ios/Default-Portrait~ipad.png" width="768" height="1024"/>

 <splash src="./res/screen/ios/Default-Portrait@2x~ipad.png" width="1536" height="2048"/>

 <splash src="./res/screen/ios/Default-Landscape~ipad.png" width="1024" height="768"/>

 <splash src="./res/screen/ios/Default-Landscape@2x~ipad.png" width="2048" height="1536"/>

 <splash src="./res/screen/ios/Default-568h@2x~iphone.png" width="640" height="1136"/>

 <splash src="./res/screen/ios/Default-667h.png" width="750" height="1334"/>

 <splash src="./res/screen/ios/Default-736h.png" width="1242" height="2208"/>

 <splash src="./res/screen/ios/Default-Landscape-736h.png" width="2208" height="1242"/>

</platform>
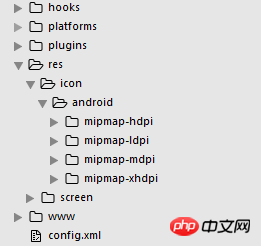
마찬가지로 해당 폴더에 설치해야 합니다. res 폴더 아래에 해당 로고나 그림을 넣으세요.
관련 권장 사항:
WebStorm, React 및 Ant.Design을 기반으로 WebAppDemo를 개발하는 방법
javascript - 사용자 메시지를 읽었는지 확인하는 방법 웹앱 개발에서 읽지 않은 내용
웹앱 외부 CSS reference_html/css_WEB-ITnose
위 내용은 Cordova를 webapp에 패키징하는 방법에 대한 자세한 설명의 상세 내용입니다. 자세한 내용은 PHP 중국어 웹사이트의 기타 관련 기사를 참조하세요!

