nginx 구성 React 정적 페이지 튜토리얼
- 小云云원래의
- 2017-12-28 10:18:542333검색
이 글에서는 주로 nginx 구성 React 정적 페이지에 대한 관련 내용을 소개하며 nginx 설치 및 일부 기본 작업을 자세히 소개하고 React 정적 페이지를 위한 간단한 버전의 nginx 구성 샘플 코드를 공유합니다. 다음 단어는 더 말할 것도 없고, 자세한 소개를 살펴보겠습니다.
nginx 설치 및 시작과 포트 80 점유 솔루션에 대해서는 다음 기사를 참조할 수도 있습니다: http://www.jb51.net/article/110291.htm
1단계: 설치
1. http://nginx.org/en/download.html
2 다운로드, tar -xf nginx-1.2.0.tar.gz
.3, 압축 해제 디렉터리 chmod a+rwx *
4, ./configure --without-http_rewrite_module
5, make && make install
6, sudo /usr/local/nginx/sbin/nginx
7, 브라우저에서 localhost에 액세스
8, 놀랐습니다. 웰컴 페이지 찾기
2단계: 기본 조작
Startup
cd /usr/local/nginx/sbin
./nginx
소프트 링크
시작이 너무 귀찮아서 nginx를 직접 시작하고 싶어요!
ln -s /usr/local/nginx/sbin/nginx /usr/local/bin/nginx
시작된 구성 파일 보기
sudo nginx -t
Restart
sudo nginx -s reload
Close
ps -ef | grep nginx
kill -QUIT xxxx
3단계 React 정적 페이지 nginx 구성 단순 버전
worker_processes 1;

events {
 worker_connections 1024;
}


http {
 include mime.types;
 default_type application/octet-stream;
 sendfile on;
 keepalive_timeout 65;
 server {
 listen 8080;
 server_name localhost;

 root /Users/jasonff/project/erp-web;

 location / {
  try_files $uri @fallback;
 }

 location @fallback {
  rewrite .* /index.html break;
 }

 error_page 500 502 503 504 /50x.html;
 location = /50x.html {
  root html;
 }
 }
 include servers/*;
}
설명:
내 구성 파일은 어디에 있나요?
구성 파일이 어디에 있는지 알고 싶다면 두 번째 단계에서 시작 구성 파일 보기를 선택한 후 이 파일에 필요한 구성을 작성하세요.
4단계: 다중 사이트 레이아웃
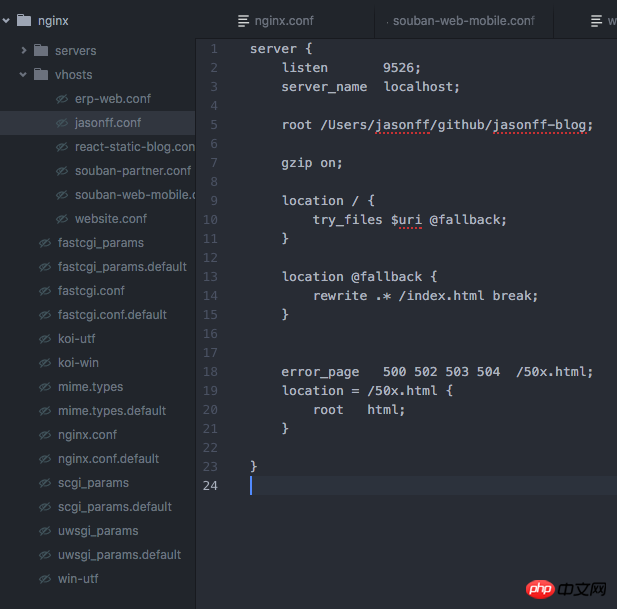
nginx.conf 파일이 있는 디렉터리에 새 폴더 vhost를 만들고 example1.conf, example2.conf...
server {
 listen 8030;
 server_name localhost;
 root /Users/jasonff/project/souban-website;
 location / {
 try_files $uri @fallback;
 }
 location @fallback {
 rewrite .* /index.html break;
 }
 error_page 500 502 503 504 /50x.html;
 location = /50x.html {
 root html;
 }
}
와 같은 여러 새 파일을 만듭니다. 그런 다음 nginx.conf를 재구성
worker_processes 1;
events {
 worker_connections 1024;
}

http {
 include mime.types;
 default_type application/octet-stream;
 sendfile on;
 keepalive_timeout 65;
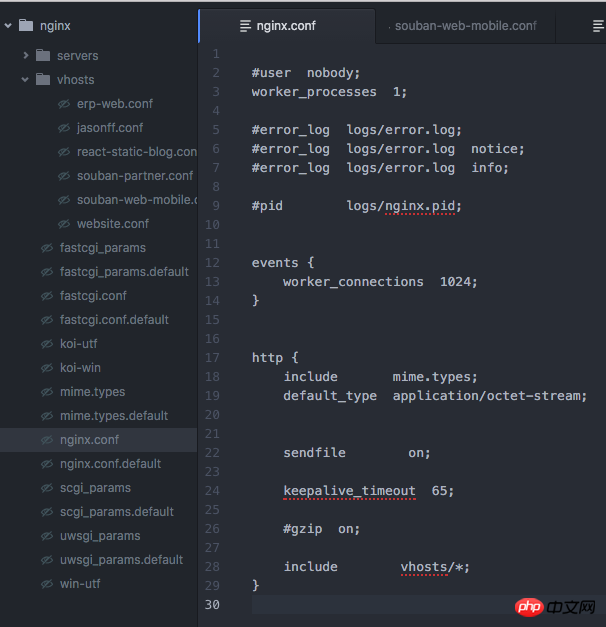
 include vhosts/*;
 //加入include vhosts/*
}
부록: 구성 소개(사전 쿼리)
#运行用户
user nobody;
#启动进程,通常设置成和cpu的数量相等
worker_processes 1;

#全局错误日志及PID文件
#error_log logs/error.log;
#error_log logs/error.log notice;
#error_log logs/error.log info;

#pid logs/nginx.pid;

#工作模式及连接数上限
events {
 #epoll是多路复用IO(I/O Multiplexing)中的一种方式,
 #仅用于linux2.6以上内核,可以大大提高nginx的性能
 use epoll;

 #单个后台worker process进程的最大并发链接数
 worker_connections 1024;

 # 并发总数是 worker_processes 和 worker_connections 的乘积
 # 即 max_clients = worker_processes * worker_connections
 # 在设置了反向代理的情况下,max_clients = worker_processes * worker_connections / 4 为什么
 # 为什么上面反向代理要除以4,应该说是一个经验值
 # 根据以上条件,正常情况下的Nginx Server可以应付的最大连接数为:4 * 8000 = 32000
 # worker_connections 值的设置跟物理内存大小有关
 # 因为并发受IO约束,max_clients的值须小于系统可以打开的最大文件数
 # 而系统可以打开的最大文件数和内存大小成正比,一般1GB内存的机器上可以打开的文件数大约是10万左右
 # 我们来看看360M内存的VPS可以打开的文件句柄数是多少:
 # $ cat /proc/sys/fs/file-max
 # 输出 34336
 # 32000 < 34336,即并发连接总数小于系统可以打开的文件句柄总数,这样就在操作系统可以承受的范围之内
 # 所以,worker_connections 的值需根据 worker_processes 进程数目和系统可以打开的最大文件总数进行适当地进行设置
 # 使得并发总数小于操作系统可以打开的最大文件数目
 # 其实质也就是根据主机的物理CPU和内存进行配置
 # 当然,理论上的并发总数可能会和实际有所偏差,因为主机还有其他的工作进程需要消耗系统资源。
 # ulimit -SHn 65535

}


http {
 #设定mime类型,类型由mime.type文件定义
 include mime.types;
 default_type application/octet-stream;
 #设定日志格式
 log_format main '$remote_addr - $remote_user [$time_local] "$request" '
   '$status $body_bytes_sent "$http_referer" '
   '"$http_user_agent" "$http_x_forwarded_for"';

 access_log logs/access.log main;

 #sendfile 指令指定 nginx 是否调用 sendfile 函数(zero copy 方式)来输出文件,
 #对于普通应用,必须设为 on,
 #如果用来进行下载等应用磁盘IO重负载应用,可设置为 off,
 #以平衡磁盘与网络I/O处理速度,降低系统的uptime.
 sendfile on;
 #tcp_nopush on;

 #连接超时时间
 #keepalive_timeout 0;
 keepalive_timeout 65;
 tcp_nodelay on;

 #开启gzip压缩
 gzip on;
 gzip_disable "MSIE [1-6].";

 #设定请求缓冲
 client_header_buffer_size 128k;
 large_client_header_buffers 4 128k;


 #设定虚拟主机配置
 server {
 #侦听80端口
 listen 80;
 #定义使用 www.nginx.cn访问
 server_name www.nginx.cn;

 #定义服务器的默认网站根目录位置
 root html;

 #设定本虚拟主机的访问日志
 access_log logs/nginx.access.log main;

 #默认请求
 location / {

  #定义首页索引文件的名称
  index index.php index.html index.htm;

 }

 # 定义错误提示页面
 error_page 500 502 503 504 /50x.html;
 location = /50x.html {
 }

 #静态文件,nginx自己处理
 location ~ ^/(images|javascript|js|css|flash|media|static)/ {

  #过期30天,静态文件不怎么更新,过期可以设大一点,
  #如果频繁更新,则可以设置得小一点。
  expires 30d;
 }

 #PHP 脚本请求全部转发到 FastCGI处理. 使用FastCGI默认配置.
 location ~ .php$ {
  fastcgi_pass 127.0.0.1:9000;
  fastcgi_index index.php;
  fastcgi_param SCRIPT_FILENAME $document_root$fastcgi_script_name;
  include fastcgi_params;
 }

 #禁止访问 .htxxx 文件
  location ~ /.ht {
  deny all;
 }

 }
}
첨부된 것은 내 사진


관련 권장 사항:
VSCode 구성에 대한 React 자세한 설명 예제 네이티브 개발 환경
자세한 설명 React, ajax, java는 이미지 업로드 및 미리보기 기능을 구현합니다
위 내용은 nginx 구성 React 정적 페이지 튜토리얼의 상세 내용입니다. 자세한 내용은 PHP 중국어 웹사이트의 기타 관련 기사를 참조하세요!

